How to enable Static Code analysis using GitLab Open Source Analyzer

Here in this article we will try to setup GitLab server along with GitLab runner and will try to scan a java spring based project for static code analysis using GitLab Open Source analyzers.
Test Environment
- GitLab Server: Ubuntu 24.04
- GitLab Runner: Ubuntu 24.04
What is GitLab Runner
GitLab runner is an application is used to process the CICD jobs defined on the GitLab server pipeline. The CICD tasks that are defined in the .gitlab-ci.yml file are triggered when a code push happens and these jobs are executed on the GitLab runner computing infrastructure.
Here in this demo, ubser1.stack.com will act as GitLab server and ubser2.stack.com will act as GitLab Runner. Both of these server are installed with Ubuntu OS 24.04.
If you are interested in watching the video. Here is the YouTube video on the same step by step procedure outlined below.
Procedure
Step1: Ensure GitLab server installed and running
Follow “How to setup Gitlab EE on Ubuntu OS” to setup your GitLab EE server using Linux package.
Step2: Ensure SSH service enabled
Ensure that you have Ubuntu OS 24.04 installed and running on your system or virtual machine. Make sure to update the packages to the latest version and install the OpenSSH server to enable SSH access.
ubadmin@ubser1:~$ sudo apt-get update
ubadmin@ubser1:~$ sudo apt-get upgrade

ubadmin@ubser1:~$ sudo apt-get install openssh-server
ubadmin@ubser1:~$ sudo systemctl start ssh.service
ubadmin@ubser1:~$ sudo systemctl enable ssh.service
ubadmin@ubser2:~$ sudo apt-get update
ubadmin@ubser2:~$ sudo apt-get upgrade

ubadmin@ubser2:~$ sudo apt-get install openssh-server
ubadmin@ubser2:~$ sudo systemctl start ssh.service
ubadmin@ubser2:~$ sudo systemctl enable ssh.service
Step2: Add GitLab Runner Respository
GitLab Runner is an application that manages the execution on CICD pipeline jobs. GitLab Runner can run as a single binary and has no language-specific requirements.
It is recommended to install GitLab runner on a separate machine from the machine that hosts the GitLab instance. Here we will install GitLab runner from the Linux deb package manager repository.
ubadmin@ubser2:~$ sudo apt-get install curl
ubadmin@ubser2:~$ curl -L "https://packages.gitlab.com/install/repositories/runner/gitlab-runner/script.deb.sh" | sudo bash
Detected operating system as Ubuntu/noble.
Checking for curl...
Detected curl...
Checking for gpg...
Detected gpg...
Detected apt version as 2.8.3
Running apt-get update... done.
Installing apt-transport-https... done.
Installing /etc/apt/sources.list.d/runner_gitlab-runner.list...done.
Importing packagecloud gpg key... Packagecloud gpg key imported to /etc/apt/keyrings/runner_gitlab-runner-archive-keyring.gpg
done.
Running apt-get update... done.

The repository is setup! You can now install packages.
Step3: Install GitLab Runner
Now that the gitlab-runner repository has been added, we can install the gitlab-runner deb package as shown below.
ubadmin@ubser2:~$ sudo apt install gitlab-runner
Step4: Install Docker Engine
Here we are going to install the docker engine on the gitlab runner server which will be executing our jobs within isolated docker conatainer environment.
Add GPG Signing keyring file
ubadmin@ubser2:~$ sudo apt update
ubadmin@ubser2:~$ sudo apt install ca-certificates curl
ubadmin@ubser2:~$ sudo install -m 0755 -d /etc/apt/keyrings
ubadmin@ubser2:~$ sudo curl -fsSL https://download.docker.com/linux/ubuntu/gpg -o /etc/apt/keyrings/docker.asc
ubadmin@ubser2:~$ sudo chmod a+r /etc/apt/keyrings/docker.asc
Add Docker Engine repository
ubadmin@ubser2:~$ sudo tee /etc/apt/sources.list.d/docker.sources <<EOF
Types: deb
URIs: https://download.docker.com/linux/ubuntu
Suites: $(. /etc/os-release && echo "${UBUNTU_CODENAME:-$VERSION_CODENAME}")
Components: stable
Signed-By: /etc/apt/keyrings/docker.asc
EOF
Install Docker Engine
ubadmin@ubser2:~$ sudo apt-get update
ubadmin@ubser2:~$ sudo apt install docker-ce docker-ce-cli containerd.io docker-buildx-plugin docker-compose-plugin
ubadmin@ubser2:~$ sudo systemctl status docker
Post Installation
ubadmin@ubser2:~$ sudo groupadd docker
ubadmin@ubser2:~$ sudo usermod -aG docker $USER
Validate Docker Installation with Non root user
ubadmin@ubser2:~$ docker run hello-world
Step5: Create an Instance Runner with Runner Authentication Token
Instance runners are available to every project in a GitLab instance.

Once you create an instance runner, it will provide the instruction to register the runner with runner authentication token.
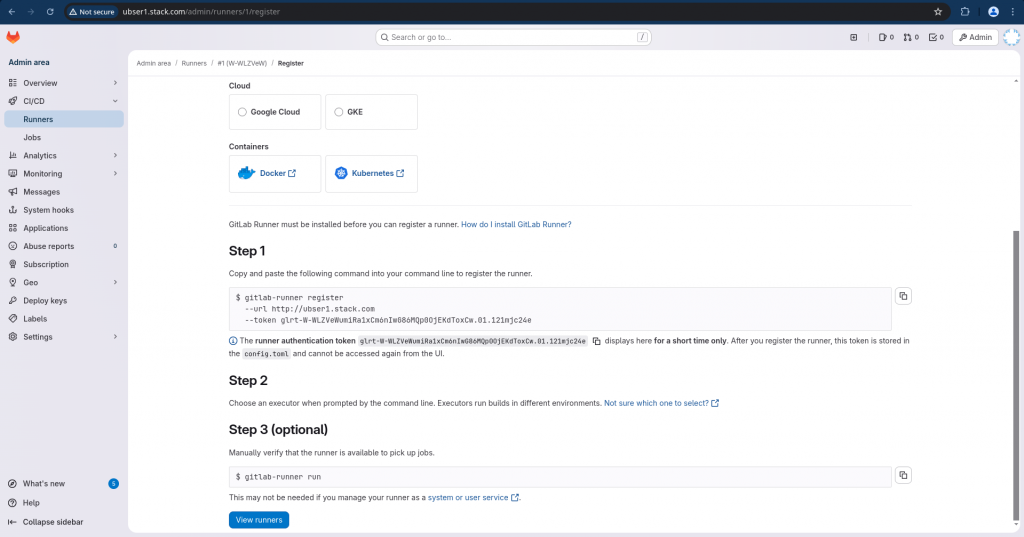
Here is the command for runner registration with token.
gitlab-runner register --url http://ubser1.stack.com --token glrt-W-WLZVeWumiRa1xCm6nIwG86MQp0OjEKdToxCw.01.121mjc24e
Step6: Register GitLab Runner with Docker executor
Let’s execute the command to register our runner as shown below. This will be an interactive process in which it will ask for executor and default docker image to use. Here we are setting them to “docker” and “ruby:3.3”.
ubadmin@ubser2:~$ gitlab-runner register  --url http://ubser1.stack.com  --token glrt-W-WLZVeWumiRa1xCm6nIwG86MQp0OjEKdToxCw.01.121mjc24e
Runtime platform                                    arch=amd64 os=linux pid=5482 revision=df85dadf version=18.6.6
WARNING: Running in user-mode.
WARNING: The user-mode requires you to manually start builds processing:
WARNING: $ gitlab-runner run
WARNING: Use sudo for system-mode:
WARNING: $ sudo gitlab-runner...

Created missing unique system ID                    system_id=s_e1a1d829706d
Enter the GitLab instance URL (for example, https://gitlab.com/):
[http://ubser1.stack.com]:
Verifying runner... is valid                        correlation_id=01KCKW1XG5YHQV6DSJY3FZAJHY runner=W-WLZVeWu
Enter a name for the runner. This is stored only in the local config.toml file:
[ubser2.stack.com]:
Enter an executor: custom, parallels, docker, kubernetes, docker-autoscaler, instance, shell, ssh, virtualbox, docker-windows, docker+machine:
docker
Enter the default Docker image (for example, ruby:3.3):

Enter the default Docker image (for example, ruby:3.3):
ruby:3.3
Runner registered successfully. Feel free to start it, but if it's running already the config should be automatically reloaded!

Configuration (with the authentication token) was saved in "/home/ubadmin/.gitlab-runner/config.toml"
The user-mode requires you to manually start builds processing. So we need to run the following to ensure our gitlab runner is able to process the pipeline jobs.
ubadmin@ubser2:~$ gitlab-runner run
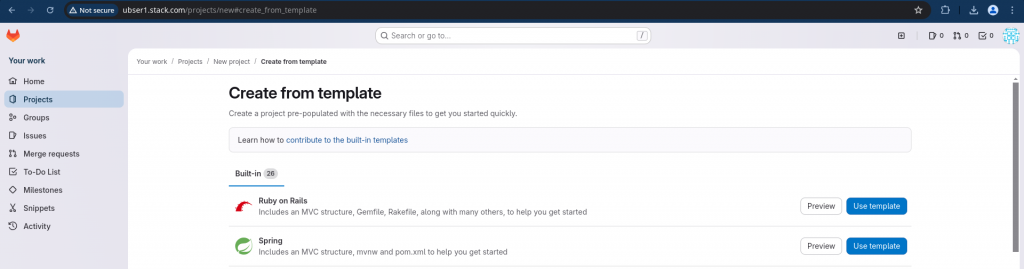
Step7: Create a GitLab project
For this demo lets create a gitlab project using a sample “Spring” template as shown below.
Now let’s edit the .gitlab-ci.yml file using the edit with pipeline editor on the portal itself and update it as shown below. We have updated two thing in this yaml definition file.
- Updated the template for SAST scanning using basic scanner with template “Jobs/SAST.gitlab-ci.yml”
- Updated each job with a tag name “sastdemo” so that it can be picked up by the gitlab runner with tag “sastdemo”
# This file is a template, and might need editing before it works on your project.
# To contribute improvements to CI/CD templates, please follow the Development guide at:
# https://docs.gitlab.com/ee/development/cicd/templates.html
# This specific template is located at:
# https://gitlab.com/gitlab-org/gitlab/-/blob/master/lib/gitlab/ci/templates/Getting-Started.gitlab-ci.yml

# This is a sample GitLab CI/CD configuration file that should run without any modifications.
# It demonstrates a basic 3 stage CI/CD pipeline. Instead of real tests or scripts,
# it uses echo commands to simulate the pipeline execution.
#
# A pipeline is composed of independent jobs that run scripts, grouped into stages.
# Stages run in sequential order, but jobs within stages run in parallel.
#
# For more information, see: https://docs.gitlab.com/ee/ci/yaml/index.html#stages

stages:          # List of stages for jobs, and their order of execution
  - build
  - test
  - deploy

include:
  #- template: Security/Dependency-Scanning.gitlab-ci.yml
  - template: Jobs/SAST.gitlab-ci.yml

# Override the default SAST job configuration
sast:
  tags:
    - sastdemo # Replace 'your-runner-tag' with your actual runner tag

build-job:       # This job runs in the build stage, which runs first.
  stage: build
  script:
    - echo "Compiling the code..."
    - echo "Compile complete."
  tags:
    - sastdemo

unit-test-job:   # This job runs in the test stage.
  stage: test    # It only starts when the job in the build stage completes successfully.
  script:
    - echo "Running unit tests... This will take about 60 seconds."
    - sleep 60
    - echo "Code coverage is 90%"
  tags:
    - sastdemo

lint-test-job:   # This job also runs in the test stage.
  stage: test    # It can run at the same time as unit-test-job (in parallel).
  script:
    - echo "Linting code... This will take about 10 seconds."
    - sleep 10
    - echo "No lint issues found."
  tags:
    - sastdemo

deploy-job:      # This job runs in the deploy stage.
  #environment: production
  stage: deploy  # It only runs when *both* jobs in the test stage complete successfully.
  script:
    - echo "Deploying application..."
    - echo "Application successfully deployed."
  tags:
    - sastdemo
Also let’s update “DemoApplication.java” as shown below to introduce a SAST vulnerability.
package com.example.demo;

import org.springframework.boot.*;
import org.springframework.boot.autoconfigure.*;
import org.springframework.web.bind.annotation.*;

@SpringBootApplication
@RestController
public class DemoApplication {


//test
	@GetMapping("/")
	public String home() {
		return "Spring is here!";
	}

	@GetMapping("/user")
	public String getUser(@RequestParam(value = "id") String id) {
		URL url = new URL("http://example.com/api/user/" + id);                     // Noncompliant
		HttpURLConnection connection = (HttpURLConnection) url.openConnection();
	}

	public static void main(String[] args) {
		SpringApplication.run(DemoApplication.class, args);
	}
}
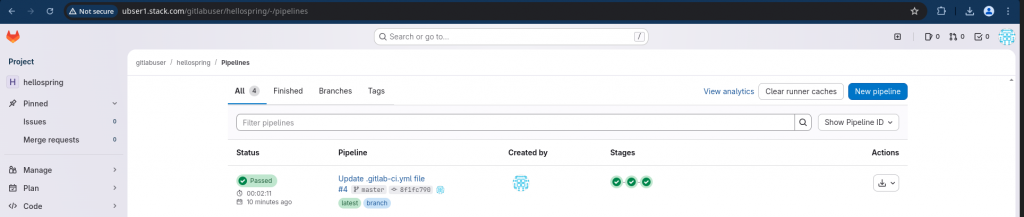
Step8: Validate Pipeline execution status
Now let’s validate the status of the pipeline and verify each job has been executed successfully.
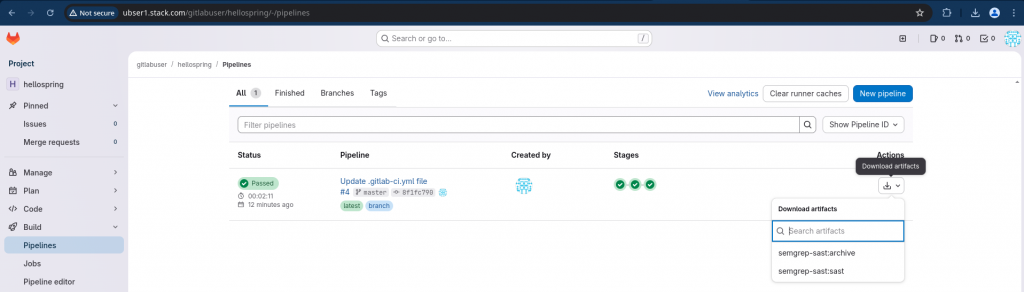
Step9: Download SAST report
Now in your pipeline you can see the “download artifacts” option to download you SAST report in JSON format to analyze further.
admin@fedser:Downloads$ cat gl-sast-report.json | jq
{
  "version": "15.2.2",
  "vulnerabilities": [
    {
      "id": "564ae8002dc4f530ff19aaf2a9cef7eeb3a673baad50a177e65bddf96da6587e",
      "category": "sast",
      "name": "Detect manually constructed URLs",
      "description": "User data flows into the host portion of this manually-constructed URL.\nThis could allow an attacker to send data to their own server, potentially\nexposing sensitive data such as cookies or authorization information sent\nwith this request. They could also probe internal servers or other\nresources that the server running this code can access. (This is called\nserver-side request forgery, or SSRF.) Do not allow arbitrary hosts.\nInstead, create an allowlist for approved hosts hardcode the correct host,\nor ensure that the user data can only affect the path or parameters.\n\nExample of using allowlist:\n```\nArrayList<String> allowlist = (ArrayList<String>)\n    Arrays.asList(new String[] { \"https://example.com/api/1\", \"https://example.com/api/2\", \"https://example.com/api/3\"});\n\nif(allowlist.contains(url)){\n  ...\n}\n```\n",
      "cve": "semgrep_id:java_endpoint_rule-ManuallyConstructedURLs:22:22",
      "severity": "Critical",
      "scanner": {
        "id": "semgrep",
        "name": "Semgrep"
      },
      "location": {
        "file": "src/main/java/com/example/demo/DemoApplication.java",
        "start_line": 22
      },
      "identifiers": [
        {
          "type": "semgrep_id",
          "name": "java_endpoint_rule-ManuallyConstructedURLs",
          "value": "java_endpoint_rule-ManuallyConstructedURLs"
        },
        {
          "type": "cwe",
          "name": "CWE-918",
          "value": "918",
          "url": "https://cwe.mitre.org/data/definitions/918.html"
        },
        {
          "type": "owasp",
          "name": "A10:2021 - Server-Side Request Forgery",
          "value": "A10:2021"
        },
        {
          "type": "owasp",
          "name": "A1:2017 - Injection",
          "value": "A1:2017"
        }
      ]
    }
  ],
  "scan": {
    "analyzer": {
      "id": "semgrep",
      "name": "Semgrep",
      "url": "https://gitlab.com/gitlab-org/security-products/analyzers/semgrep",
      "vendor": {
        "name": "GitLab"
      },
      "version": "6.14.0"
    },
    "scanner": {
      "id": "semgrep",
      "name": "Semgrep",
      "url": "https://github.com/returntocorp/semgrep",
      "vendor": {
        "name": "GitLab"
      },
      "version": "1.145.0"
    },
    "type": "sast",
    "start_time": "2025-12-16T17:54:49",
    "end_time": "2025-12-16T17:55:02",
    "status": "success",
    "observability": {
      "events": [
        {
          "event": "collect_sast_scan_metrics_from_pipeline",
          "property": "38b6ff12-acd8-41f8-bd57-5281a9d095c6",
          "label": "semgrep",
          "value": 0,
          "version": "6.14.0",
          "exit_code": 0,
          "override_count": 0,
          "passthrough_count": 0,
          "custom_exclude_path_count": 0,
          "time_s": 12,
          "file_count": 5
        }
      ]
    }
  }
}
Step10: List Vulnerabilities
Here is sample command which can be used to parse the JSON file and list all the vulnerabilties with their severity, name and file location as shown below.
admin@fedser:Downloads$ cat gl-sast-report.json | jq -r ' .vulnerabilities[] | [ .severity, .name, .location.file ] | @csv' | sort -u
"Critical","Detect manually constructed URLs","src/main/java/com/example/demo/DemoApplication.java"
Hope you enjoyed reading this article. Thank you..
Leave a Reply
You must be logged in to post a comment.