How to sign AWS API request using SigV4 signature
Here in this article we will try to understand about how we can construct an AWS API request and sign it using the AWS SigV4 signature and send it to an AWS service such as SQS.
Test Environment
- AWS Account
- AWS CLI
What is AWS Signature Version 4 (SigV4)
AWS Signature Version 4 (SigV4) is the AWS signing protocol for adding authentication information to AWS API requests. So if we want to send an query protocol or json protocol based api request to AWS service, the authentication information that is sent in a request must include this signature for validation.
What are Service Endpoints
AWS service endpoint is the URL of the entry point to an AWS service. In order to manage the AWS service programmatically we make use of these service endpoints.
There are different types of service endpoints provided by AWS based on the type of resources that we want to manage. If you want to manage a regional resources such as Amazon SQS, there are unique service endpoints available for this service for each region. If you are working with a global resource such as Amazon Cloudfront you get global endpoint to work with these global resource.
For detailed information on service endpoints refer to Amazon Simple Queue Service endpoints and quotas.
Now that we got some basic understanding about the AWS SigV4 signature and Service endpoints, let’s dive into understanding in detail about constructing a AWS SigV4 signed API request. In the end i would share a sample python script implementing the same.
If you are interested in watching the video. Here is the YouTube video on the same step by step procedure outlined below.
Procedure
Step1: Create a Canonical request
Every HTTP request conforms to a basic structure. It consist of HTTP method, endpoint to access, headers with authorization data and the payload if any that needs to be sent as part of the request (ie. POST request).
Here is the screenshot of such as basic HTTP API request that needs to be sent to the AWS service.

A canonical request is basically a structured arrangement of these components in a standard canonical format as shown below.
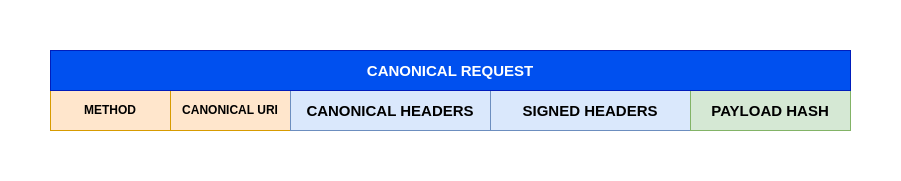
NOTE: PAYLOAD data needs to be a HASH value such as SHA256 HASH
Step2: Create Canonical request HASH
Here we need to hash the canonical request using the same algorithm that we use to create the hash of the payload. The hash of the canonical request is a string of lowercase hexadecimal characters.
Here is the screenshot of the canonical request hash.

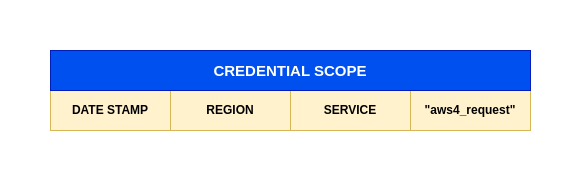
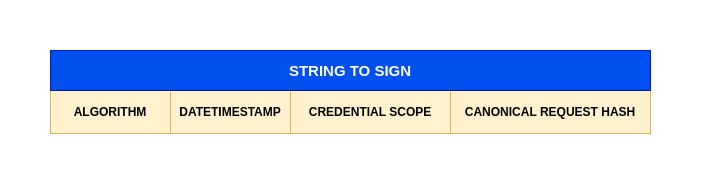
Step3: Create a String to sign
Before we can construct the string to sign using the SigV4 algorithm, we need to construct a credential scope object. This object restricts the resulting signature to the specified region and service.
Here we will use the canonical request hash that was created along with the extra information such as the algorithm, request date, credential scope to construct our string to sign as shown below.
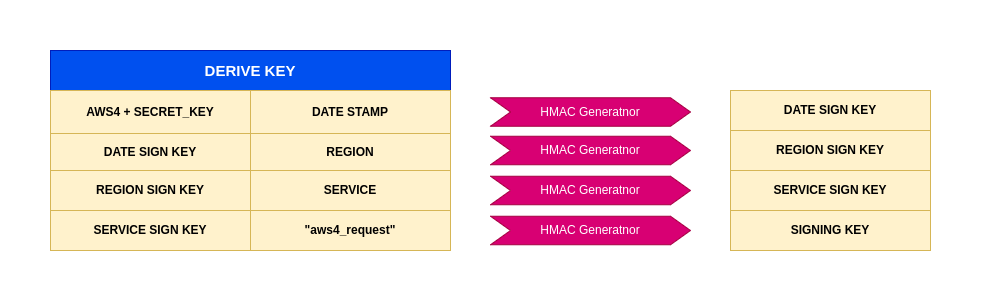
Step4: Derive Signing key using secret access key
To derive a signing key for SigV4, we need to perform a succession of keyed hash operations (HMAC) on the request date, region, and service, with your AWS secret access key as the key for the initial hashing operation.
For each step, call the hash function with the required key and data. The result of each call to the hash function becomes the input for the next call to the hash function as shown below.
Step5: Calculate Signature
In order to calculate the signature for SigV4 we need to call the hash function with the result of the previous call as the key and the string to sign as the data. Use the derived signing key as the hash key for this operation.

Step6: Build Authorization Header with Signature
The authorization header is basically a concatination of the AWS SigV4 algorithm used and the credentials object which consist of your AWS access key along with the scope along with Signed headers and Signature value caluclated in previous step.
NOTE: There is no comma between the AWS Sigv4 algorithm and Credential fields.

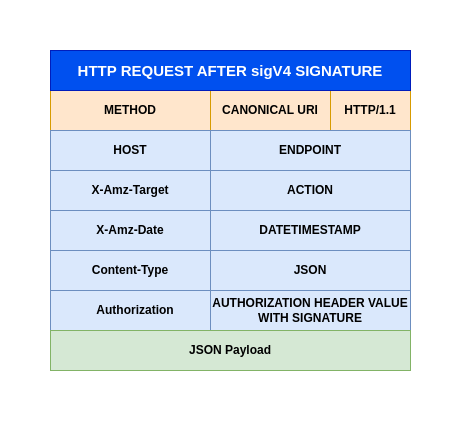
Step7: Create API request with SigV4 signature
As a final step we now need to construct our API request with the Authorization header containing our calculated signature as shown below.
Step8: Python Script for SigV4 API request
admin@fedser:sqs$ cat create-sqs-queue.py
import os
import json
import hashlib
import hmac
from datetime import datetime
import requests

# AWS Credentials
#ACCESS_KEY = "YOUR_AWS_ACCESS_KEY"
#SECRET_KEY = "YOUR_AWS_SECRET_KEY"
ACCESS_KEY = os.environ['AWS_ACCESS_KEY_ID']
SECRET_KEY = os.environ['AWS_SECRET_ACCESS_KEY']
REGION = "ap-south-1"
SERVICE = "sqs"

# SQS Queue Configuration
QUEUE_NAME = "MyQueue"
VISIBILITY_TIMEOUT = "40"
QUEUE_TYPE_TAG = "Development"

# Payload
payload = {
    "QueueName": QUEUE_NAME,
    "Attributes": {
        "VisibilityTimeout": VISIBILITY_TIMEOUT
    },
    "tags": {
        "QueueType": QUEUE_TYPE_TAG
    }
}

payload_bytes = json.dumps(payload).encode('utf-8')
payload_hash = hashlib.sha256(payload_bytes).hexdigest()

# Request Details
host = f"sqs.{REGION}.amazonaws.com"
target = "AmazonSQS.CreateQueue"
method = "POST"
canonical_uri = "/"

# Create timestamp in AWS format
amz_date = datetime.utcnow().strftime('%Y%m%dT%H%M%SZ')
date_stamp = datetime.utcnow().strftime('%Y%m%d')

# Create Canonical Request
canonical_headers = f"content-type:application/x-amz-json-1.0\nhost:{host}\nx-amz-date:{amz_date}\nx-amz-target:{target}\n"
signed_headers = "content-type;host;x-amz-date;x-amz-target"

canonical_request = f"{method}\n{canonical_uri}\n\n{canonical_headers}\n{signed_headers}\n{payload_hash}"
canonical_request_hash = hashlib.sha256(canonical_request.encode('utf-8')).hexdigest()

# Create String to Sign
credential_scope = f"{date_stamp}/{REGION}/{SERVICE}/aws4_request"
string_to_sign = f"AWS4-HMAC-SHA256\n{amz_date}\n{credential_scope}\n{canonical_request_hash}"

# Calculate Signature
def sign(key, msg):
    return hmac.new(key, msg.encode('utf-8'), hashlib.sha256).digest()

kDate = sign(("AWS4" + SECRET_KEY).encode('utf-8'), date_stamp)
kRegion = sign(kDate, REGION)
kService = sign(kRegion, SERVICE)
kSigning = sign(kService, "aws4_request")

signature = hmac.new(kSigning, string_to_sign.encode('utf-8'), hashlib.sha256).hexdigest()

# Build Authorization Header
auth_header = f"AWS4-HMAC-SHA256 Credential={ACCESS_KEY}/{credential_scope}, SignedHeaders={signed_headers}, Signature={signature}"

# Create Request
url = f"https://{host}/"
headers = {
    "Content-Type": "application/x-amz-json-1.0",
    "X-Amz-Target": target,
    "X-Amz-Date": amz_date,
    "Authorization": auth_header,
    "Content-Length": str(len(payload_bytes)),
    "Connection": "Keep-Alive"
}

print("=" * 60)
print("AWS SQS CreateQueue Request")
print("=" * 60)
print(f"URL: {url}")
print(f"\nHeaders:")
for key, value in headers.items():
    print(f"  {key}: {value}")
print(f"\nPayload:\n{json.dumps(payload, indent=2)}")
print("=" * 60)

# Send Request using requests library
try:
    response = requests.post(url, data=payload_bytes, headers=headers)

    print(f"\nResponse Status: {response.status_code}")
    print("Response Headers:")
    for key, value in response.headers.items():
        print(f"  {key}: {value}")
    print("\nResponse Body:")

    if response.status_code == 200:
        print(json.dumps(response.json(), indent=2))
    else:
        print(f"Error: {response.text}")

except requests.exceptions.RequestException as e:
    print(f"\nRequest Error: {e}")
except json.JSONDecodeError:
    print(f"Response (not JSON): {response.text}")
except Exception as e:
    print(f"\nError: {e}")
Now you can validate that you able to send a SigV4 signed API request using the above python script to create a SQS queue.
admin@fedser:sqs$ export AWS_ACCESS_KEY_ID="your_access_key"
admin@fedser:sqs$ export AWS_SECRET_ACCESS_KEY="your_secret_key"
admin@fedser:sqs$ python create-sqs-queue.py
IMPORTANT: It is recommended to use AWS SDK or AWS CLI to send AWS API requests wherein the requests are automatically signed rather than using the SigV4 signed API request which is a complex task.
Hope you enjoyed reading this article. Thank you..
Leave a Reply
You must be logged in to post a comment.