How to integrate Amazon MSK with SQS using the Amazon EventBridge
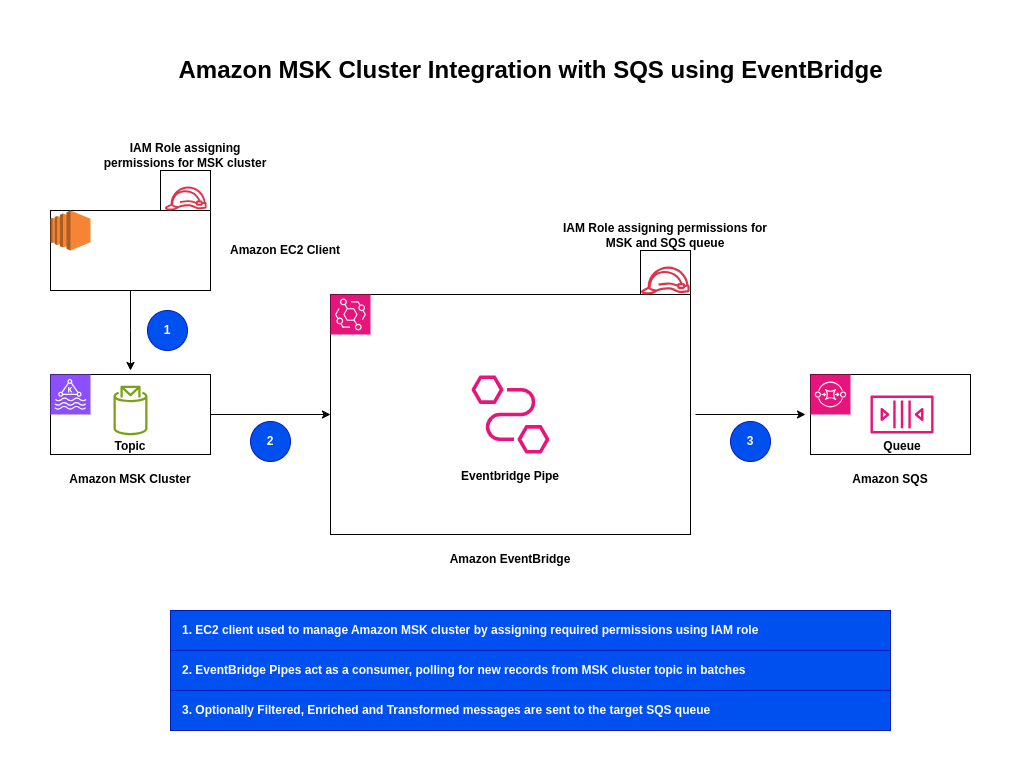
Here in this article we will try to integrate Amazon MSK with Amazon SQS queue using the EventBridge. EventBridge acts as intermediate layer that helps in building event driven applications by routing data between these AWS services and many more.
Test Environment
- AWS Account
What is Amazon MSK
Amazon Managed Streaming for Apache Kafka (AWS MSK) is a fully managed, highly available service that simplifies running Apache Kafka to process real-time streaming data. It eliminates infrastructure management, such as provisioning, patching, and scaling clusters.
What is Amazon EventBridge
Amazon EventBridge is a serverless event bus service that enables developers to build loosely coupled, event-driven applications by routing data in real-time from various sources—such as AWS services, SaaS applications, and custom apps—to targets like AWS Lambda.
What is Amazon SQS
Amazon Simple Queue Service (SQS) is a fully managed, highly scalable, and reliable message queuing service used to decouple and scale microservices, distributed systems, and serverless applications.
High Level Architecture
If you are interested in watching the video. Here is the YouTube video on the same step by step procedure outlined below.
Procedure
Step1: Ensure AWS Account and Non Root IAM user created
Ensure that you registered with AWS and created a root account which is used to manage billing, authentication and authorization control. Create a IAM user.
Follow “Setting up your AWS account” and “Create an IAM user in your AWS account” for the same.
Step2: Create Amazon MSK Provisioned cluster
Here we will try to create an Amazon MSK provisioned cluster using the AWS Management Console.
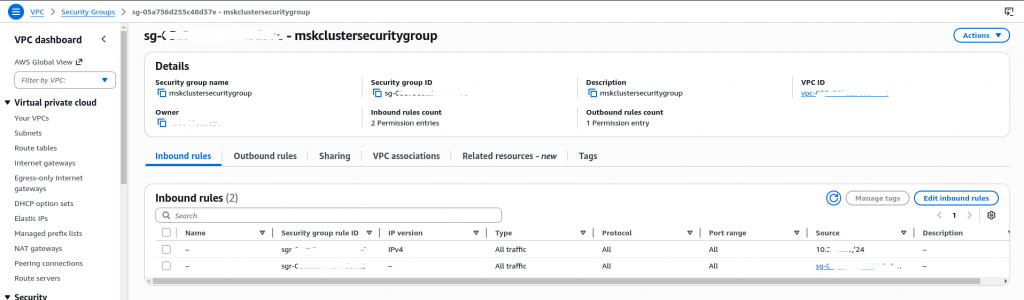
Please note the VPC and Subnet that you are using to provision this cluster, as we will need it to setup a client machine within the same VPC and subnet for it to access the MSK cluster. Also note the Security group associated with the MSK cluster for later reference.
Here are the details of the settings for the same.
type: provisioned
cluster: MSKTutorialCluster
kafka version: 3.6.0
Metadata mode: ZooKeeper
VPC: vpc-xxx (default)
Subnets:
subnet-xxx
subnet-yyy
subnet-zzz
Security groups associated with VPC: sg-xxx (mskclustersecuritygroup)
Access control method: Unauthenticated
SASL/SCRAM authentication: Not enabled
TLS client authentication through AWS Certificate Manager (ACM): Not enabled
Encryption within the cluster: Enabled – TLS
Encryption between clients – brokers: Enabled – TLS, Plaintext
Here is the Amazon MSK cluster in active state. It would usually take 15 – 20 min for the cluster to be provisioned.

Step3: Create EC2 client instance
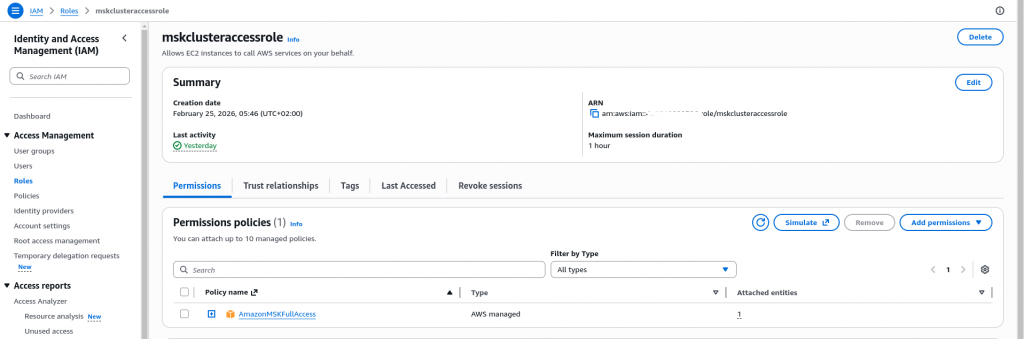
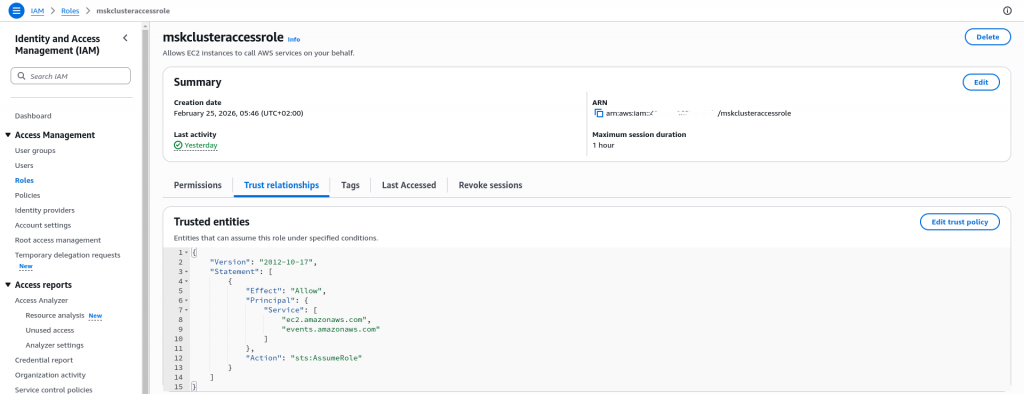
First let’s create a IAM role named “mskclusteraccessrole” which can be assumed by the EC2 instance and has the permissions to manager the MSK cluster as shown below.
Now that we have our IAM role ready, Let’s instantiate an EC2 instance which will act as a client for the MSK cluster. Here are some important points to note before creating the EC2 instance.
- EC2 instance need to be provisioned in the same VPC as the cluster
- EC2 instance default security group should allow SSH access to your IP address
- Assign the EC2 instance with a IAM role “mskclusteraccessrole” that was created previously
Ensure that your EC2 instance is running and you able to SSH into it. Once your EC2 instance is up and running you need to update your Amazon MSK cluster security group to allow access to this cluster from the security group assigned to the EC2 instance.
Step4: Setup EC2 instance with Kafka client tools
Now that we have our Amazon MSK cluster and EC2 instance ready, its time to install the necessary Kafka client tools on the EC2 instance to manage the Amazon MSK cluster from the EC2 instance.
[ec2-user@ip-10-x-x-x ~]$ sudo yum -y install java-17
[ec2-user@ip-10-x-x-x ~]$ export KAFKA_VERSION=3.6.0
[ec2-user@ip-10-x-x-x ~]$ wget https://archive.apache.org/dist/kafka/$KAFKA_VERSION/kafka_2.13-$KAFKA_VERSION.tgz
[ec2-user@ip-10-x-x-x ~]$ tar -xzf kafka_2.13-$KAFKA_VERSION.tgz
[ec2-user@ip-10-x-x-x ~]$ export KAFKA_ROOT=$(pwd)/kafka_2.13-$KAFKA_VERSION
[ec2-user@ip-10-x-x-x ~]$ echo $KAFKA_ROOT
/home/ec2-user/kafka_2.13-3.6.0
Step5: Get BootStrap Server information for Plaintext connection
Now, if you cluster is ready, you should be able to view the client information and the bootstrap server details as shown below by clicking on the “View Client information” on your Amazon MSK cluster.
b-2.msktutorialcluster.xxx.c4.kafka.region.amazonaws.com:9092
b-1.msktutorialcluster.xxx.c4.kafka.region.amazonaws.com:9092
b-3.msktutorialcluster.xxx.c4.kafka.region.amazonaws.com:9092
Export these endpoint as BOOTSTRAP_SERVER environment variable as shown below.
[ec2-user@ip-10-x-x-x ~]$ export BOOTSTRAP_SERVER=b-2.msktutorialcluster.xxx.c4.kafka.region.amazonaws.com:9092,
b-1.msktutorialcluster.xxx.c4.kafka.region.amazonaws.com:9092,b-3.msktutorialcluster.xxx.c4.kafka.region.amazonaws.com:9092
Step6: Create a Topic
Now let’s create a Topic in our Amazon MSK cluster using the “kafka-topics.sh” by providing the below options as shown below.
[ec2-user@ip-10-x-x-x ~]$ $KAFKA_ROOT/bin/kafka-topics.sh --create --bootstrap-server $BOOTSTRAP_SERVER --replication-factor 3 --partitions 1 --topic MSKTutorialTopic
Created topic MSKTutorialTopic.
Step7: List topic
Once the Topic is created, lets list the Topics that are now available in the cluster.
[ec2-user@ip-10-x-x-x ~]$ $KAFKA_ROOT/bin/kafka-topics.sh --list --bootstrap-server $BOOTSTRAP_SERVER
MSKTutorialTopic
...
Step8: Produce and Consume Message
Let’s now procduce some messages into our topic using the “kafka-console-producer.sh” as shown below. We have published three messages into our topic.
[ec2-user@ip-10-x-x-x ~]$ $KAFKA_ROOT/bin/kafka-console-producer.sh --broker-list $BOOTSTRAP_SERVER  --topic MSKTutorialTopic
>Hello from Kafka
>How is your learning experience
>Happy learning
Now let’s try to consume our messages using the “kafka-console-consumer.sh” as shown below.
[ec2-user@ip-10-x-x-x ~]$ $KAFKA_ROOT/bin/kafka-console-consumer.sh --bootstrap-server $BOOTSTRAP_SERVER --topic MSKTutorialTopic --from-beginning
Hello from Kafka
How is your learning experience
Happy learning
With this we have our MSK cluster with Topic and some messsages available for processing.
Step9: Create a Standard SQS Queue
Here let’s go to Amazon SQS service and create a standard queue that will act as a target for the Amazon EventBridge as shown below.

Step10: Create an EventBridge Pipe
Let’s now create an EventBridge Pipe with Source and Target with the following settings. You can leave the Filtering and Enrichment settings for now.
Pipe Name: MSKeventbridgepipe
Source: Amazon MSK
MSK Cluster: MSKTutorialCluster
Topic Name: MSKTutorialTopic
Authentication: OFF
Starting position: Trim Horizon
Target Service: SQS Queue
Queue: MyQueue

Step11: Validate the EventBridge Setup
Now we can go the SQS queue and see that whatever message were sent to Amazon MSK Topic are available in the SQS Queue. You can poll messages in the Receive messages section of SQS queue.
Here is the sample message as received in the SQS Queue.
{
  "topic": "MSKTutorialTopic",
  "partition": 0,
  "offset": 0,
  "timestamp": 1771992056160,
  "timestampType": "CREATE_TIME",
  "value": "SGVsbG8gZnJvbSBLYWZrYQ==",
  "headers": [],
  "eventSourceArn": "arn:aws:kafka:region:account_id:cluster/MSKTutorialCluster/xxx",
  "bootstrapServers": "b-1.msktutorialcluster.xxx.c4.kafka.region.amazonaws.com:9094,b-3.msktutorialcluster.xxx.c4.kafka.region.amazonaws.com:9094,b-2.msktutorialcluster.xxx.c4.kafka.region.amazonaws.com:9094",
  "eventSource": "aws:kafka",
  "eventSourceKey": "MSKTutorialTopic-0"
}
The message that was sent to the Topic is base64 encoded in the value key which can be decrypted as shown below.
$ echo "SGVsbG8gZnJvbSBLYWZrYQ==" | base64 -d
Hello from Kafka
Hope you enjoyed reading this article. Thank you..
Leave a Reply
You must be logged in to post a comment.