How to setup Nexus OSS proxy repository for caching artifacts
Here in this article we will try to setup maven based Nexus OSS proxy repository for caching artifacts from a remote repository.
Test Environment
- Fedora 41 server
- Nexus 3.92.2
- Postgres 17.6-alpine
Nexus Proxy Repository
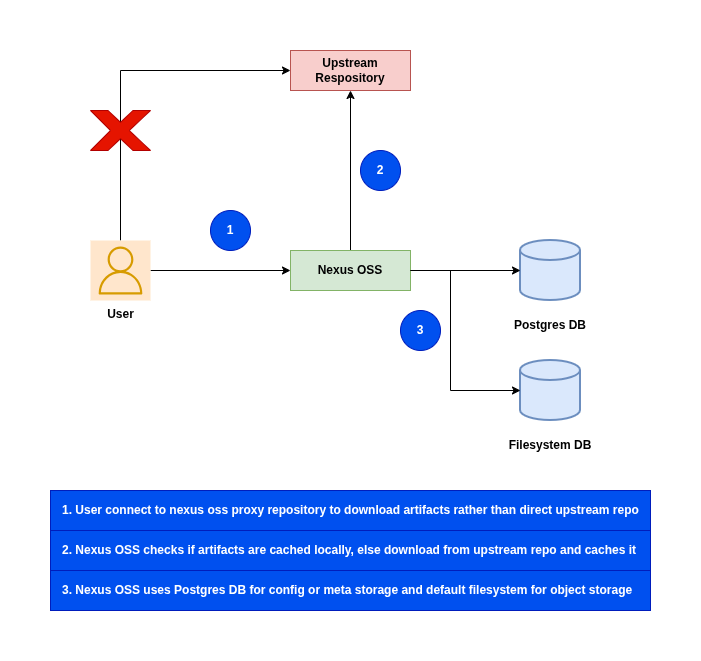
A proxy repository caches content from a remote repository. When a client requests content, Nexus Repository first checks the local cache. If the content is not cached, Nexus Repository retrieves it from the remote repository, stores it locally, and serves it to the client.
Nexus OSS provides us with the ability to update the settings related to cached content as to how long it can be considered valid and when is the cached content invalidated.
Here are the details of those settings.
- Maximum Component Age: It sets how long Nexus Repository can serve cached component files before checking the remote repository again.
- Maximum Metadata Age: It sets how long Nexus Repository can use cached metadata, such as package indexes or version lists, before retrieving updated metadata from the remote repository.
By default, Sonatype Nexus Repository ships with the following configured proxy repositories (ie. maven-central) for Maven, Gradle, Ant or Ivy based projects.
Advantages
- Optimized or Improved build times
- Isolation from upstream or remote repository failures
- Optimized Bandwidth utiliztion
- Bypassing network restrictions
- Centralized source of truth
NOTE: For more information on cache settings, follow the blog “How should I configure Proxy Repository Cache setting“.
High Level Architecture
If you are interested in watching the video. Here is the YouTube video on the same step by step procedure outlined below.
Procedure
Step1: Ensure Docker and Docker compose installed
As a pre-requisite step ensure that docker and docker-compose is installed and running.
admin@linuxscratch:nexus_oss$ docker -v
Docker version 29.2.1, build a5c7197

admin@linuxscratch:nexus_oss$ docker compose version
Docker Compose version v5.0.2

admin@linuxscratch:nexus_oss$ sudo systemctl start docker.service
admin@linuxscratch:nexus_oss$ sudo systemctl status docker.service
Step2: Ensure Nexus OSS service installed
Here we will be setting up Nexus OSS service with Postgres database as the backend to manage and store all repository metadata and configuration data. We will be using docker compose to instantiate these services.
admin@linuxscratch:nexus_oss$ cat docker-compose.yml
services:
  postgresql:
    image: releases-docker.jfrog.io/postgres:17.6-alpine
    container_name: postgresql
    environment:
      - POSTGRES_DB=nexus
      - POSTGRES_USER=nexus
      - POSTGRES_PASSWORD=nexus@1234
    volumes:
      - ./init.sql:/docker-entrypoint-initdb.d/init.sql
      - postgres_data:/var/lib/postgresql/data

  nexus3:
    image: sonatype/nexus3:3.92.2
    container_name: nexus3
    depends_on:
      - postgresql
    environment:
      - NEXUS_SECURITY_INITIAL_PASSWORD=admin@1234
      - NEXUS_SECURITY_RANDOMPASSWORD=false
      - NEXUS_CONTEXT=nexus
      - NEXUS_DATASTORE_NEXUS_JDBCURL=jdbc:postgresql://postgresql:5432/nexus?currentSchema=nexus
      - NEXUS_DATASTORE_NEXUS_USERNAME=nexus
      - NEXUS_DATASTORE_NEXUS_PASSWORD=nexus@1234
      - NEXUS_DATASTORE_NEXUS_ADVANCED=maximumPoolSize=10
    ports:
      - "8081:8081" # Nexus UI
    volumes:
      - nexus-data:/nexus-data

volumes:
  nexus-data:
  postgres_data:
Within the postgres service we are going to run an init.sql script to create a schema named “nexus” and install an extension within this schema as shown below.
admin@linuxscratch:nexus_oss$ cat init.sql
-- Create the schema if it doesn't already exist
CREATE SCHEMA IF NOT EXISTS nexus;

-- Install the pg_trgm extension into the specific schema
CREATE EXTENSION IF NOT EXISTS pg_trgm SCHEMA nexus;
Now we are ready to launch our Nexus OSS service as shown below.
admin@linuxscratch:nexus_oss$ docker compose up -d
If this is the first time you are starting up the Nexus OSS service you need to complete the setup tasks when you launch the Nexus OSS portal.
URL: http://linuxscratch.stack.com:8081/nexus
Step3: Create Nexus OSS Maven Proxy respository
Here we are going to create a Nexus OSS maven based proxy repository using the REST API as shown below. This proxy repository connects to a remote maven central repository.
POST http://linuxscratch.stack.com:8081/nexus/service/rest/v1/repositories/maven/proxy HTTP/1.1
Authorization: Basic admin:admin@1234
Content-Type: application/json
Accept: application/json

{
  "name": "maven-central-proxy",
  "online": true,
  "storage": {
    "blobStoreName": "default",
    "strictContentTypeValidation": true
  },
  "proxy": {
    "remoteUrl": "https://repo1.maven.org/maven2/",
    "contentMaxAge": 1440,
    "metadataMaxAge": 1440,
    "preserveEncodedCharacters": false
  },
  "negativeCache": {
    "enabled": true,
    "timeToLive": 1440
  },
  "httpClient": {
    "blocked": false,
    "autoBlock": true,
    "connection": {
      "retries": 0,
      "userAgentSuffix": "string",
      "timeout": 60,
      "enableCircularRedirects": false,
      "enableCookies": false,
      "useTrustStore": false
    }
  },
  "maven": {
    "versionPolicy": "MIXED",
    "layoutPolicy": "PERMISSIVE",
    "contentDisposition": "ATTACHMENT"
  }
}
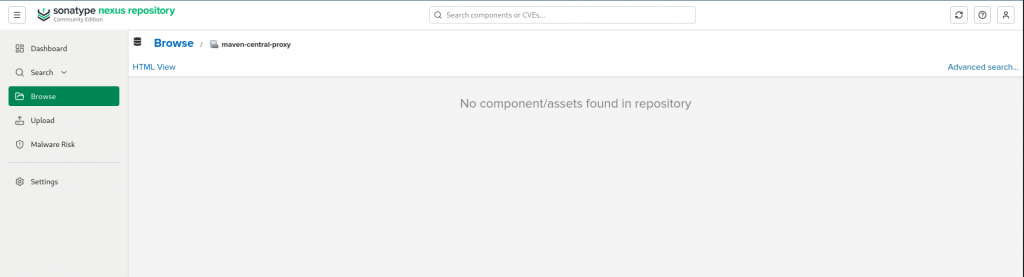
Validate the proxy repository is created and empty currently as shown below.
Step4: Configre Maven with Nexus OSS proxy repository
Here we need to update the maven with the proxy repository url to which all the traffic needs to be routed to instead of the direct upstream remote repository.
admin@linuxscratch:vscodeprojects$ cat ~/.m2/settings.xml
<settings>
  <mirrors>
    <!-- Map all traffic (*) away from public repositories and direct it to Nexus -->
    <mirror>
      <id>nexus-proxy</id>
      <mirrorOf>*</mirrorOf>
      <name>Nexus Central Proxy Mirror</name>
      <!-- Paste your copied repository URL here -->
      <url>http://linuxscratch.stack.com:8081/nexus/repository/maven-central-proxy/</url>
    </mirror>
  </mirrors>
    <servers>
        <server>
            <id>nexus-proxy</id>
            <username>admin</username>
            <password>admin@1234</password>
        </server>
    </servers>
</settings>
Step5: Create Maven based project
Here we are going to create a maven based project.
Ensure that you have maven and jdk25 installed on your machine for the same.
admin@linuxscratch:~$ mvn archetype:generate \
  -DarchetypeGroupId=org.apache.maven.archetypes \
  -DarchetypeArtifactId=maven-archetype-quickstart \
  -DarchetypeVersion=1.5 \
  -DjavaCompilerVersion=25 \
  -DgroupId=com.example \
  -DartifactId=nexus_proxy_demo \
  -DinteractiveMode=false
If you look at the output of this command it will try to connect to “maven-central-proxy” to fetch the required dependencies. Now if the dependency is not available on the Nexus OSS cache, it will fetch from the remote repository and cache it at the Nexus OSS instance level.
Downloading from nexus-proxy: http://linuxscratch.stack.com:8081/repo/repository/maven-central-proxy/org/apache/groovy/groovy-xml/4.0.28/groovy-xml-4.0.28.pom
Downloaded from nexus-proxy: http://linuxscratch.stack.com:8081/repo/repository/maven-central-proxy/org/apache/groovy/groovy-xml/4.0.28/groovy-xml-4.0.28.pom (23 kB at 21 kB/s)
Downloading from nexus-proxy: http://linuxscratch.stack.com:8081/repo/repository/maven-central-proxy/org/apache/groovy/groovy-yaml/4.0.28/groovy-yaml-4.0.28.pom
Downloaded from nexus-proxy: http://linuxscratch.stack.com:8081/repo/repository/maven-central-proxy/org/apache/groovy/groovy-yaml/4.0.28/groovy-yaml-4.0.28.pom (23 kB at 92 kB/s)
Downloading from nexus-proxy: http://linuxscratch.stack.com:8081/repo/repository/maven-central-proxy/com/fasterxml/jackson/dataformat/jackson-dataformat-yaml/2.19.2/jackson-dataformat-yaml-2.19.2.pom
Downloaded from nexus-proxy: http://linuxscratch.stack.com:8081/repo/repository/maven-central-proxy/com/fasterxml/jackson/dataformat/jackson-dataformat-yaml/2.19.2/jackson-dataformat-yaml-2.19.2.pom (3.0 kB at 6.3 kB/s)
Downloading from nexus-proxy: http://linuxscratch.stack.com:8081/repo/repository/maven-central-proxy/com/fasterxml/jackson/dataformat/jackson-dataformats-text/2.19.2/jackson-dataformats-text-2.19.2.pom
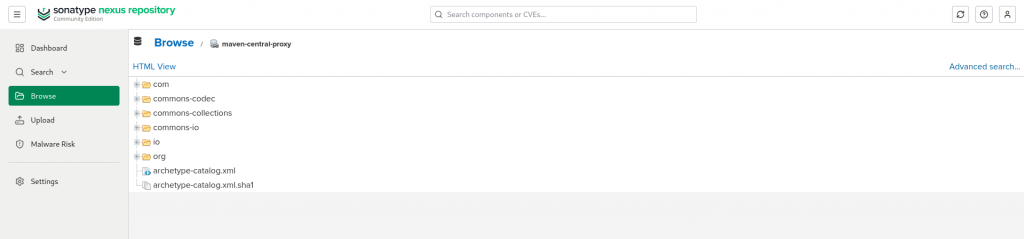
Step6: Validate Nexus OSS Proxy respository
Now if you look at the Nexus OSS proxy repository that we created initially, it is populated with the dependencies required by the maven project as shown below.
Hope you enjoyed reading this article. Thank you..
Leave a Reply
You must be logged in to post a comment.