How to setup AWS SQS service using AWS CLI
Here in this article we will try to understand about AWS SQS queue and setup it using the AWS CLI and use a python script to send and receive message from the queue.
Test Environment
- Fedora 41 server
- aws-cli v2.33.27
- boto3 v1.42.54
What is AWS SQS
Amazon Simple Queue Service (Amazon SQS) offers a secure, durable, and available hosted queue that lets you integrate and decouple distributed software systems and components. It supports two types of queues: standard queues and FIFO queues.
- Standard Queues: These queues are used for unlimited throughput, gurantees at-least-once delivery, meaning that every message is delivered at least once, but in some cases, a message may be delivered more than once due to retries or network delays. These are suitable for real-time data streaming or large-scale applications.
- FIFO Queues: These queues are better for batch processing applications. They provide high throughput, deliver each message once and keep it available until you process and delete it. They also ensure that you receive messages in the order they are sent within each message group.
Features of SQS
- Security: Allows messages sent or received through SQS queue to be encrypted and also allows to control who can send or receive the messages.
- High Availability: SQS uses redundant infrastructure to protect against single point of failure
- Durability: SQS stores message on multiple servers to ensure no data loss in case of any server failure
- Scalability: SQS automatically scales its internal infrastructure to handle any volume of message traffic, from a few messages to billions per day, without the need for manual capacity planning or provisioning
- Reliability: SQS provides reliability through redundant message storage, message locking during processing, and features like Dead-Letter Queues (DLQs) to handle failures.
- Customization: SQS can leverage S3 or DynamoDB to store large messages holding pointers into these services
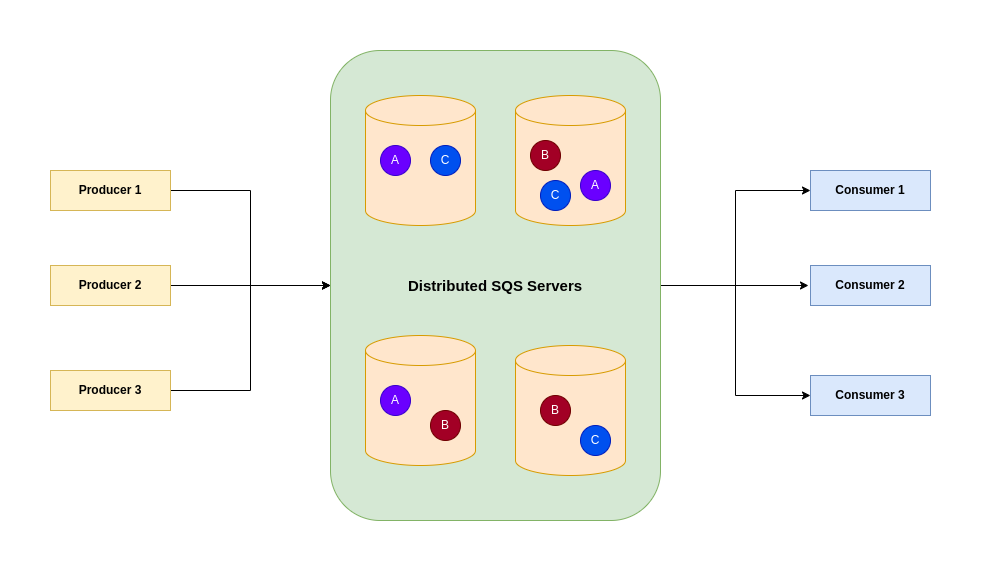
SQS Architecture
There are three main parts of a distributed messaging systems.
- Components of distributed systems: Producers and Consumers
- SQS queues distributed on SQS servers
- Messages within SQS queues
LifeCycle of SQS message
- Producer sends a message A to the queue, and the message is distributed across the Amazon SQS servers redundantly
- When a consumer (Component 2) is ready to process messages, it consumes messages from the queue, and message A is returned. While message A is being processed, it remains in the queue and isn’t returned to subsequent receive requests for the duration of the visibility timeout
- Consumer deletes message A from the queue to prevent the message from being received and processed again when the visibility timeout expires
NOTE: If an SQS consumer takes longer than the visibility timeout to process a message, the message becomes visible to other consumers in the queue again, leading to potential duplicate processing. The original consumer may still finish processing, but it will be unable to delete the message, as the receipt handle will have expired.
Also Amazon SQS automatically deletes messages that have been in a queue for more than the maximum message retention period. The default message retention period is 4 days.
If you are interested in watching the video. Here is the YouTube video on the same step by step procedure outlined below.
Procedure
Step1: Ensure AWS Account and Non Root IAM user created
Ensure that you registered with AWS and created a root account which is used to manage billing, authentication and authorization control. Create a IAM user.
Follow “Setting up your AWS account” and “Create an IAM user in your AWS account” for the same.
Step2: Create Queue attributes file
Before creating a queue, we will create a queue attributes file named “create-queue.json” that we will use to pass the attribute during the queue creation process.
- MessageRetentionPeriod: The length of time, in seconds, for which Amazon SQS retains a message. Default: 345,600 (4 days).
- DelaySeconds: The length of time, in seconds, for which the delivery of all messages in the queue is delayed.
- MaximumMessageSize: The limit of how many bytes a message can contain before Amazon SQS rejects it. Default is 1,048,576 bytes (1 MiB).
- VisibilityTimeout: The visibility timeout for the queue, in seconds. It is the time period until which its hidden from other consumers when the message is being processed.
- SqsManagedSseEnabled: Enables server-side queue encryption using SQS owned encryption keys.
admin@fedser:sqs$ cat create-queue.json
{
  "MessageRetentionPeriod": "345600",
  "DelaySeconds": "1",
  "MaximumMessageSize": "1048576",
  "VisibilityTimeout": "300",
  "SqsManagedSseEnabled": "true"
}
Step3: Create Queue using AWS CLI
Here we are going to using the AWS CLI tools to create a queue named “MyQueue” and pass the attributes file that was created in last step.
Also ensure that you update the “aws_profile” and “aws_region” with your respective values.
admin@fedser:sqs$ aws sqs create-queue --queue-name MyQueue --profile <aws_profile> --region <aws_region> --attributes file://create-queue.json
{
    "QueueUrl": "https://sqs.<aws_region>.amazonaws.com/<aws_account_id>/MyQueue"
}
Step4: List SQS Queues
Once the SQS queue is created, we can list the queues as shown below.
admin@fedser:sqs$ aws sqs list-queues --profile <aws_profile> --region <aws_region>
{
    "QueueUrls": [
        "https://sqs.<aws_region>.amazonaws.com/<aws_account_id>/MyQueue",
    ]
}
Step5: Send message using Python AWS SDK
Here we are using the Python AWS SDK library to create a “send.py” python which will be used to send a message to our queue.
admin@fedser:sqs$ cat send.py
import boto3
import time

# Create a custom session, specifying both the region and profile name
session = boto3.Session(
    region_name='aws_region', # Replace with your desired region
    profile_name='aws_profile' # Replace with your profile name
)

# Create an SQS client
# Ensure your AWS credentials and default region are configured in your environment
sqs = session.client('sqs')

# Replace with your SQS queue URL
# You can get this from the AWS Management Console or by calling create_queue or get_queue_url
QUEUE_URL = 'https://sqs.<aws_region>.amazonaws.com/<aws_account_id>/MyQueue'

def send_sqs_message(queue_url, message_body):
    """
    Sends a message to an SQS queue.
    """
    print(f"Sending message: {message_body}")
    response = sqs.send_message(
        QueueUrl=queue_url,
        MessageBody=message_body
    )
    print(f"Message sent, Message ID: {response['MessageId']}")
    return response

# Example usage:
send_sqs_message(QUEUE_URL, f"Hello, world! Current time is {time.time()}")
Now, let’s execute our script to send message to the queue as shown below.
admin@fedser:sqs$ python send.py
Sending message: Hello, world! Current time is 1771574188.2929752
Message sent, Message ID: 44aaf060-f69a-43b8-8ebb-bfb3e3a82cec
Step6: Receive and delete message using Python AWS SDK
Here we are using the Python AWS SDK library to create a “receive.py” python which will be used to receive a message from our queue and delete it once processed.
admin@fedser:sqs$ cat receive.py
import boto3

# Create a custom session, specifying both the region and profile name
session = boto3.Session(
    region_name='aws_region', # Replace with your desired region
    profile_name='aws_profile' # Replace with your profile name
)

# Create an SQS client
# Ensure your AWS credentials and default region are configured in your environment
sqs = session.client('sqs')

# Replace with your SQS queue URL
# You can get this from the AWS Management Console or by calling create_queue or get_queue_url
QUEUE_URL = 'https://sqs.<aws_region>.amazonaws.com/<aws_account_id>/MyQueue'

def receive_and_delete_sqs_messages(queue_url):
    """
    Receives and deletes messages from an SQS queue.
    """
    print("Polling for messages...")
    response = sqs.receive_message(
        QueueUrl=queue_url,
        AttributeNames=['All'],
        MaxNumberOfMessages=1, # Fetch up to 1 message at a time
        WaitTimeSeconds=10 # Use long polling for efficiency (waits up to 10 seconds for a message)
    )

    messages = response.get('Messages', [])
    if not messages:
        print("No messages received.")
        return

    for message in messages:
        print(f"\nReceived message: {message['Body']}")
        # Process the message here
        # ...

        # Delete the message after processing
        receipt_handle = message['ReceiptHandle']
        sqs.delete_message(
            QueueUrl=queue_url,
            ReceiptHandle=receipt_handle
        )
        print(f"Deleted message, Receipt Handle: {receipt_handle}")

# Example usage:
receive_and_delete_sqs_messages(QUEUE_URL)
Let’s now execute our script to receive message from the queue.
admin@fedser:sqs$ python receive.py
Polling for messages...

Received message: Hello, world! Current time is 1771574188.2929752
Deleted message, Receipt Handle: AQEBLVO8DRgshObQ+itiJzhFIz6lybbBMwz+xcwa9Sb6P8t4REJ6Oa6eGqhkDQnZ/4R4ueLNH+9/Rt53yAhIrI2MCaZAhD6Uo/o4nqPCYrfKonV0MPcWOGp3AkAXOeoMRTHDwFLUKwHxIYCFJlnIMq64lDVdz7fhLSdCuRewNA2j7n557Aj31qzC1lCZ5D3b9BD3oxBo45s0vkCZ77HPb7FV/eH9/y1E1gcCFZhuDr5Sczf01B9wd07M7ROS6IzPJZ3rPVALpKwIavkJW9ZjG/osdx1pIc5YsR74po1EDb3QBEVoqk7iKNE26aUc2F51wi2oIYbkN/ykGYXRQS7tOqjLBxoRbgx2zMriur6KdSTufKAEKHH1MjJHNv637LhWak1PsArw/20VVIYayzeDDfGYeQ==
Step7: Delete SQS Queue
Finally once you are done with the demo, you can delete the queue to avoid any charges.
admin@fedser:sqs$ aws sqs delete-queue --queue-url https://sqs.<aws_region>.amazonaws.com/<aws_account_id>/MyQueue --profile aws_profile --region aws_region
Hope you enjoyed reading this article. Thank you..
Leave a Reply
You must be logged in to post a comment.