How to manage container Logs with Grafana Alloy and Loki
Here in this article we will try to setup Grafana Alloy to collect logs from the Docker containers and ingest them to Grafana Loki which acts as log aggregration platform. Further we will use Grafana to visualize the logs through portal.
Test Environment
- Fedora 41 server
- Docker
- Docker Compose
What is Grafana Alloy
Grafana Alloy is Grafana Labs’ open-source distribution of the OpenTelemetry Collector, acting as a unified telemetry agent to collect, process, and export metrics, logs, traces, and profiles from cloud-native infrastructure.
What is Grafana Loki
Grafana Loki is a Open Source platform consisting of multiple components to provide a full featured logging stack. It is horizontally-scalable, highly-available, multi-tenant log aggregation system inspired by Prometheus. Grafana Loki focuses on collecting logs via push method.
It is used to index metadata about your logs and store the log content in small chunks of compressed objects in any object store such as Amazon S3, Google cloud storage or even on the local filesystem. The small footprint of indexes and highly compressed chunks of log content make it cost effective and easy to operate.
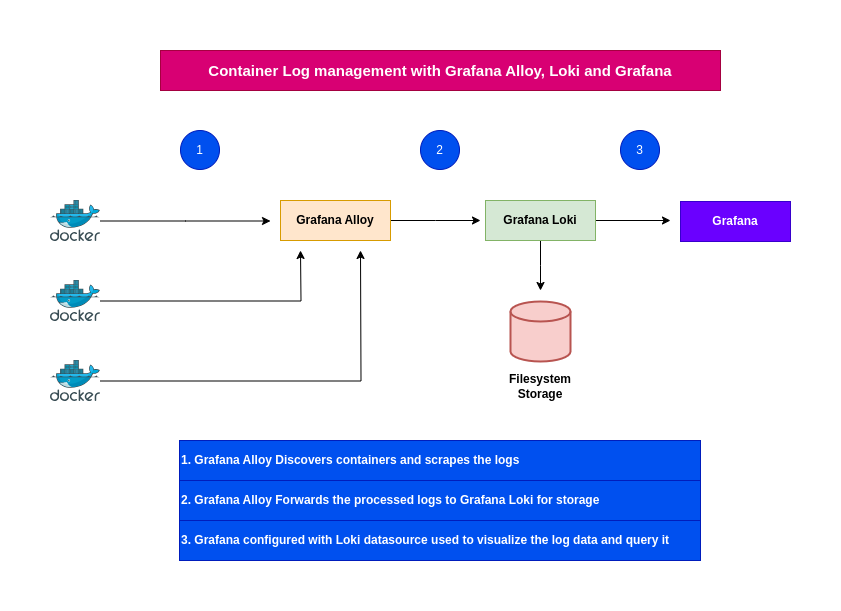
High Level Architecture
If you are interested in watching the video. Here is the YouTube video on the same step by step procedure outlined below.
Procedure
Step1: Ensure Docker installed and running
As a first step ensure that you have docker and docker compose installed. Verify that you docker service is up and running as shown below.
admin@linuxscratch:~$ sudo systemctl start docker.service
admin@linuxscratch:~$ sudo systemctl status docker.service
Step2: Setup Grafana Alloy docker service
Grafana alloy is an agent that is used to collect telemetry data from applications, databases, and OpenTelemetry collectors. It is used to collect, transform and write the data to OpenTelemetry-compatible databases or collectors.
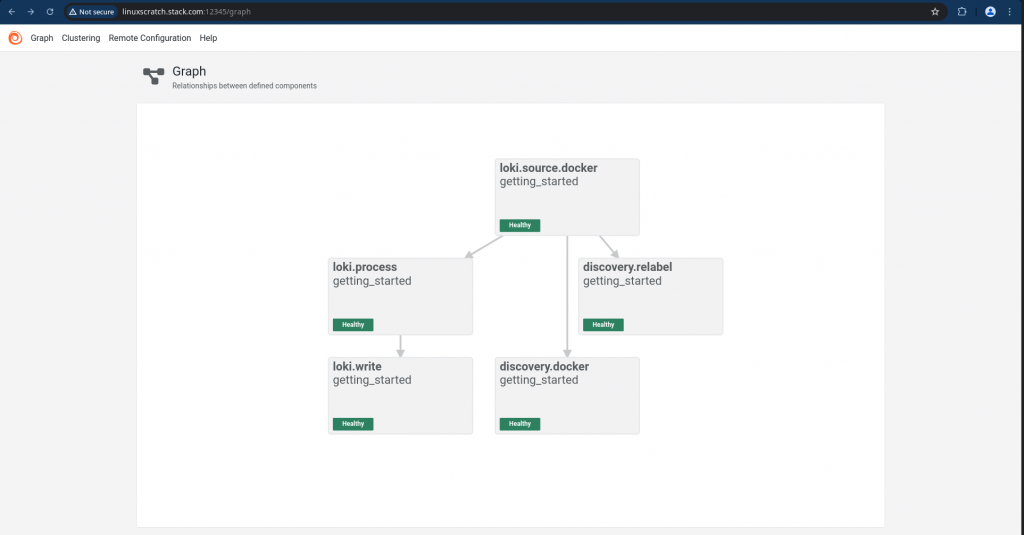
We use components in the config.alloy file to tell Alloy which logs we want to scrape, how you want to process that data, and where you want the data sent.
Here are the details of the components we are using in the config.alloy configuration file.
- discovery.docker: This component is responsible for disovering new containers within the docker environment
- discovery.relabel: This component is responsible for relabeling the discovered containers
- loki.source.docker: This component is responsible for collecting logs from the discovered containers
- loki.process: This component is responsible for processing the logs (In this case adding static labels)
- loki.write: This component is responsible for writing the logs to Loki
- livedebugging: Enables the ability to view logs in the Alloy UI in realtime
admin@linuxscratch:~/grafana-alloy$ cat config.alloy
// This component is responsible for disovering new containers within the docker environment
discovery.docker "getting_started" {
	host = "unix:///var/run/docker.sock"
	refresh_interval = "5s"
}

// This component is responsible for relabeling the discovered containers
discovery.relabel "getting_started" {
	targets = []

	rule {
		source_labels = ["__meta_docker_container_name"]
		regex         = "/(.*)"
		target_label  = "container"
	}
}

// This component is responsible for collecting logs from the discovered containers
loki.source.docker "getting_started" {
	host             = "unix:///var/run/docker.sock"
	targets          = discovery.docker.getting_started.targets
	forward_to       = [loki.process.getting_started.receiver]
	relabel_rules    = discovery.relabel.getting_started.rules
	refresh_interval = "5s"
}

// This component is responsible for processing the logs (In this case adding static labels)
loki.process "getting_started" {
    stage.static_labels {
    values = {
      env = "production",
    }
}
    forward_to = [loki.write.getting_started.receiver]
}

// This component is responsible for writing the logs to Loki
loki.write "getting_started" {
	endpoint {
		url  = "http://linuxscratch.stack.com:3100/loki/api/v1/push"
	}
}

// Enables the ability to view logs in the Alloy UI in realtime
livedebugging {
  enabled = true
}
Here is the docker compose file to instantiate the Grafana Alloy service. Please note, we need to volume mount the “/var/run/docker.sock” into the container so that the alloy agent is able to discover the containers on the host.
admin@linuxscratch:~/grafana-alloy$ cat docker-compose.yml
services:
  alloy:
    image: grafana/alloy:v1.7.5
    ports:
      - 12345:12345
    volumes:
      - ./config.alloy:/etc/alloy/config.alloy
      - /var/run/docker.sock:/var/run/docker.sock
    command: run --server.http.listen-addr=0.0.0.0:12345 --storage.path=/var/lib/alloy/data /etc/alloy/config.alloy
Let’s now instantiate the Grafana alloy service.
admin@linuxscratch:~/grafana-alloy$ docker compose up -d
Step3: Setup Grafana Loki docker service
Here we are going to setup Grafana Loki service which collect the logs received from the Grafana alloy and stores it in compressed chunks of objects.
The default configuration /etc/loki/local-config.yaml uses filesystem-backed setup using inmemory for cluster communication, ideal for testing or small deployments where logs and indexes are stored locally (/loki/chunks, /loki/rules), using 127.0.0.1 as its address, with replication_factor: 1 indicating no data redundancy for simplicity,
admin@linuxscratch:~/grafana-loki$ cat docker-compose.yml
services:
  loki:
    image: grafana/loki:3.0.0
    ports:
      - "3100:3100"
    command: -config.file=/etc/loki/local-config.yaml
Let’s now instantiate the Grafana Loki service.
admin@linuxscratch:~/grafana-loki$ docker compose up -d
Validate the Grafana Loki is ready for log ingestion as shown below.
admin@linuxscratch:~/grafana-loki$ curl http://linuxscratch.stack.com:3100/ready
ready
Step4: Setup Grafana docker service
Here we are going to setup Grafana docker service with minimal configuraiton and preloaded datasource configuration for Loki which acts as source of logs for grafana.
admin@linuxscratch:~/grafana$ cat docker-compose.yml
services:
  grafana:
    environment:
      - GF_PATHS_PROVISIONING=/etc/grafana/provisioning
      - GF_AUTH_ANONYMOUS_ENABLED=true
      - GF_AUTH_ANONYMOUS_ORG_ROLE=Admin
    entrypoint:
      - sh
      - -euc
      - |
        mkdir -p /etc/grafana/provisioning/datasources
        cat <<EOF > /etc/grafana/provisioning/datasources/ds.yaml
        apiVersion: 1
        datasources:
        - name: Loki
          type: loki
          access: proxy
          orgId: 1
          url: http://linuxscratch.stack.com:3100
          basicAuth: false
          isDefault: false
          version: 1
          editable: false
        EOF
        /run.sh
    image: grafana/grafana:11.0.0
    ports:
      - "3000:3000"
Let’s now instantiate the Grafana service.
admin@linuxscratch:~/grafana$ docker compose up -d
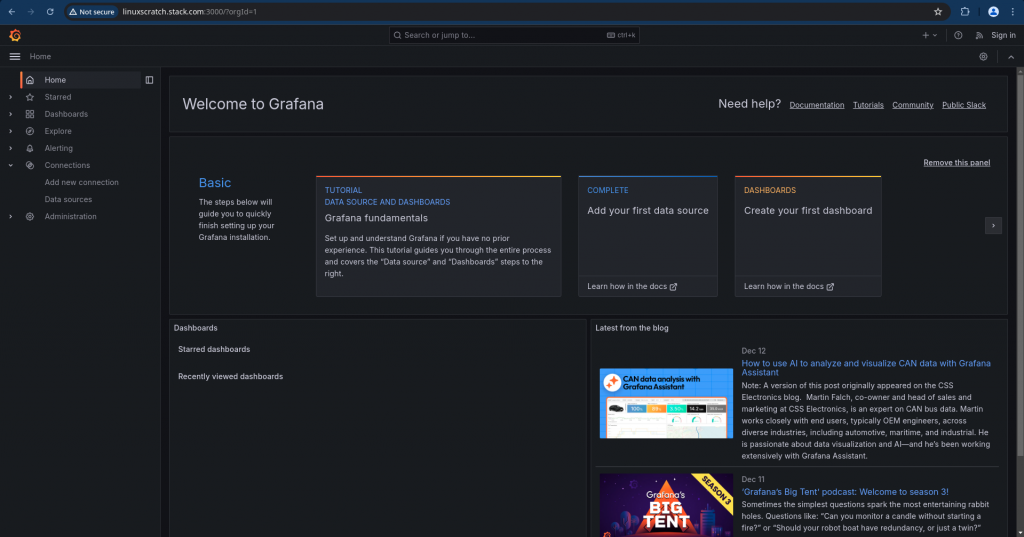
Validate the Grafana service by accessing the portal on port “3000” and ensure that the datasource “Loki” test connection is successful.
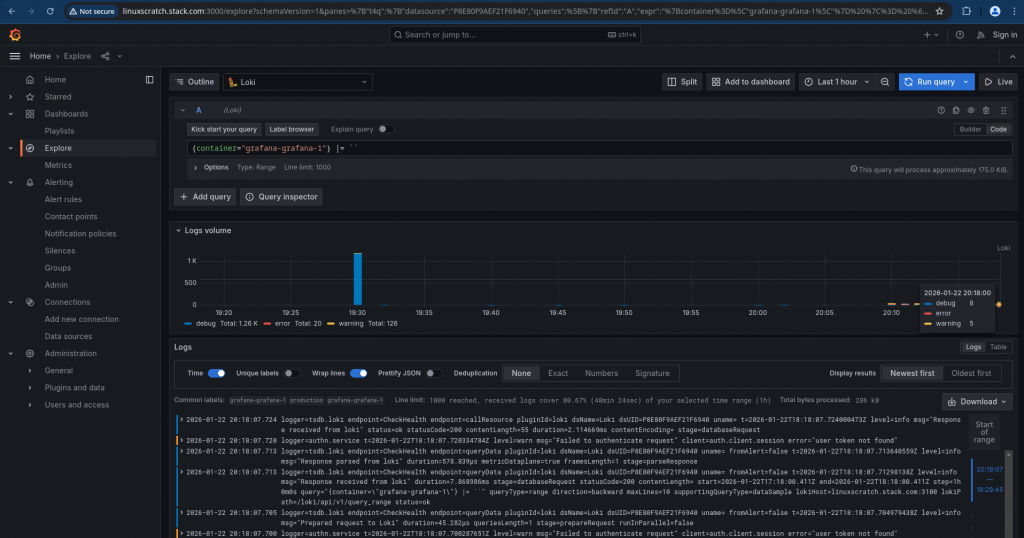
Step5: Validate Container logs in Grafana explorer
Now we should be able to navigate to the Grafana explorer and visualize the docker container logs. Ensure that in the explorer view you are connecting to the Loki datasource and we can use the Query builder or Write the Query code and execute it to get our log data as shown below.
Hope you enjoyed reading this article. Thank you..
Leave a Reply
You must be logged in to post a comment.