How to authenticate using Remote User Token in Nexus OSS
Here in this article we will try to see how we can leverage a reverse proxy to authenticate and pass the authenticated user identity as a part of request header to the backend systems for authorization and granting access.
Test Environment
- Fedora 41 server
- Nexus OSS v3.92.2
- Apache HTTP Server v2.4.65
Remote User Token (RUT)
Remote User Token based authentication is one of the method supported by Nexus OSS. It allows authentication using an external security systems that passes along user details via HTTP headers for all requests to the Nexus OSS Repository.
The Nexus OSS Repository uses this header value to grant authentication to the respository and further uses this value as username for authorization.
Basically this external security systems is used as a single source of trust for authenticating the users which all the backends systems or applications leverage so they need not worry about authenticity of the user.
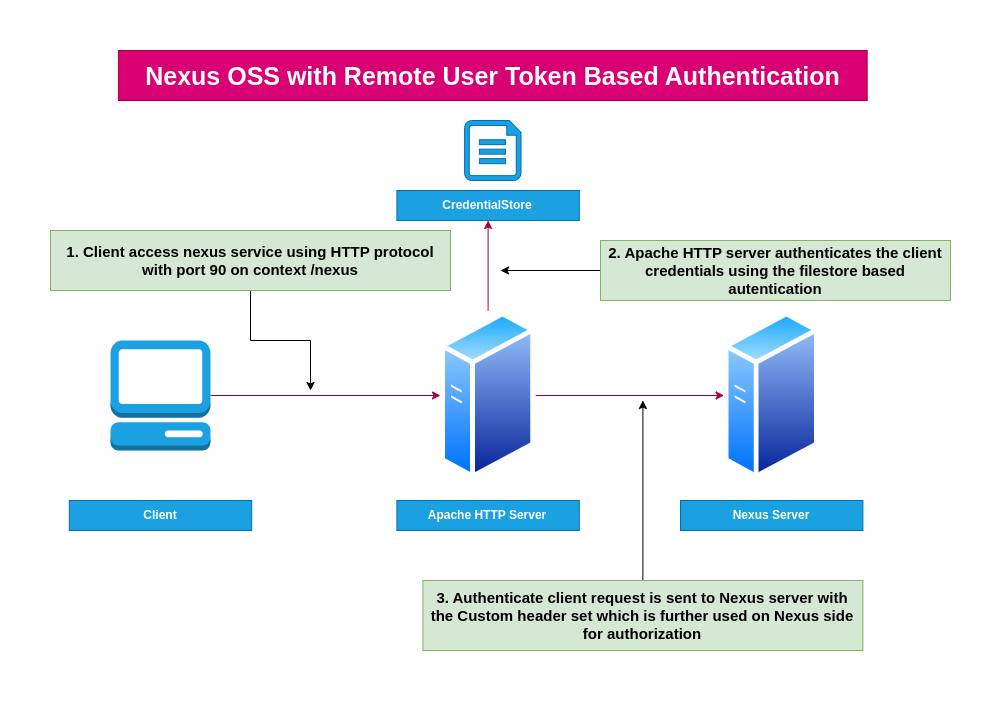
High Level Architecture
If you are interested in watching the video. Here is the YouTube video on the same step by step procedure outlined below.
Procedure
Step1: Install Apache HTTP Server
As a first step we will install apache http server package which we will configure with the Filestore for basic authentication.
admin@linuxser:~$ sudo dnf install httpd
Before implementing the Basic authentication using Filestore we need to ensure that the required authentication and authorization modules are loaded. By default the httpd package installation on Fedora OS has the following modules dynamically loaded.
admin@linuxser:~$ httpd -M | grep -E "auth_basic|authn_file|authz_user"
 auth_basic_module (shared)
 authn_file_module (shared)
 authz_user_module (shared)
Step2: Create a Credentials filestore
Here we are going to the leverage the “htpasswd” utility to create a flat file credentials store to store some user credentails which we will use for basic authenticaiton.
admin@linuxser:/etc/httpd$ sudo htpasswd -cb /etc/httpd/credentialstore admin admin@1234
Adding password for user admin

admin@linuxser:/etc/httpd$ sudo htpasswd -b /etc/httpd/credentialstore dev1 dev1@1234
Adding password for user dev1

admin@linuxser:/etc/httpd$ sudo htpasswd -b /etc/httpd/credentialstore dev2 dev2@1234
Adding password for user dev2
Here is the credentialstore file that is created.
admin@linuxser:/etc/httpd$ cat /etc/httpd/credentialstore
admin:$apr1$yhpW2qc0$CFC.NIMMWcxnUCgOoQg9T1
dev1:$apr1$5L3ON9h.$1erDEYl.WJU6u2TFDPscY/
dev2:$apr1$2raatTzB$/6jfd.3r4HZOo92j3bTzj1
Step3: Configure Apache HTTP server
Now before we confirm Apahce HTTP server with proxypass and header settings, we need to ensure that the following modules are loaded.
admin@linuxser:~$ httpd -M | grep -E 'proxy_module|proxy_http_module|headers_module'
 headers_module (shared)
 proxy_module (shared)
 proxy_http_module (shared)
Let’s now create a “nexus.conf” file within “/etc/httpd/conf.d” which is by default loaded as a part of the main “/etc/httpd/conf/httpd.conf” configuration file.
The below configuration basically states that when a request is received on “/nexus” context it needs to be authentication using the apache filestore based authentication system and set the “X-Proxy-REMOTE-USER” header that is further proxied to the backend Nexus OSS instance.
admin@linuxser:~$ sudo cat /etc/httpd/conf.d/nexus.conf
# Enable Proxy and Header modules in your main server config
# LoadModule proxy_module modules/mod_proxy.so
# LoadModule proxy_http_module modules/mod_proxy_http.so
# LoadModule headers_module modules/mod_headers.so

<Location /nexus>
    # File-based basic authentication setup
    AuthType Basic
    AuthName "Nexus OSS Restricted Access"
    AuthBasicProvider file
    AuthUserFile /etc/httpd/credentialstore
    Require valid-user

    # Capture the authenticated username and forward it via header
    RequestHeader set X-Proxy-REMOTE-USER expr=%{REMOTE_USER}

    # Reverse proxy settings to backend Nexus OSS (adjust port/URL as needed)
    ProxyPass http://localhost:8081/nexus
    ProxyPassReverse http://localhost:8081/nexus
</Location>
Step4: Instantiate Nexus OSS service
Here we will be using a basic docker compose file to instantiate Nexus OSS service which listens on port 8081 with a custom contextroot “/nexus” as shown below.
Ensure that you have docker and docker composed installed and started the docker service.
admin@linuxser:~/nexus_oss$ sudo systemctl start docker.service
Nexus OSS docker compose file
admin@linuxser:~/nexus_oss$ cat docker-compose.yml
services:
  nexus3:
    image: sonatype/nexus3:3.92.2
    container_name: nexus3
    environment:
      - NEXUS_SECURITY_INITIAL_PASSWORD=admin@1234
      - NEXUS_SECURITY_RANDOMPASSWORD=false
      - NEXUS_CONTEXT=nexus
    ports:
      - "8081:8081" # Nexus UI
    volumes:
      - nexus-data:/nexus-data

volumes:
  nexus-data:
Let’s start up the Nexus OSs service and validate it.
admin@linuxser:~/nexus_oss$ docker compose up -d
admin@linuxser:~/nexus_oss$ docker ps
CONTAINER ID   IMAGE                        COMMAND                  CREATED         STATUS                     PORTS                                                     NAMES
273aedb34d4a   sonatype/nexus3:3.92.2       "/opt/sonatype/nexus…"   3 minutes ago   Up 3 minutes               0.0.0.0:8081->8081/tcp, [::]:8081->8081/tcp               nexus3
Here is the backend url for the nexus oss serivce which listens on port 8081.
URL: http://linuxser.stack.com:8081/nexus/#/login
Step5: Configure Nexus OSS RUT Capability
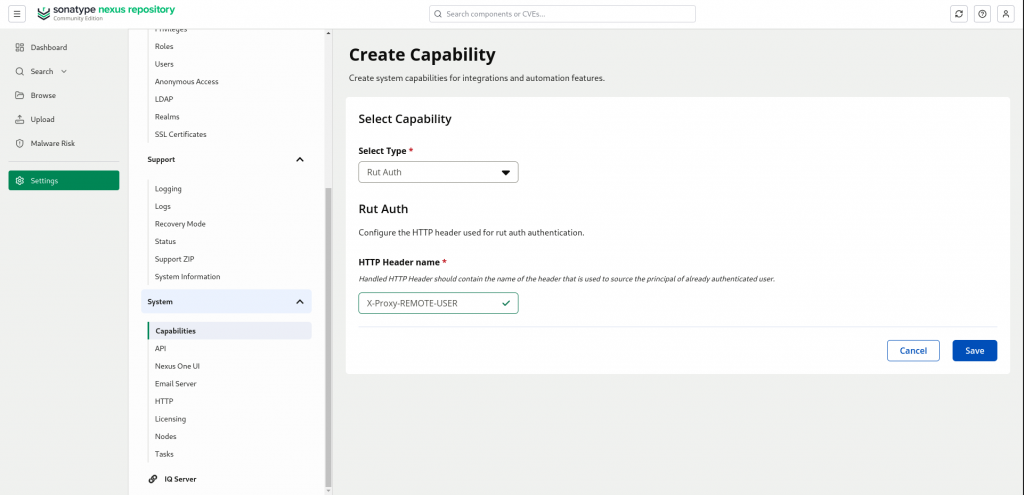
Here we need to now configure our nexus oss service to “Activate HTTP header integration by adding and enabling the Rut Auth” capability.
- Log in as a user with administrative rights.
- Access the Server configuration in the Settings menu.
- Navigate to the System section and select Capabilities.
- Click Create Capability and then select Rut Auth.
- Configure the HTTP Header name to the value used by your PKI system, e.g. X-SSO-USER, and click Create capability.
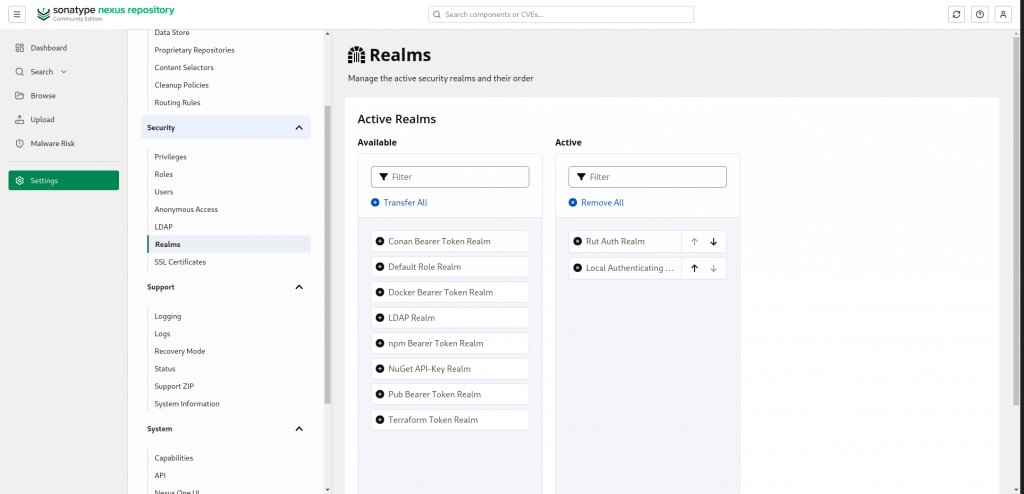
- Select Realms under Security in the Settings menu.
- Move the Rut Auth Realm to the top of the Active list.
- Click Save.
With this configuration in place, any username that is passed to Nexus Repository via the configured HTTP header field is assumed to be authenticated. The access level for the specific user is determined by the access rights for a matching username found in the internal security setup or any configured LDAP system and the associated roles.
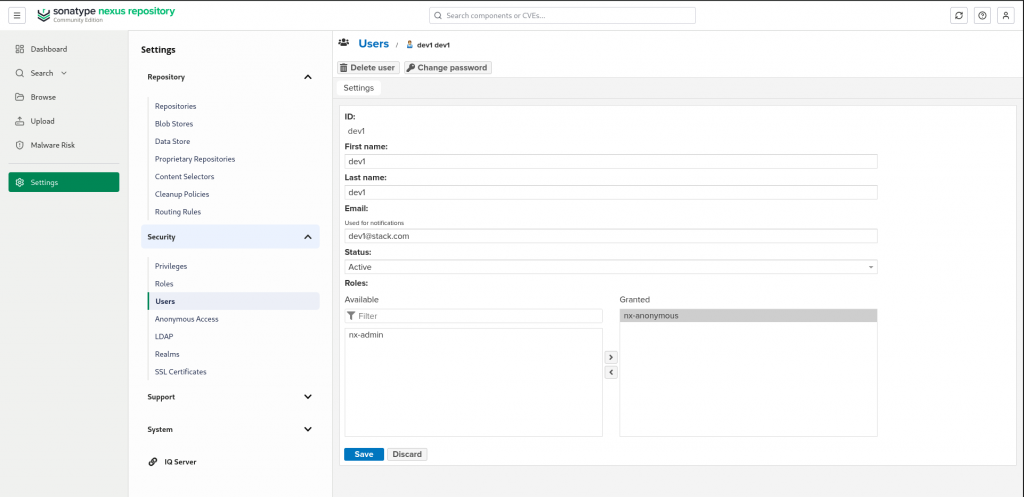
But here we do not have any LDAP configured so we are going to fake this internal security setup by creating a internal user “dev1” with a random password “xyz” different from what was setup on the apache layer and associate it with a role as shown below.
NOTE: For production deployment its recommended to confirm some kind of security security for authorization. Check out my blog on “How to integrate Nexus OSS with OpenLDAP for authentication” for the same.
Here is my fake internal user with assigned role which we will use for authorization purpose.
Step6: Instantiate Apache HTTP server
Now its time to start up our apache http service and check if there are no errors within our configuration.
admin@linuxser:~$ sudo systemctl start httpd.service
admin@linuxser:~$ sudo systemctl status httpd.service
Step7: Validate RUT authentication
Now we need to access our nexus using the apache http server as proxy using the following url. Our apache http service is configured to listen on the default HTTP port “80”.
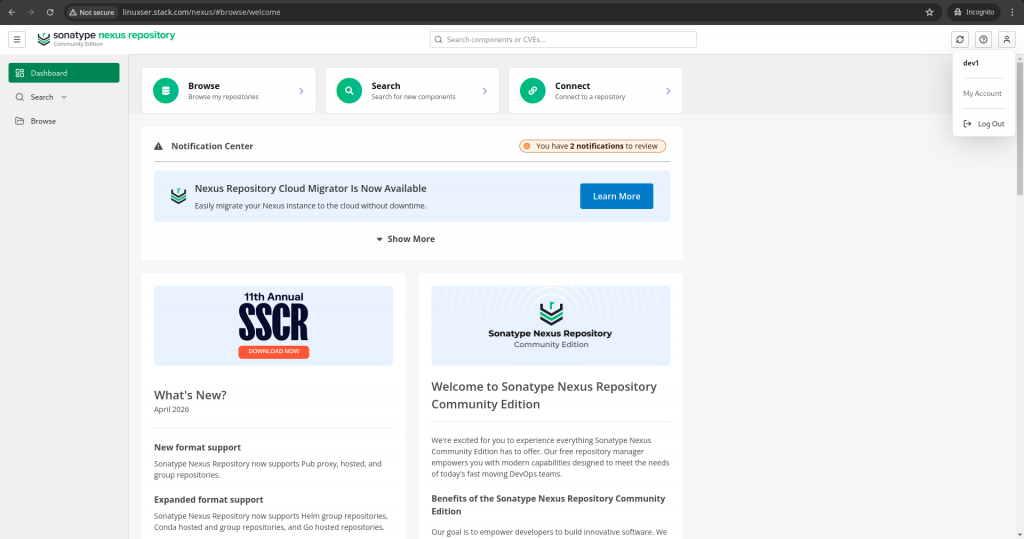
URL: http://linuxser.stack.com/nexus/#browse/welcome
It will pop up a basic authentication page wherein you can login with the “dev1” user credentials which you configured on the apache http server side and see if you able to login and get the anonymous access page.
Hope you enjoyed reading this article. Thank you..

Related Posts