How to setup Keycloak OIDC based authentication and authorization in Apache

Here in this article we will try to setup Keycloak OIDC based authentication and authorization to restrict access to website content.
Test Environment
- Fedora Server 41
- Apache httpd v2.4.63
- Keycloak 26.1.4
Apache mod_auth_openidc module
mod_auth_openidc is an OpenID Certified™ authentication and authorization module for the Apache 2.x HTTP server that implements the OpenID Connect 1.x and FAPI 2.x Relying Party functionality.
This module enables an Apache 2.x web server to operate as an OpenID Connect Relying Party (RP) towards an OpenID Connect Provider (OP). It relays end user authentication to a Provider and receives user identity information from that Provider. It then passes on that identity information (a.k.a. claims) to applications protected by the Apache web server and establishes an authentication session for the identified user. For more details please read mod_auth_openidc documentation.
This is a continuation to our previous article “How to Setup File-Based Authentication and Authorization in Apache” wherein we have seen how we can secure Named Based Virtual Host website content using Filestore based authentication provider.
We are now going to disable Filestore based authentication provider and replace it with Keycloak OpenID connect based authentication provider to secure our customers website content.
High Level Architecture
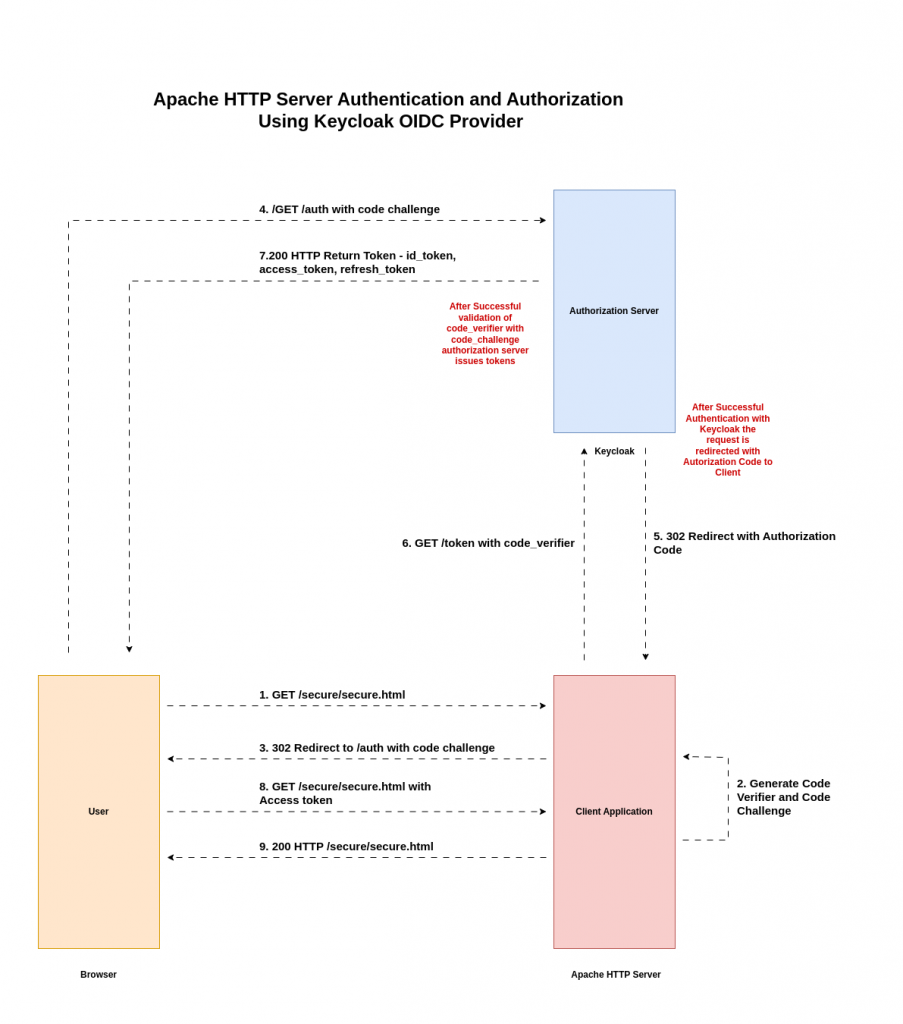
Correction: In the above architecture, the Access token is not sent to User but is referenced by the Client Application to add it as a header in the Apache HTTP request and serve the response to end user.
If you are interested in watching the video. Here is the YouTube video on the same step by step procedure outlined below.
Procedure
Step1: Ensure mod_auth_openidc module installed
Here we are going to update our role “linux_install_prerequisite” to install pre-requisite packages for setting up OIDC based authentication and authorization in Apache HTTP server.
admin@fedser:ahs$ cat roles/linux_install_prerequisite/tasks/main.yml
---
- name: ensure pre-requisite packages installed
  dnf:
    name: "{{ item }}"
    state: present
  with_items:
#    - mod_ldap
    - mod_auth_openidc
On the remote Apache HTTP server it is going to install the modules at the following location as shown below.
admin@linuxser:~$ rpm -ql mod_auth_openidc-2.4.15.7-2.fc41.x86_64
/etc/httpd/conf.d/auth_openidc.conf
/etc/httpd/conf.modules.d/10-auth_openidc.conf
/usr/lib/.build-id
/usr/lib/.build-id/03
/usr/lib/.build-id/03/a0d481d939f12ea3b63babcbf73dfa031d109b
/usr/lib64/httpd/modules/mod_auth_openidc.so
/usr/share/doc/mod_auth_openidc
/usr/share/doc/mod_auth_openidc/AUTHORS
/usr/share/doc/mod_auth_openidc/ChangeLog
/usr/share/doc/mod_auth_openidc/README.md
/usr/share/licenses/mod_auth_openidc
/usr/share/licenses/mod_auth_openidc/LICENSE.txt
/var/cache/httpd/mod_auth_openidc
/var/cache/httpd/mod_auth_openidc/cache
/var/cache/httpd/mod_auth_openidc/metadata
Step2: Ensure Keycloak service running
Here we are going to setup the Keycloak service using docker-compose.yml file as shown below.
admin@fedser:keycloak$ cat docker-compose.yml
version: '3.8'
services:

  keycloak:
    image: quay.io/keycloak/keycloak:26.1.4
    command: start-dev
    environment:
      KC_BOOTSTRAP_ADMIN_USERNAME: admin
      KC_BOOTSTRAP_ADMIN_PASSWORD: admin
    ports:
      - "8080:8080"
      - "8443:8443"
Now let’s startup our Keycloak service using the below command. Ensure that you have docker service installed and running before starting the Keycloak service.
admin@fedser:keycloak$ docker-compose up -d
Once the Keycloak services is running we can validate it by launching the Keycloak Admin Console.
URL: http://fedser.stack.com:8080/
Step3: Configure keycloak
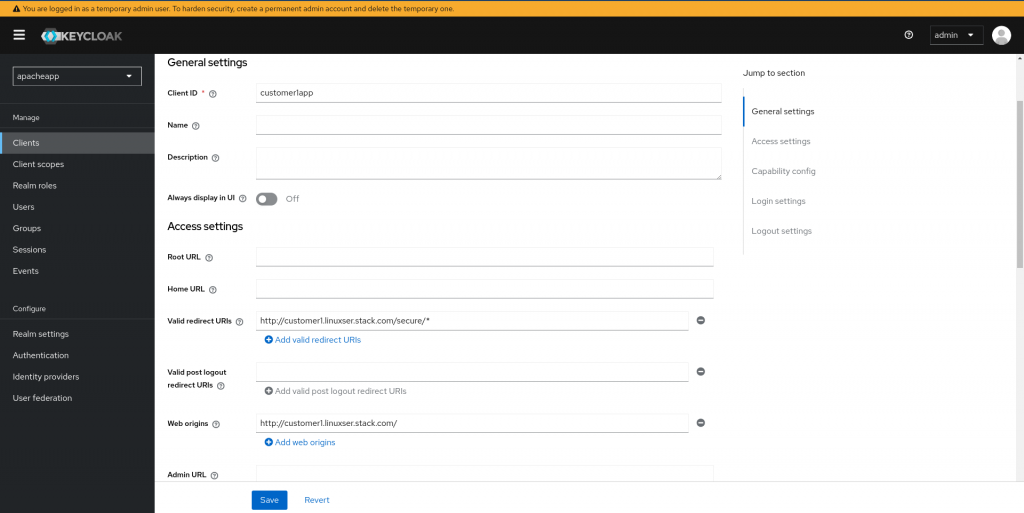
In this step we are going to create a new realm named “apacheapp” which will be used to register new clients who want to use Keycloak OpenID connect as authentication and authorization service provider.
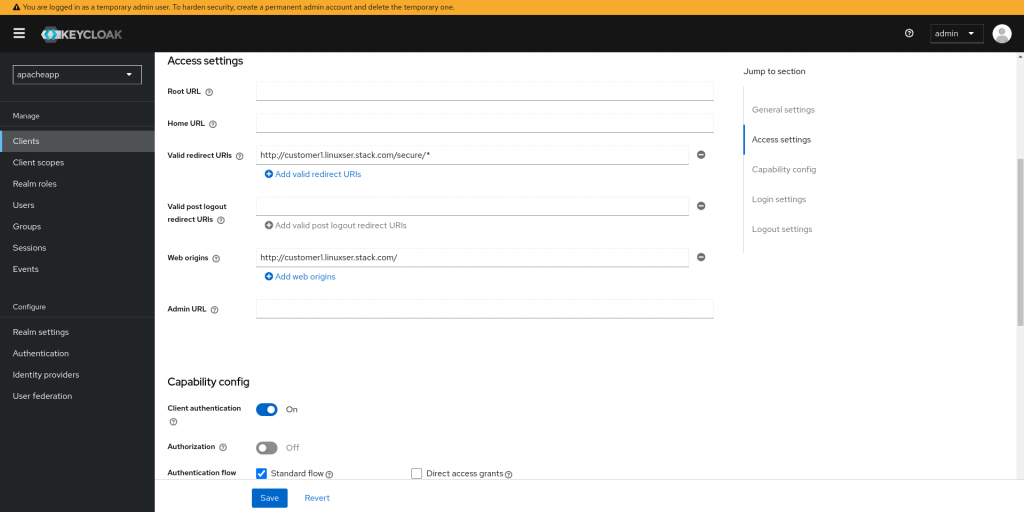
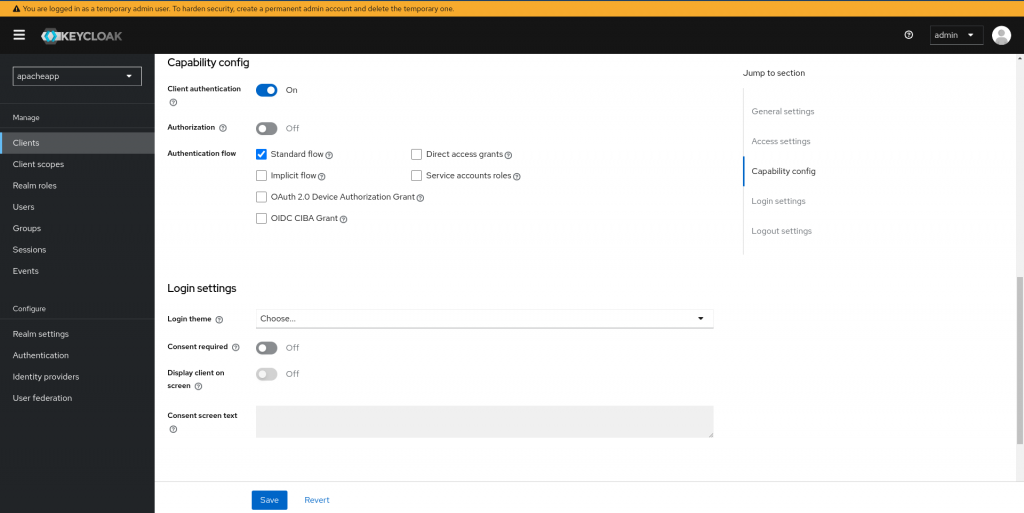
Once the new realm named “apacheapp” we can now register a new client named “customer1app” with the configuration as shown below. When we set the “Client authentication” to “On” we will be able to get the client secret from the “Credentials” tab which we will need later for Keycloak Open ID connect configuration on Apache HTTP server.
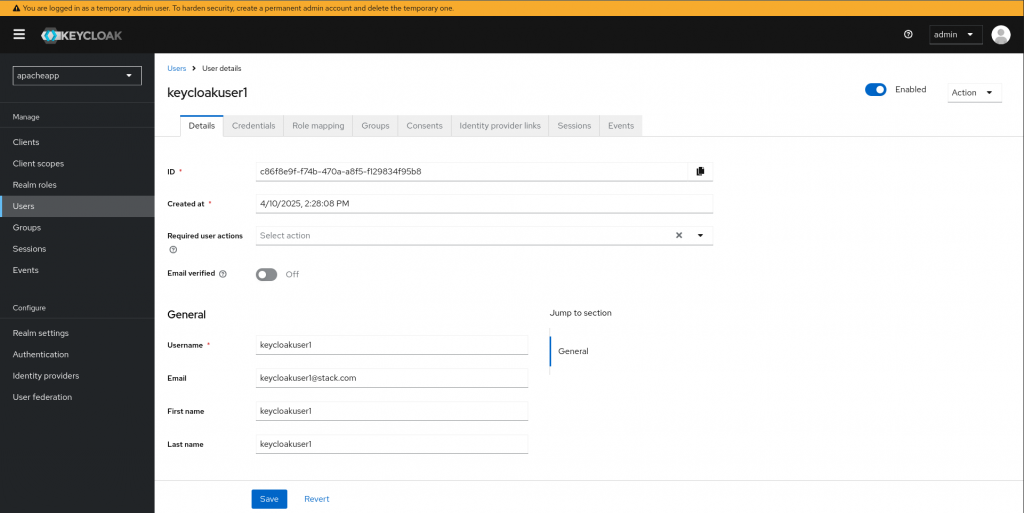
Now we can create a new user named “keycloakuser1” with a default password “keycloakpassword1” in the realm “apacheapp” which we will be using to validate the credentails entered while authenticating to keycloak authentication provider.
Similarly you can create a new client named “customer2app” with a new user named “keycloakuser2” as above.
Here is the summary of the details from keycloak configuration for customer1 and customer2 respectively.
Customer1 keycloak configuration
- realm: apacheapp
- username: keycloakuser1
- password: keycloakpassword1
- client: customer1app
- secret: n7n3VAE3CglO44y0fY6XuVhJdd7XW0vu
- redirect_uri: http://customer1.linuxser.stack.com/secure/*
- web origin: http://customer1.linuxser.stack.com/
Customer2 keycloak configuration
- realm: apacheapp
- username: keycloakuser2
- password: keycloakpassword2
- client: customer2app
- secret: I76vm6W1nFiyrIZWzJr9OpfHzJNc8Y9A
- redirect_uri: http://customer2.linuxser.stack.com/secure/*
- web origin: http://customer2.linuxser.stack.com/
Step4: Update Virtual Host configuration
Here we are going to update our configuration for “customer1.conf” and “customer2.conf” to enable Keycloak OIDC based authentication and authorization only.
admin@fedser:ahs$ cat roles/linux_configure_httpd/files/customer1.conf
<VirtualHost 192.168.122.238:80>

    ServerName customer1.linuxser.stack.com
    DocumentRoot "/var/opt/data/customer1"

    <Directory /var/opt/data/customer1>
        AllowOverride None
        Require all granted
    </Directory>

# Secure Application Context using Keycloak OIDC Authn and AuthZ
     OIDCRedirectURI http://customer1.linuxser.stack.com/secure/*
     OIDCCryptoPassphrase admin@1234
     OIDCProviderMetadataURL http://fedser.stack.com:8080/realms/apacheapp/.well-known/openid-configuration
     OIDCClientID customer1app
     OIDCClientSecret n7n3VAE3CglO44y0fY6XuVhJdd7XW0vu
     <Location /secure>
         AuthType openid-connect
         #Require valid-user
         Require claim given_name:keycloakuser1

</VirtualHost>
admin@fedser:ahs$ cat roles/linux_configure_httpd/files/customer2.conf
<VirtualHost 192.168.122.238:80>

    ServerName customer2.linuxser.stack.com
    DocumentRoot "/var/opt/data/customer2"

    <Directory /var/opt/data/customer2>
        AllowOverride None
        Require all granted
    </Directory>

# Secure Application Context using Keycloak OIDC Authn and AuthZ
     OIDCRedirectURI http://customer2.linuxser.stack.com/secure/*
     OIDCCryptoPassphrase admin@1234
     OIDCProviderMetadataURL http://fedser.stack.com:8080/realms/apacheapp/.well-known/openid-configuration
     OIDCClientID customer2app
     OIDCClientSecret I76vm6W1nFiyrIZWzJr9OpfHzJNc8Y9A
     <Location /secure>
         AuthType openid-connect
         #Require valid-user
         Require claim given_name:keycloakuser2
     </Location>

</VirtualHost>
For debugging the Keycloak authentication and authorization workflow we will enable debug logging for our Apache HTTP server as shown below.
admin@fedser:ahs$ cat roles/linux_configure_httpd/templates/httpd.conf.j2 | grep -i loglevel
# LogLevel: Control the number of messages logged to the error_log.
LogLevel debug
Step5: Execute linux_configure_httpd
Let’s now upload our updated configuration files customer1.conf and customer2.conf to remote Apache HTTP server by executing the role “linux_configure_httpd”.
admin@fedser:ahs$ ansible-playbook linux_setup_httpd.yml -i inventory/hosts --tags "linux_configure_httpd" -v
Step6: Restart Apache httpd service
Once the configuration is updated onto remote Apache HTTP server, let’s restart the httpd service as shown below.
admin@fedser:ahs$ ansible-playbook linux_setup_httpd.yml -i inventory/hosts --tags "linux_stop_httpd" -v
admin@fedser:ahs$ ansible-playbook linux_setup_httpd.yml -i inventory/hosts --tags "linux_start_httpd" -v
Step7: Validate Keycloak OIDC secured application
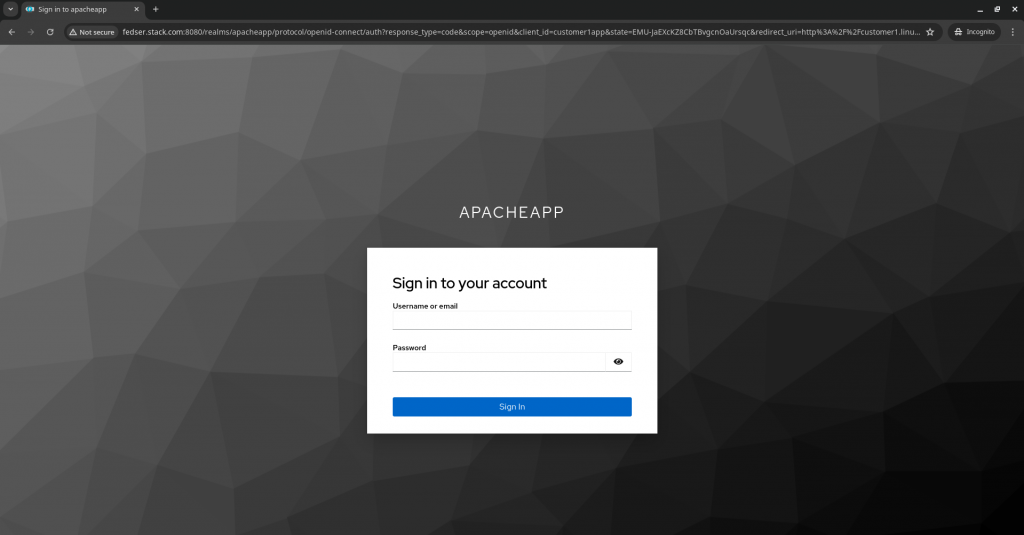
Let us now try to access our secure page for customer1 using the below url.
URL: http://customer1.linuxser.stack.com/secure/secure.html
If the recieved request is not authenticated, it will be redirected to the Keycloak Authentication endpoint as shown below.
Once you provide the credentials for the “keycloakuser1”, the authentication and authorization process is triggered in Keycloak OIDC provider and Apache HTTP server client. If that is successful you should be able to access the “secure.html” page as shown below.

In similar way you can try to access the “customer2” secure content using the user “keycloakuser2” using the below url.
URL: http://customer2.linuxser.stack.com/secure/secure.html
Hope you enjoyed reading this article. Thank you..
Leave a Reply
You must be logged in to post a comment.