How to Setup File-Based Authentication and Authorization in Apache

Here in this article we will try to setup File based Authentication and Authorization to restrict access to website content.
Test Environment
- Fedora Server 41
- Fedora Workstation
Authentication and Authorization
Authentication verifies a user’s identity, while authorization determines what access or permissions that user has within a system. Authentication is the first step, and authorization follows to control access to resources.
In Apache HTTP server there are three types of modules involved in this authentication and authorization process. Here are the details.
- Authentication type: It is a method through which the user credentials are collected. Apache HTTP Server supports several authentication types, including Basic, Digest, Form, and external methods like LDAP and Kerberos, each with varying security and implementation complexities.
- Authentication provider: In the context of Apache HTTP Server, authentication providers are modules that handle verifying user identities, allowing access to protected resources based on credentials like usernames and passwords.
- Authorization: In the context of Apache, authorization refers to the process of verifying a user’s permissions to access specific resources or perform actions after they have been authenticated. It determines “who has access to what”.
The following modules “mod_authn_core” and “mod_authz_core” should either been built into the httpd binary or loaded by the httpd.conf configuration file. These modules provide core directives and functionality that are critical to the configuration and use of authentication and authorization in the web server.
NOTE: For any business data that is critical and needs to be secured, consider securing the communication channel using mod_ssl along with authentication and authorization control.
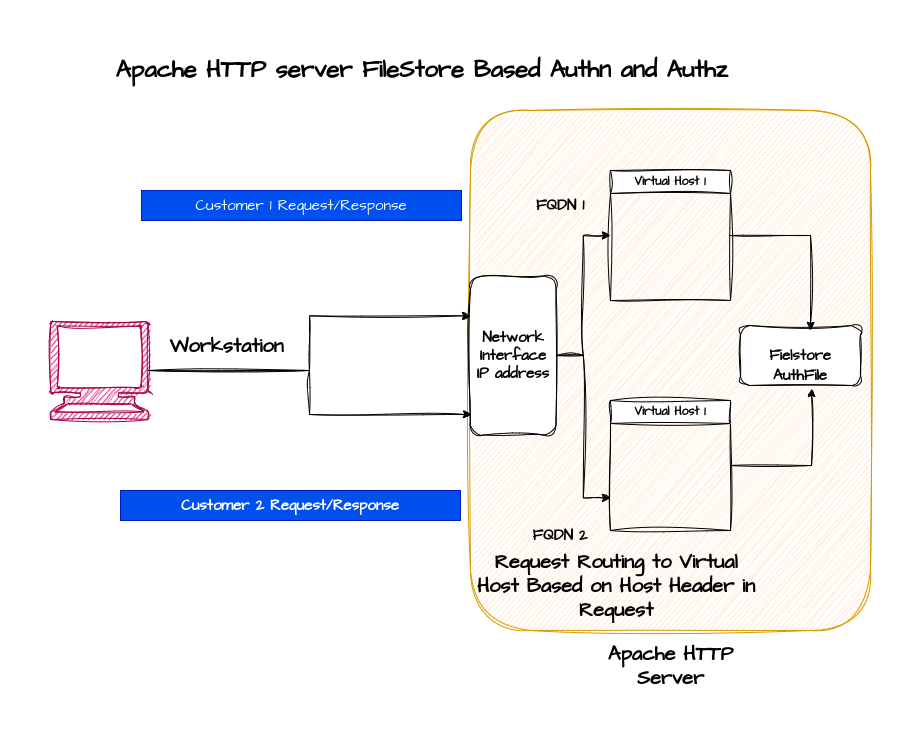
High Level Architecture
If you are interested in watching the video. Here is the YouTube video on the same step by step procedure outlined below.
Procedure
This article is a continuation to our previous article “How to setup Named Based Virtual Hosting in Apache HTTP server” wherein we have seen how we can setup Name Based Virtual Hosting for two different customers.
Step1: Create linux_create_users role
htpasswd is a utility used to create and manage flat files that store usernames and passwords for basic HTTP authentication. In this step we will create two sets of users for each customer (ie. customer1 and customer2) using the htpasswd utility and store them in separate “passfile” for each customer.
Here is the template script that we will copy to the remote Apache HTTP server and execute it to create the users.
admin@fedser:ahs$ cat roles/linux_create_users/templates/create_user.sh.j2
#!/bin/bash

customer=$1
echo "$customer"

# Create user with htpasswd
if [[ "$customer" == "customer1" ]]; then
    htpasswd -cb {{ ahs_customer1_passdir }}/passfile user1 password1
    htpasswd -b {{ ahs_customer1_passdir }}/passfile user2 password2
elif [[ "$customer" == "customer2" ]]; then
    htpasswd -cb {{ ahs_customer2_passdir }}/passfile user1 password1
    htpasswd -b {{ ahs_customer2_passdir }}/passfile user2 password2
else
    echo "Invalid Customer"
fi
Update the host_vars variables to include the directory “ahs_customer1_passdir” and “ahs_customer2_passdir” that will be used to store the files with credentails as shown below.
admin@fedser:ahs$ cat inventory/host_vars/linuxser.stack.com.yml
---
ahs_version: "2.4.63"
ahs_http_port: 80
ahs_https_port: 443
ahs_config_root: "/etc/httpd"

# customer1 configuration
ahs_customer1_config_directory: "/var/opt/config/customer1"
ahs_customer1_data_directory: "/var/opt/data/customer1"
ahs_customer1_passdir: "/var/opt/passwd/customer1"

# customer2 configuration
ahs_customer2_config_directory: "/var/opt/config/customer2"
ahs_customer2_data_directory: "/var/opt/data/customer2"
ahs_customer2_passdir: "/var/opt/passwd/customer2"
Create “tasks/main.yml” file to upload and execute the script as shown below.
admin@fedser:ahs$ cat roles/linux_create_users/tasks/main.yml
---
- name: copy script
  template:
    src: "create_user.sh.j2"
    dest: "/tmp/create_user.sh"
    mode: 0755

- name: ensure customers passwd directory exists
  file:
    path: "{{ item }}"
    state: directory
    owner: "root"
    group: "root"
    mode: '0755'
    recurse: yes
  with_items:
    - "{{ ahs_customer1_passdir }}"
    - "{{ ahs_customer2_passdir }}"

- name: execute script
  shell: "/tmp/create_user.sh {{ customer }}"
We can now try to execute the role “linux_create_users” to create our user credentials filestore for each customer as shown below.
admin@fedser:ahs$ ansible-playbook linux_setup_httpd.yml -i inventory/hosts --tags "linux_create_users" --extra-vars "customer=customer1" -v
admin@fedser:ahs$ ansible-playbook linux_setup_httpd.yml -i inventory/hosts --tags "linux_create_users" --extra-vars "customer=customer2" -v
Here is the updated linux_setup_httpd.yml playbook.
admin@fedser:ahs$ cat linux_setup_httpd.yml
---
- hosts: "ahs"
  serial: 1
  become: true
  become_user: root
  roles:
  - { role: "linux_ping", tags: "linux_ping" }
  - { role: "linux_install_httpd", tags: "linux_install_httpd" }
  - { role: "linux_configure_httpd", tags: "linux_configure_httpd" }
  - { role: "linux_expose_httpd", tags: "linux_expose_httpd" }
  - { role: "linux_stop_httpd", tags: "linux_stop_httpd" }
  - { role: "linux_start_httpd", tags: "linux_start_httpd" }
  - { role: "linux_staticdeploy_httpd", tags: "linux_staticdeploy_httpd" }
  - { role: "linux_create_users", tags: "linux_create_users" }
Also here is the updated README.md file with instructions for the new roles.
admin@fedser:ahs$ cat README.md
# Instructions for execution

ansible-playbook linux_setup_httpd.yml -i inventory/hosts --tags "linux_ping" -v
ansible-playbook linux_setup_httpd.yml -i inventory/hosts --tags "linux_install_httpd" -v
ansible-playbook linux_setup_httpd.yml -i inventory/hosts --tags "linux_configure_httpd" -v
ansible-playbook linux_setup_httpd.yml -i inventory/hosts --tags "linux_expose_httpd" -v
ansible-playbook linux_setup_httpd.yml -i inventory/hosts --tags "linux_stop_httpd" -v
ansible-playbook linux_setup_httpd.yml -i inventory/hosts --tags "linux_start_httpd" -v
ansible-playbook linux_setup_httpd.yml -i inventory/hosts --tags "linux_staticdeploy_httpd" -v
ansible-playbook linux_setup_httpd.yml -i inventory/hosts --tags "linux_create_users" --extra-vars "customer=customer1" -v
ansible-playbook linux_setup_httpd.yml -i inventory/hosts --tags "linux_create_users" --extra-vars "customer=customer2" -v
Step2: Create a secure content store
Here we are going to update our static content store for each customer to include a secure folder with a secure.html file for which we want to restrict access using authentication and authorization.
admin@fedser:data$ tree .
.
├── customer1
│   ├── index.html
│   └── secure
│       └── secure.html
└── customer2
    ├── index.html
    └── secure
        └── secure.html

5 directories, 4 files
admin@fedser:~$ cat /var/opt/data/customer1/secure/secure.html
Hello Customer1. This is your secure page

admin@fedser:~$ cat /var/opt/data/customer2/secure/secure.html
Hello Customer2. This is your secure page
Step3: Update Virtual Host Configuration to secure access
Here we will update our customer1.conf and customer2.conf Virtual Host configuration to secure access to “/var/opt/data/customer1/secure” directory using basic authentication. The credentails for the basic authentication would be validated against the passfile reference in “AuthUserFile” directive for each customer.
The AuthName directive sets this realm. The term “Realm” in this context refers to a protection space. It is a string that acts as an identifier for a set of resources that are protected by the same authentication credentials.
The realm helps browsers manage credentials. If a user has authenticated for a particular realm, the browser can keep track of this and may not ask for the credentials again for resources within the same realm.
The Require directive provides the authorization part of the process by setting the user that is allowed to access this region of the server. This configuration allows access to only single user. But we can use “AuthGroupFile” to provide access to the secure directory to all the users who are part of that group. Read AuthGroupFile directive for more details.
admin@fedser:ahs$ cat roles/linux_configure_httpd/files/customer1.conf
<VirtualHost 192.168.122.238:80>

    ServerName customer1.linuxser.stack.com
    DocumentRoot "/var/opt/data/customer1"

    <Directory /var/opt/data/customer1>
        AllowOverride None
        Require all granted
    </Directory>

    <Directory /var/opt/data/customer1/secure>
        AuthType Basic
        AuthName "Restricted Files"
        # (Following line optional)
        AuthBasicProvider file
        AuthUserFile "/var/opt/passwd/customer1/passfile"
        Require user user1
    </Directory>

</VirtualHost>
admin@fedser:ahs$ cat roles/linux_configure_httpd/files/customer2.conf
<VirtualHost 192.168.122.238:80>

    ServerName customer2.linuxser.stack.com
    DocumentRoot "/var/opt/data/customer2"

    <Directory /var/opt/data/customer2>
        AllowOverride None
        Require all granted
    </Directory>

    <Directory /var/opt/data/customer2/secure>
        AuthType Basic
        AuthName "Restricted Files"
        # (Following line optional)
        AuthBasicProvider file
        AuthUserFile "/var/opt/passwd/customer2/passfile"
        Require user user2
    </Directory>

</VirtualHost>
Step4: Execute linux_configure_httpd role
Now that our configuration is updated, let us execute our role “linux_configure_httpd” upload our updated configuration to remote Apache HTTP server.
admin@fedser:ahs$ ansible-playbook linux_setup_httpd.yml -i inventory/hosts --tags "linux_configure_httpd" -v
Step5: Execute linux_staticdeploy_httpd role
Let us now update the secure content for each customer from our workstation to remote Apache HTTP server using the “linux_staticdeploy_httpd” role as shown below.
admin@fedser:ahs$ ansible-playbook linux_setup_httpd.yml -i inventory/hosts --tags "linux_staticdeploy_httpd" -v
Step6: Restart Apache HTTP server
For the changes to take effect, restart the httpd service using the below roles.
admin@fedser:ahs$ ansible-playbook linux_setup_httpd.yml -i inventory/hosts --tags "linux_stop_httpd" -v
admin@fedser:ahs$ ansible-playbook linux_setup_httpd.yml -i inventory/hosts --tags "linux_start_httpd" -v
Step7: Validate Secure Content access
Here for the customer1 secure.html access only user1 is authorized to access. For user2 you will get “401 Unauthorized” even though the authentication is successful.
admin@fedser:ahs$ curl -u "user1:password1" http://customer1.linuxser.stack.com/secure/secure.html
Hello Customer1. This is your secure page

admin@fedser:ahs$ curl -I -u "user2:password2" http://customer1.linuxser.stack.com/secure/secure.html
HTTP/1.1 401 Unauthorized
For the customer2 secure.html access only user2 is authorized to access. For user1 you will get “401 Unauthorized” even though the authentication is successful.
admin@fedser:ahs$ curl -I -u "user1:password1" http://customer2.linuxser.stack.com/secure/secure.html
HTTP/1.1 401 Unauthorized

admin@fedser:ahs$ curl -u "user2:password2" http://customer2.linuxser.stack.com/secure/secure.html
Hello Customer2. This is your secure page
Basic authentication using the File store is not suitable for large files with credentials as it slows down the authentication process as it has to do it on every page load.
Hope you enjoyed reading this article. Thank you..
Leave a Reply
You must be logged in to post a comment.