How to build a fault tolerant and HA cluster using NAT servers

Here in this article we will try to build a cluster of NAT servers providing fault tolerance and high availability feature.
Test Environment
- Fedora 41 server
NATS Service Infrastructure
NATS messaging platform is a client-server architecture wherein NATS client applications leveraging NATS client libraries connect to NATS servers. NATS it is extremely flexible and scalable and allows the service infrastructure to be as small as a single process running locally on your local machine and as large as an ‘Internet of NATS’ of Leaf Nodes, and Leaf Node clusters all interconnected in a secure way over a global shared NATS super-cluster.
NATS services infrastructure can be built by deploying clusters of NATS servers in multiple locations and multiple cloud providers and VPCs.
The only configuration needed by the client applications is the location (NATS URLs) of one or more NATS servers and depending on the required security, their credentials.
NATS Server Clustering
NATS supports running each server in clustered mode. The servers that form a cluster establish connection with each other through gossip protocol.
A gossip protocol, also known as an epidemic or rumor protocol, is a communication mechanism used in distributed systems where nodes exchange information with each other in a decentralized manner, similar to how gossip spreads in social networks.
Each nats-server instance will only forward messages that it has received from a client to the immediately adjacent nats-server instances to which it has routes. Messages received from a route will only be distributed to local clients. For the NATS servers to form a full mesh each server should be able to communicate with other server and also each client should be able to connect to each server in the cluster.
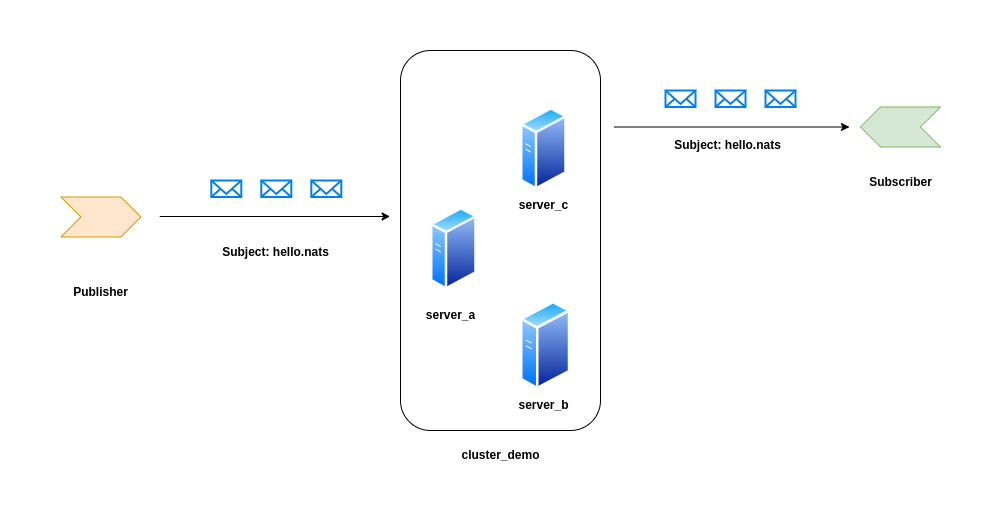
High Level Architecture
Here in this demo will try to setup a cluster of three servers to form a NATS service infrastructure and try to connect pub/sub clients to this cluster members and demonstrate the fault tolerance, high availability, scalability features.
If you are interested in watching the video. Here is the YouTube video on the same step by step procedure outlined below.
Procedure
Step1: Create a Seed Server A
A standalone NATS server listens on port 4222 for client connection. For a NATS server to be a part of cluster, it also need to listen on cluster url.
So here we will launch our first memeber of NATS cluster which is also known as seed server.
Instead of passing the parameters through NATS CLI we will leverage NATS configuration file to pass our server configuration as shown below.
In this configuration file we have created an user named “admin” and added it to the “$SYS” account which is an administrative user. Any client that connect to the server using this administrative user will be able to do administrative tasks on the server.
Also as you can see we enabled the server to listen for client connections on port “4222” and for the cluster to listen on port “4248”. As we are working on a local setup we will be just updating the ports for the client connection and cluster url to be unique so they do not conflict.
Here is the configuration file details.
admin@linuxser:~/nats_cluster$ cat server_a.conf
#General settings
host: 0.0.0.0
port: 4222
server_name: server_a

# List of accounts and user within accounts
# User may have an authorization and authentication section
accounts: {
  $SYS: {
    users: [
    	{ user: admin, password: admin }
    ]
  }
}

cluster: {
  name: cluster_demo
  host: 127.0.0.1
  port: 4248
}
Once’s the configuration is ready we can launch our server by passing the config file as shown below.
admin@linuxser:~/nats_cluster$ nats-server -c server_a.conf
[2087] 2025/07/27 00:27:50.377555 [INF] Starting nats-server
[2087] 2025/07/27 00:27:50.377695 [INF]   Version:  2.10.20
[2087] 2025/07/27 00:27:50.377701 [INF]   Git:      [7140387]
[2087] 2025/07/27 00:27:50.377704 [INF]   Cluster:  cluster_demo
[2087] 2025/07/27 00:27:50.377707 [INF]   Name:     server_a
[2087] 2025/07/27 00:27:50.377711 [INF]   ID:       NC2VC5HWOXY3HTLQM2IZGO6KQ7PMHBBPNRA5FJL2ZSEMLKNTX6VGVFFI
[2087] 2025/07/27 00:27:50.377715 [WRN] Plaintext passwords detected, use nkeys or bcrypt
[2087] 2025/07/27 00:27:50.377724 [INF] Using configuration file: server_a.conf
[2087] 2025/07/27 00:27:50.378485 [INF] Listening for client connections on 0.0.0.0:4222
[2087] 2025/07/27 00:27:50.378655 [INF] Server is ready
[2087] 2025/07/27 00:27:50.378768 [INF] Cluster name is cluster_demo
[2087] 2025/07/27 00:27:50.378853 [INF] Listening for route connections on 127.0.0.1:4248
Step2: Create a Cluster Member Server B
Here we will do the same activity as in Step1 to launch our next server (ie. server_b) with its update config file as shown below.
admin@linuxser:~/nats_cluster$ cat server_b.conf
#General settings
host: 0.0.0.0
port: 4223
server_name: server_b

# List of accounts and user within accounts
# User may have an authorization and authentication section
accounts: {
  $SYS: {
    users: [
    	{ user: admin, password: admin }
    ]
  }
}

cluster: {
  name: cluster_demo
  host: 127.0.0.1
  port: 5248
  routes = [
    nats://127.0.0.1:4248
  ]
}
admin@linuxser:~/nats_cluster$ nats-server -c server_b.conf
[2121] 2025/07/27 00:28:26.850790 [INF] Starting nats-server
[2121] 2025/07/27 00:28:26.850952 [INF]   Version:  2.10.20
[2121] 2025/07/27 00:28:26.850963 [INF]   Git:      [7140387]
[2121] 2025/07/27 00:28:26.850984 [INF]   Cluster:  cluster_demo
[2121] 2025/07/27 00:28:26.850993 [INF]   Name:     server_b
[2121] 2025/07/27 00:28:26.851001 [INF]   ID:       NDSX5A2IBMYZWPU4WHYQKWTOCSVSQLEFE7UEQJQGOVKSRDHNL6LGXNGS
[2121] 2025/07/27 00:28:26.851015 [WRN] Plaintext passwords detected, use nkeys or bcrypt
[2121] 2025/07/27 00:28:26.851036 [INF] Using configuration file: server_b.conf
[2121] 2025/07/27 00:28:26.851921 [INF] Listening for client connections on 0.0.0.0:4223
[2121] 2025/07/27 00:28:26.852207 [INF] Server is ready
[2121] 2025/07/27 00:28:26.852330 [INF] Cluster name is cluster_demo
[2121] 2025/07/27 00:28:26.852465 [INF] Listening for route connections on 127.0.0.1:5248
[2121] 2025/07/27 00:28:26.853085 [INF] 127.0.0.1:4248 - rid:5 - Route connection created
[2121] 2025/07/27 00:28:26.853122 [INF] 127.0.0.1:4248 - rid:6 - Route connection created
[2121] 2025/07/27 00:28:26.874706 [INF] 127.0.0.1:4248 - rid:7 - Route connection created
[2121] 2025/07/27 00:28:26.907798 [INF] 127.0.0.1:4248 - rid:8 - Route connection created
Step3: Create a Cluster Member Server C
Same as Step2, let’s create one more cluster member by providing updated config file.
admin@linuxser:~/nats_cluster$ cat server_c.conf
#General settings
host: 0.0.0.0
port: 4224
server_name: server_c

# List of accounts and user within accounts
# User may have an authorization and authentication section
accounts: {
  $SYS: {
    users: [
    	{ user: admin, password: admin }
    ]
  }
}

cluster: {
  name: cluster_demo
  host: 127.0.0.1
  port: 6248
  routes = [
    nats://127.0.0.1:4248
  ]
}
admin@linuxser:~/nats_cluster$ nats-server -c server_c.conf
[2170] 2025/07/27 00:29:24.714283 [INF] Starting nats-server
[2170] 2025/07/27 00:29:24.714412 [INF]   Version:  2.10.20
[2170] 2025/07/27 00:29:24.714418 [INF]   Git:      [7140387]
[2170] 2025/07/27 00:29:24.714420 [INF]   Cluster:  cluster_demo
[2170] 2025/07/27 00:29:24.714423 [INF]   Name:     server_c
[2170] 2025/07/27 00:29:24.714425 [INF]   ID:       NBLQR5KP5YYEEVSMPNSHVCQJSYWFMXUMPIM643FRZDBFDX3JOTCEYBRK
[2170] 2025/07/27 00:29:24.714428 [WRN] Plaintext passwords detected, use nkeys or bcrypt
[2170] 2025/07/27 00:29:24.714439 [INF] Using configuration file: server_c.conf
[2170] 2025/07/27 00:29:24.715283 [INF] Listening for client connections on 0.0.0.0:4224
[2170] 2025/07/27 00:29:24.715751 [INF] Server is ready
[2170] 2025/07/27 00:29:24.715910 [INF] Cluster name is cluster_demo
[2170] 2025/07/27 00:29:24.716071 [INF] Listening for route connections on 127.0.0.1:6248
[2170] 2025/07/27 00:29:24.716835 [INF] 127.0.0.1:4248 - rid:5 - Route connection created
[2170] 2025/07/27 00:29:24.716897 [INF] 127.0.0.1:4248 - rid:6 - Route connection created
[2170] 2025/07/27 00:29:24.718109 [INF] 127.0.0.1:57374 - rid:7 - Route connection created
[2170] 2025/07/27 00:29:24.718302 [INF] 127.0.0.1:57382 - rid:8 - Route connection created
[2170] 2025/07/27 00:29:24.777650 [INF] 127.0.0.1:4248 - rid:9 - Route connection created
[2170] 2025/07/27 00:29:24.781576 [INF] 127.0.0.1:57398 - rid:10 - Route connection created
[2170] 2025/07/27 00:29:24.849170 [INF] 127.0.0.1:57408 - rid:11 - Route connection created
[2170] 2025/07/27 00:29:24.863345 [INF] 127.0.0.1:4248 - rid:12 - Route connection created
Step5: Testing Cluster
Here let’s try to connect our subscriber to one cluster memeber (eg. server_b) and listen for published messages.
admin@linuxser:~$ nats sub --server "nats://127.0.0.1:4223" hello.nats
Now let’s launch a publisher which connects to all the three cluster members and tries to publish the messages.
admin@linuxser:~$ nats pub --server "nats://127.0.0.1:4222" hello.nats "Hello from Server A"
admin@linuxser:~$ nats pub --server "nats://127.0.0.1:4223" hello.nats "Hello from Server B"
admin@linuxser:~$ nats pub --server "nats://127.0.0.1:4224" hello.nats "Hello from Server C"
If you look at the subscriber client console you will all the three message being delivered to the client from different NATS servers in the cluster.
10:32:45 Subscribing on hello.nats
[#1] Received on "hello.nats"
Hello from Server A


[#2] Received on "hello.nats"
Hello from Server B


[#3] Received on "hello.nats"
Hello from Server C
Now let’s try to publish message from NATS client by pointing it to all the NATS server url in the cluster as shown below.
admin@linuxser:~$ nats pub --server "nats://127.0.0.1:4222, nats://127.0.0.1:4223, nats://127.0.0.1:4224" hello.nats "Hello from NATS cluster members"
This shows how NATS cluster efficiently manages the traffic by distributing it to all the cluster memebers.
Step6: Create and Switch to Client context
In our previous step we have validated our cluster members by manually pointing the NATS client with the server url. Here we will try to create a context to permanently configure the NATS server urls and enabling the context for client to use.
admin@linuxser:~/nats_cluster$ nats context save cluster_demo
admin@linuxser:~/nats_cluster$ nats context edit cluster_demo
NATS Configuration Context "cluster_demo"

  Description: cluster_demo
  Server URLs: nats://127.0.0.1:4222,nats://127.0.0.1:4223,nats://127.0.0.1:4224
     Username: admin
     Password: *****
         Path: /home/admin/.config/nats/context/cluster_demo.json
Switch to context cluster_demo.
admin@linuxser:~/nats_cluster$ nats context select cluster_demo
Step5: Validate Cluster Admin User
By default there is an implicit system account created on the server, but there are no users associated with it.
As we have enabled the client to connect with “admin” user who is part of $SYS account. This system account enables for operations and monitoring the server, cluster, or supercluster.
We can have NATS client applications use a PING/PONG protocol to check that there is a working connection to the NATS service as shown below with user part of system account.
admin@linuxser:~/nats_cluster$ nats server ping
server_b                                                     rtt=1.178652ms
server_a                                                     rtt=1.266724ms
server_c                                                     rtt=1.338859ms

---- ping statistics ----
3 replies max: 1.00 min: 1.00 avg: 1.00
admin@linuxser:~/nats_cluster$ nats server ls
╭────────────────────────────────────────────────────────────────────────────────────────────────────────────────────────────╮
│                                                       Server Overview                                                      │
├──────────┬──────────────┬──────┬─────────┬────┬───────┬──────┬────────┬─────┬────────┬───────┬───────┬──────┬────────┬─────┤
│ Name     │ Cluster      │ Host │ Version │ JS │ Conns │ Subs │ Routes │ GWs │ Mem    │ CPU % │ Cores │ Slow │ Uptime │ RTT │
├──────────┼──────────────┼──────┼─────────┼────┼───────┼──────┼────────┼─────┼────────┼───────┼───────┼──────┼────────┼─────┤
│ server_c │ cluster_demo │ 0    │ 2.10.20 │ no │ 1     │ 158  │      8 │   0 │ 14 MiB │ 0     │     8 │ 0    │ 2m36s  │ 1ms │
│ server_a │ cluster_demo │ 0    │ 2.10.20 │ no │ 0     │ 158  │      8 │   0 │ 13 MiB │ 0     │     8 │ 0    │ 4m10s  │ 1ms │
│ server_b │ cluster_demo │ 0    │ 2.10.20 │ no │ 0     │ 158  │      8 │   0 │ 14 MiB │ 0     │     8 │ 0    │ 3m34s  │ 1ms │
├──────────┼──────────────┼──────┼─────────┼────┼───────┼──────┼────────┼─────┼────────┼───────┼───────┼──────┼────────┼─────┤
│          │ 1            │ 3    │         │ 0  │ 1     │ 474  │        │     │ 41 MiB │       │       │ 0    │        │     │
╰──────────┴──────────────┴──────┴─────────┴────┴───────┴──────┴────────┴─────┴────────┴───────┴───────┴──────┴────────┴─────╯

╭─────────────────────────────────────────────────────────────────────────────────╮
│                                 Cluster Overview                                │
├──────────────┬────────────┬───────────────────┬───────────────────┬─────────────┤
│ Cluster      │ Node Count │ Outgoing Gateways │ Incoming Gateways │ Connections │
├──────────────┼────────────┼───────────────────┼───────────────────┼─────────────┤
│ cluster_demo │          3 │                 0 │                 0 │           1 │
├──────────────┼────────────┼───────────────────┼───────────────────┼─────────────┤
│              │          3 │                 0 │                 0 │           1 │
╰──────────────┴────────────┴───────────────────┴───────────────────┴─────────────╯
Step6: Simulate Pub/Sub messaging traffic
We will now use nats cli tool to simulate a pub/sub client environment with 10 subscribers created as shown below.
admin@linuxser:~/nats_cluster$ nats bench sub "hello.nats" --clients=10
00:33:09 Starting Core NATS subscribe benchmark [clients=10, msg-size=128 B, msgs=100,000, multi-subject=false, subject=hello]
Receiving    --- [--------------------------------------------------------------------------------------------------------]   0%
Receiving    --- [--------------------------------------------------------------------------------------------------------]   0%
Receiving    --- [--------------------------------------------------------------------------------------------------------]   0%
Receiving    --- [--------------------------------------------------------------------------------------------------------]   0%
Receiving    --- [--------------------------------------------------------------------------------------------------------]   0%
Receiving    --- [--------------------------------------------------------------------------------------------------------]   0%
Receiving    --- [--------------------------------------------------------------------------------------------------------]   0%
Receiving    --- [--------------------------------------------------------------------------------------------------------]   0%
Receiving    --- [--------------------------------------------------------------------------------------------------------]   0%
Receiving    --- [--------------------------------------------------------------------------------------------------------]   0%
Here we will try to publish messages onto subject “hello.nats” at an interval of 10ms indefinitely (ie. count=-1) until we stop.
admin@linuxser:~$ nats pub hello.nats "Hello from NATS server" --count=-1 --sleep=10ms
Now you can watch how the connections to NATS servers in the cluster are established by watching the “nats server ls” command as shown below.
admin@linuxser:~$ watch nats server ls --sort=name
You can even try to launch some more servers by creating a config file and try to see if they add to the cluster and also try to shutdown a server and see if the pub/sub messaging still works with the servers that are available in the cluster.
Hope you enjoyed reading this article. Thank you..
Leave a Reply
You must be logged in to post a comment.