How to setup Named Based Virtual Hosting in Apache HTTP server

Here in this article we will try to setup a very basic Named Based Virtual Hosting to host two different customer websites using ansible.
Test Environment
- Fedoora Server 41
- Fedora Workstation 39
Virtual Hosting
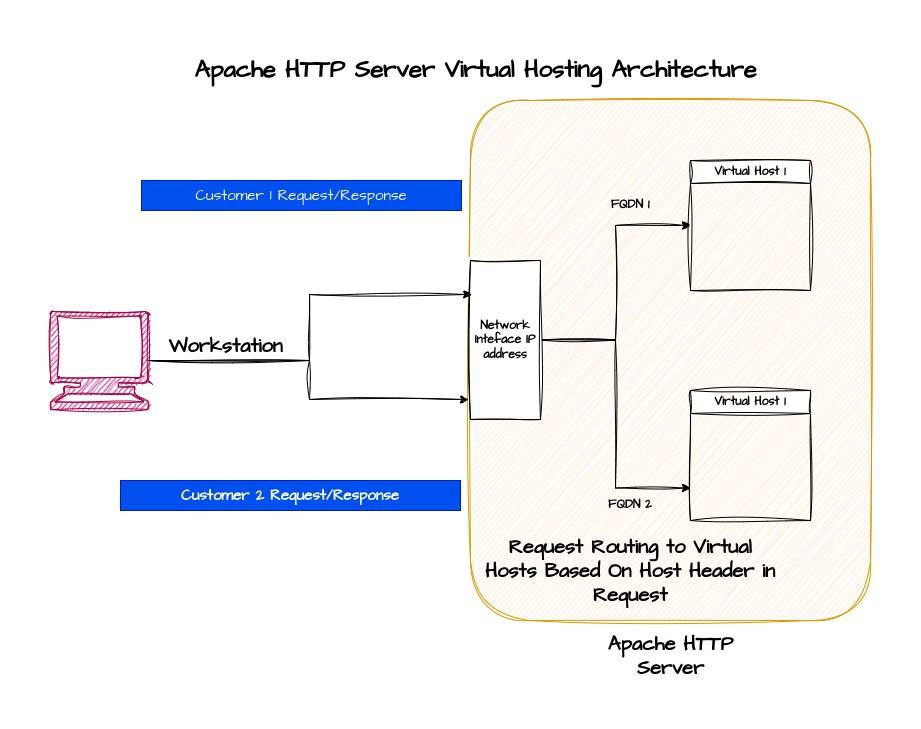
Virtual Hosting is a feature provided by Apache HTTP server that helps in running multiple website on a single machine. This feature can be enabled using the IP based or Name based Virtual Hosting. Irrespective of which method is used to enable this feature, for the end user it appears a single web server.
- IP Based Virtual Hosting: The routing of the request to the correct Virtual Host is decided based on the IP address that is present in the requested URL
- Named Based Virtual Hosting: The routing of the request to the correct Virtual Host is decided based on the Host header that is send by the client as a part of the request
Support for Host Header
With the advent of HTTP/1.1, introduced in 1997, support for the Host header became mandatory for compliant web browsers. This allowed servers to host multiple domains on a single IP address, making name-based virtual hosting feasible and efficient. Since then, virtually all modern web browsers and clients support the Host header, rendering the need for multiple IP addresses for different domains unnecessary for general-purpose web servers.
Also Modern web servers can efficiently handle multiple domains using name-based virtual hosting, which is more resource-efficient and scalable.
High Level Architecture for Named Based Virtual Hosting
If you are interested in watching the video. Here is the YouTube video on the same step by step procedure outlined below.
Procedure
Step1: Ensure Apache HTTP server installed
As a first step you need to ensure that you have Apache HTTP server installed and running with the default configuration. Follow How to setup Apache HTTP Server using Ansible for the same.
Optionally we can have the mod_info and mod_status modules enabled with restricted access for future reference in case we need to do any troubleshooting of Apache HTTP server. Follow [How to Activate and Configure Apache HTTP Server Modules for Status and Configuration for the same.
Step2: Create Virtual Host
Here we are going to create two Virtual Host sections for two different customers. We will be using name based Virtual Hosting methods to host two different websites.
Let us first update the host variables with the config and data directory for each customer as shown below.
admin@fedser:ahs$ cat inventory/host_vars/linuxser.stack.com.yml
---
ahs_version: "2.4.63"
ahs_http_port: 80
ahs_https_port: 443
ahs_config_root: "/etc/httpd"

# customer1 configuration
ahs_customer1_config_directory: "/var/opt/config/customer1"
ahs_customer1_data_directory: "/var/opt/data/customer1"

# customer2 configuration
ahs_customer2_config_directory: "/var/opt/config/customer2"
ahs_customer2_data_directory: "/var/opt/data/customer2"
Step3: Update Apache HTTP server configuration
Here we are going to create two separate configuration files named “customer1.conf” and “customer2.conf” which will include the Virtual Host configuration for each customer. These configuration files will be further included using the “Include” directive into the main “httpd.conf” file.
The ServerNmae directive is crucial for defining the main domain name that the virtual host will respond to. Also we need to define the “Directory” section for our DocumentRoot to ensure that this directory is not allowed to be overriddent by setting “AllowOverride” to None and also grant access to this filesystem directory for all.
The default configuration of the HTTP server has Deny access to the entirety of your server’s filesystem. We must explicitly permit access to web content directories in other \<Directory\> blocks as shown below.
Here are the Virtual Host definitions for each customer as shown below.
admin@fedser:ahs$ cat roles/linux_configure_httpd/files/customer1.conf
<VirtualHost 192.168.122.238:80>
    ServerName customer1.linuxser.stack.com
    DocumentRoot "/var/opt/data/customer1"
    <Directory /var/opt/data/customer1>
        AllowOverride None
        Require all granted
    </Directory>
</VirtualHost>

admin@fedser:ahs$ cat roles/linux_configure_httpd/files/customer2.conf
<VirtualHost 192.168.122.238:80>
    ServerName customer2.linuxser.stack.com
    DocumentRoot "/var/opt/data/customer2"
    <Directory /var/opt/data/customer2>
        AllowOverride None
        Require all granted
    </Directory>
</VirtualHost>
Update “httpd.conf.j2” template file to include these two Virtual Host configuration at the EOF.
admin@fedser:ahs$ cat roles/linux_configure_httpd/templates/httpd.conf.j2
...
# Include customer configurations
Include /var/opt/config/customer1/customer1.conf
Include /var/opt/config/customer2/customer2.conf
Now, we will update the “tasks/main.yml” file to ensure that the configuration directory and data directory are created for each customer and also copy the Virtual Host configuration files to the config directory for the respective customers.
Here is the complete “tasks/main.yml” file.
admin@fedser:ahs$ cat roles/linux_configure_httpd/tasks/main.yml
- name: update apache httpd config
  template:
    src: "httpd.conf.j2"
    dest: "{{ ahs_config_root }}/conf/httpd.conf"

- name: ensure customers config directory exists
  file:
    path: "{{ item }}"
    state: directory
    owner: "root"
    group: "root"
    mode: '0755'
    recurse: yes
  with_items:
    - "{{ ahs_customer1_config_directory }}"
    - "{{ ahs_customer2_config_directory }}"

- name: ensure customers data directory exists
  file:
    path: "{{ item }}"
    state: directory
    owner: "root"
    group: "root"
    mode: '0755'
    recurse: yes
  with_items:
    - "{{ ahs_customer1_data_directory }}"
    - "{{ ahs_customer2_data_directory }}"

- name: update customer1 virtualhost config
  copy:
    src: "customer1.conf"
    dest: "{{ ahs_customer1_config_directory }}/customer1.conf"

- name: update customer2 virtualhost config
  copy:
    src: "customer2.conf"
    dest: "{{ ahs_customer2_config_directory }}/customer2.conf"
For name based Virtual Hosting we need to have our Apache HTTP server IP address to be DNS resolvable to two different Hostnames. As we are working on a local setup will update our workstation machine “/etc/hosts” file to DNS resolve the following FQDN “customer2.linuxser.stack.com” and “customer1.linuxser.stack.com” to Apache HTTP server IP address as shown below.
admin@fedser:ahs$ cat /etc/hosts | grep linuxser
192.168.122.238 linuxser.stack.com customer1.linuxser.stack.com customer2.linuxser.stack.com
Step4: Create Static Content Source
As a part of this step we will create some static content on the workstation machine which will be acting as the source of static content for the web server. This static content will be copied to Apache HTTP server DocuementRoot for each customer respectively.
Here is the tree structure of the “/var/opt/data” directory that is created on workstation machine containing two folder “customer1” and “customer2” with unique “index.html” as shown below.
admin@fedser:ahs$ tree /var/opt/data/
/var/opt/data/
├── customer1
│   └── index.html
└── customer2
    └── index.html

3 directories, 2 files
admin@fedser:ahs$ cat /var/opt/data/customer1/index.html
Hello Customer1

admin@fedser:ahs$ cat /var/opt/data/customer2/index.html
Hello Customer2
Step5: Create linux_staticdeploy_httpd role
We will now create a new role named “linux_staticdeploy_httpd” which will be used to deploy the static content from source directory on workstation to Apache HTTP server DocumentRoot directory for each customer respectively as shown below.
admin@fedser:ahs$ cat roles/linux_staticdeploy_httpd/tasks/main.yml
---
- name: deploy static content
  copy:
    src: "{{ ahs_customer1_data_directory }}/"
    dest: "{{ ahs_customer1_data_directory }}"

- name: deploy static content
  copy:
    src: "{{ ahs_customer2_data_directory }}/"
    dest: "{{ ahs_customer2_data_directory }}"
Step6: Update linux_setup_httpd.yml playbook
Here we are going to update our “linux_setup_httpd.yml” playbook to include the role “linux_staticdeploy_httpd” as shown below.
admin@fedser:ahs$ cat linux_setup_httpd.yml
---
- hosts: "ahs"
  serial: 1
  become: true
  become_user: root
  roles:
  - { role: "linux_ping", tags: "linux_ping" }
  - { role: "linux_install_httpd", tags: "linux_install_httpd" }
  - { role: "linux_configure_httpd", tags: "linux_configure_httpd" }
  - { role: "linux_expose_httpd", tags: "linux_expose_httpd" }
  - { role: "linux_stop_httpd", tags: "linux_stop_httpd" }
  - { role: "linux_start_httpd", tags: "linux_start_httpd" }
  - { role: "linux_staticdeploy_httpd", tags: "linux_staticdeploy_httpd" }
Step7: Deploy Static content
Here we are going to execute “linux_staticdeploy_httpd” role to deploy the static content to the remote Apache HTTP server as shown below.
admin@fedser:ahs$ ansible-playbook linux_setup_httpd.yml -i inventory/hosts --tags "linux_staticdeploy_httpd" -v
Step8: Execute Playbook roles to reconfigure and start httpd service
First we will need to run the “linux_configure_httpd” to ensure that the updated configuration files are loaded onto the remote Apache HTTP server.
admin@fedser:ahs$ ansible-playbook linux_setup_httpd.yml -i inventory/hosts --tags "linux_configure_httpd" -v
Stop httpd service if its already started.
admin@fedser:ahs$ ansible-playbook linux_setup_httpd.yml -i inventory/hosts --tags "linux_stop_httpd" -v
Start httpd service to get the changes into effect.
admin@fedser:ahs$ ansible-playbook linux_setup_httpd.yml -i inventory/hosts --tags "linux_start_httpd" -v
Step9: Validate the Applications
Now its time to validate the default “index.html” page for each Customer as shown below.
admin@fedser:ahs$ curl http://customer1.linuxser.stack.com/index.html
Hello Customer1
admin@fedser:ahs$ curl http://customer2.linuxser.stack.com/index.html
Hello Customer2
Hope you enjoyed reading this article. Thank you..
Leave a Reply
You must be logged in to post a comment.