How to setup secure mail server using postfix and dovecot
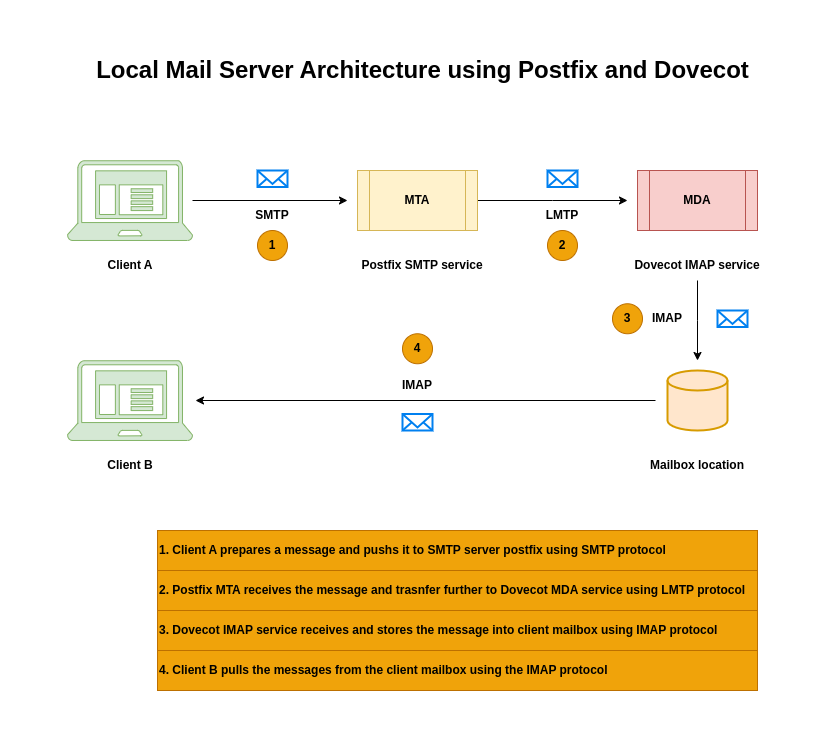
Here in this article we will try to setup a secure and reliable local mail service using the mail transport agent Postfix as SMTP service and the mail delivery agent Dovecot as IMAP and POP3 services.
Test Environment
- Fedora 41 server
What is Dovecot
Dovecot is a high-performance mail delivery agent (MDA) with a focus on security. It supports both IMAP or POP3-compatible email clients to connect to a Dovecot server and read or download emails.
What is Postfix
Postfix is a free, open-source Mail Transfer Agent (MTA) that serves as the “post office” for a server, handling the sending, receiving, and routing of emails using the Simple Mail Transfer Protocol (SMTP). It’s known for its security, ease of configuration, and modular design, making it a popular choice for both small and large email server environments.
What is Thunderbird
Thunderbird is a free, open-source desktop application for email, calendar, and contacts management, developed by the Mozilla Foundation. It’s a local application that runs on your device.
High Level Architecture
If you are interested in watching the video. Here is the YouTube video on the same step by step procedure outlined below.
Before proceeding with the implementation, ensure that you have your Host machine “/etc/hosts” file configured with the IP address and FQDN for DNS resolution.
admin@linuxscratch:~$ cat /etc/hosts
# Loopback entries; do not change.
# For historical reasons, localhost precedes localhost.localdomain:
127.0.0.1   localhost localhost.localdomain localhost4 localhost4.localdomain4
::1         localhost localhost.localdomain localhost6 localhost6.localdomain6
192.168.122.10 linuxscratch.stack.com linuxscratch
# See hosts(5) for proper format and other examples:
# 192.168.1.10 foo.example.org foo
# 192.168.1.13 bar.example.org bar
Procedure
Step1: Install Dovecot
As a first step we will install dovecot an imap and pop3 service provider. Dovecot is a high performance mail delivery agent (ie. MDA).
IMAP or POP3 compatible clients such as Thunderbird can be used to connect to dovecot server to read or download emails.
admin@linuxscratch:~$ sudo dnf install dovecot
Step2: Install sscg
SSCG also known as Simple Signed Certificate Generator makes it easy to generate usable, signed certificates quickly without needing to understand complex openssl, certtool or certutil commands.
admin@linuxscratch:~$ sudo dnf install sscg
Generate certificates in PEM format.
admin@linuxscratch:~$ sscg
Wrote service certificate key to /home/admin/service-key.pem
Wrote service certificate to /home/admin/service.pem
Wrote CA certificate to /home/admin/ca.crt
Wrote Diffie-Hellman parameters to /home/admin/dhparams.pem
Step3: Configure TLS encryption on Dovecot server
Dovecot is secure by default. TLS is enabled by default to transmit credentials and data encrypted over networks. We just need to configure the certificate paths for public and private key files.
Additionally, you can increase the security of TLS connections by generating and by using Diffie-Hellman parameters to provide perfect forward secrecy (PFS).
Let’s copy private, public and ca certificate into the default dovecot certs location as shown below.
admin@linuxscratch:~$ sudo cp /home/admin/service-key.pem /etc/pki/dovecot/private/linuxscratch.stack.com.key
admin@linuxscratch:~$ sudo cp /home/admin/service.pem /etc/pki/dovecot/certs/linuxscratch.stack.com.crt
admin@linuxscratch:~$ sudo cp /home/admin/ca.crt /etc/pki/dovecot/certs/ca.crt
admin@linuxscratch:~$ sudo cp /home/admin/dhparams.pem /etc/dovecot/dh.pem
Now, we need to update correct path details in “/etc/dovecot/conf.d/10-ssl.conf” file for the public, private and ca certificate along with the Diffie-Hellman parameters PEM file.
admin@linuxscratch:~$ sudo cat /etc/dovecot/conf.d/10-ssl.conf | grep -v "^#" | sed -e '/^$/d'
ssl = required
ssl_cert = </etc/pki/dovecot/certs/linuxscratch.stack.com.crt
ssl_key = </etc/pki/dovecot/private/linuxscratch.stack.com.key
ssl_ca = </etc/pki/dovecot/certs/ca.crt
ssl_dh = </etc/dovecot/dh.pem
ssl_cipher_list = PROFILE=SYSTEM
NOTE: For Dovecot to read the value of a parameter from a file, the path must start with a leading < character.
Step4: Configure Dovecot to use virtual users
By default, Dovecot performs many actions on the file system as the user who uses the service. Instead of using the UID of the user who is using the Dovecot service let us configure it to use one local user to perform these actions.
admin@linuxscratch:~$ sudo useradd --home-dir /var/mail/ --shell /usr/sbin/nologin vmail
This virtual user “vmail” will be used by dovecot to manage the mailboxes. Let us now grant write permission on /var/mail/ only to the vmail user.
admin@linuxscratch:~$ sudo chown vmail:vmail /var/mail/
admin@linuxscratch:~$ sudo chmod 700 /var/mail/
Step5: Configure Dovecot mailbox format and location
Let’s now configure the mailbox location and format in “/etc/dovecot/conf.d/10-mail.conf” file by updating the “mail_location” parameter as shown below.
Here we are using “sdbox” which stands for “single-dbox” and is a mailbox format where each email message is stored in a separate file. It is one of two high-performance mailbox storage formats provided by Dovecot, the other being mdbox, which stores multiple messages within a single file.
Also let’s update the first_valid_uid parameter in the /etc/dovecot/conf.d/10-mail.conf file to define the lowest user ID (UID) that can authenticate to Dovecot. This ensures that users with a UID greater than or equal to 1000 can authenticate with dovecot.
admin@linuxscratch:~$ sudo cat /etc/dovecot/conf.d/10-mail.conf | grep -v "^.*#" | sed -e '/^$/d'
mail_location = sdbox:/var/mail/%n/
namespace inbox {
  inbox = yes
}
first_valid_uid = 1000
protocol !indexer-worker {
}
mbox_write_locks = fcntl
Step6: Configure Dovecot authentication backend
By default, Dovecot uses the Name Service Switch (NSS) interface as the user database and the Pluggable Authentication Modules (PAM) framework as the authentication backend.
In the “/etc/dovecot/conf.d/auth-system.conf.ext” file, add the override_fields parameter to the userdb section as follows.
This is very important for using vmail virtual user. This setting overrides any values returned by the userdb backend, in this case passwd file, setting the user’s UID to vmail, the GID to vmail, and their home directory to /var/mail/ followed by the username (%n).
admin@linuxscratch:~$ sudo cat /etc/dovecot/conf.d/auth-system.conf.ext
passdb {
  driver = pam
  # [session=yes] [setcred=yes] [failure_show_msg=yes] [max_requests=<n>]
  # [cache_key=<key>] [<service name>]
  #args = dovecot
}
...
userdb {
  # <doc/wiki/AuthDatabase.Passwd.txt>
  driver = passwd
  override_fields = uid=vmail gid=vmail home=/var/mail/%n/
  # [blocking=no]
  #args =
Also, as we are using the PAM authentication with “passwd” as the backend, we need to strip off the domain name that gets appended to the receipent email id so that LMTP protocol is able to find the user and to avoid the below error while sending an email.
Error:
Sep 02 18:39:10 linuxscratch.stack.com postfix/lmtp[3622]: 25EE566130: to=<admin@linuxscratch.stack.com>, relay=linuxscratch.stack.com[/var/run/dovecot/lmtp], delay=0.01, delays=0/0/0/0.01, dsn=5.1.1, status=bounced (host linuxscratch.stack.com[/var/run/dovecot/lmtp] said: 550 5.1.1 <admin@linuxscratch.stack.com> User doesn't exist: admin@linuxscratch.stack.com (in reply to RCPT TO command))
Update “auth_username_format” in “/etc/dovecot/conf.d/10-auth.conf” as shown below.
admin@linuxscratch:~$ cat /etc/dovecot/conf.d/10-auth.conf | grep auth_username_format
auth_username_format = %Ln
NOTE: “%Ln” would get the recipient email address with the domain stripped off.
Step7: Enable imap and pop3 services and ports on firewalld
If you want to access IMAP or POP3 services from remote server we need to update the firewalld service to open required ports and services.
The standard unencrypted IMAP port is 143, while the secure IMAPS (IMAP over SSL/TLS) port is 993. For POP3, the standard unencrypted port is 110, and the secure POP3S port is 995.
We can enable services or ports as show below.
admin@linuxscratch:~$ sudo firewall-cmd --permanent --add-service=imaps --add-service=imap --add-service=pop3s --add-service=pop3
admin@linuxscratch:~$ sudo firewall-cmd --reload
admin@linuxscratch:~$ sudo firewall-cmd --permanent --add-port 143/tcp
success
admin@linuxscratch:~$ sudo firewall-cmd --permanent --add-port 993/tcp
success
admin@linuxscratch:~$ sudo firewall-cmd --permanent --add-port 110/tcp
success
admin@linuxscratch:~$ sudo firewall-cmd --permanent --add-port 995/tcp
success
admin@linuxscratch:~$ sudo firewall-cmd --reload
Step8: Enable and Start Dovecot service
Now its time to enable ad start the dovecot service.
admin@linuxscratch:~$ sudo systemctl enable --now dovecot
Check the status of dovecot service if its up and running.
admin@linuxscratch:~$ sudo systemctl status dovecot.service
We can also verify if the dovecot PAM authentication mechanism is working as expected as shown below.
admin@linuxscratch:~$ sudo doveadm auth test admin
Password:
passdb: admin auth succeeded
extra fields:
  user=admin
If you want to look at the overall configuration for the dovecot service with updated parameters from the default, we get it by running the below command.
admin@linuxscratch:~$ doveconf -n
Step9: Install Postfix
Ensure that you remove “sendmail” an old Mail Transfer Agent (MTA) before we install “postfix”.
admin@linuxscratch:~$ sudo dnf remove sendmail
admin@linuxscratch:~$ sudo dnf install postfix
Step10: Configure Postfix
Let’s try to understand about the configuration that we need to update by keeping everyting else the default.
- inet_interfaces: The inet_interfaces parameter specifies the network interface addresses that this mail system receives mail on
- inet_protocols: The internet protocols (IPv4 or IPv6) the server will use for accepting and making network connections
- mydestination: The mydestination parameter specifies the list of domains that this machine considers itself the final destination for
- local_recipient_maps: The local_recipient_maps parameter specifies optional lookup tables with all names or addresses of users that are local with respect to $mydestination, $inet_interfaces or $proxy_interfaces
- mynetworks_style: It determines the scope of networks Postfix trusts to relay mail without requiring further authentication. The available options are host (only the local machine), subnet (local subnetworks), and class (entire IP class A/B/C networks
- mailbox_transport: It specifies the local delivery agent to use for messages intended for local users
admin@linuxscratch:~$ sudo cat /etc/postfix/main.cf | grep -v "^#" | sed '/^$/d'
compatibility_level = 3.9
queue_directory = /var/spool/postfix
command_directory = /usr/sbin
daemon_directory = /usr/libexec/postfix
data_directory = /var/lib/postfix
mail_owner = postfix
inet_interfaces = $myhostname, localhost
inet_protocols = ipv4
mydestination = $myhostname, localhost.$mydomain, localhost
local_recipient_maps = unix:passwd.byname $alias_maps
unknown_local_recipient_reject_code = 550
mynetworks_style = host
alias_maps = hash:/etc/aliases
alias_database = hash:/etc/aliases

mailbox_transport = lmtp:unix:/var/run/dovecot/lmtp

debug_peer_level = 2
debugger_command =
	 PATH=/bin:/usr/bin:/usr/local/bin:/usr/X11R6/bin
	 ddd $daemon_directory/$process_name $process_id & sleep 5
sendmail_path = /usr/sbin/sendmail.postfix
newaliases_path = /usr/bin/newaliases.postfix
mailq_path = /usr/bin/mailq.postfix
setgid_group = postdrop
html_directory = no
manpage_directory = /usr/share/man
sample_directory = /usr/share/doc/postfix/samples
readme_directory = /usr/share/doc/postfix/README_FILES
smtpd_tls_cert_file = /etc/pki/tls/certs/postfix.pem
smtpd_tls_key_file = /etc/pki/tls/private/postfix.key
smtpd_tls_security_level = may
smtp_tls_CApath = /etc/pki/tls/certs
smtp_tls_CAfile = /etc/pki/tls/certs/ca-bundle.crt
smtp_tls_security_level = may
shlib_directory = /usr/lib64/postfix
meta_directory = /etc/postfix
By default, the TLS encryption protocol is enabled in the Postfix server. The basic Postfix TLS configuration contains self-signed certificates for inbound SMTP and the opportunistic TLS for outbound SMTP.
Step11: Configure LMTP socket
Local Mail Transfer Protocol also know as LMTP is an application-layer protocol that we will use to deliver email messages between mail services on a local network or the same server. In this case from Postfix SMTP service to Dovecot service.
First let’s check if “lmtp” protocol is enabled on dovecot service. We can list all the setting with their current values and check for the protocols that are enabled as shown below.
admin@linuxscratch:~$ sudo doveconf -a | grep -i protocols
protocols = imap pop3 lmtp
If the lmtp protocol is not listed above or disabled, edit the “/etc/dovecot/dovecot.conf” file, and append lmtp to the values in the protocols parameter to enable it.
Update the “/etc/dovecot/conf.d/10-master.conf” to customize the ownership and permissions as shown below.
admin@linuxscratch:~$ sudo cat /etc/dovecot/conf.d/10-master.conf
...
service lmtp {
  unix_listener lmtp {
    #mode = 0666
    mode = 0600
    user = postfix
    group = postfix
  }
...
Configure firewalld rules to allow only the SMTP server to access the LMTP port “24”, for example.
admin@linuxscratch:~$ sudo firewall-cmd --permanent --zone=public --add-rich-rule="rule family="ipv4" source address="192.0.2.1/32" port protocol="tcp" port="24" accept"
admin@linuxscratch:~$ sudo firewall-cmd --permanent --zone=public --add-rich-rule="rule family="ipv6" source address="2001:db8:2::1/128" port protocol="tcp" port="24" accept"
admin@linuxscratch:~$ sudo firewall-cmd --reload
Restart the dovecot service for the changes to take effect.
admin@linuxscratch:~$ sudo systemctl restart dovecot.service
Verify that Dovecot has created the socket and that the permissions are correct.
admin@linuxscratch:~$ ls -ltr /var/run/dovecot/lmtp
srw-------. 1 postfix postfix 0 Sep  3 12:28 /var/run/dovecot/lmtp
Step12: Verify Postfix configuration for errors
Run the following to check if any errors in the postfix configuration. There will be no output if there are no configuration errors.
admin@linuxscratch:~$ sudo postfix check
Step13: Enable Postfix service on firewalld
Here we will enable the SMTP service on firewall so that it can be accessed remotely.
admin@linuxscratch:~$ firewall-cmd --permanent --add-service smtp
admin@linuxscratch:~$ firewall-cmd --reload
Step14: Enable and Start Postfix service
Once all the configuration and check are done, we can enable and start the postfix service as shown below.
admin@linuxscratch:~$ sudo systemctl enable --now postfix
Verify the status of postfix service.
admin@linuxscratch:~$ sudo systemctl status postfix.service
Step15: Verify communication between postfix and dovecot
Let’s try to send an email to “admin” user locally using the “mail” utility as shown below.
Install s-nail if not already available on your system.
root@linuxscratch:~# dnf install s-nail
Tail the logs for “postfix” service in another shell before triggering a message.
root@linuxscratch:~# journalctl -fu postfix
Sep 03 12:28:10 linuxscratch.stack.com systemd[1]: Starting postfix.service - Postfix Mail Transport Agent...
Sep 03 12:28:10 linuxscratch.stack.com postfix[1145]: postfix/postlog: starting the Postfix mail system
Sep 03 12:28:10 linuxscratch.stack.com postfix/postfix-script[1145]: starting the Postfix mail system
Sep 03 12:28:10 linuxscratch.stack.com postfix/master[1149]: daemon started -- version 3.9, configuration /etc/postfix
Sep 03 12:28:10 linuxscratch.stack.com systemd[1]: Started postfix.service - Postfix Mail Transport Agent.
Trigger the message to user “admin@linuxscratch.stack.com”.
admin@linuxscratch:~$ echo "Testing linuxscratch" | mail -s "Testing linuxscratch" admin@linuxscratch.stack.com
If everything is configured correctly you should be able to get the message delived, which can be verifed using the logs as shown below.
Here is the snippet of successful message delivery.
Sep 03 14:30:29 linuxscratch.stack.com postfix/cleanup[3124]: 7F332662AA: message-id=<20250903090029.7F332662AA@linuxscratch.stack.com>
Sep 03 14:30:29 linuxscratch.stack.com postfix/qmgr[1152]: 7F332662AA: from=<admin@linuxscratch.stack.com>, size=389, nrcpt=1 (queue active)
Sep 03 14:30:29 linuxscratch.stack.com postfix/local[3126]: 7F332662AA: passing <admin@linuxscratch.stack.com> to transport=lmtp
Sep 03 14:30:29 linuxscratch.stack.com postfix/lmtp[3127]: 7F332662AA: to=<admin@linuxscratch.stack.com>, relay=linuxscratch.stack.com[/var/run/dovecot/lmtp], delay=0.1, delays=0.04/0.02/0.02/0.02, dsn=2.0.0, status=sent (250 2.0.0 <admin@linuxscratch.stack.com> zxOBIq0DuGg4DAAAUs7ekw Saved)
Sep 03 14:30:29 linuxscratch.stack.com postfix/qmgr[1152]: 7F332662AA: removed
This email trigger should create a folder for user “admin” with his mailboxes as shown below.
root@linuxscratch:~# ls -ltr /var/mail/admin
You can check your email that was received by reading the “u.*” related files.
root@linuxscratch:~# cat /var/mail/admin/mailboxes/INBOX/dbox-Mails/u.6
2 M1e C68b8047e
N          00000000000002A9
Return-Path: <admin@linuxscratch.stack.com>
Delivered-To: admin@linuxscratch.stack.com
Received: from linuxscratch.stack.com
	by linuxscratch.stack.com with LMTP
	id 0zv9E34EuGhpDAAAUs7ekw
	(envelope-from <admin@linuxscratch.stack.com>)
	for <admin@linuxscratch.stack.com>; Wed, 03 Sep 2025 14:33:58 +0530
Received: by linuxscratch.stack.com (Postfix, from userid 1000)
	id 47BF0662AD; Wed, 03 Sep 2025 14:33:58 +0530 (IST)
Date: Wed, 03 Sep 2025 14:33:58 +0530
To: admin@linuxscratch.stack.com
Subject: Testing linuxscratch
User-Agent: s-nail v14.9.25
Message-Id: <20250903090358.47BF0662AD@linuxscratch.stack.com>
From: admin <admin@linuxscratch.stack.com>

Testing linuxscratch


R68b8047e
V2ba
Ga9f769147e04b868690c000052cede93
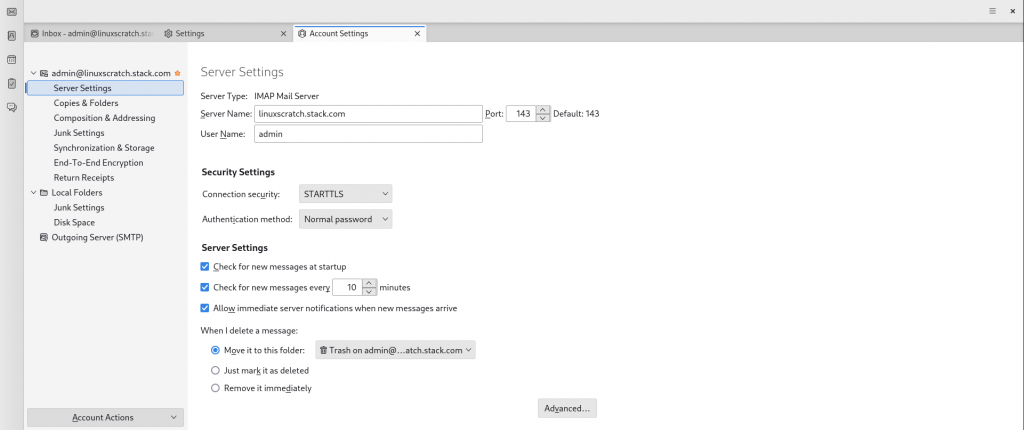
Step16: Configure Thunderbird
Ensure that you have thunderbird client installed on your system.
admin@linuxscratch:~$ sudo dnf install thunderbird
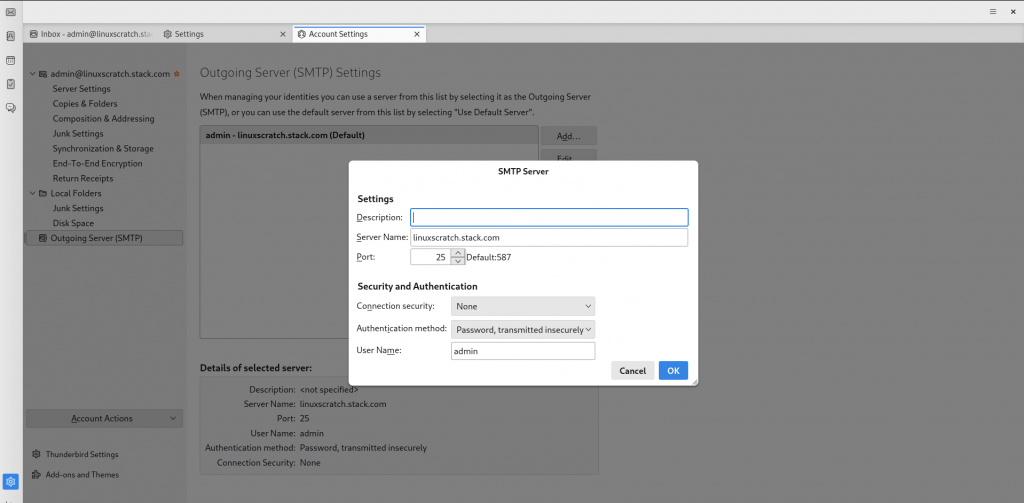
Once you launch thunderbird client application, you will be asked to configure the email account with the incoming and outgoing server settings.
Incoming IMAP server settings.
Outgoing SMTP server settings.
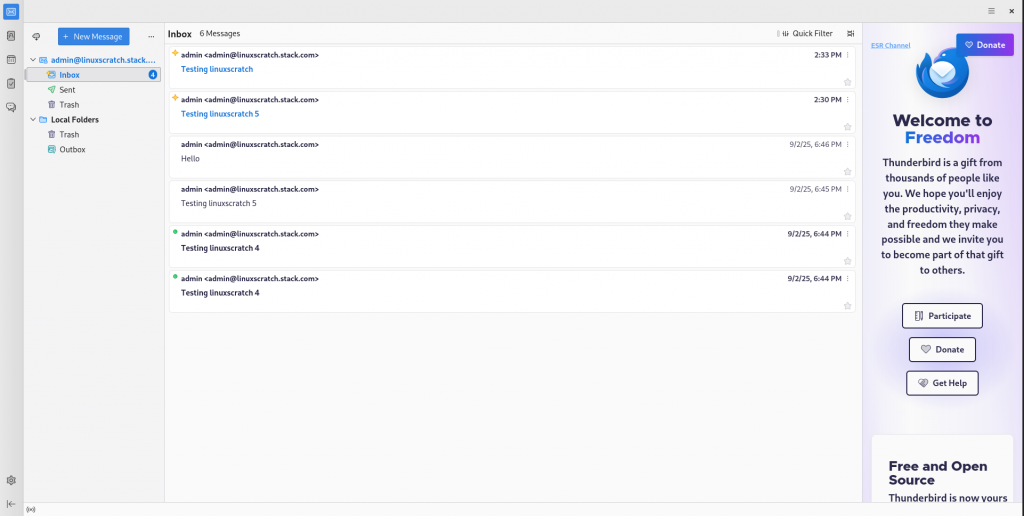
Once configured you can test your configuration and if connection is successful, you should be able to see the messages delieved through dovecot IMAP service as shown below.
Hope you enjoyed reading this article. Thank you..
Leave a Reply
You must be logged in to post a comment.