How to secure OpenSearch Cluster with Keycloak OIDC

Here in this article we will try to secure OpenSearch cluster using Keycloak Open ID Connect Authentication and Authorization service provider.
Test Environment
- Fedora Server 41
- Docker v27.5.1
- Docker Compose v2.32.4
What is OpenSearch
OpenSearch is an open-source search and analytics engine, designed for a variety of use cases such as implementing a search box on a website to analyzing security data for threat detection, log analytics, real-time application monitoring, and full-text search.
OpenSearch supports several authentication types, including basic authentication (username and password), SAML and OpenID Connect for single sign-on, client certificates, and JWT (JSON Web Tokens). You can also integrate with identity providers like Amazon Cognito and AWS IAM Identity Center. The Security plugin handles these by configuring various authentication backends, such as the internal user database, LDAP, or external SAML providers.
What is Keycloak
Keycloak is an open-source Identity and Access Management (IAM) solution developed by Red Hat. It allows you to centralize authentication and authorization for your applications and services, offering features like single sign-on (SSO), social login, user federation, and more. Keycloak simplifies securing applications by handling user authentication and authorization, eliminating the need for developers to build these functionalities from scratch.
If you are interested in watching the video. Here is the YouTube video on the same step by step procedure outlined below.
Procedure
Step1: Ensure Docker and Docker compose installed and running
As a first step ensure that you have docker and docker-compose installed on your system. You can following the official documentation from docker to install these tools.
admin@linuxser:~$ docker -v
Docker version 27.5.1, build 9f9e405

admin@linuxser:~$ docker compose version
Docker Compose version v2.32.4
Start up the docker services if its not already started.
admin@linuxser:~$ sudo systemctl start docker.service
Also let us create a working directory and switch into that folder.
admin@linuxser:~$ mkdir opensearch_with_openid
admin@linuxser:~$ cd opensearch_with_openid/
Step2: Ensure OpenSearch Cluster and Keycloak Service up and running
Here is the docker compose file for OpenSearch, OpenSearch Dashboard and Keycloak service setup.
Ensure that we have the OpenSearch “admin” user password initialized in the environment file before starting up the OpenSearch cluster.
admin@linuxser:~/opensearch$ cat .env
OPENSEARCH_INITIAL_ADMIN_PASSWORD=Se@rch@2025
admin@linuxser:~/opensearch_with_openid$ cat docker-compose.yml
services:
  opensearch-node1: # This is also the hostname of the container within the Docker network (i.e. https://opensearch-node1/)
    image: opensearchproject/opensearch:3.3.0
    container_name: opensearch-node1
    environment:
      - cluster.name=opensearch-cluster # Name the cluster
      - node.name=opensearch-node1 # Name the node that will run in this container
      - discovery.seed_hosts=opensearch-node1,opensearch-node2 # Nodes to look for when discovering the cluster
      - cluster.initial_cluster_manager_nodes=opensearch-node1,opensearch-node2 # Nodes eligibile to serve as cluster manager
      - bootstrap.memory_lock=true # Disable JVM heap memory swapping
      - "OPENSEARCH_JAVA_OPTS=-Xms3072m -Xmx3072m" # Set min and max JVM heap sizes to at least 50% of system RAM
      - OPENSEARCH_INITIAL_ADMIN_PASSWORD=${OPENSEARCH_INITIAL_ADMIN_PASSWORD} # Sets the demo admin user password when using demo configuration (for OpenSearch 2.12 and later)
    ulimits:
      memlock:
        soft: -1 # Set memlock to unlimited (no soft or hard limit)
        hard: -1
      nofile:
        soft: 65536 # Maximum number of open files for the opensearch user - set to at least 65536
        hard: 65536
    volumes:
      - opensearch-data1:/usr/share/opensearch/data # Creates volume called opensearch-data1 and mounts it to the container
      #- ./config.yml:/usr/share/opensearch/config/opensearch-security/config.yml
    ports:
      - 9200:9200 # REST API
      - 9600:9600 # Performance Analyzer
    networks:
      - opensearch-net # All of the containers will join the same Docker bridge network
  opensearch-node2:
    image: opensearchproject/opensearch:3.3.0 # This should be the same image used for opensearch-node1 to avoid issues
    container_name: opensearch-node2
    environment:
      - cluster.name=opensearch-cluster
      - node.name=opensearch-node2
      - discovery.seed_hosts=opensearch-node1,opensearch-node2
      - cluster.initial_cluster_manager_nodes=opensearch-node1,opensearch-node2
      - bootstrap.memory_lock=true
      - "OPENSEARCH_JAVA_OPTS=-Xms3072m -Xmx3072m"
      - OPENSEARCH_INITIAL_ADMIN_PASSWORD=${OPENSEARCH_INITIAL_ADMIN_PASSWORD}
    ulimits:
      memlock:
        soft: -1
        hard: -1
      nofile:
        soft: 65536
        hard: 65536
    volumes:
      - opensearch-data2:/usr/share/opensearch/data
      #- ./config.yml:/usr/share/opensearch/config/opensearch-security/config.yml
    networks:
      - opensearch-net
  opensearch-dashboards:
    image: opensearchproject/opensearch-dashboards:3.3.0 # Make sure the version of opensearch-dashboards matches the version of opensearch installed on other nodes
    container_name: opensearch-dashboards
    ports:
      - 5601:5601 # Map host port 5601 to container port 5601
    expose:
      - "5601" # Expose port 5601 for web access to OpenSearch Dashboards
    #volumes:
    #  - ./opensearch_dashboards.yml:/usr/share/opensearch-dashboards/config/opensearch_dashboards.yml
    environment:
      OPENSEARCH_HOSTS: '["https://opensearch-node1:9200","https://opensearch-node2:9200"]' # Define the OpenSearch nodes that OpenSearch Dashboards will query
    networks:
      - opensearch-net
  keycloak:
    image: quay.io/keycloak/keycloak:26.1.4
    command: start-dev
    container_name: keycloak
    environment:
      KC_BOOTSTRAP_ADMIN_USERNAME: admin
      KC_BOOTSTRAP_ADMIN_PASSWORD: admin
    ports:
      - "8080:8080"
      - "8443:8443"
    networks:
      - opensearch-net
    healthcheck:
      test: ["CMD", "sh", "-c", "exec 3<>/dev/tcp/localhost/8080; echo 'HTTP/1.1' >&3; head -1 <&3"]
      interval: 30s
      timeout: 10s
      retries: 5


volumes:
  opensearch-data1:
  opensearch-data2:

networks:
  opensearch-net:
admin@linuxser:~/opensearch_with_openid$ docker compose up -d
OpenSearch service validation
admin@linuxser:~/opensearch$ curl https://linuxser.stack.com:9200 -ku admin:Se@rch@2025
{OPENSEARCH_INITIAL_ADMIN_PASSWORD=Se@rch@2025
  "name" : "opensearch-node1",
  "cluster_name" : "opensearch-cluster",
  "cluster_uuid" : "xcaIsJtWSE-F_iBXmzv9Kg",
  "version" : {
    "distribution" : "opensearch",
    "number" : "3.2.0",
    "build_type" : "tar",
    "build_hash" : "6adc0bf476e1624190564d7fbe4aba00ccf49ad8",
    "build_date" : "2025-08-12T03:55:01.226522683Z",
    "build_snapshot" : false,
    "lucene_version" : "10.2.2",
    "minimum_wire_compatibility_version" : "2.19.0",
    "minimum_index_compatibility_version" : "2.0.0"
  },
  "tagline" : "The OpenSearch Project: https://opensearch.org/"
}
OpenSearch Dashboard service validation
URL: http://linuxser.stack.com:5601/
Keycloak service validation
URL: http://linuxser.stack.com:8080/
Step3: Configure Keycloak
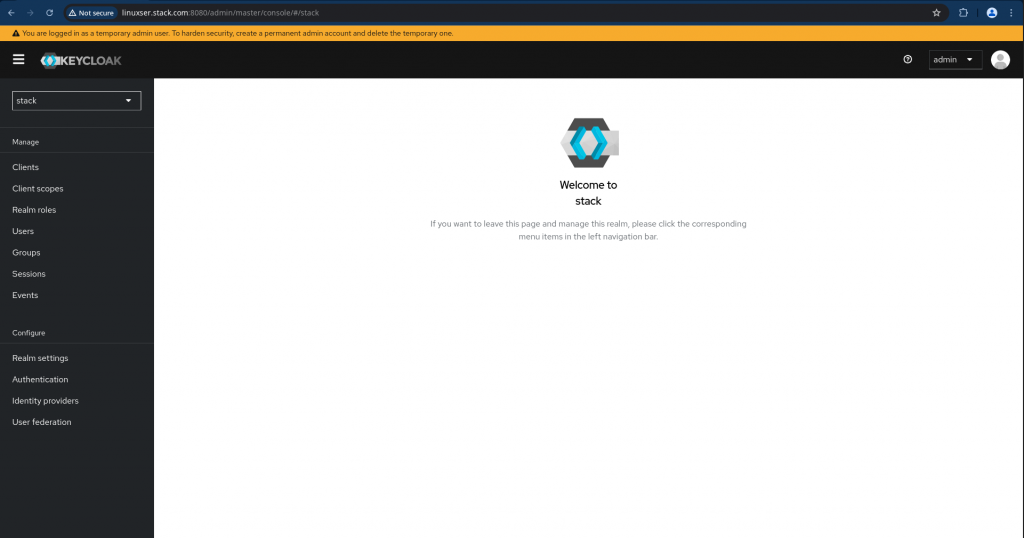
Here let us first create a new realm named “stack” by navigating to top left side and clicking on the drop down to Create Realm. Once you create a realm you will be automatically switched into your new realm.
Now navigate to Clients on left navigation bar and create a new client named “opensearchsso” with the following details.
General Settings
Client Name : opensearchsso
Client ID   : opensearchsso
Capability Config
Client Authentication   : On
Authorization Flow      : Standard flow, Direct access grants and Implicit flow enabled
Login Settings
Valid Redirect URls     : http://linuxser.stack.com:5601/*
Web Origins             : http://linuxser.stack.com:5601
Once the Client is created you can navigate to “Credentials” tab and retrieve your Client Secret and keep it secure.
Client Secret : HifH6BgxETJ0exeYTsrLB4nNb1YOBcw5
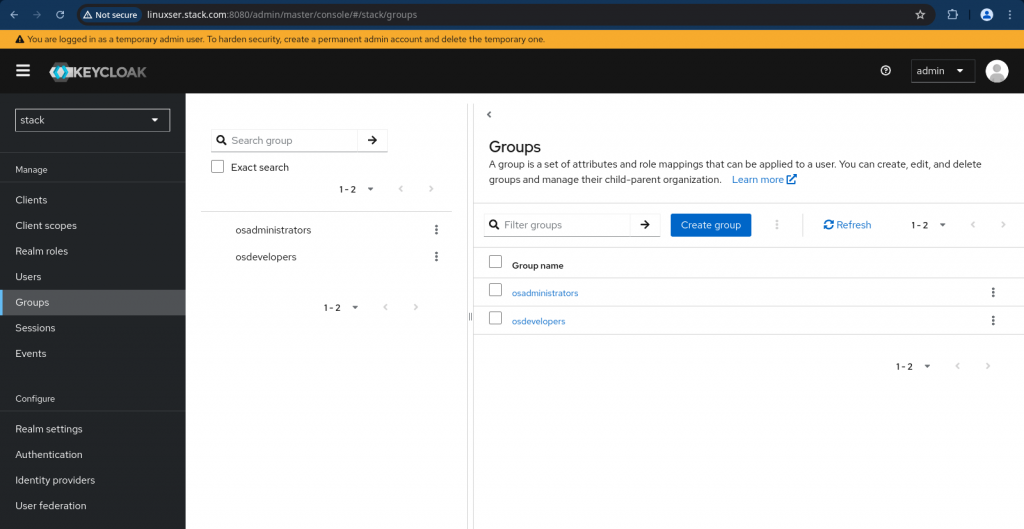
Once the client has been created, its now time to setup groups and users. Let us create groups named “osadministrators” and “osdevelopers“.
Navigate to Groups on left navigation bar and create the following groups.
Now let us create two users named “osadmin” and “osdev” part of groups “osadministrators” and “osdevelopers” respectively.
Username    : osadmin
Email       : osadmin@stack.com
First name  : osadmin
Last name   : osadminsso
Groups      : osadministrators
Username    : osdev
Email       : osdev@stack.com
First name  : osdev
Last name   : osdevsso
Groups      : osdevelopers
Navigate to “Credentials” tab and “Set Password” for each user and ensure Temporary option is Off so you don’t need to change the password again on first login.
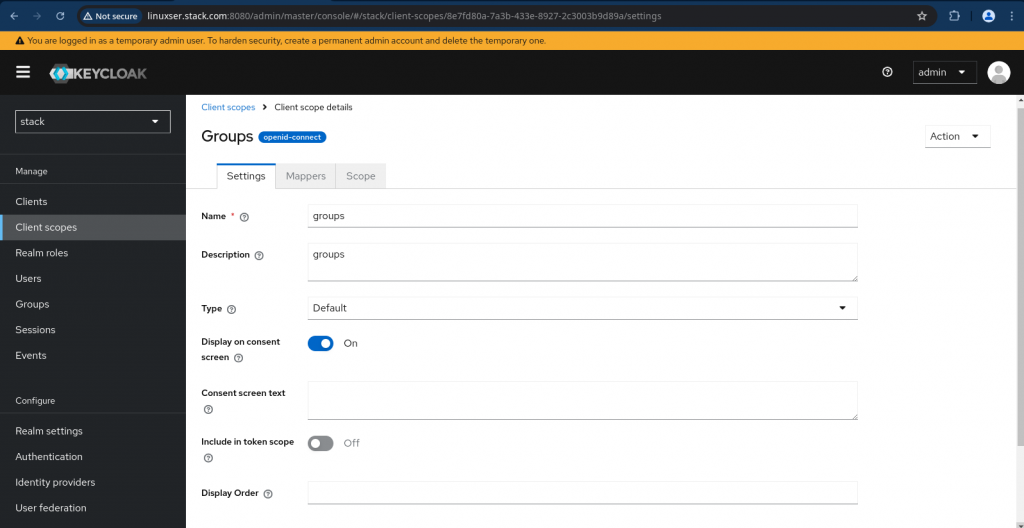
There are two more important steps that we need to carry out. First “Create a client scope with group membership mapping” as shown below.
Navigate to Client scopes on the left navigation bar and click “Create client scope” on that page. Update the details and save the changes.
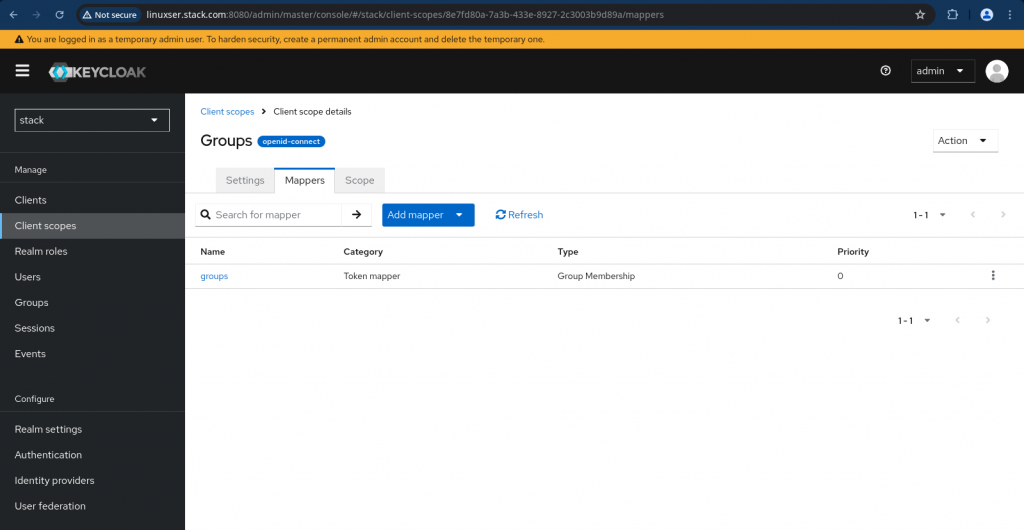
Now we need to go to “Mappers” tab for the Client scope “groups” and click on “Configure a new mapper” and select “Group Membership”. Just disable the “Full group path” as we are going to deal with top level groups only for this demo and create the mappers.
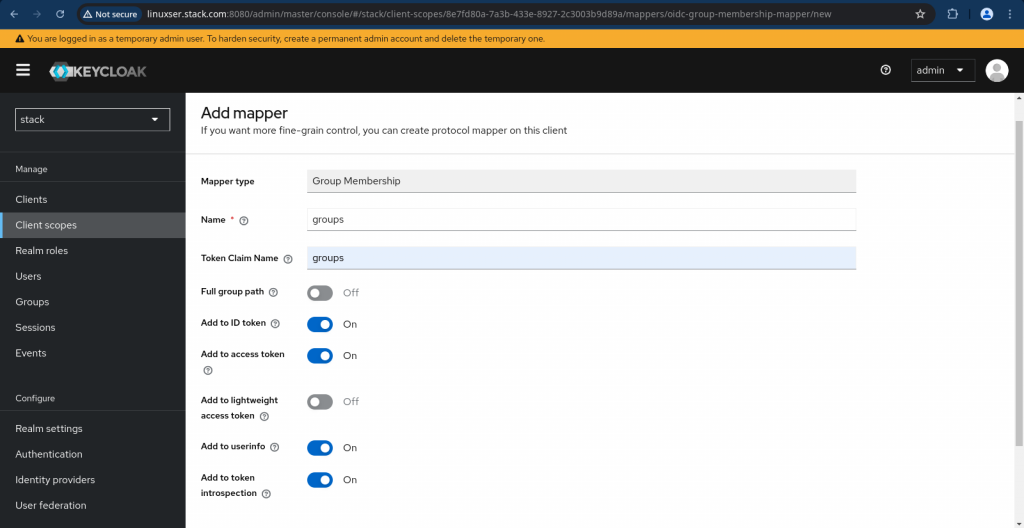
This is how your updated client scope mappers look like.
Now we need to map this client scope to our client “opensearchsso”. Navigate to your client and go to “Client scopes” tab and ensure you click on “groups” to map it to the client as shown below and set the Assigned type as “Default”.
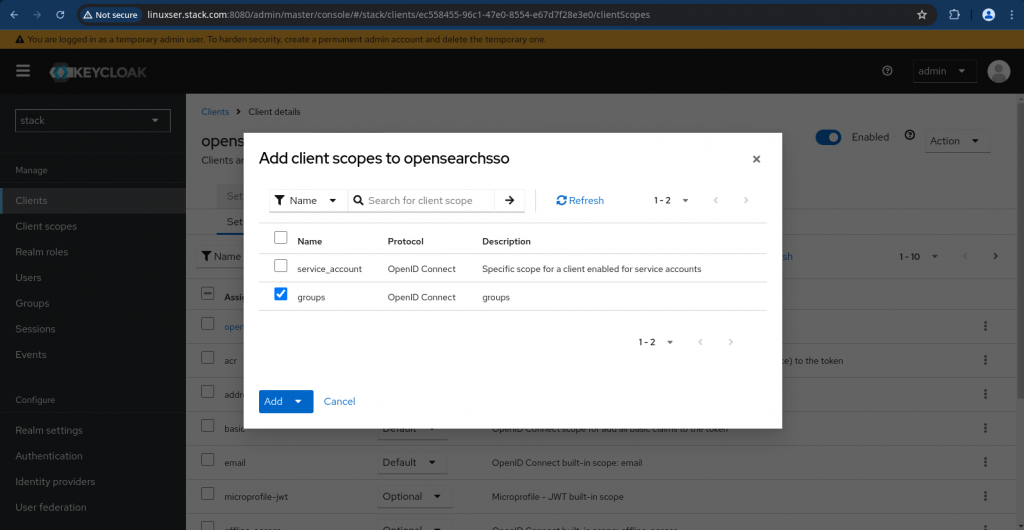
NOTE: By default “Client” is mapped with the following scopes “email” and “profile” which we will be using during SSO communication.
Just to make sure your client is configured correctly and is able to authenticate and issue tokens with the required claims we can validate it using the implicit authentication flow wherein we provide the client id and client secret to get the access token as shown below.
admin@linuxser:~/opensearch_with_openid$ curl -k -d "grant_type=password" -d "scope=openid" -d "client_id=opensearchsso" -d "client_secret=HifH6BgxETJ0exeYTsrLB4nNb1YOBcw5" -d "username=osadmin" -d "password=osadmin" http://linuxser.stack.com:8080/realms/stack/protocol/openid-connect/token | jq .

  % Total    % Received % Xferd  Average Speed   Time    Time     Time  Current
                                 Dload  Upload   Total   Spent    Left  Speed
100  3538  100  3401  100   137  20954    844 --:--:-- --:--:-- --:--:-- 22112
{
  "access_token": "eyJhbGciOiJSUzI1NiIsInR5cCIgOiAiSldUIiwia2lkIiA6ICIxcWV1eGEwS3pLcGdRVmR1N3dmWldpZmF1QXQzUHpQOW9ESk1aeFl6WWljIn0.eyJleHAiOjE3NjE5OTM4ODYsImlhdCI6MTc2MTk5MzU4NiwianRpIjoiMzZiODE2MDMtMmY2OS00NTE2LTllZGEtYjc5YjQwZTFjNDYzIiwiaXNzIjoiaHR0cDovL2xpbnV4c2VyLnN0YWNrLmNvbTo4MDgwL3JlYWxtcy9zdGFjayIsImF1ZCI6ImFjY291bnQiLCJzdWIiOiI4Y2M4OWJmOS1lNTE1LTQ1ZmQtYmNjZS03N2FiOTZkMmFjNGIiLCJ0eXAiOiJCZWFyZXIiLCJhenAiOiJvcGVuc2VhcmNoc3NvIiwic2lkIjoiOGQwNmIzMzQtNTI2Zi00NGQ0LWE1Y2QtNzkxYzNjODU1ZTZjIiwiYWNyIjoiMSIsImFsbG93ZWQtb3JpZ2lucyI6WyJodHRwOi8vbG9jYWxob3N0OjU2MDEiXSwicmVhbG1fYWNjZXNzIjp7InJvbGVzIjpbImRlZmF1bHQtcm9sZXMtc3RhY2siLCJvZmZsaW5lX2FjY2VzcyIsInVtYV9hdXRob3JpemF0aW9uIl19LCJyZXNvdXJjZV9hY2Nlc3MiOnsiYWNjb3VudCI6eyJyb2xlcyI6WyJtYW5hZ2UtYWNjb3VudCIsIm1hbmFnZS1hY2NvdW50LWxpbmtzIiwidmlldy1wcm9maWxlIl19fSwic2NvcGUiOiJvcGVuaWQgZW1haWwgcHJvZmlsZSIsImVtYWlsX3ZlcmlmaWVkIjpmYWxzZSwibmFtZSI6Im9zYWRtaW4gb3NhZG1pbnNzbyIsInByZWZlcnJlZF91c2VybmFtZSI6Im9zYWRtaW4iLCJnaXZlbl9uYW1lIjoib3NhZG1pbiIsImZhbWlseV9uYW1lIjoib3NhZG1pbnNzbyIsImVtYWlsIjoib3NhZG1pbkBzdGFjay5jb20ifQ.UU8vL2At9JnSfD_00Imwdwth1K0tJcR8osb8guqCd66QCyZ7tXc8CHnCVIB1PwRHWzdiJDm0t0WDkHj4VtWyBjp89BzbVr7Aa3E_N1m0Z9Vy4EmaLF-BoKWenoFm3FbG8AtmqyRj4QTF4FNaTfN2a7lT3eRxw44oI1VcSrMow5I0vZkHDzcqiWeMr95s0raXiCzaQgSPBvYsZQewcMgtgXFRO1D4UoEgsI1XLNdhLaPnOGPuOKJ88VpXLtvXTpIXgX03BChb6NOm-XbPkLsOYImdzVC87lDtI_7QnFilSyW_NH8StRsC-kKLM5rUJKQVPzQOT60dvfN2l1BtgreRZQ",
  "expires_in": 300,
  "refresh_expires_in": 1800,
  "refresh_token": "eyJhbGciOiJIUzUxMiIsInR5cCIgOiAiSldUIiwia2lkIiA6ICI5N2ZjN2ViMS03ZmJkLTQwMjEtYWQzOS0wMWY4NDkwN2UwNmEifQ.eyJleHAiOjE3NjE5OTUzODYsImlhdCI6MTc2MTk5MzU4NiwianRpIjoiZTA4NTkxZTEtMTg3Zi00MjFiLWI5OGEtMDA1M2M1OGVlMzIwIiwiaXNzIjoiaHR0cDovL2xpbnV4c2VyLnN0YWNrLmNvbTo4MDgwL3JlYWxtcy9zdGFjayIsImF1ZCI6Imh0dHA6Ly9saW51eHNlci5zdGFjay5jb206ODA4MC9yZWFsbXMvc3RhY2siLCJzdWIiOiI4Y2M4OWJmOS1lNTE1LTQ1ZmQtYmNjZS03N2FiOTZkMmFjNGIiLCJ0eXAiOiJSZWZyZXNoIiwiYXpwIjoib3BlbnNlYXJjaHNzbyIsInNpZCI6IjhkMDZiMzM0LTUyNmYtNDRkNC1hNWNkLTc5MWMzYzg1NWU2YyIsInNjb3BlIjoib3BlbmlkIGVtYWlsIHJvbGVzIGJhc2ljIHdlYi1vcmlnaW5zIHByb2ZpbGUgYWNyIn0.JMt-L2iwRxoZYTFbng6VI0NNOV1TAim0ImdnbcPJqais5ppHkGzzdOqM0MlY2z5hc-R3pzQFnASAwzXFORL5ug",
  "token_type": "Bearer",
  "id_token": "eyJhbGciOiJSUzI1NiIsInR5cCIgOiAiSldUIiwia2lkIiA6ICIxcWV1eGEwS3pLcGdRVmR1N3dmWldpZmF1QXQzUHpQOW9ESk1aeFl6WWljIn0.eyJleHAiOjE3NjE5OTM4ODYsImlhdCI6MTc2MTk5MzU4NiwianRpIjoiOTMxZjgxYjktMTQyZS00ZWViLTg5NWItNmE2NDVjZjNlMWE0IiwiaXNzIjoiaHR0cDovL2xpbnV4c2VyLnN0YWNrLmNvbTo4MDgwL3JlYWxtcy9zdGFjayIsImF1ZCI6Im9wZW5zZWFyY2hzc28iLCJzdWIiOiI4Y2M4OWJmOS1lNTE1LTQ1ZmQtYmNjZS03N2FiOTZkMmFjNGIiLCJ0eXAiOiJJRCIsImF6cCI6Im9wZW5zZWFyY2hzc28iLCJzaWQiOiI4ZDA2YjMzNC01MjZmLTQ0ZDQtYTVjZC03OTFjM2M4NTVlNmMiLCJhdF9oYXNoIjoiX0o2UWt6dVFxS0VISFFXdUc3bWp6dyIsImFjciI6IjEiLCJlbWFpbF92ZXJpZmllZCI6ZmFsc2UsIm5hbWUiOiJvc2FkbWluIG9zYWRtaW5zc28iLCJwcmVmZXJyZWRfdXNlcm5hbWUiOiJvc2FkbWluIiwiZ2l2ZW5fbmFtZSI6Im9zYWRtaW4iLCJmYW1pbHlfbmFtZSI6Im9zYWRtaW5zc28iLCJlbWFpbCI6Im9zYWRtaW5Ac3RhY2suY29tIn0.lG4Zyr6nXcxL5VrUuj21-1M4TmEouqP3IBhPOWjTVWIuX0oApvu0JDy2d8H19S1CPzeXV0wGO3rY4yjNnCDX-R7pQsFtGFhv9VskQM6LhiArT_ySHOFWzafRm-NAXTBroLnESk4ybKjaYOdRECax0v7NnzaYVuKJN-6wL0SvV8znakKYtWa0RXpk3eVOAdjkLOUo6CXrE5gg2FnAWOqNcLWBgXAS-2AqUdszh-gwoKMlhtfsVB7_rvv9k8IPi9N0qZr9oOrCxDhYK55q_IHO8fSsNqMc-hmVVTWWmX31RGKCCVM6xgC4j0oUQ8h-sm4WSoeGmT8pzblihpWYHd-v6g",
  "not-before-policy": 0,
  "session_state": "8d06b334-526f-44d4-a5cd-791c3c855e6c",
  "scope": "openid email profile"
}
You can validate your issued token at JWT token decoder. Here is the JSON token in my case.
{
  "exp": 1761994040,
  "iat": 1761993740,
  "jti": "a3cce949-d5c4-4cd9-8252-fa29f52e1fbc",
  "iss": "http://linuxser.stack.com:8080/realms/stack",
  "aud": "account",
  "sub": "8cc89bf9-e515-45fd-bcce-77ab96d2ac4b",
  "typ": "Bearer",
  "azp": "opensearchsso",
  "sid": "5340c450-a2e6-4be2-8f38-833ebf1a33a0",
  "acr": "1",
  "allowed-origins": [
    "http://localhost:5601"
  ],
  "realm_access": {
    "roles": [
      "default-roles-stack",
      "offline_access",
      "uma_authorization"
    ]
  },
  "resource_access": {
    "account": {
      "roles": [
        "manage-account",
        "manage-account-links",
        "view-profile"
      ]
    }
  },
  "scope": "openid email profile",
  "email_verified": false,
  "name": "osadmin osadminsso",
  "groups": [
    "osadministrators"
  ],
  "preferred_username": "osadmin",
  "given_name": "osadmin",
  "family_name": "osadminsso",
  "email": "osadmin@stack.com"
}
With this we have now completed our Realm, Clients, Client Scopes, Users and Groups settings.
Step4: Configure OpenSearch Security
Here we are going to update config.yml to enable both “basic_internal_auth_domain” and “oidc_auth_domain” domains.
For “basic_internal_auth_domain” we are going to use the default settings. For “oidc_auth_domain” here are the details of the updated fields.
- openid_connect_url: The URL of your IdP where the Security plugin can find the OpenID Connect metadata/configuration settings. This URL differs between IdPs. Required when using OpenID Connect as your backend.
- subject_key: The key in the JSON payload that stores the user’s name. If not defined, the subject registered claim is used. Most IdP providers use the preferred_username claim. To extract a username from nested JWT claims, you can configure subject_key as a list. Optional.
- roles_key: The key in the JSON payload that stores the user’s roles. The value must be a comma-separated list of roles. This key is required only if you want to use roles in the JWT. You can configure roles_key as a list to extract roles from nested JWT claims.
- client_id and client_secret: These are the credentials assigned by Keycloak OIDC when “opensearchsso” client was registered.
For brevity, i have removed all the comment sections and only provided the required settings. An authentication with lower order value is given first priority for authentication and if that fails authentication fallbacks to basic authentication.
admin@linuxser:~/opensearch_with_openid$ cat config.yml
_meta:
  type: "config"
  config_version: 2

config:
  dynamic:
    http:
      anonymous_auth_enabled: false
    authc:
      basic_internal_auth_domain:
        description: "Authenticate via HTTP Basic against internal users database"
        http_enabled: true
        transport_enabled: true
        order: 0
        http_authenticator:
          type: "basic"
          challenge: false
        authentication_backend:
          type: "internal"

      oidc_auth_domain:
        description: "Authenticate via OIDC (OpenID Connect)"
        http_enabled: true
        transport_enabled: true
        order: 1
        http_authenticator:
          type: "openid"
          challenge: true
          config:
            subject_key: "preferred_username"
            roles_key: "groups"
            openid_connect_url: "http://linuxser.stack.com:8080/realms/stack/.well-known/openid-configuration"
            client_id: "opensearchsso"
            client_secret: "HifH6BgxETJ0exeYTsrLB4nNb1YOBcw5" # replace with your actual client secret
        authentication_backend:
          type: "noop"
As OpenID connect itself can be used for user authentication and authorization, there is no additional need of authentication_backend. We can set this value to noop.
Step5: Configure OpenSearch Dashboard Security
In order to enable OpenSearch Dashboard to support multiple authentication types we need to add “opensearch_security.auth.multiple_auth_enabled” as “true” and update the list of authentication types to be supported using the following setting “opensearch_security.auth.type” with values “basicauth” and “openid”.
Additionally we are configuring the OpenSearch Dashboard with the following settings to identify and communicate with the Keycloak OIDC provider.
- opensearch_security.openid.connect_url: The URL where the IdP publishes the OpenID metadata. Required.
- opensearch_security.openid.client_id: The ID of the OpenID Connect client configured in your IdP. Required.
- opensearch_security.openid.client_secret: The client secret of the OpenID Connect client configured in your IdP. Required.
- opensearch_security.openid.base_redirect_url: The base of the redirect URL that will be sent to your IdP. Optional.
- opensearch_security.openid.scope: The scope of the identity token issued by the IdP. Optional. Default is openid profile email address phone.
admin@linuxser:~/opensearch_with_openid$ cat opensearch_dashboards.yml
---
opensearch.hosts: [https://localhost:9200]
opensearch.ssl.verificationMode: none
opensearch.username: kibanaserver
opensearch.password: kibanaserver
opensearch.requestHeadersWhitelist: [authorization, securitytenant]

opensearch_security.multitenancy.enabled: true
opensearch_security.multitenancy.tenants.preferred: [Private, Global]
opensearch_security.readonly_mode.roles: [kibana_read_only]
# Use this setting if you are running opensearch-dashboards without https
opensearch_security.cookie.secure: false
server.host: '0.0.0.0'

#OpenID authentication - keycloak
opensearch_security.auth.multiple_auth_enabled: true
opensearch_security.auth.type: ["basicauth","openid"]
opensearch_security.openid.connect_url: "http://linuxser.stack.com:8080/realms/stack/.well-known/openid-configuration"
opensearch_security.openid.client_id: "opensearchsso"
opensearch_security.openid.client_secret: "HifH6BgxETJ0exeYTsrLB4nNb1YOBcw5"
opensearch_security.openid.base_redirect_url: "http://linuxser.stack.com:5601"
opensearch_security.openid.scope: "openid profile email groups"
Step6: Update Docker Compose file
Once we have the OpenSearch config.yml file and OpenSearch Dashboard config file ready with the updated settings, we can volume mount them into the docker container services as shown below.
admin@linuxser:~/opensearch_with_openid$ cat docker-compose.yml
services:
  opensearch-node1: # This is also the hostname of the container within the Docker network (i.e. https://opensearch-node1/)
    image: opensearchproject/opensearch:3.3.0
    container_name: opensearch-node1
    environment:
      - cluster.name=opensearch-cluster # Name the cluster
      - node.name=opensearch-node1 # Name the node that will run in this container
      - discovery.seed_hosts=opensearch-node1,opensearch-node2 # Nodes to look for when discovering the cluster
      - cluster.initial_cluster_manager_nodes=opensearch-node1,opensearch-node2 # Nodes eligibile to serve as cluster manager
      - bootstrap.memory_lock=true # Disable JVM heap memory swapping
      - "OPENSEARCH_JAVA_OPTS=-Xms3072m -Xmx3072m" # Set min and max JVM heap sizes to at least 50% of system RAM
      - OPENSEARCH_INITIAL_ADMIN_PASSWORD=${OPENSEARCH_INITIAL_ADMIN_PASSWORD} # Sets the demo admin user password when using demo configuration (for OpenSearch 2.12 and later)
    ulimits:
      memlock:
        soft: -1 # Set memlock to unlimited (no soft or hard limit)
        hard: -1
      nofile:
        soft: 65536 # Maximum number of open files for the opensearch user - set to at least 65536
        hard: 65536
    volumes:
      - opensearch-data1:/usr/share/opensearch/data # Creates volume called opensearch-data1 and mounts it to the container
      - ./config.yml:/usr/share/opensearch/config/opensearch-security/config.yml
    ports:
      - 9200:9200 # REST API
      - 9600:9600 # Performance Analyzer
    networks:
      - opensearch-net # All of the containers will join the same Docker bridge network
  opensearch-node2:
    image: opensearchproject/opensearch:3.3.0 # This should be the same image used for opensearch-node1 to avoid issues
    container_name: opensearch-node2
    environment:
      - cluster.name=opensearch-cluster
      - node.name=opensearch-node2
      - discovery.seed_hosts=opensearch-node1,opensearch-node2
      - cluster.initial_cluster_manager_nodes=opensearch-node1,opensearch-node2
      - bootstrap.memory_lock=true
      - "OPENSEARCH_JAVA_OPTS=-Xms3072m -Xmx3072m"
      - OPENSEARCH_INITIAL_ADMIN_PASSWORD=${OPENSEARCH_INITIAL_ADMIN_PASSWORD}
    ulimits:
      memlock:
        soft: -1
        hard: -1
      nofile:
        soft: 65536
        hard: 65536
    volumes:
      - opensearch-data2:/usr/share/opensearch/data
      - ./config.yml:/usr/share/opensearch/config/opensearch-security/config.yml
    networks:
      - opensearch-net
  opensearch-dashboards:
    image: opensearchproject/opensearch-dashboards:3.3.0 # Make sure the version of opensearch-dashboards matches the version of opensearch installed on other nodes
    container_name: opensearch-dashboards
    ports:
      - 5601:5601 # Map host port 5601 to container port 5601
    expose:
      - "5601" # Expose port 5601 for web access to OpenSearch Dashboards
    volumes:
      - ./opensearch_dashboards.yml:/usr/share/opensearch-dashboards/config/opensearch_dashboards.yml
    environment:
      OPENSEARCH_HOSTS: '["https://opensearch-node1:9200","https://opensearch-node2:9200"]' # Define the OpenSearch nodes that OpenSearch Dashboards will query
    networks:
      - opensearch-net
  keycloak:
    image: quay.io/keycloak/keycloak:26.1.4
    command: start-dev
    container_name: keycloak
    environment:
      KC_BOOTSTRAP_ADMIN_USERNAME: admin
      KC_BOOTSTRAP_ADMIN_PASSWORD: admin
    ports:
      - "8080:8080"
      - "8443:8443"
    networks:
      - opensearch-net
    healthcheck:
      test: ["CMD", "sh", "-c", "exec 3<>/dev/tcp/localhost/8080; echo 'HTTP/1.1' >&3; head -1 <&3"]
      interval: 30s
      timeout: 10s
      retries: 5


volumes:
  opensearch-data1:
  opensearch-data2:

networks:
  opensearch-net:
Restart OpenSearch and OpenSearch Dashboard services for the changes to take effect.
admin@linuxser:~/opensearch_with_openid$ docker compose down opensearch-node1 -v
admin@linuxser:~/opensearch_with_openid$ docker compose down opensearch-node2 -v
admin@linuxser:~/opensearch_with_openid$ docker compose down opensearch-dashboards -v
admin@linuxser:~/opensearch_with_openid$ docker compose up -d opensearch-node1
admin@linuxser:~/opensearch_with_openid$ docker compose up -d opensearch-node2
admin@linuxser:~/opensearch_with_openid$ docker compose up -d opensearch-dashboards
Step7: Create Role
Let’s now create a new role named “osdevelopers” with cluster and index level permissions as defined below.
The cluster_composite_ops action group in OpenSearch grants a set of cluster-level permissions primarily related to bulk operations and alias management.
PUT https://linuxser.stack.com:9200/_plugins/_security/api/roles/osdevelopers
Authorization: Basic admin:Se@rch@2025
Accept: application/json
Content-Type: application/x-ndjson

{
  "cluster_permissions": [
    "cluster_composite_ops"
  ],
  "index_permissions": [{
    "index_patterns": [
      "*"
    ],
    "allowed_actions": [
      "read",
      "search"
    ]
  }]
}
Here will create another role named “osadministrators” with additional permission to monitor the cluster.
PUT https://linuxser.stack.com:9200/_plugins/_security/api/roles/osadministrators
Authorization: Basic admin:Se@rch@2025
Accept: application/json
Content-Type: application/x-ndjson

{
  "cluster_permissions": [
    "cluster_composite_ops",
    "cluster_monitor"
  ],
  "index_permissions": [{
    "index_patterns": [
      "*"
    ],
    "allowed_actions": [
      "read",
      "search"
    ]
  }]
}
Step8: Create role mapping
Once we have the role ready, we need to map the roles “osdevelopers” and “osadministrators” to backend roles “osdevelopers” and “osadministrators” respectively. These backend roles are the groups which are assigned to the users in the realm “stack”.
### Create a role mapping
PUT https://linuxser.stack.com:9200/_plugins/_security/api/rolesmapping/osdevelopers
Authorization: Basic admin:Se@rch@2025
Accept: application/json
Content-Type: application/json

{
  "backend_roles" : [ "osdevelopers" ]
}
### Create a role mapping
PUT https://linuxser.stack.com:9200/_plugins/_security/api/rolesmapping/osadministrators
Authorization: Basic admin:Se@rch@2025
Accept: application/json
Content-Type: application/json

{
  "backend_roles" : [ "osadministrators" ]
}
Step9: Validate Access with OIDC
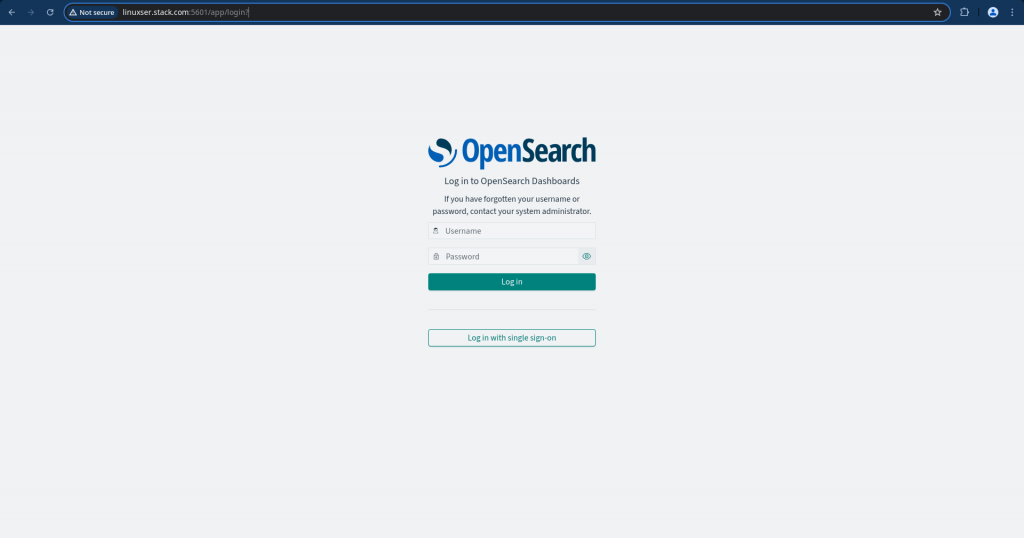
Now, if you try to launch the OpenSearch Dashboard portal, it will have both “basic” auth and “login with single sign-on” options enabled as shown below.
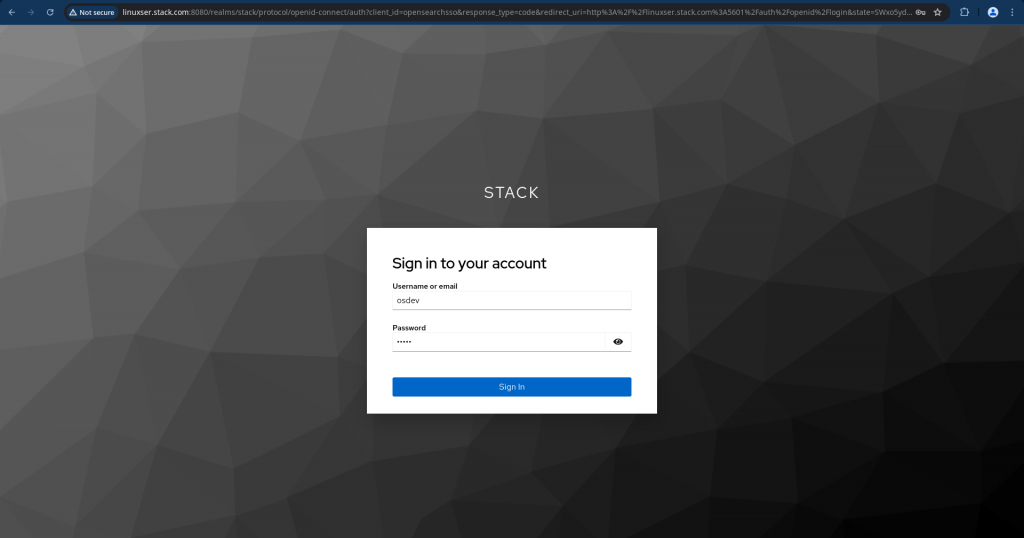
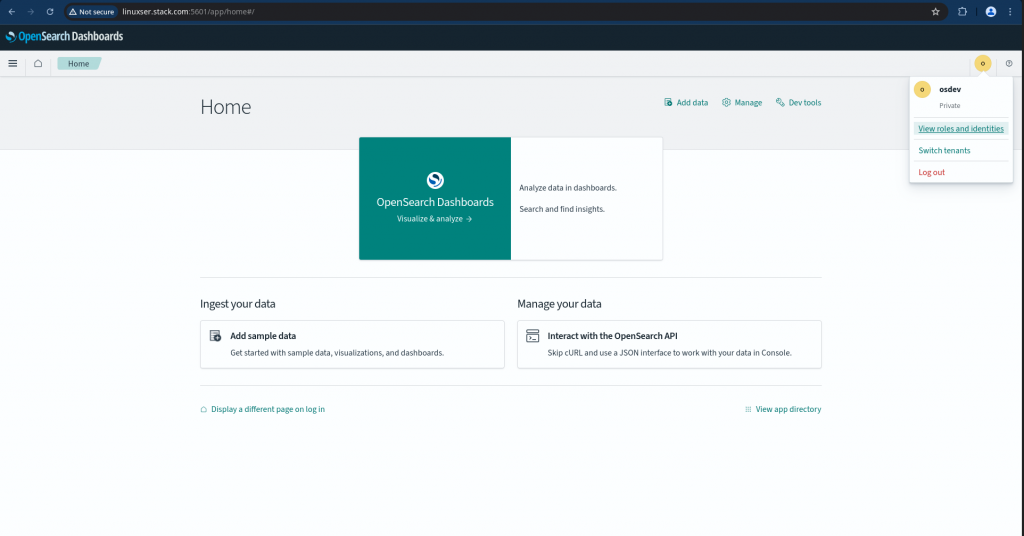
Now if you click the “login with single sign-on” button you will be redirected to keycloak sign-in page where in you can login with the “osdev” user created in the realm “stack”.
If everything goes fine, you should be able to login with “osdev” user into the OpenSearch Dashboard with the permissions granted under the role “osdevelopers”.
As the OpenSearch cluster still supports the “basic” auth with backend interal user database for authorization, admin user would still be able to login with basic auth and manage the cluster.
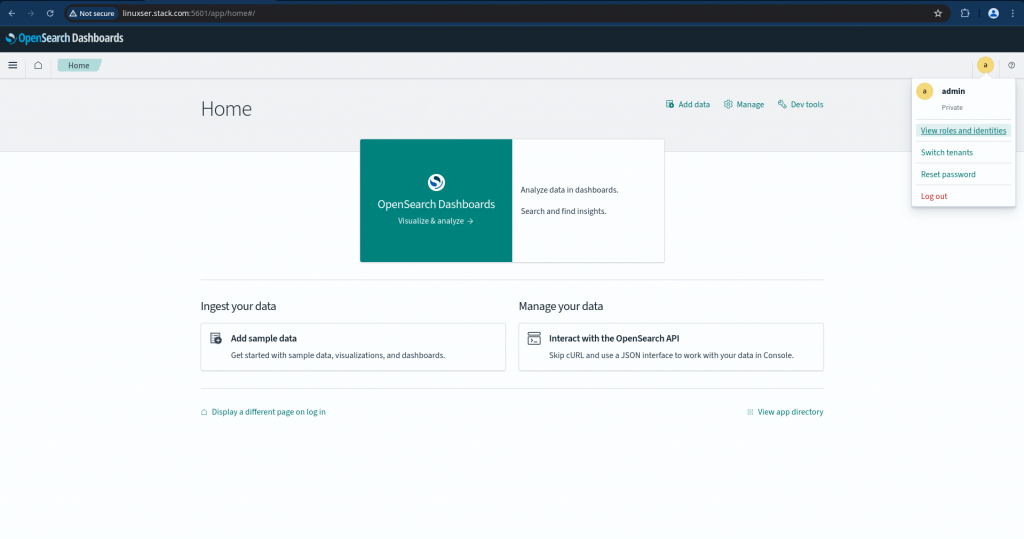
You can as well try to login with “osadmin” user and try to see if you able to monitor the cluster by running some of the queries relaled to cluster monitoring.
Hope you enjoyed reading this article. Thank you..
Leave a Reply
You must be logged in to post a comment.