How to secure OpenSearch cluster with JWT authentication backend

Here in this article we will try to secure OpenSearch cluster with JSON Web token based authentication backend.
Test Environment
- Fedora 41 server
- Docker version 27.4.1
- Docker Compose v2.32.1
JSON Web Token (JWT)
JWT is a Open standard defined to securly transmit information between parties in the JSON format. Its primarly used to implement Single Sign-On solutions and come under the category of token based authentication system. JWT are signed using a secret (HMAC key or RSA/ECDSA keypair). Signed tokens can verify the integrity of the claims contained within it.
JWT structure consist of the following components.
- Header: Contains the type of token and the algorithm used to sign the token
- Payload: Contains claims about an entity. There are three types of claims: registered, public, and private claims
- Signature: Calculated using the header and the payload, Provides validation that the content hasn’t been tampered with
For detailed information about JWT refer Introduction to JSON Web Tokens.
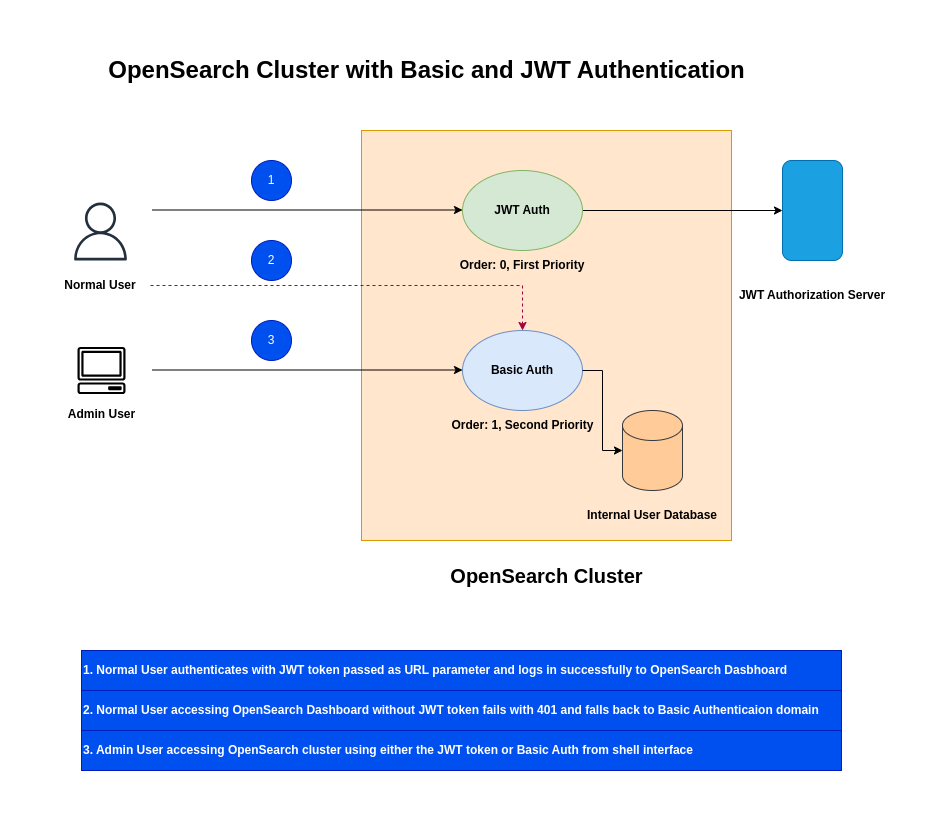
Chained Authentication
Chained authentication in OpenSearch allows you to specify a sequence of authentication methods for a single login attempt. The OpenSearch Security plugin sequentially tries each backend in the configured order until one successfully authenticates the user. This provides significant benefits for flexibility, user experience, and security.
Chained authentication supports a mix of users with different authentication methods, which is ideal for organizations with varied access requirements.
Example: Administrative user’s can leverage the internal user database for authentication and authorization while the normal users allowed to access the cluster using the Modern SSO authentication and authorization system.
High Level Architecture
If you are interested in watching the video. Here is the YouTube video on the same step by step procedure outlined below.
Procedure
Step1: Ensure OpenSearch Cluster running
For this demo, let’s setup a OpenSearch cluster with security enabled by following Set up a cluster with security (recommended for most use cases).
This setup will install OpenSearch cluster with default TLS certificates and internal user database for authentication and authorization.
So my cluster is up and running on the following server “linuxser.stack.com” with port “9200” for OpenSearch and “5601” for OpenSearch Dasbhoard.
We can verify the same using the below restapi query using the vscode restclient extension.
### Get cluster status
GET https://linuxser.stack.com:9200/_cluster/health
Authorization: Basic admin:Se@rch@2025
Accept: application/json
Content-Type: application/json
The OpenSearch Dashboard is available at “http://linuxser.stack.com:5601” with basic authentication powered by internal user database.
Step2: Configure OpenSearch Security config with JWT
Here we are going to update config.yml to enable both “basic_internal_auth_domain” and “jwt_auth_domain” domains.
For “basic_internal_auth_domain” we are going to use the default settings. For jwt_auth_domain here are the details of the updated fields.
- signing_key: The signing key(s) used to verify the token. If you use a symmetric key algorithm, this is the Base64-encoded shared secret. If you use an asymmetric algorithm, the algorithm contains the public key. To pass multiple keys, use a comma-separated list or enumerate the keys.
- jwt_header: The HTTP header in which the token is transmitted. This is typically the Authorization header with the Bearer schema,Authorization: Bearer . Default is Authorization. Replacing this field with a value other than Authorization prevents the audit log from properly redacting the JWT header from audit messages. It is recommended that users only use Authorization when using JWTs with audit logging.
- subject_key: The key in the JSON payload that stores the username. If not set, the subject registered claim is used. To extract a username from nested JWT claims, you can configure subject_key as a list.
- roles_key: The key in the JSON payload that stores the user’s roles. The value must be a comma-separated list of roles. You can configure roles_key as a list to extract roles from nested JWT claims.
For brevity, i have removed all the comment sections and only provided the required settings. An authentication with lower order value is given first priority for authentication and if that fails authentication fallback’s to basic authentication.
admin@linuxser:~/opensearch_with_jwt$ cat config.yml
---
_meta:
  type: "config"
  config_version: 2

config:
  dynamic:
    authc:
      jwt_auth_domain:
        description: "Authenticate via Json Web Token"
        http_enabled: true
        transport_enabled: true
        order: 0
        http_authenticator:
          type: jwt
          challenge: false
          config:
            #jwks_uri: 'https://your-jwks-endpoint.com/.well-known/jwks.json'
            signing_key: "dWJoV284UXRPTW5pSDh6aFpTZTBRRFJ3TFI3bG9lN2U4eVBPSE9kUmFuWFEycDBtYW4="
            jwt_header: "Authorization"
            jwt_url_parameter: null
            jwt_clock_skew_tolerance_seconds: 30
            roles_key: roles
            subject_key: username
        authentication_backend:
          type: noop
      basic_internal_auth_domain:
        description: "Authenticate via HTTP Basic against internal users database"
        http_enabled: true
        transport_enabled: true
        order: 1
        http_authenticator:
          type: basic
          challenge: true
        authentication_backend:
          type: intern
As JWTs tokens itself can be used for user identification and authorization, there is no additional authentication_backend. We can set this value to noop.
Step3: Configure OpenSearch Dashboard config with JWT
In order to enable OpenSearch Dashboard to be authenticated using the JWT token we need to “opensearch_security.auth.type” and “opensearch_security.jwt.url_param”.
- opensearch_security.auth.type: Defines the type of authentication to use for OpenSearch Dashboard. In this case its JWT
- opensearch_security.jwt.url_param: Defines the query parameter that we can use to pass the JWT token for authentication
admin@linuxser:~/opensearch_with_jwt$ cat opensearch_dashboards.yml
---
opensearch.hosts: [https://localhost:9200]
opensearch.ssl.verificationMode: none
opensearch.username: kibanaserver
opensearch.password: kibanaserver
opensearch.requestHeadersWhitelist: [authorization, securitytenant]

opensearch_security.multitenancy.enabled: true
opensearch_security.multitenancy.tenants.preferred: [Private, Global]
opensearch_security.readonly_mode.roles: [kibana_read_only]
# Use this setting if you are running opensearch-dashboards without https
opensearch_security.cookie.secure: false
server.host: '0.0.0.0'

# chained auth config
opensearch_security.auth.multiple_auth_enabled: true
opensearch_security.auth.type: ["basicauth","jwt"]
opensearch_security.jwt.url_param: "token"
Step4: Update Docker compose file
Once we have the OpenSearch config.yml file and OpenSearch Dashboard config file ready with the updated settings, we can volume mount them into the docker container services as shown below.
admin@linuxser:~/opensearch_with_jwt$ cat docker-compose.yml
services:
  opensearch-node1: # This is also the hostname of the container within the Docker network (i.e. https://opensearch-node1/)
    image: opensearchproject/opensearch:3.3.0
    container_name: opensearch-node1
    environment:
      - cluster.name=opensearch-cluster # Name the cluster
      - node.name=opensearch-node1 # Name the node that will run in this container
      - discovery.seed_hosts=opensearch-node1,opensearch-node2 # Nodes to look for when discovering the cluster
      - cluster.initial_cluster_manager_nodes=opensearch-node1,opensearch-node2 # Nodes eligibile to serve as cluster manager
      - bootstrap.memory_lock=true # Disable JVM heap memory swapping
      - "OPENSEARCH_JAVA_OPTS=-Xms3072m -Xmx3072m" # Set min and max JVM heap sizes to at least 50% of system RAM
      - OPENSEARCH_INITIAL_ADMIN_PASSWORD=${OPENSEARCH_INITIAL_ADMIN_PASSWORD} # Sets the demo admin user password when using demo configuration (for OpenSearch 2.12 and later)
    ulimits:
      memlock:
        soft: -1 # Set memlock to unlimited (no soft or hard limit)
        hard: -1
      nofile:
        soft: 65536 # Maximum number of open files for the opensearch user - set to at least 65536
        hard: 65536
    volumes:
      - opensearch-data1:/usr/share/opensearch/data # Creates volume called opensearch-data1 and mounts it to the container
      - ./config.yml:/usr/share/opensearch/config/opensearch-security/config.yml
    ports:
      - 9200:9200 # REST API
      - 9600:9600 # Performance Analyzer
    networks:
      - opensearch-net # All of the containers will join the same Docker bridge network
  opensearch-node2:
    image: opensearchproject/opensearch:3.3.0 # This should be the same image used for opensearch-node1 to avoid issues
    container_name: opensearch-node2
    environment:
      - cluster.name=opensearch-cluster
      - node.name=opensearch-node2
      - discovery.seed_hosts=opensearch-node1,opensearch-node2
      - cluster.initial_cluster_manager_nodes=opensearch-node1,opensearch-node2
      - bootstrap.memory_lock=true
      - "OPENSEARCH_JAVA_OPTS=-Xms3072m -Xmx3072m"
      - OPENSEARCH_INITIAL_ADMIN_PASSWORD=${OPENSEARCH_INITIAL_ADMIN_PASSWORD}
    ulimits:
      memlock:
        soft: -1
        hard: -1
      nofile:
        soft: 65536
        hard: 65536
    volumes:
      - opensearch-data2:/usr/share/opensearch/data
      - ./config.yml:/usr/share/opensearch/config/opensearch-security/config.yml
    networks:
      - opensearch-net
  opensearch-dashboards:
    image: opensearchproject/opensearch-dashboards:3.3.0 # Make sure the version of opensearch-dashboards matches the version of opensearch installed on other nodes
    container_name: opensearch-dashboards
    ports:
      - 5601:5601 # Map host port 5601 to container port 5601
    expose:
      - "5601" # Expose port 5601 for web access to OpenSearch Dashboards
    volumes:
      - ./opensearch_dashboards.yml:/usr/share/opensearch-dashboards/config/opensearch_dashboards.yml
    environment:
      OPENSEARCH_HOSTS: '["https://opensearch-node1:9200","https://opensearch-node2:9200"]' # Define the OpenSearch nodes that OpenSearch Dashboards will query
    networks:
      - opensearch-net

volumes:
  opensearch-data1:
  opensearch-data2:

networks:
  opensearch-net:
Step5: Create JWT Token Generator Python script
Here is a sample python script which takes user identity as payload along with a shared secret. We leverage the “pyjwt” python pip package to encode and decode the JSON payload. This script uses the HS256 algorithm for signing the JWT token and also adds a claim “exp” to ensure that the token is validate for mentioned number of minutes.
admin@linuxser:~/opensearch_with_jwt$ cat tokengenerator.py
import jwt
from datetime import datetime, timedelta, timezone

def generate_jwt_token(payload_data: dict, secret_key: str, algorithm: str = "HS256", expires_in_minutes: int = 30) -> str:
    """
    Generates a JWT token.

    Args:
        payload_data (dict): The data to be included in the token's payload.
        secret_key (str): The secret key used to sign the token.
        algorithm (str): The algorithm to use for signing (e.g., "HS256", "RS256").
        expires_in_minutes (int): The token's expiration time in minutes.

    Returns:
        str: The generated JWT token.
    """
    to_encode = payload_data.copy()
    expire_time = datetime.now(timezone.utc) + timedelta(minutes=expires_in_minutes)
    to_encode.update({"exp": expire_time})

    encoded_jwt = jwt.encode(to_encode, secret_key, algorithm=algorithm)
    return encoded_jwt

# Example Usage:
if __name__ == "__main__":
    # Define your payload data
    #user_payload = {
    #    "user_id": "1",
    #    "username": "admin",
    #    "roles": ["admin", "user"]
    #}
    user_payload = {
        "user_id": "1000",
        "username": "devopsuser",
        "roles": ["devops"]
            }

    # Define your secret key (keep this secure and don't expose it!)
    my_secret_key = "ubhWo8QtOMniH8zhZSe0QDRwLR7loe7e8yPOHOdRanXQ2p0man"

    # Generate the token
    token = generate_jwt_token(user_payload, my_secret_key)
    print(f"Generated JWT Token: {token}")

    # You can also decode it to verify (for demonstration purposes)
    try:
        decoded_payload = jwt.decode(token, my_secret_key, algorithms=["HS256"])
        print(f"Decoded Payload: {decoded_payload}")
    except jwt.ExpiredSignatureError:
        print("Token has expired!")
    except jwt.InvalidTokenError:
        print("Invalid token!")
Step6: Start OpenSearch Cluster
Now its time to start our OpenSearch services using docker compose with the updated configuration files.
admin@linuxser:~/opensearch_with_jwt$ docker compose up -d
Once the cluster is up and running, we can verify the security config that is currently enabled within the cluster as shown below.
### Get cluster security config
GET https://linuxser.stack.com:9200/_plugins/_security/api/securityconfig?pretty
Authorization: Basic admin:Se@rch@2025
Accept: application/json
Content-Type: application/json
Step7: Create a role
Let’s now create a new role named “devops” with cluster and index level permissions as defined below.
PUT https://linuxser.stack.com:9200/_plugins/_security/api/roles/devops
Authorization: Basic admin:Se@rch@2025
Accept: application/json
Content-Type: application/x-ndjson

{
  "cluster_permissions": [
    "cluster_composite_ops"
  ],
  "index_permissions": [{
    "index_patterns": [
      "*"
    ],
    "allowed_actions": [
      "read",
      "search"
    ]
  }]
}
Step8: Create role mapping
Once we have the role ready, we need to map the role to backend role “devops”. This backend role is the role which is assigned to the user as per the JWT token
### Create a role mapping
PUT https://linuxser.stack.com:9200/_plugins/_security/api/rolesmapping/devops
Authorization: Basic admin:Se@rch@2025
Accept: application/json
Content-Type: application/json

{
  "backend_roles" : [ "devops" ]
}
Step9: Generate JWT Token
Let’s now generate a JWT token for the user named “devopsuser” who has a backend role “devops”.
admin@linuxser:~/opensearch_with_jwt$ python3 tokengenerator.py
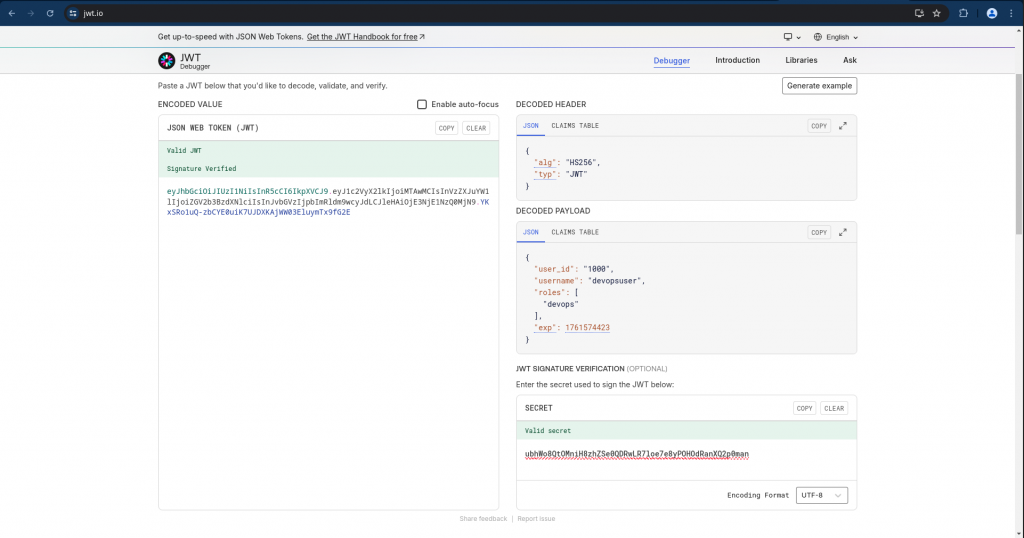
Generated JWT Token: eyJhbGciOiJIUzI1NiIsInR5cCI6IkpXVCJ9.eyJ1c2VyX2lkIjoiMTAwMCIsInVzZXJuYW1lIjoiZGV2b3BzdXNlciIsInJvbGVzIjpbImRldm9wcyJdLCJleHAiOjE3NjE1NzQ0MjN9.YKxSRo1uQ-zbCYE0uiK7UJDXKAjWW03EluymTx9fG2E
Decoded Payload: {'user_id': '1000', 'username': 'devopsuser', 'roles': ['devops'], 'exp': 1761574423}
Once the JWT token is generated, you can verify it using the ]JWT decoder portal(https://www.jwt.io/) as shown below.
You can verify how the PyJWT encoded JWT token is decoded and showing the header, payload and signature section.
Step10: Validate Access with JWT Token
It’s time to verify the access to the OpenSearch cluster using the JWT token that we have generated.
Get cluster status using JWT token
This request fails with permission denied as the user authenticated with the JWT token and the mapped role does not have the required permissions to check the cluster health.
GET https://linuxser.stack.com:9200/_cluster/health
Authorization: Bearer eyJhbGciOiJIUzI1NiIsInR5cCI6IkpXVCJ9.eyJ1c2VyX2lkIjoiMTAwMCIsInVzZXJuYW1lIjoiZGV2b3BzdXNlciIsInJvbGVzIjpbImRldm9wcyJdLCJleHAiOjE3NjE1NzQ0MjN9.YKxSRo1uQ-zbCYE0uiK7UJDXKAjWW03EluymTx9fG2E
Accept: application/json
Content-Type: application/json
Here we are doing a search query using the JWT token based authentication and the user has the required permissions to search the indices.
### Search indices
GET https://linuxser.stack.com:9200/_search
Authorization: Bearer eyJhbGciOiJIUzI1NiIsInR5cCI6IkpXVCJ9.eyJ1c2VyX2lkIjoiMTAwMCIsInVzZXJuYW1lIjoiZGV2b3BzdXNlciIsInJvbGVzIjpbImRldm9wcyJdLCJleHAiOjE3NjE1NzQ0MjN9.YKxSRo1uQ-zbCYE0uiK7UJDXKAjWW03EluymTx9fG2E
Accept: application/json
Content-Type: application/json

{
  "query": {
    "match_all": {}
  }
}
Let’s now try to access the OpenSearch Dashboard using the JWT token passed as token parameter value and you should be able to access the dashboard
### OpenSearch Dashboard Access
GET http://linuxser.stack.com:5601/?token=eyJhbGciOiJIUzI1NiIsInR5cCI6IkpXVCJ9.eyJ1c2VyX2lkIjoiMTAwMCIsInVzZXJuYW1lIjoiZGV2b3BzdXNlciIsInJvbGVzIjpbImRldm9wcyJdLCJleHAiOjE3NjE1NzQ0MjN9.YKxSRo1uQ-zbCYE0uiK7UJDXKAjWW03EluymTx9fG2E
Accept: application/json
Content-Type: application/json
You can as well pass the JWT token in the AUthorization Header for accessing the Dashboard.
### OpenSearch Dashboard Access
GET http://linuxser.stack.com:5601/
Authorization: Bearer eyJhbGciOiJIUzI1NiIsInR5cCI6IkpXVCJ9.eyJ1c2VyX2lkIjoiMTAwMCIsInVzZXJuYW1lIjoiZGV2b3BzdXNlciIsInJvbGVzIjpbImRldm9wcyJdLCJleHAiOjE3NjE1NzQ0MjN9.YKxSRo1uQ-zbCYE0uiK7UJDXKAjWW03EluymTx9fG2E
Accept: application/json
Content-Type: application/json
Finally you can try to launch the OpenSearch Dashboard using the below url with the updated JWT token value in your case and verify that you are able to access the portal.
URL: http://linuxser.stack.com:5601/?token=eyJhbGciOiJIUzI1NiIsInR5cCI6IkpXVCJ9.eyJ1c2VyX2lkIjoiMTAwMCIsInVzZXJuYW1lIjoiZGV2b3BzdXNlciIsInJvbGVzIjpbImRldm9wcyJdLCJleHAiOjE3NjE1NzQ0MjN9.YKxSRo1uQ-zbCYE0uiK7UJDXKAjWW03EluymTx9fG2E
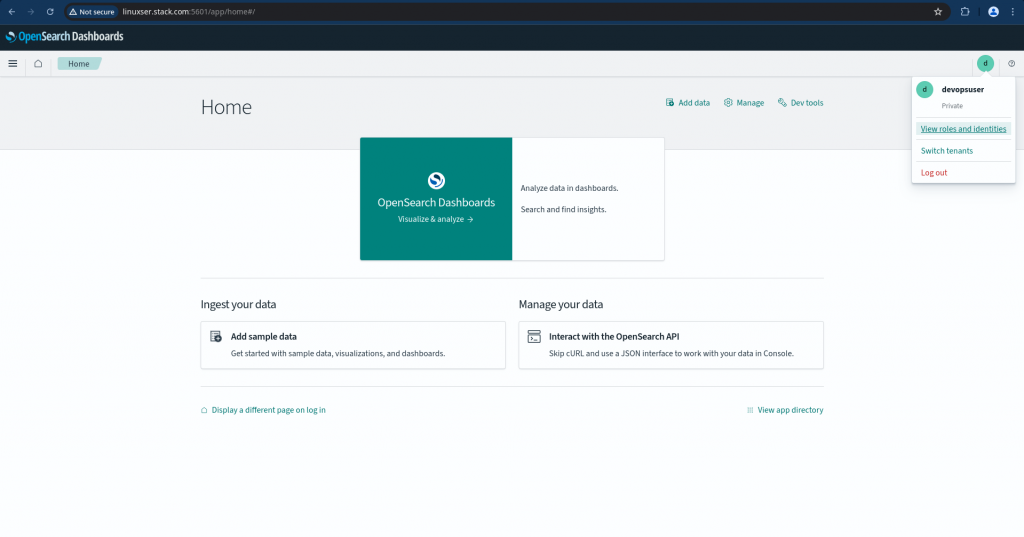
If we try to access the OpenSearch Dashboard without passing the token parameter, JWT authentication fail with 401 Unauthorized and falls back to basic authentication and provides basic authentication page to authenticate.
Now we have a very basic implementation of JWT token based authentication system along with Basic authentication (ie. Chained authentication) where in the admin users are still able to access the cluster by authenticating with internal user database and normal users can leverage JWT token based authentication.
Hope you enjoyed reading this article. Thank you..
Leave a Reply
You must be logged in to post a comment.