How to leverage Amazon Inspector service for vulnerability scanning

Securing our infrastructure and the application is becoming an important aspect of any IT service organisation. Here in this article we will look one of the security vulnerability scanning service provide by AWS which is Amazon Inspector. We will enable the Amazon Inspector service and try to instantiate an EC2 instance and configure it in such a way that the Amazon Inspector is able to collect the data from the EC2 instance and identify all the security vulnerabilities in that EC2 instance.
Test Environment
AWS Cloud with EC2 instance
What is Amazon Inspector
Amazon Inspector is an automated security vulnerability scanning and management service that runs continually. It automatically tries to discover and scan AWS workloads like EC2 instances and Elastic Container registry for software vulnerabilities and unintended network exposure with a single click. It calculates the risk score and efficiently prioritizes them for remediation. It supports compliance requirements and best practices for NIST CSF, PCI DSS, and other regulations.
If you are interested in watching the video. Here is the YouTube video on the same step by step procedure outlined below.
Procedure
Step1: Create an EC2 instance
As first step, lets create an EC2 instance. If you haven’t already registered for AWS free tier, you can register for it and get a 1 year free tier subscription else you can continue with your existing account and launch an EC2 instance.
In my case i have created an EC2 instance based on “Ubuntu Server 20.04 LTS (HVM), SSD Volume Type” AMI image with t2.micro instance type which is eligible for the free tier. While you configure your EC2 instance you migth notice that their is no IAM role attached by default to the EC2 instance on the Configure Instance section.
Step2: Validate SSM agent service status
By default Amazon EC2 instances have AWS Systems Manager agent installed and running on most of the EC2 instances launched. You can check the status of this service as shown below.
$ sudo systemctl status snap.amazon-ssm-agent.amazon-ssm-agent.service
● snap.amazon-ssm-agent.amazon-ssm-agent.service - Service for snap application amazon-ssm-agent.amazon-ssm-agent
     Loaded: loaded (/etc/systemd/system/snap.amazon-ssm-agent.amazon-ssm-agent.service; enabled; vendor preset: enabled)
     Active: active (running) since Sun 2022-05-01 03:12:29 UTC; 12min ago
   Main PID: 7820 (amazon-ssm-agen)
      Tasks: 16 (limit: 1147)
     Memory: 64.9M
     CGroup: /system.slice/snap.amazon-ssm-agent.amazon-ssm-agent.service
             ├─7820 /snap/amazon-ssm-agent/5163/amazon-ssm-agent
             └─8376 /snap/amazon-ssm-agent/5163/ssm-agent-worker
If you have launched any other OS based EC2 instance. You can check the SSM agent status and restart guide for making sure that this service is installed and running.
Step3: Attach instance profile to EC2 instance
Amazon Inspector uses the AWS Systems Manager (SSM) agent to collect information about the software application inventory of your EC2 instances, this data is then scanned by Amazon Inspector for software vulnerabilities.
As mentioned in the Step1, there is no IAM role attached to the EC2 instance by default. In order to provide permissions for the EC2 instance to use Systems Manager service core functionality we need to attach an instance profile with ‘AmazonSSMManagedInstanceCore‘ policy as shown below. Go to EC2 instance – Actions – Security – Modify IAM role. Here you will be able to create a new IAM role.

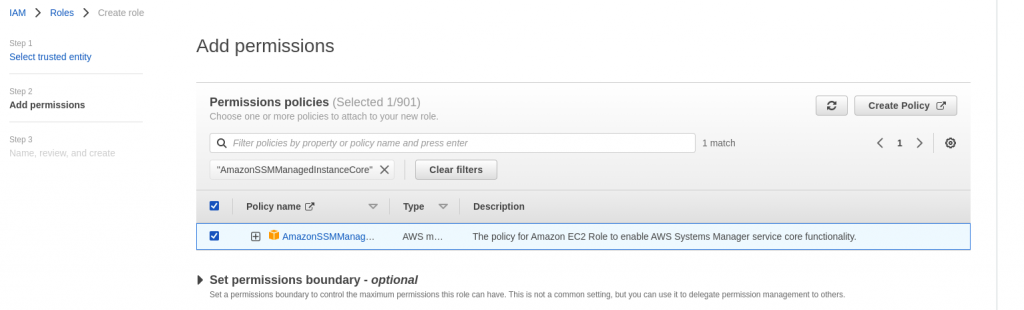
In the last page, provide a name to the role and create it. We can now attach this role to the EC2 instance so that it is able to leverage the SSM core functionality.
Step4: Enable Amazon Inspector service
In the AWS Dashboard you can search for Inspector service and enable it as shown below. Please make sure to check the list of regions in which Amazon Inspector service is available as its a regional specific service.

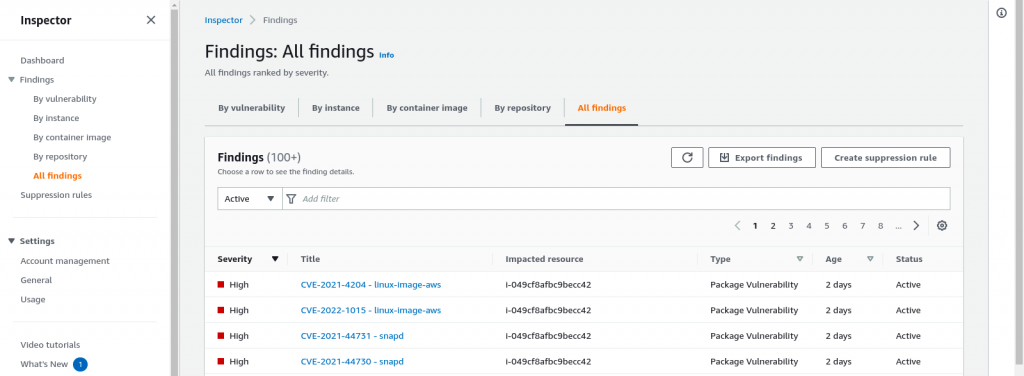
Step5: Validate the Amazon Inspector Dashboard
Once the required policy is attached to the EC2 instance. You can go the Amazon Inspector and see that it automatically detects the EC2 instance start scanning it for vulnerability as shown below.

Step6: Export vulnerability scanning report
These vulnerability scanning report can also be exported in JSON or CSV format by going to All findings section and Clicking on Export findings button as shown below.
For each vulnerability that is identify you will get a detailed report on the affected package and remediation guidelines if any.
This service can be leverage for your cloud based infrastructure workloads. But in case if you looking for on-prem infrastructure vulnerability scanning you can look into my previous articles on How to scan ubuntu system vulnerabilities using OpenSCAP and How to scan container images for security vulnerabilities using Trivy for details.
Hope you enjoyed reading this article. Thank you..
Leave a Reply
You must be logged in to post a comment.