How to scan ubuntu system vulnerabilities using OpenSCAP
Here in this article we will explore about OpenSCAP a system configuration, compliance and security vulnerability assessment tool which helps in identifying and classifying vulnerabilities on a system and validating the system configuration if its inline with the security policies. OpenSCAP scanner a scanning/auditing tool uses the security policies which are machine readable descriptions of the rules that infrastructure must conform to.
Test Environment
Fedora 35 (Ansible Controller)
Ubuntu 20.04 (Ansible Managed Node)
In this test environment we are going to use ansible controller (fedser) and ansible managed node (ubuntuopenscap) which is a ubuntu system on which we are going to carry out vulnerability assessment using the OpenSCAP scanning tool and generate report for analysis and mitigating them as required.
If you are interested in watching the video. Here is the YouTube video on the same step by step procedure outlined below.
Procedure
Step1: Make sure SSH key based authentication enabled for managed node
As a part of this step please make sure you have your working ansible setup and able to manage a node using it. Here i have two machines in my environment as shown below and i am able to login to ‘ubuntuopenscap’ using SSH keybased authentication.
- fedser – Ansible Controller
- ubuntuopenscap – Ansible Managed Node
[admin@fedser openscap_setup]$ ssh admin1@ubuntuopenscap
Welcome to Ubuntu 20.04.3 LTS (GNU/Linux 5.13.0-37-generic x86_64)

 * Documentation:  https://help.ubuntu.com
 * Management:     https://landscape.canonical.com
 * Support:        https://ubuntu.com/advantage

243 updates can be applied immediately.
160 of these updates are standard security updates.
To see these additional updates run: apt list --upgradable

Your Hardware Enablement Stack (HWE) is supported until April 2025.
Last login: Tue Mar 29 11:00:05 2022 from 192.168.122.1
admin1@ubuntuopenscap:~$
Step2: Updated ansible hosts file
Here in this step we will updated our ansible hosts file to include ‘ubuntuopenscap’ server for managing it using ansible controller. This is is the server on which we are going to carry out vulnerability scanning using OpenSCAP scanner.
[admin@fedser openscap_setup]$ cat /etc/ansible/hosts | grep openscap
...
[openscap]
ubuntuopenscap
...
Step3: Validate the ansible setup
I have user ‘admin1’ with which i am able to login to ‘ubuntuopenscap’ system. Let’s try to run the ‘ping’ on the managed node and see if we are able to get the response as shown below.
[admin@fedser openscap_setup]$ ansible openscap -m ping -u admin1
ubuntuopenscap | SUCCESS => {
    "ansible_facts": {
        "discovered_interpreter_python": "/usr/bin/python3"
    },
    "changed": false,
    "ping": "pong"
}
The above output confirms that we have setup our ansible correctly able to get the response from the managed node.
Step4: Install openscap
As a first step lets install OpenSCAP scanner package which provides the oscap tool using the below ansible task. Here we need to run the task using root privileges for installing the package. Once installed i am capturing the ubuntu release and oscap version details and printing to console.
- name: openscap setup
  hosts: openscap
  become: true
  become_user: root
  tasks:
  - name: ubuntu release name
    command: lsb_release -cs
    register: rel
  - name: install openscap-scanner
    apt:
      name: libopenscap8
      state: latest
  - name: validate installation
    shell: oscap --version | grep "command line tool"
    register: oscap_version
  - name: print oscap version
    debug: msg={{ oscap_version.stdout }}
  - name: print ubuntu release
    debug: msg={{ rel.stdout }}
Step5: Down and Extract the OVAL definition file
In this step we are going to prepare a script to download the OVAL definition file and extract it. Once the oval xml file is extracted we are going to run the scan using the oscap cli tool and providing the oval definition file (also called security content file) to this tool for evaluation. Also we are going save the results into a html and xml for later analysis.
#!/bin/bash

DATE=$(date +%m%d%Y)

# Download oval file
wget -O /var/tmp/com.ubuntu.$(lsb_release -cs).usn.oval.xml.bz2 https://security-metadata.canonical.com/oval/com.ubuntu.$(lsb_release -cs).usn.oval.xml.bz2

# Extract the xml file
bunzip2 /var/tmp/com.ubuntu.$(lsb_release -cs).usn.oval.xml.bz2

# Scan for vulnerability
oscap oval eval --results /var/tmp/report_${DATE}.xml --report /var/tmp/report_${DATE}.html /var/tmp/com.ubuntu.$(lsb_release -cs).usn.oval.xml
Step6: Copy and Execute the scan script
In this step we are going to copy the script onto managed node and execute it using the bash shell as per the below defined tasks when the playbook is executed. For each scan a xml and html report will be generated with appended date.
...
  - name: copy script
    copy:
      src: /home/admin/middleware/stack/ansible/playbooks/openscap_setup/openscap_scan.sh
      dest: /var/tmp/openscap_scan.sh
      mode: 0755
  - name: Scan system for vulnerability
    shell: /var/tmp/openscap_scan.sh
...
Step7: Execute the playbook
Here is my complete playbook for your reference.
[admin@fedser openscap_setup]$ cat scanubuntu.yml
---
- name: openscap setup
  hosts: openscap
  become: true
  become_user: root
  tasks:
  - name: ubuntu release name
    command: lsb_release -cs
    register: rel
  - name: install openscap-scanner
    apt:
      name: libopenscap8
      state: latest
  - name: validate installation
    shell: oscap --version | grep "command line tool"
    register: oscap_version
  - name: print oscap version
    debug: msg={{ oscap_version.stdout }}
  - name: print ubuntu release
    debug: msg={{ rel.stdout }}
  - name: copy script
    copy:
      src: /home/admin/middleware/stack/ansible/playbooks/openscap_setup/openscap_scan.sh
      dest: /var/tmp/openscap_scan.sh
      mode: 0755
  - name: Scan system for vulnerability
    shell: /var/tmp/openscap_scan.sh
Let’s go ahead and execute the ansible playbook by passing the password for root privilege escalation for installing the package and running the script as shown below.
[admin@fedser openscap_setup]$ ansible-playbook scanubuntu.yml -u admin1 -K
BECOME password:

PLAY [openscap setup] ****************************************************************************************************************************************

TASK [Gathering Facts] ***************************************************************************************************************************************
ok: [ubuntuopenscap]

TASK [ubuntu release name] ***********************************************************************************************************************************
changed: [ubuntuopenscap]

TASK [install openscap-scanner] ******************************************************************************************************************************
changed: [ubuntuopenscap]

TASK [validate installation] *********************************************************************************************************************************
changed: [ubuntuopenscap]

TASK [print oscap version] ***********************************************************************************************************************************
ok: [ubuntuopenscap] => {
    "msg": "OpenSCAP command line tool (oscap) 1.2.16"
}

TASK [print ubuntu release] **********************************************************************************************************************************
ok: [ubuntuopenscap] => {
    "msg": "focal"
}

TASK [copy script] *******************************************************************************************************************************************
changed: [ubuntuopenscap]

TASK [Scan system for vulnerability] *************************************************************************************************************************
changed: [ubuntuopenscap]

PLAY RECAP ***************************************************************************************************************************************************
ubuntuopenscap             : ok=8    changed=5    unreachable=0    failed=0    skipped=0    rescued=0    ignored=0
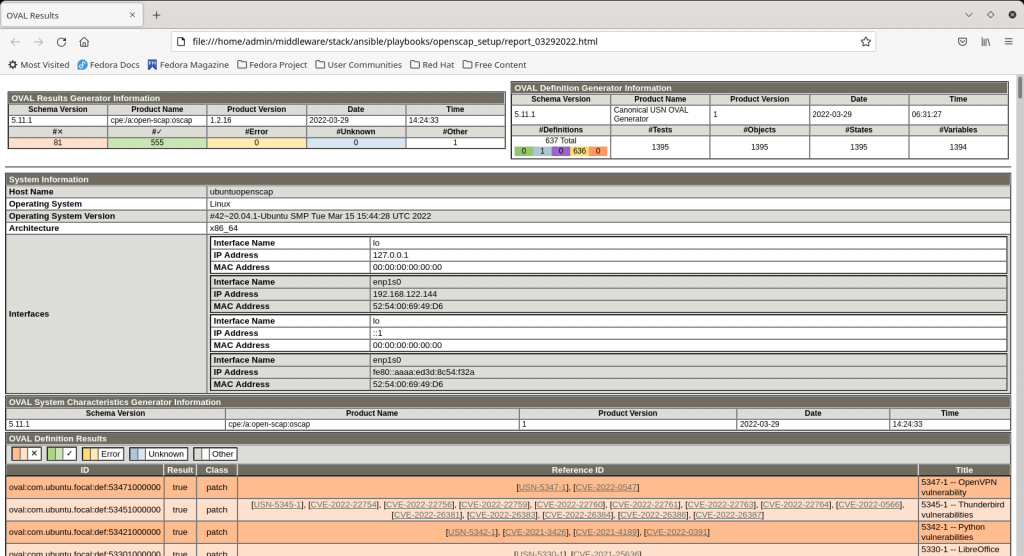
Step8: Validate the Scan report
Once the playbook is executed successfully you should be able to view the generated reports as shown below. You can open the html report using any browser and review it to mitigate any vulnerabilities that you want to address.
admin1@ubuntuopenscap:/var/tmp$ ls -ltr report_*
-rw-r--r-- 1 root root 8520631 Mar 29 14:24 report_03292022.xml
-rw-r--r-- 1 root root  556268 Mar 29 14:24 report_03292022.html
These reports can be further transfer to any centralised remote server from where you can access them using any web server. I am going to scp these reports for now onto my host machine from where i can view the reports using browser.
[admin@fedser openscap_setup]$ scp -r admin1@ubuntuopenscap:/var/tmp/report_03292022.html .
Here is the sample screenshot of the report.
NOTE: Before trying to fix any vulnerabilities make sure you got the necessary backups or restore point snapshots in place to revert back in case of any issues with the fix.
Hope you enjoyed reading this article. Thank you..
Leave a Reply
You must be logged in to post a comment.