How to protect the Kuberentes dashboard using keycloak oidc and oauth2-proxy
Here in this article we will see how we can protect the kubernetes dashboard using the keycloak oidc and oauth2-proxy.
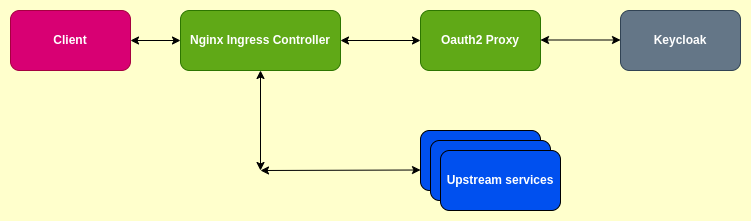
The keycloak oidc here provides the authentication service for the user and generates the oauth2 token which needs to be passed onto the client to be included in the authorization bearer token header for future requests from the client.
oauth2-proxy acts as an intermediary between the client and the keycloak oidc which intercepts the request from the client and redirects to the keycloak oidc for user authentication. The oauth2-proxy acts as a reverse proxy here which gets the authenticated session state from the keycloak oidc provider. This authenticated session which consists of oauth2 tokens are stored in the configured session store (ie cookies, redis or etc) and passed onto the client on the callback url. The client then appends the request with the authentication session state and headers and passes onto the upstream server to access the services.
Test Environment
Ubuntu 20.04
Kubernetes cluster v1.23.1
Here is the high level request flow diagram.
This article is in continuation to the following article.
So i assume you have the kubernetes cluster setup ready along with the keycloak setup. Also you have verified that you are able to access the kubernetes cluster resources using kubectl configured with the keycloak oidc provider. The kubernetes cluster that i am currently working on consists of (1 master and 1 worker) with flannel networking policy.
Let’s now get started and see how we can protect the kubernetes dashboard using keycloak and oauth2-proxy.
If you are interested in watching the video. Here is the youtube video on the same step by step procedure outlined below.
Procedure
Step1: Generate certificate key pair for kubernetes host FQDN
kubeadmin@kubemaster:~/stack$ pwd
/home/kubeadmin/stack
kubeadmin@kubemaster:~/stack$ mkdir oauth2
kubeadmin@kubemaster:~/stack$ cd oauth2/
Create ssl certificate configuration file named ‘sslcert.conf’.
kubeadmin@kubemaster:~/stack/oauth2$ cat sslcert.conf
[req]
distinguished_name = req_distinguished_name
x509_extensions = v3_req
prompt = no
[req_distinguished_name]
C = IN
ST = MH
L = Mumbai
O = stack
OU = devops
CN = kubemaster
[v3_req]
keyUsage = keyEncipherment, dataEncipherment
extendedKeyUsage = serverAuth, clientAuth
subjectAltName = @alt_names
[alt_names]
DNS.1 = kubemaster
DNS.2 = kubenode
DNS.3 = 192.168.122.54
DNS.4 = 192.168.122.198
Generate the SSL certificate and key file using the openssl utility.
kubeadmin@kubemaster:~/stack/oauth2$ openssl req -x509 -nodes -days 730 -newkey rsa:2048 -keyout tls.key -out tls.crt -config sslcert.conf -extensions 'v3_req'

kubeadmin@kubemaster:~/stack/oauth2$ ls -ltr
total 12
-rw-rw-r-- 1 kubeadmin kubeadmin  396 Dec 29 17:24 sslcert.conf
-rw------- 1 kubeadmin kubeadmin 1704 Dec 29 17:25 tls.key
-rw-rw-r-- 1 kubeadmin kubeadmin 1399 Dec 29 17:25 tls.crt
Step2: Generate kubernetes dashboard ingress TLS secret in kubernetes-dashboard
kubeadmin@kubemaster:~/stack/oauth2$ kubectl create secret tls kubernetes-dashboard-ingress-tls --cert=./tls.crt --key=./tls.key -n kubernetes-dashboard
secret/kubernetes-dashboard-ingress-tls created

kubeadmin@kubemaster:~/stack/oauth2$ kubectl describe secret kubernetes-dashboard-ingress-tls -n kubernetes-dashboard
Name:         kubernetes-dashboard-ingress-tls
Namespace:    kubernetes-dashboard
Labels:       <none>
Annotations:  <none>

Type:  kubernetes.io/tls

Data
====
tls.crt:  1399 bytes
tls.key:  1704 bytes
Step3: Deploy the kubernetes dashboard application
As a first step we first need to have the kubernetes application deployed into our cluster. This can be done by applying the below yaml definition file.
kubeadmin@kubemaster:~/stack/oauth2$ kubectl apply -f https://raw.githubusercontent.com/kubernetes/dashboard/v2.4.0/aio/deploy/recommended.yaml
namespace/kubernetes-dashboard created
serviceaccount/kubernetes-dashboard created
service/kubernetes-dashboard created
secret/kubernetes-dashboard-certs created
secret/kubernetes-dashboard-csrf created
secret/kubernetes-dashboard-key-holder created
configmap/kubernetes-dashboard-settings created
role.rbac.authorization.k8s.io/kubernetes-dashboard created
clusterrole.rbac.authorization.k8s.io/kubernetes-dashboard created
rolebinding.rbac.authorization.k8s.io/kubernetes-dashboard created
clusterrolebinding.rbac.authorization.k8s.io/kubernetes-dashboard created
deployment.apps/kubernetes-dashboard created
service/dashboard-metrics-scraper created
deployment.apps/dashboard-metrics-scraper created
This kuberentes dashboard which we just deployed is currently not exposed for external access as the service is of type ClusterIP.
Step4: Setup nginx ingress controller
Here we will install the ingress controller. The ingress controller acts like a load balancer which takes the client requests on http(s) and routes it to the appropriate ingress resource based on the application context. The ingress resources when applied are actually updating the nginx configuration based on the context and backend service information present in the definition. The Ingress controller abstracts away the complexity of Kubernetes application traffic routing and provides a bridge between Kubernetes services and external ones.
kubeadmin@kubemaster:~/stack/oauth2$ kubectl apply -f https://raw.githubusercontent.com/kubernetes/ingress-nginx/controller-v1.1.0/deploy/static/provider/cloud/deploy.yaml
namespace/ingress-nginx created
serviceaccount/ingress-nginx created
configmap/ingress-nginx-controller created
clusterrole.rbac.authorization.k8s.io/ingress-nginx created
clusterrolebinding.rbac.authorization.k8s.io/ingress-nginx created
role.rbac.authorization.k8s.io/ingress-nginx created
rolebinding.rbac.authorization.k8s.io/ingress-nginx created
service/ingress-nginx-controller-admission created
service/ingress-nginx-controller created
deployment.apps/ingress-nginx-controller created
ingressclass.networking.k8s.io/nginx created
validatingwebhookconfiguration.admissionregistration.k8s.io/ingress-nginx-admission created
serviceaccount/ingress-nginx-admission created
clusterrole.rbac.authorization.k8s.io/ingress-nginx-admission created
clusterrolebinding.rbac.authorization.k8s.io/ingress-nginx-admission created
role.rbac.authorization.k8s.io/ingress-nginx-admission created
rolebinding.rbac.authorization.k8s.io/ingress-nginx-admission created
job.batch/ingress-nginx-admission-create created
job.batch/ingress-nginx-admission-patch created
Step5: Setup oauth2-proxy service
In this step we are going to deploy oauth2-proxy as a service and configure it with the keycloak oidc provider configuration. This configuration enables the oauth2-proxy to intercept the request and based on whether the request is authenticated or unauthenticated is passed onto the oidc provider auth url for authentication. Here is the yaml definition file for deploying the oauth2-proxy and exposing it as a service.
kubeadmin@kubemaster:~/stack/oauth2$ cat oauth2-proxy.yml
apiVersion: apps/v1
kind: Deployment
metadata:
  labels:
    k8s-app: oauth2-proxy
  name: oauth2-proxy
  namespace: kubernetes-dashboard
spec:
  replicas: 1
  selector:
    matchLabels:
      k8s-app: oauth2-proxy
  template:
    metadata:
      labels:
        k8s-app: oauth2-proxy
    spec:
      #hostAliases:
      #- ip: "192.168.122.54"
      #  hostnames:
      #  - "kubemaster"
      containers:
      - args:
        - --provider=oidc
        - --email-domain=*
        - --http-address=0.0.0.0:4180
        #- --https-address=":443"
        #- --upstream=file:///dev/null
        #- --scope="groups"
        env:
        - name: OAUTH2_PROXY_OIDC_ISSUER_URL
          value: https://kubemaster:8443/auth/realms/local
        - name: OAUTH2_PROXY_REDIRECT_URL
          value: https://kubenode:32012/oauth2/callback
        #  value: https://192.168.122.198:8081/oauth2/callback
        - name: OAUTH2_PROXY_CLIENT_ID
          value: gatekeeper
        - name: OAUTH2_PROXY_CLIENT_SECRET
          value: jZzvJ0wCDDwltV3tAf0SXSbVoKXM1RqV
        - name: OAUTH2_PROXY_COOKIE_SECRET
          value: kgKUT3IMmESA81VWXvRpYIYwMSo1xndwIogUks6IS00=
        - name: OAUTH2_PROXY_UPSTREAM
          value: https://kubernetes-dashboard
        - name: OAUTH2_PROXY_SSL_INSECURE_SKIP_VERIFY
          value: "true"
        #- name: OAUTH2_PROXY_COOKIE_DOMAIN
        #  value:
        - name: OAUTH2_PROXY_INSECURE_OIDC_ALLOW_UNVERIFIED_EMAIL
          value: "true"
        #- name: OAUTH2_PROXY_COOKIE_SECURE
        #  value: "false"
        - name: OAUTH2_PROXY_PASS_AUTHORIZATION_HEADER
          value: "true"
        - name: OAUTH2_PROXY_SSL_UPSTREAM_INSECURE_SKIP_VERIFY
          value: "true"
        - name: OAUTH2_PROXY_OIDC_EMAIL_CLAIM
          value: email
        - name: OAUTH2_PROXY_GROUPS_CLAIM
          value: groups
        - name: OAUTH2_PROXY_ALLOWED_GROUPS
          value: developers
        - name: OAUTH2_PROXY_SKIP_PROVIDER_BUTTON
          value: "true"
        - name: OAUTH2_PROXY_SET_AUTHORIZATION_HEADER
          value: "true"
        image: quay.io/oauth2-proxy/oauth2-proxy:latest
        imagePullPolicy: Always
        name: oauth2-proxy
        ports:
        - containerPort: 4180
          protocol: TCP
---

apiVersion: v1
kind: Service
metadata:
  labels:
    k8s-app: oauth2-proxy
  name: oauth2-proxy
  namespace: kubernetes-dashboard
spec:
  ports:
  - name: http
    port: 4180
    protocol: TCP
    targetPort: 4180
  selector:
    k8s-app: oauth2-proxy
Step6: Setup Ingress resouces
The auth-url and auth-signin annotations allow you to use an external authentication provider to protect your Ingress resources. This functionality is enabled by deploying multiple Ingress objects for a single host. One Ingress object has no special annotations and handles authentication. Other Ingress objects can then be annotated in such a way that require the user to authenticate against the first Ingress’s endpoint, and can redirect 401s to the same endpoint.
If you have deployed your kubernetes cluster using kubeadm and do not have an external load balancer ip assigned. You can access the ingress controller HTTP and HTTPS protocols on the assigned NodePorts. In my case i have have my HTTPS protocol allocated a NodePort of 32012 for accessing it externally.
If you have a external ip assigned to your ingress controller loadbalancer and its mapped to a valid FQDN which is DNS routable. You can use that FQDN to access the ingress controller. You can comment out the first two annotations and uncomment next two annotation for a valid DNS routable FQDN.
Replace INGRESS_HOST with a valid FQDN and INGRESS_SECRET with a Secret with a valid SSL certificate. In my case i have used the kubenode which is my worker node FQDN as INGRESS_HOST with its self signed certificate.
kubeadmin@kubemaster:~/stack/oauth2$ cat dashboard-ingress.yml
apiVersion: networking.k8s.io/v1
kind: Ingress
metadata:
  annotations:
    nginx.ingress.kubernetes.io/auth-url: "https://$host:32012/oauth2/auth"
    nginx.ingress.kubernetes.io/auth-signin: "https://$host:32012/oauth2/start?rd=$escaped_request_uri"
    #nginx.ingress.kubernetes.io/auth-url: "https://$host/oauth2/auth"
    #nginx.ingress.kubernetes.io/auth-signin: "https://$host/oauth2/start?rd=$escaped_request_uri"
    nginx.ingress.kubernetes.io/backend-protocol: "HTTPS"
    nginx.ingress.kubernetes.io/auth-response-headers: "x-auth-request-user, x-auth-request-email, authorization"
  name: external-auth-oauth2
  namespace: kubernetes-dashboard
spec:
  ingressClassName: nginx
  rules:
  - host: kubenode		# __INGRESS_HOST__
    http:
      paths:
      - path: /
        pathType: Prefix
        backend:
          service:
            name: kubernetes-dashboard
            port:
              number: 443
---

apiVersion: networking.k8s.io/v1
kind: Ingress
metadata:
  name: oauth2-proxy
  namespace: kubernetes-dashboard
spec:
  ingressClassName: nginx
  rules:
  - host: kubenode		# __INGRESS_HOST__
    http:
      paths:
      - path: /oauth2
        pathType: Prefix
        backend:
          service:
            name: oauth2-proxy
            port:
              number: 4180
  tls:
  - hosts:
    - kubenode		# __INGRESS_HOST__
    secretName: kubernetes-dashboard-ingress-tls	# __INGRESS_SECRET__
Step7: Deploy the oauth2-proxy application and ingress resouces
kubeadmin@kubemaster:~/stack/oauth2$ kubectl apply -f oauth2-proxy.yaml
deployment.apps/oauth2-proxy created
service/oauth2-proxy created

kubeadmin@kubemaster:~/stack/oauth2$ kubectl apply -f dashboard-ingress.yaml
ingress.networking.k8s.io/external-auth-oauth2 created
ingress.networking.k8s.io/oauth2-proxy created
Step8: Launch you Client application
URL – https://INGRESS_HOST/ # INGRESS_HOST with a valid FQDN for your application
In my case i do not have a external load balancer ip address so, i have used my kubenode as valid FQDN by accessing the ingress the ingress controller on HTTPS NodePort 32012.
My Client Application url – https://kubenode:32012/
This should route you to the keycloak authentication page and once authenticated successfully it should load your upstream kubernetes dashboard page. Based on the RBAC access that has been provided to the static user alice which was setup in our earlier article you should be able to see the pods and namespaces from the kubernetes dashboard. All other resources access will be blocked.
Hope you enjoyed reading this article. Thank you..
Leave a Reply
You must be logged in to post a comment.