How to authenticate user with Keycloak OIDC Provider in Kubernetes
Here in this article we will setup a keycloak Open ID connect identity provider and configure the Kubernetes API server in such a way that it authenticates the user using the Keycloak identity provider and provides access to the kubernetes cluster resources.
Test Environment
Ubuntu 20.04
Kubernetes cluster v1.23.1
What is Kubernetes
Kubernetes is an Open source container orchestration engine which helps in automating the deployments, scaling and management of containerised applications. Kubernetes can be used to deploy your applications into containerised environment using various different workloads and expose the application to the end user using the various networking features available. Today most of the monolithic application are being converted into microservice architecture application in which each component is developed as a separate API and deployed into the containerised environment. This type of micro serviced architecture application can be easily managed, upgraded and maintained. Kubernetes orchestration engine helps in automating these containerised application deployment, scaling, upgrading by utilising the resources in an optimised manner.
Kubernetes API server which is a service deployed on the Master node is the component which exposes the HTTP(S) API endpoint. All the API request to manage the Kubernetes cluster go through the API server. Here in this article will see how the Kubernetes API server can authenticate and authrorize an API request before it provides access to the cluster resources.
Kubernetes API can be accessed using the following methods
- Kubectl
- Client libraries
- REST API requests
Types of users accessing the API server
- Human user
- Service accounts
Supported Authentication Modules are
- Client certificates
- Passwords
- Static tokens
- Bootstrap tokens
- JSON web tokens (used for service accounts)
If you are interested in watching the video. Here is the YouTube video on the same step by step procedure outlined below.
Procedure
Step1: Generate certificate key pair for keycloak server
As a first step i am generating the SSL keypair certificates which i will be using for the keycloak ssl setup. In my case i am running the keycloak service on the Kubernetes master cluster (ie. kubemaster). But this service can be running remotely on any server.
kubeadmin@kubemaster:~/stack$ pwd
/home/kubeadmin/stack
kubeadmin@kubemaster:~/stack$ mkdir kubernetes_oidc_oauth
kubeadmin@kubemaster:~/stack$ cd kubernetes_oidc_oauth/
Create ssl certificate configuration file named ‘sslcert.conf’
kubeadmin@kubemaster:~/stack/kubernetes_oidc_oauth$ cat sslcert.conf
[req]
distinguished_name = req_distinguished_name
x509_extensions = v3_req
prompt = no
[req_distinguished_name]
C = IN
ST = MH
L = Mumbai
O = stack
OU = devops
CN = kubemaster
[v3_req]
keyUsage = keyEncipherment, dataEncipherment
extendedKeyUsage = serverAuth, clientAuth
subjectAltName = @alt_names
[alt_names]
DNS.1 = kubemaster
DNS.2 = kubenode
DNS.3 = 192.168.122.54
DNS.4 = 192.168.122.198
Generate the SSL keypair
kubeadmin@kubemaster:~/stack/kubernetes_oidc_oauth$ openssl req -x509 -nodes -days 730 -newkey rsa:2048 -keyout tls.key -out tls.crt -config sslcert.conf -extensions 'v3_req'

kubeadmin@kubemaster:~/stack/kubernetes_oidc_oauth$ ls -ltr
total 12
-rw-rw-r-- 1 kubeadmin kubeadmin  396 Dec 29 17:24 sslcert.conf
-rw------- 1 kubeadmin kubeadmin 1704 Dec 29 17:25 tls.key
-rw-rw-r-- 1 kubeadmin kubeadmin 1399 Dec 29 17:25 tls.crt
Step2: Setup and Configure the Keycloak server
Here we are going to use the following docker compose file for setting up the keycloak service. This docker compose file configures the default environment variables for keycloak administrator account and exposes the service on port 8080 and 8443 for HTTP and HTTPS protocol. Also we have mounted the tls certificates for configuring the SSL setup along with the ‘keycloak-latest-db’ host folder for persisting the keycloak data.
kubeadmin@kubemaster:~/stack/kubernetes_oidc_oauth$ cat docker-compose.yml
version: '3.8'
services:

  keycloak:
    image: quay.io/keycloak/keycloak:16.1.0
    environment:
      KEYCLOAK_USER: admin
      KEYCLOAK_PASSWORD: admin
      PROXY_ADDRESS_FORWARDING: "true"
    ports:
      - "8080:8080"
      - "8443:8443"
    volumes:
    - "$PWD/tls.key:/etc/x509/https/tls.key"
    - "$PWD/tls.crt:/etc/x509/https/tls.crt"
    - "$PWD/keycloak-latest-db:/opt/jboss/keycloak/standalone/data"
Let’s start the keycloak service as shown below.
kubeadmin@kubemaster:~/stack/kubernetes_oidc_oauth$ docker-compose up -d
Creating keycloak_keycloak_1 ... done
Validate the keycloak startup logs and make sure you are able to access the keycloak portal.
kubeadmin@kubemaster:~/stack/kubernetes_oidc_oauth$ docker-compose logs -f keycloak
URL - https://kubemaster:8443/auth/
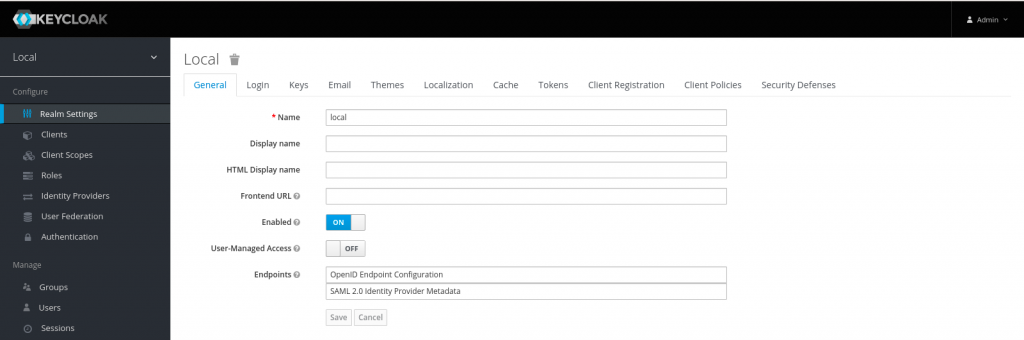
Step3: Create a new realm and Client
First let’s setup a new realm named ‘local’ as shown below.
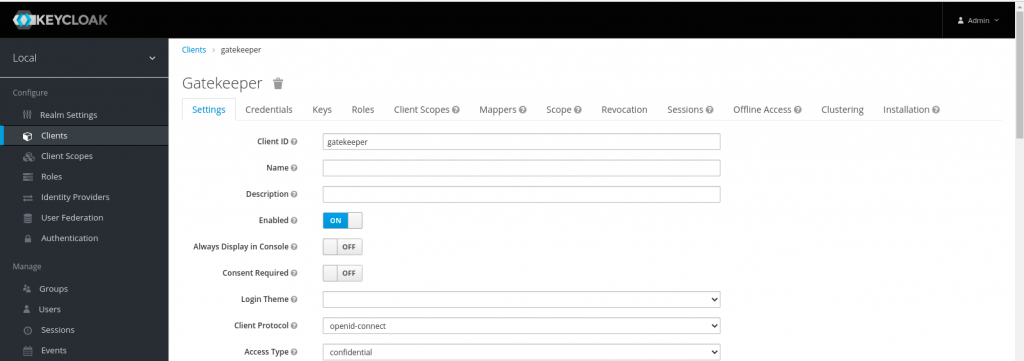
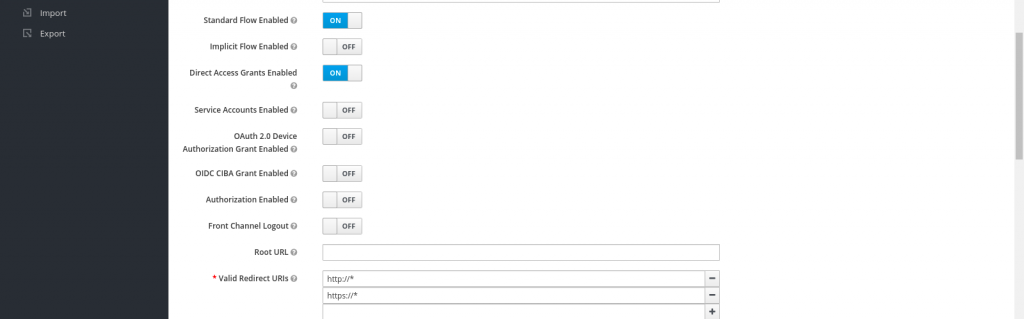
Now, let’s create a new client named ‘gatekeeper’ with client protocol ‘openid-connect’ and Access type – confidential. Also we need to update Valid redirect url. In my case i have updated it with http://* and https://* to match all the http and https redirect urls. Here is the screenshot below for the same configuration.
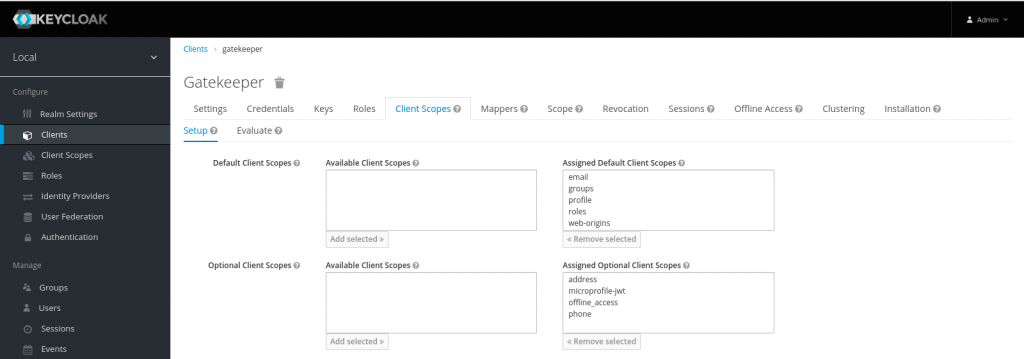
Once the client has been created, let’s create client scope named ‘groups’ and map the required claims (ie. name – user attribute and groups – group membership) as shown in the below screenshots.
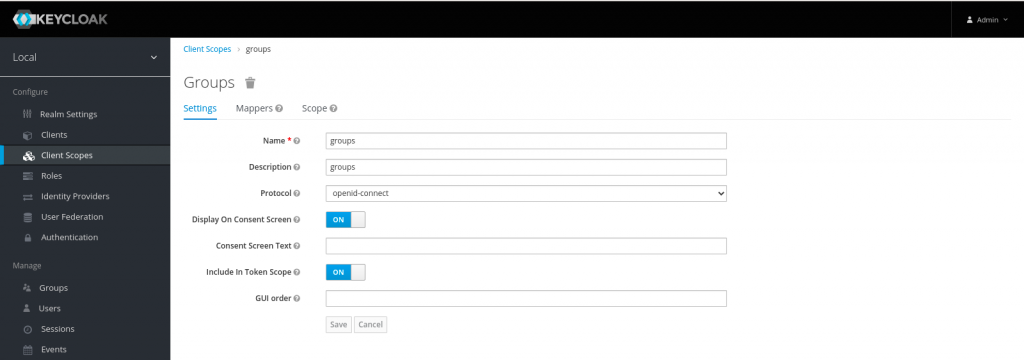
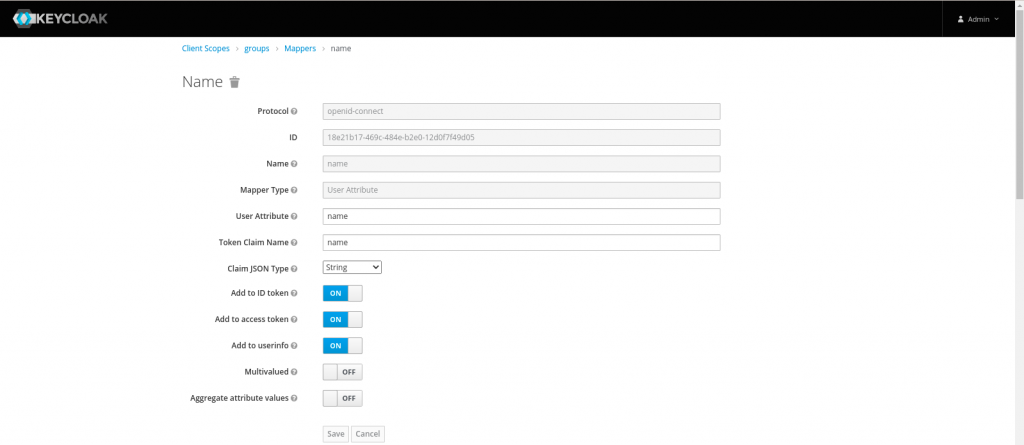
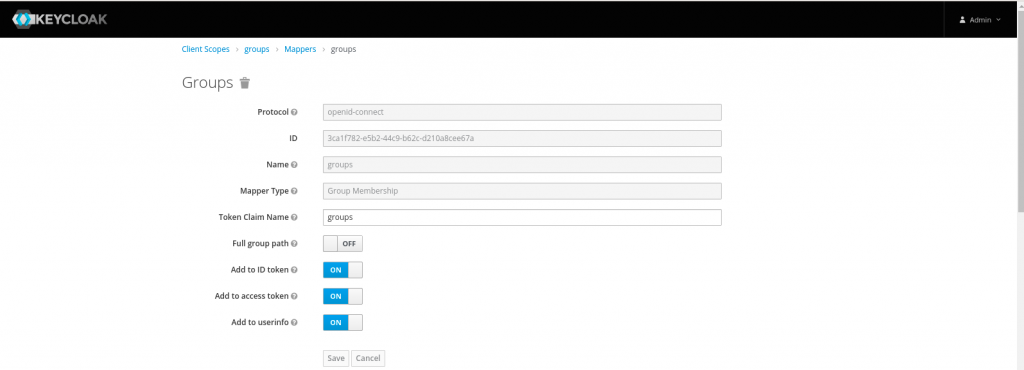
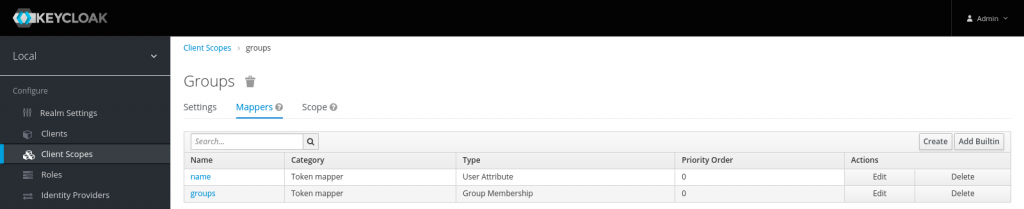
Now that we are completed the setup for client id and client scope we need to map the client scope to the client id that we created earlier so that the required mappers are mapped to the client id.
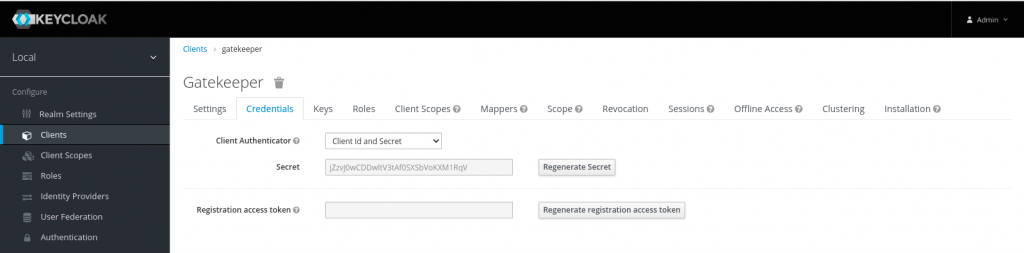
Let’s now capture the client id and secret from the screenshot below.
Below is the summary of the keycloak configuration that we carried out above.
Realm - local
Client id - gatekeeper
Client secret - jZzvJ0wCDDwltV3tAf0SXSbVoKXM1RqV
Client scopes - groups
Client scope mappers - (ie. name - user attribute and groups - group membership)
Step4: Add users and groups
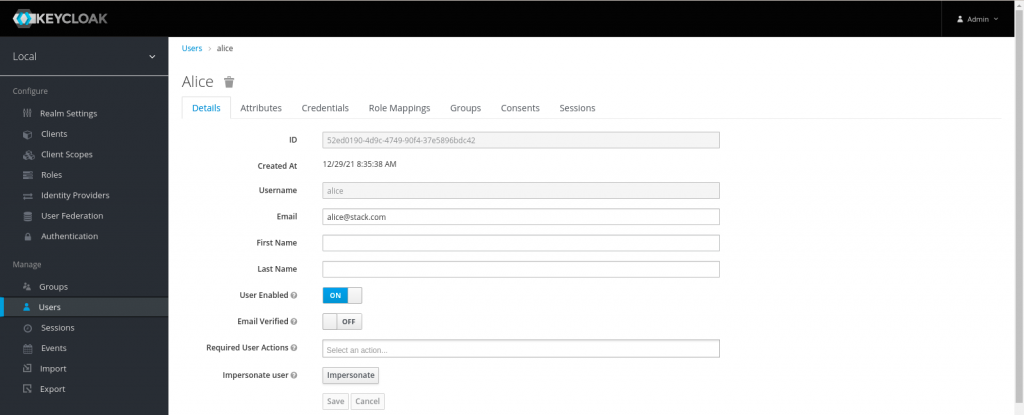
Here in this step we are going to create a user named ‘alice’ who is part of group ‘developers’.
Create user – alice (set a default password under the credentials tab – Reset Password and set Temporary to OFF so there is no need to change password at first login)
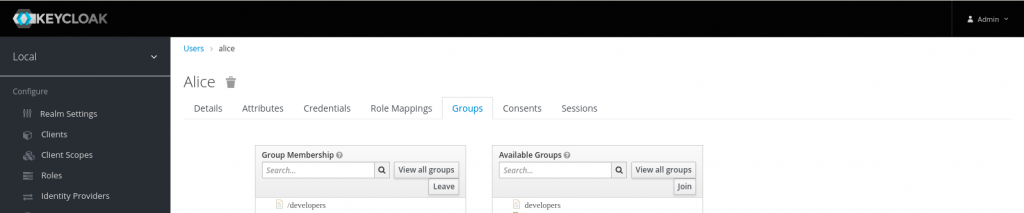
Create group – developers
Map the user ‘alice’ to group ‘developers’
With this we have completed the keycloak setup.
Step5: Configure the API server with keycloak OIDC provider details
Now, we need to update the API server yaml definition with the keycloak OIDC provider configuration details as shown below. We need to map the keyclaok service self signed certificate which we generated in the first step in the API server configuration ‘–oidc-ca-file’. As this is a self signed certificate the certificate and singer will be the same. Also, please note to mount the certificate from the host into the pod by updating the volume and volume mount named ‘keycloak-ca-certificates’.
kubeadmin@kubemaster:/etc/kubernetes/manifests$ sudo cat kube-apiserver.yaml
apiVersion: v1
kind: Pod
metadata:
  annotations:
    kubeadm.kubernetes.io/kube-apiserver.advertise-address.endpoint: 192.168.122.54:6443
  creationTimestamp: null
  labels:
    component: kube-apiserver
    tier: control-plane
  name: kube-apiserver
  namespace: kube-system
spec:
  containers:
  - command:
    - kube-apiserver
    - --advertise-address=192.168.122.54
    - --allow-privileged=true
    - --authorization-mode=Node,RBAC
    - --client-ca-file=/etc/kubernetes/pki/ca.crt
    - --enable-admission-plugins=NodeRestriction
    - --enable-bootstrap-token-auth=true
    - --etcd-cafile=/etc/kubernetes/pki/etcd/ca.crt
    - --etcd-certfile=/etc/kubernetes/pki/apiserver-etcd-client.crt
    - --etcd-keyfile=/etc/kubernetes/pki/apiserver-etcd-client.key
    - --etcd-servers=https://127.0.0.1:2379
    - --kubelet-client-certificate=/etc/kubernetes/pki/apiserver-kubelet-client.crt
    - --kubelet-client-key=/etc/kubernetes/pki/apiserver-kubelet-client.key
    - --kubelet-preferred-address-types=InternalIP,ExternalIP,Hostname
    - --proxy-client-cert-file=/etc/kubernetes/pki/front-proxy-client.crt
    - --proxy-client-key-file=/etc/kubernetes/pki/front-proxy-client.key
    - --requestheader-allowed-names=front-proxy-client
    - --requestheader-client-ca-file=/etc/kubernetes/pki/front-proxy-ca.crt
    - --requestheader-extra-headers-prefix=X-Remote-Extra-
    - --requestheader-group-headers=X-Remote-Group
    - --requestheader-username-headers=X-Remote-User
    - --secure-port=6443
    - --service-account-issuer=https://kubernetes.default.svc.cluster.local
    - --service-account-key-file=/etc/kubernetes/pki/sa.pub
    - --service-account-signing-key-file=/etc/kubernetes/pki/sa.key
    - --service-cluster-ip-range=10.96.0.0/12
    - --tls-cert-file=/etc/kubernetes/pki/apiserver.crt
    - --tls-private-key-file=/etc/kubernetes/pki/apiserver.key
    - --oidc-issuer-url=https://kubemaster:8443/auth/realms/local
    - --oidc-client-id=gatekeeper
    - --oidc-username-claim=name
    - --oidc-groups-claim=groups
    - --oidc-ca-file=/etc/kubernetes/ssl/kubemaster.crt
    image: k8s.gcr.io/kube-apiserver:v1.23.1
    imagePullPolicy: IfNotPresent
    livenessProbe:
      failureThreshold: 8
      httpGet:
        host: 192.168.122.54
        path: /livez
        port: 6443
        scheme: HTTPS
      initialDelaySeconds: 10
      periodSeconds: 10
      timeoutSeconds: 15
    name: kube-apiserver
    readinessProbe:
      failureThreshold: 3
      httpGet:
        host: 192.168.122.54
        path: /readyz
        port: 6443
        scheme: HTTPS
      periodSeconds: 1
      timeoutSeconds: 15
    resources:
      requests:
        cpu: 250m
    startupProbe:
      failureThreshold: 24
      httpGet:
        host: 192.168.122.54
        path: /livez
        port: 6443
        scheme: HTTPS
      initialDelaySeconds: 10
      periodSeconds: 10
      timeoutSeconds: 15
    volumeMounts:
    - mountPath: /etc/ssl/certs
      name: ca-certs
      readOnly: true
    - mountPath: /etc/ca-certificates
      name: etc-ca-certificates
      readOnly: true
    - mountPath: /etc/pki
      name: etc-pki
      readOnly: true
    - mountPath: /etc/kubernetes/pki
      name: k8s-certs
      readOnly: true
    - mountPath: /usr/local/share/ca-certificates
      name: usr-local-share-ca-certificates
      readOnly: true
    - mountPath: /usr/share/ca-certificates
      name: usr-share-ca-certificates
      readOnly: true
    - mountPath: /etc/kubernetes/ssl
      name: keycloak-ca-certificates
      readOnly: true
  hostNetwork: true
  priorityClassName: system-node-critical
  securityContext:
    seccompProfile:
      type: RuntimeDefault
  volumes:
  - hostPath:
      path: /etc/ssl/certs
      type: DirectoryOrCreate
    name: ca-certs
  - hostPath:
      path: /etc/ca-certificates
      type: DirectoryOrCreate
    name: etc-ca-certificates
  - hostPath:
      path: /etc/pki
      type: DirectoryOrCreate
    name: etc-pki
  - hostPath:
      path: /etc/kubernetes/pki
      type: DirectoryOrCreate
    name: k8s-certs
  - hostPath:
      path: /usr/local/share/ca-certificates
      type: DirectoryOrCreate
    name: usr-local-share-ca-certificates
  - hostPath:
      path: /usr/share/ca-certificates
      type: DirectoryOrCreate
    name: usr-share-ca-certificates
  - hostPath:
      path: /etc/kubernetes/ssl
      type: DirectoryOrCreate
    name: keycloak-ca-certificates
status: {}
I have placed the self signed certificate at the below location which we are mapping to the kubernetes API server pod. Its the same certificate as tls.crt which was generated in first step.
kubeadmin@kubemaster:/etc/kubernetes/manifests$ ls -ltr /etc/kubernetes/ssl/kubemaster.crt
-rw-r--r-- 1 root root 1237 Dec 28 17:54 /etc/kubernetes/ssl/kubemaster.crt
With this we have completed our kubernetes API server configuration. Make sure once you update the kube-apiserver.yaml file the pod is recreated and you are able to list the nodes using kubectl as shown below. This may take a minute but if you are still unable to list the nodes then you may have to look at the configuration and troubleshoot further.
kubeadmin@kubemaster:~/stack/kubernetes_oidc_oauth$ kubectl get nodes
NAME         STATUS   ROLES                  AGE   VERSION
kubemaster   Ready    control-plane,master   19d   v1.23.1
kubenode     Ready    <none>                 19d   v1.23.1
Step6: Create a role and rolebinding
Here we are going to create a role with pods and namespaces access to the users who are part of group ‘developers’.
kubeadmin@kubemaster:~/stack/kubernetes_oidc_oauth$ cat devrole.yml
kind: ClusterRole
apiVersion: rbac.authorization.k8s.io/v1
metadata:
  name: developer-role
rules:
  - apiGroups: [""]
    resources: ["namespaces","pods"]
    verbs: ["get", "watch", "list"]
---
kind: ClusterRoleBinding
apiVersion: rbac.authorization.k8s.io/v1
metadata:
  name: developer-crb
roleRef:
  apiGroup: rbac.authorization.k8s.io
  kind: ClusterRole
  name: developer-role
subjects:
- kind: Group
  name: "developers"
  apiGroup: rbac.authorization.k8s.io
kubeadmin@kubemaster:~/stack/kubernetes_oidc_oauth$ kubectl apply -f devrole.yml
clusterrole.rbac.authorization.k8s.io/developer-role created
clusterrolebinding.rbac.authorization.k8s.io/developer-crb created
Step7: Generate Authentication tokens
Now that we have completed the setup for keycloak and kubernetes API server let’s try to generate the authentication token using the keycloak ‘token’ endpoint with the required details as shown below.
scope=openid
client_id=gatekeeper
client_secret=jZzvJ0wCDDwltV3tAf0SXSbVoKXM1RqV
username=alice
password=alice (update with whatever you setup for this user)
Generate Token – This will generate three tokens that are access_token, refresh_token and id_token
kubeadmin@kubemaster:~/stack/kubernetes_oidc_oauth$ curl -k -d "grant_type=password" -d "scope=openid" -d "client_id=gatekeeper" -d "client_secret=jZzvJ0wCDDwltV3tAf0SXSbVoKXM1RqV" -d "username=alice" -d "password=alice" https://kubemaster:8443/auth/realms/local/protocol/openid-connect/token | jq .
  % Total    % Received % Xferd  Average Speed   Time    Time     Time  Current
                                 Dload  Upload   Total   Spent    Left  Speed
100  3515  100  3385  100   130  36793   1413 --:--:-- --:--:-- --:--:-- 38206
{
  "access_token": "eyJhbGciOiJSUzI1NiIsInR5cCIgOiAiSldUIiwia2lkIiA6ICJwM1dBVG04Vl90bTRMVFllbU5YUl9HUl9lbVpHaU5FOWRCVF9UNWF1Sld3In0.eyJleHAiOjE2NDE5Njc1NjcsImlhdCI6MTY0MTk2NzI2NywianRpIjoiZGM3NzY1YTktNDhkNS00NzkxLWJlYWUtODM2YzhlNzBlNTY3IiwiaXNzIjoiaHR0cHM6Ly9rdWJlbWFzdGVyOjg0NDMvYXV0aC9yZWFsbXMvbG9jYWwiLCJhdWQiOiJhY2NvdW50Iiwic3ViIjoiNTJlZDAxOTAtNGQ5Yy00NzQ5LTkwZjQtMzdlNTg5NmJkYzQyIiwidHlwIjoiQmVhcmVyIiwiYXpwIjoiZ2F0ZWtlZXBlciIsInNlc3Npb25fc3RhdGUiOiJmNmU0ZGNhZi1lMjU4LTQyYjEtYmEzOC1mZTQ3M2FiYzM2YTMiLCJhY3IiOiIxIiwicmVhbG1fYWNjZXNzIjp7InJvbGVzIjpbIm9mZmxpbmVfYWNjZXNzIiwidW1hX2F1dGhvcml6YXRpb24iLCJkZWZhdWx0LXJvbGVzLWxvY2FsIl19LCJyZXNvdXJjZV9hY2Nlc3MiOnsiYWNjb3VudCI6eyJyb2xlcyI6WyJtYW5hZ2UtYWNjb3VudCIsIm1hbmFnZS1hY2NvdW50LWxpbmtzIiwidmlldy1wcm9maWxlIl19fSwic2NvcGUiOiJvcGVuaWQgZW1haWwgcHJvZmlsZSBncm91cHMiLCJzaWQiOiJmNmU0ZGNhZi1lMjU4LTQyYjEtYmEzOC1mZTQ3M2FiYzM2YTMiLCJlbWFpbF92ZXJpZmllZCI6ZmFsc2UsIm5hbWUiOiJhbGljZSIsImdyb3VwcyI6WyJkZXZlbG9wZXJzIl0sInByZWZlcnJlZF91c2VybmFtZSI6ImFsaWNlIiwiZW1haWwiOiJhbGljZUBzdGFjay5jb20ifQ.MK9CRv_42VSIpCtmaJn5xEert_SjtnoH8KLmsGUWVb7_5067f3zpcBBgnAXAUKaDQgh7xyv0EXU42dS0TtVtYHCX0EuF2fWoJEgc3xST-Cr5npJQdehf9mLNqTiNhn7a2R_dVapnX1yppgIKDoVYEASKGL063Q70tMUbKovn8xdXgNOn4n6QsR1oBuRrhiKQKp6b7WdAlFEkXX5N4rgukhUIuLl8K6OWgitV-7jy0tZd1zER9kxmHNVS2ctCdRrhPKCnl9pEbqY9LkeADm42Je-LZcCStwMisLuAchWo1n0_j5WX6yArgBJBqopDgyiR5o2nP7XhEg6tzI8u64XzJg",
  "expires_in": 300,
  "refresh_expires_in": 1800,
  "refresh_token": "eyJhbGciOiJIUzI1NiIsInR5cCIgOiAiSldUIiwia2lkIiA6ICI4MWI4MjY2Yy04YTIxLTRlZDQtYTJlNi0xMmMzMDhjNzBlODgifQ.eyJleHAiOjE2NDE5NjkwNjcsImlhdCI6MTY0MTk2NzI2NywianRpIjoiYzA2MTI5MTktYzM5OS00ZTc3LWFhZjAtM2E0NzMzMzU0MTViIiwiaXNzIjoiaHR0cHM6Ly9rdWJlbWFzdGVyOjg0NDMvYXV0aC9yZWFsbXMvbG9jYWwiLCJhdWQiOiJodHRwczovL2t1YmVtYXN0ZXI6ODQ0My9hdXRoL3JlYWxtcy9sb2NhbCIsInN1YiI6IjUyZWQwMTkwLTRkOWMtNDc0OS05MGY0LTM3ZTU4OTZiZGM0MiIsInR5cCI6IlJlZnJlc2giLCJhenAiOiJnYXRla2VlcGVyIiwic2Vzc2lvbl9zdGF0ZSI6ImY2ZTRkY2FmLWUyNTgtNDJiMS1iYTM4LWZlNDczYWJjMzZhMyIsInNjb3BlIjoib3BlbmlkIGVtYWlsIHByb2ZpbGUgZ3JvdXBzIiwic2lkIjoiZjZlNGRjYWYtZTI1OC00MmIxLWJhMzgtZmU0NzNhYmMzNmEzIn0.mUIdKg2iIDUEeNkbhIfCoEJ8HpWq8HR8AjRJ4MuJTW0",
  "token_type": "Bearer",
  "id_token": "eyJhbGciOiJSUzI1NiIsInR5cCIgOiAiSldUIiwia2lkIiA6ICJwM1dBVG04Vl90bTRMVFllbU5YUl9HUl9lbVpHaU5FOWRCVF9UNWF1Sld3In0.eyJleHAiOjE2NDE5Njc1NjcsImlhdCI6MTY0MTk2NzI2NywiYXV0aF90aW1lIjowLCJqdGkiOiJlZDFiN2UwOC03NjQ4LTQyOWMtOGE2Mi00M2FhOTdiOGVkYzEiLCJpc3MiOiJodHRwczovL2t1YmVtYXN0ZXI6ODQ0My9hdXRoL3JlYWxtcy9sb2NhbCIsImF1ZCI6ImdhdGVrZWVwZXIiLCJzdWIiOiI1MmVkMDE5MC00ZDljLTQ3NDktOTBmNC0zN2U1ODk2YmRjNDIiLCJ0eXAiOiJJRCIsImF6cCI6ImdhdGVrZWVwZXIiLCJzZXNzaW9uX3N0YXRlIjoiZjZlNGRjYWYtZTI1OC00MmIxLWJhMzgtZmU0NzNhYmMzNmEzIiwiYXRfaGFzaCI6IkxTSk9zZ1BNUW5KQWhTVTJ5OUx1bUEiLCJhY3IiOiIxIiwic2lkIjoiZjZlNGRjYWYtZTI1OC00MmIxLWJhMzgtZmU0NzNhYmMzNmEzIiwiZW1haWxfdmVyaWZpZWQiOmZhbHNlLCJuYW1lIjoiYWxpY2UiLCJncm91cHMiOlsiZGV2ZWxvcGVycyJdLCJwcmVmZXJyZWRfdXNlcm5hbWUiOiJhbGljZSIsImVtYWlsIjoiYWxpY2VAc3RhY2suY29tIn0.dXsad7NZqAE2jXtsfoR4-hGh1-2NitwPtUjOGfB_SgfiAXMU02nURW8mJE-cQIUNadzmEcSe_BQa9bGax3MuhvBtrPmMU98QBdMa-7kDrXTm3xiVjYiUW7pLHZ4unBy1kZhUXm-DLrcKzShADEdge6gAjiV7HZgU1yTbUURC015wtL64Akdhcyzuk4mcPFeUtJWVN-8dAQEMUMQsgWjIPPvkvADLIg_8cnlAukqdip5jjB9zeXuj0H4Mi0waKHhfqwv7RA0c0l84A7buUjiFpdpvGqzY1KctD9ZoqbbVgnZ1H79vSaw8_c1MFYcBcJhbK7xTr8Kw4rzYhoPgO9Utiw",
  "not-before-policy": 0,
  "session_state": "f6e4dcaf-e258-42b1-ba38-fe473abc36a3",
  "scope": "openid email profile groups"
}
Refresh Token – We can refresh the token using the grant_type=refresh_token to regenerate all the three tokens again as shown below
kubeadmin@kubemaster:~/stack/kubernetes_oidc_oauth$ eval "$(curl -k -d "grant_type=refresh_token" -d "client_id=gatekeeper" -d "client_secret=jZzvJ0wCDDwltV3tAf0SXSbVoKXM1RqV" -d "refresh_token=eyJhbGciOiJIUzI1NiIsInR5cCIgOiAiSldUIiwia2lkIiA6ICI4MWI4MjY2Yy04YTIxLTRlZDQtYTJlNi0xMmMzMDhjNzBlODgifQ.eyJleHAiOjE2NDE5NjkwNjcsImlhdCI6MTY0MTk2NzI2NywianRpIjoiYzA2MTI5MTktYzM5OS00ZTc3LWFhZjAtM2E0NzMzMzU0MTViIiwiaXNzIjoiaHR0cHM6Ly9rdWJlbWFzdGVyOjg0NDMvYXV0aC9yZWFsbXMvbG9jYWwiLCJhdWQiOiJodHRwczovL2t1YmVtYXN0ZXI6ODQ0My9hdXRoL3JlYWxtcy9sb2NhbCIsInN1YiI6IjUyZWQwMTkwLTRkOWMtNDc0OS05MGY0LTM3ZTU4OTZiZGM0MiIsInR5cCI6IlJlZnJlc2giLCJhenAiOiJnYXRla2VlcGVyIiwic2Vzc2lvbl9zdGF0ZSI6ImY2ZTRkY2FmLWUyNTgtNDJiMS1iYTM4LWZlNDczYWJjMzZhMyIsInNjb3BlIjoib3BlbmlkIGVtYWlsIHByb2ZpbGUgZ3JvdXBzIiwic2lkIjoiZjZlNGRjYWYtZTI1OC00MmIxLWJhMzgtZmU0NzNhYmMzNmEzIn0.mUIdKg2iIDUEeNkbhIfCoEJ8HpWq8HR8AjRJ4MuJTW0" https://kubemaster:8443/auth/realms/local/protocol/openid-connect/token | jq -r '"REFRESH_TOKEN="+.refresh_token,"TOKEN="+.access_token,"ID_TOKEN="+.id_token')" ; echo ; echo "TOKEN=${TOKEN}" ; echo ; echo "ID_TOKEN=${ID_TOKEN}" ; echo ; echo "REFRESH_TOKEN=${REFRESH_TOKEN}"
  % Total    % Received % Xferd  Average Speed   Time    Time     Time  Current
                                 Dload  Upload   Total   Spent    Left  Speed
100  4170  100  3385  100   785   122k  29074 --:--:-- --:--:-- --:--:--  150k

TOKEN=eyJhbGciOiJSUzI1NiIsInR5cCIgOiAiSldUIiwia2lkIiA6ICJwM1dBVG04Vl90bTRMVFllbU5YUl9HUl9lbVpHaU5FOWRCVF9UNWF1Sld3In0.eyJleHAiOjE2NDE5Njc3MTgsImlhdCI6MTY0MTk2NzQxOCwianRpIjoiMjFmODE4ZDEtZjA4Ni00NDVhLTk5YmMtMGNhOTEyYjI2YmRmIiwiaXNzIjoiaHR0cHM6Ly9rdWJlbWFzdGVyOjg0NDMvYXV0aC9yZWFsbXMvbG9jYWwiLCJhdWQiOiJhY2NvdW50Iiwic3ViIjoiNTJlZDAxOTAtNGQ5Yy00NzQ5LTkwZjQtMzdlNTg5NmJkYzQyIiwidHlwIjoiQmVhcmVyIiwiYXpwIjoiZ2F0ZWtlZXBlciIsInNlc3Npb25fc3RhdGUiOiJmNmU0ZGNhZi1lMjU4LTQyYjEtYmEzOC1mZTQ3M2FiYzM2YTMiLCJhY3IiOiIxIiwicmVhbG1fYWNjZXNzIjp7InJvbGVzIjpbIm9mZmxpbmVfYWNjZXNzIiwidW1hX2F1dGhvcml6YXRpb24iLCJkZWZhdWx0LXJvbGVzLWxvY2FsIl19LCJyZXNvdXJjZV9hY2Nlc3MiOnsiYWNjb3VudCI6eyJyb2xlcyI6WyJtYW5hZ2UtYWNjb3VudCIsIm1hbmFnZS1hY2NvdW50LWxpbmtzIiwidmlldy1wcm9maWxlIl19fSwic2NvcGUiOiJvcGVuaWQgZW1haWwgcHJvZmlsZSBncm91cHMiLCJzaWQiOiJmNmU0ZGNhZi1lMjU4LTQyYjEtYmEzOC1mZTQ3M2FiYzM2YTMiLCJlbWFpbF92ZXJpZmllZCI6ZmFsc2UsIm5hbWUiOiJhbGljZSIsImdyb3VwcyI6WyJkZXZlbG9wZXJzIl0sInByZWZlcnJlZF91c2VybmFtZSI6ImFsaWNlIiwiZW1haWwiOiJhbGljZUBzdGFjay5jb20ifQ.LEsGA9I_MdA1ILUbpIUbu5TJC2OBfZyNG_Efb3GiNb0MVmR2JNVV6qRpQPztPJ5JmfILCglMRgiolGty0pNEle2w_roYfTsRC8n_CtXi1cRY15BRZ0YYGzIMA_vD8-xmj8C9yHnLBWVNbG1vCbajbUliI5XhVUY39jXqrJK5aQyNgnRAiFGdOZu2XpV0N_zGwN5dok1FqHN0IbaaZ2UVt6gsrWv6b0HLm7zRhC4jpVAzhxTHkxyVVHVguYhh-UNVOerBgmjNvFz3GidFX9emB_P3L2KOigU5RtdU4ETaCV3knu1nryxT3Hozoo8B0m91gUatc6erg5YwP2ZUZwaowA

ID_TOKEN=eyJhbGciOiJSUzI1NiIsInR5cCIgOiAiSldUIiwia2lkIiA6ICJwM1dBVG04Vl90bTRMVFllbU5YUl9HUl9lbVpHaU5FOWRCVF9UNWF1Sld3In0.eyJleHAiOjE2NDE5Njc3MTgsImlhdCI6MTY0MTk2NzQxOCwiYXV0aF90aW1lIjowLCJqdGkiOiJjNzgwY2M3NS0wYzdkLTRkYjktYTExZi00Nzk0MmEwZjQwMDIiLCJpc3MiOiJodHRwczovL2t1YmVtYXN0ZXI6ODQ0My9hdXRoL3JlYWxtcy9sb2NhbCIsImF1ZCI6ImdhdGVrZWVwZXIiLCJzdWIiOiI1MmVkMDE5MC00ZDljLTQ3NDktOTBmNC0zN2U1ODk2YmRjNDIiLCJ0eXAiOiJJRCIsImF6cCI6ImdhdGVrZWVwZXIiLCJzZXNzaW9uX3N0YXRlIjoiZjZlNGRjYWYtZTI1OC00MmIxLWJhMzgtZmU0NzNhYmMzNmEzIiwiYXRfaGFzaCI6IlhDbEEzQnZFVUxNVlRKdWZDLWRGVVEiLCJhY3IiOiIxIiwic2lkIjoiZjZlNGRjYWYtZTI1OC00MmIxLWJhMzgtZmU0NzNhYmMzNmEzIiwiZW1haWxfdmVyaWZpZWQiOmZhbHNlLCJuYW1lIjoiYWxpY2UiLCJncm91cHMiOlsiZGV2ZWxvcGVycyJdLCJwcmVmZXJyZWRfdXNlcm5hbWUiOiJhbGljZSIsImVtYWlsIjoiYWxpY2VAc3RhY2suY29tIn0.CsENbvnw3t9S540ROgjMrsPuvfPJsyNWYNUKRl9XxZ4ig7tnXVkHHGT86Nnj0QG0LaXd8VDu47fzmXFVgV_zCbfwcI2fkc5f7DDUulJnC4chjeWevN3w9HyWg1QdCSNLf1PbzXqe1ZVjR2wQ3sgu7GEgruwzpPeBvYK4hFXAUWoyhv0rVA3GGNT8OHTiidzfNQ-e6sKrWuP7xjzfuTWFibsTYz0lsVRMn16uAbfJB8IlBSsITZ-FEmfEp_PfatJP6jV69KKQK8-wSbJZmf2UorZ-ZsuXXlqrfk8HDgqjNufHxS_TxOBixYqpaNKoLzG0U8ip7gz1ofrF30ru-bj6kw

REFRESH_TOKEN=eyJhbGciOiJIUzI1NiIsInR5cCIgOiAiSldUIiwia2lkIiA6ICI4MWI4MjY2Yy04YTIxLTRlZDQtYTJlNi0xMmMzMDhjNzBlODgifQ.eyJleHAiOjE2NDE5NjkyMTgsImlhdCI6MTY0MTk2NzQxOCwianRpIjoiNTNhYzhhMzMtZTQ1OS00YzFmLWIzYTgtOGEwODEwYjRhODQ2IiwiaXNzIjoiaHR0cHM6Ly9rdWJlbWFzdGVyOjg0NDMvYXV0aC9yZWFsbXMvbG9jYWwiLCJhdWQiOiJodHRwczovL2t1YmVtYXN0ZXI6ODQ0My9hdXRoL3JlYWxtcy9sb2NhbCIsInN1YiI6IjUyZWQwMTkwLTRkOWMtNDc0OS05MGY0LTM3ZTU4OTZiZGM0MiIsInR5cCI6IlJlZnJlc2giLCJhenAiOiJnYXRla2VlcGVyIiwic2Vzc2lvbl9zdGF0ZSI6ImY2ZTRkY2FmLWUyNTgtNDJiMS1iYTM4LWZlNDczYWJjMzZhMyIsInNjb3BlIjoib3BlbmlkIGVtYWlsIHByb2ZpbGUgZ3JvdXBzIiwic2lkIjoiZjZlNGRjYWYtZTI1OC00MmIxLWJhMzgtZmU0NzNhYmMzNmEzIn0.Oukqh011MXAbNWg_kd8NS-6zudaFJ5iWKJtdyBpD-v4
Introspect token – This will provide the details about the JSON Web token (ie ID_TOKEN). We need to make sure that the name and groups fields are available in the out as these are the required token claims for authenticating the API request
kubeadmin@kubemaster:~/stack/kubernetes_oidc_oauth$ curl -k --user "gatekeeper:jZzvJ0wCDDwltV3tAf0SXSbVoKXM1RqV" -d "token=${ID_TOKEN}" https://kubemaster:8443/auth/realms/local/protocol/openid-connect/token/introspect | jq .
  % Total    % Received % Xferd  Average Speed   Time    Time     Time  Current
                                 Dload  Upload   Total   Spent    Left  Speed
100  1686  100   558  100  1128  20666  41777 --:--:-- --:--:-- --:--:-- 60214
{
  "exp": 1641967718,
  "iat": 1641967418,
  "auth_time": 0,
  "jti": "c780cc75-0c7d-4db9-a11f-47942a0f4002",
  "iss": "https://kubemaster:8443/auth/realms/local",
  "aud": "gatekeeper",
  "sub": "52ed0190-4d9c-4749-90f4-37e5896bdc42",
  "typ": "ID",
  "azp": "gatekeeper",
  "session_state": "f6e4dcaf-e258-42b1-ba38-fe473abc36a3",
  "at_hash": "XClA3BvEULMVTJufC-dFUQ",
  "name": "alice",
  "preferred_username": "alice",
  "email": "alice@stack.com",
  "email_verified": false,
  "acr": "1",
  "sid": "f6e4dcaf-e258-42b1-ba38-fe473abc36a3",
  "groups": [
    "developers"
  ],
  "client_id": "gatekeeper",
  "username": "alice",
  "active": true
}
Now, we can updated the kubectl configuration by setting up the new credentials for the user ‘alice’.
kubeadmin@kubemaster:~/stack/kubernetes_oidc_oauth$ kubectl config set-credentials alice \
    "--auth-provider=oidc" \
    "--auth-provider-arg=idp-issuer-url=https://192.168.122.54:8443/auth/realms/local" \
    "--auth-provider-arg=client-id=gatekeeper" \
    "--auth-provider-arg=client-secret=jZzvJ0wCDDwltV3tAf0SXSbVoKXM1RqV" \
    "--auth-provider-arg=refresh-token=${REFRESH_TOKEN}" \
    "--auth-provider-arg=id-token=${ID_TOKEN}"
User "alice" set.
Set the new context named alice
kubeadmin@kubemaster:~/stack/kubernetes_oidc_oauth$ kubectl config set-context alice --cluster=kubernetes --user=alice
Context "alice" modified.
List the pods in the default namespaces
kubeadmin@kubemaster:~/stack/kubernetes_oidc_oauth$ kubectl --context=alice get pods
No resources found in default namespace.
Create a httpd pod
kubeadmin@kubemaster:~/stack/kubernetes_oidc_oauth$ kubectl run httpd --image=httpd
pod/httpd created
List the pods using kubectl
kubeadmin@kubemaster:~/stack/kubernetes_oidc_oauth$ kubectl --context=alice get pods
NAME    READY   STATUS    RESTARTS   AGE
httpd   1/1     Running   0          13s
List the pods using the API endpoint
kubeadmin@kubemaster:~/stack/kubernetes_oidc_oauth$ curl -k https://kubemaster:6443/api/v1/pods --header "Authorization: Bearer $ID_TOKEN"
{
  "kind": "PodList",
  "apiVersion": "v1",
  "metadata": {
    "resourceVersion": "480801"
  },
  "items": [
    {
      "metadata": {
        "name": "httpd",
        "namespace": "default",
        "uid": "a8147bbf-75a6-40e7-b161-be2d27a8856c",
        "resourceVersion": "480579",
        "creationTimestamp": "2022-01-12T06:08:14Z",
        "labels": {
          "run": "httpd"
        },
...
Here is a very basic script that you can use to automate the process of generating the token and configuring the kubectl configuration with the token details for accessing cluster resources using the user authenticated by keycloak idp.
[admin@fedkubemaster kubernetes_oauth2_setup]$ cat token_management.sh
#!/bin/bash

scope=openid
client_id=gatekeeper
client_secret=jZzvJ0wCDDwltV3tAf0SXSbVoKXM1RqV
username=alice
password=alice
oidc_url=https://kubemaster:8443/auth/realms/local/protocol/openid-connect/token
realm_url=https://kubemaster:8443/auth/realms/local

### Generate Authentication token

json_data=`curl -k -d "grant_type=password" -d "scope=${scope}" -d "client_id=${client_id}" -d "client_secret=${client_secret}" -d "username=${username}" -d "password=${password}" ${oidc_url}`

id_token=`echo $json_data | jq '.id_token' | tr -d '"'`
refresh_token=`echo $json_data | jq '.refresh_token' | tr -d '"'`
access_token=`echo $json_data | jq '.access_token' | tr -d '"'`

### Print tokens

echo "ID_TOKEN=$id_token"; echo
echo "REFRESH_TOKEN=$refresh_token"; echo
echo "ACCESS_TOKEN=$access_token"; echo

### Introspect the id token

token=`curl -k --user "${client_id}:${client_secret}" -d "token=${id_token}" ${oidc_url}/introspect`
token_details=`echo $token | jq .`
echo $token_details

### Update kubectl config

kubectl config set-credentials ${username} \
    "--auth-provider=oidc" \
    "--auth-provider-arg=idp-issuer-url=${realm_url}" \
    "--auth-provider-arg=client-id=${client_id}" \
    "--auth-provider-arg=client-secret=${client_secret}" \
    "--auth-provider-arg=refresh-token=${refresh_token}" \
    "--auth-provider-arg=id-token=${id_token}"

### Create new context

kubectl config set-context ${username} --cluster=kubernetes --user=${username}

### Validate access with new context

kubectl --context=${username} get pods
If you face any issues while authentication and authorising the API request you can look at the logs of the API server pod which will provide the useful information to troubleshoot further on this issues that may occur.
kubeadmin@kubemaster:~/stack/kubernetes_oidc_oauth$ kubectl logs -f kube-apiserver-kubemaster -n kube-system
...
E0112 06:09:00.233553       1 authentication.go:63] "Unable to authenticate the request" err="[invalid bearer token, oidc: verify token: oidc: token is expired (Token Expiry: 2022-01-12 06:08:38 +0000 UTC)]"
E0112 06:09:04.329240       1 authentication.go:63] "Unable to authenticate the request" err="[invalid bearer token, oidc: verify token: oidc: token is expired (Token Expiry: 2022-01-12 06:08:38 +0000 UTC)]"
E0112 06:09:58.257905       1 authentication.go:63] "Unable to authenticate the request" err="[invalid bearer token, oidc: verify token: oidc: token is expired (Token Expiry: 2022-01-12 06:08:38 +0000 UTC)]"
As you can see the logs showing the token has expired. Please note that ID_TOKEN expires in 5min (ie. 300 sec). You need to regenerate the token and update the kubectl configuration file so that you can access the kubernetes resources with that user again.
Hope you enjoyed reading this article. Thank you..
Leave a Reply
You must be logged in to post a comment.