How to integrate Nexus OSS with OpenLDAP for authentication

Here in this article we will try to configure Nexus OSS to authenticate with OpenLDAP server and also configure external role mapping to grant required permissions.
Test Environment
- Fedora 41 server
- Nexus 3.91.1
- OpenLDAP v2
- Postgres 16.11
What is Nexus OSS
Sonatype Nexus OSS is a free, open-source artifact repository manager that acts as a central hub for storing, managing, and distributing software binaries, containers, and components (e.g., Maven, npm, Docker). It enhances DevOps workflows by caching external dependencies to speed up builds and secures the software supply chain.
What is OpenLDAP
OpenLDAP is a free, open-source implementation of the Lightweight Directory Access Protocol (LDAP) used to store, manage, and secure hierarchical information about users, devices, and applications. It operates as a high-performance directory service, commonly used for centralized authentication and authorization across Linux/Unix environments.
High Level Architecture
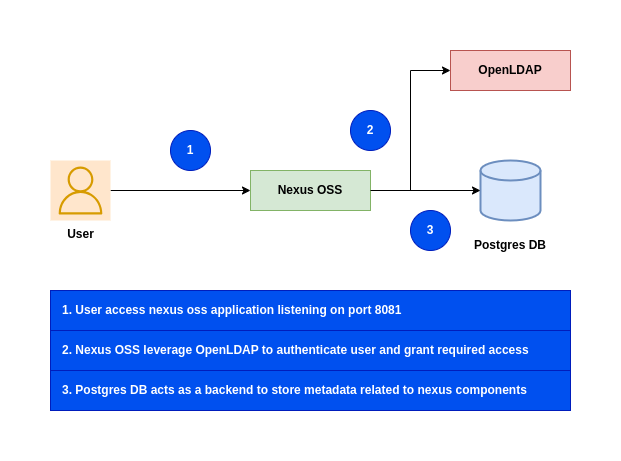
If you are interested in watching the video. Here is the YouTube video on the same step by step procedure outlined below.
Procedure
Step1: Ensure Nexus OSS installed and running
As a first step ensure that you have a instance of Nexus OSS installed and running in your system. Follow “How to setup Nexus OSS repository with Postgres database on Fedora” for the same.
Step2: Ensure OpenLDAP service running
We need to clone the openldap repository and build the docker image as shown below.
admin@linuxser:~/openldapbuild$ git clone https://github.com/bitnami/containers.git
admin@linuxser:~/openldapbuild$ cd containers/bitnami/openldap/2.6/debian-12
admin@linuxser:~/openldapbuild/containers/bitnami/openldap/2.6/debian-12$ docker build -t bitnami/openldap:2 .
Below is the custom LDAP directory structure LDIF file that we will be using to setup LDAP domain, groups and users for this demo.
As you can see there are two types of users.
- “nxdev1” and “nxdev2” part of “Developers” group
- “nxadmin1” user part of “Administrator” group
admin@linuxser:~/openldap$ cat ldifs/custom.ldif
dn: dc=stack,dc=com
objectClass: top
objectClass: domain
dc: stack

dn: ou=groups,dc=stack,dc=com
objectClass: organizationalUnit
objectClass: top
ou: groups

dn: ou=users,dc=stack,dc=com
objectClass: organizationalUnit
objectClass: top
ou: users

dn: cn=nxdev1,ou=users,dc=stack,dc=com
objectClass: person
objectClass: inetOrgPerson
objectClass: organizationalPerson
objectClass: top
cn: nxdev1
sn: nxdev1
givenName: nxdev1
mail: nxdev1@stack.com
uid: 1001
userPassword: nxdev1

dn: cn=nxdev2,ou=users,dc=stack,dc=com
objectClass: person
objectClass: inetOrgPerson
objectClass: organizationalPerson
objectClass: top
cn: nxdev2
sn: nxdev2
givenName: nxdev2
mail: nxdev2@stack.com
uid: 1002
userPassword: nxdev2

dn: cn=nxadmin1,ou=users,dc=stack,dc=com
objectClass: person
objectClass: inetOrgPerson
objectClass: organizationalPerson
objectClass: top
cn: nxadmin1
sn: nxadmin1
givenName: nxadmin1
mail: nxadmin1@stack.com
uid: 1003
userPassword: nxadmin1

dn: cn=Administrator,ou=groups,dc=stack,dc=com
objectClass: groupOfNames
objectClass: top
cn: Administrator
member: cn=nxadmin1,ou=users,dc=stack,dc=com

dn: cn=Developers,ou=groups,dc=stack,dc=com
objectClass: groupOfNames
objectClass: top
cn: Developers
member: cn=nxdev1,ou=users,dc=stack,dc=com
member: cn=nxdev2,ou=users,dc=stack,dc=com
Here is the docker compose file to setup OpenLDAP service.
admin@linuxser:~/openldap$ cat docker-compose.yml
services:
  openldap:
    image: bitnami/openldap:2
    container_name: openldap
    ports:
      - '1389:1389'
      - '1636:1636'
    environment:
      - LDAP_ADMIN_USERNAME=admin
      - LDAP_ADMIN_PASSWORD=admin@1234
      #- LDAP_USERS=devuser1,devuser2
      #- LDAP_PASSWORDS=devuser1,devuser2
      - LDAP_ROOT=dc=stack,dc=com
      - LDAP_ADMIN_DN=cn=admin,dc=stack,dc=com
      - LDAP_CUSTOM_LDIF_DIR=/ldifs         # Configuring LDAP to use custom LDIF file
    networks:
      - openldap-net
    volumes:
      - 'openldap-data:/bitnami/openldap'
      - './ldifs:/ldifs'                    # Custom LDIF file directory loaded from host to container

volumes:
  openldap-data:

networks:
  openldap-net:
Let’s now instantiate the OpenLDAP service.
admin@linuxser:~/openldap$ docker compose up -d
Once the OpenLDAP services is running we can validate LDAP DIT tree structure using the below command.
admin@linuxser:~/opensearch_with_openldap$ ldapsearch -H ldap://linuxser.stack.com:1389 -x -b 'dc=stack,dc=com' -D 'cn=admin,dc=stack,dc=com' '(objectClass=*)' -W
NOTE: Install openldap-clients package for ldap client tools installation
Step3: Update Nexus OSS LDAP security settings
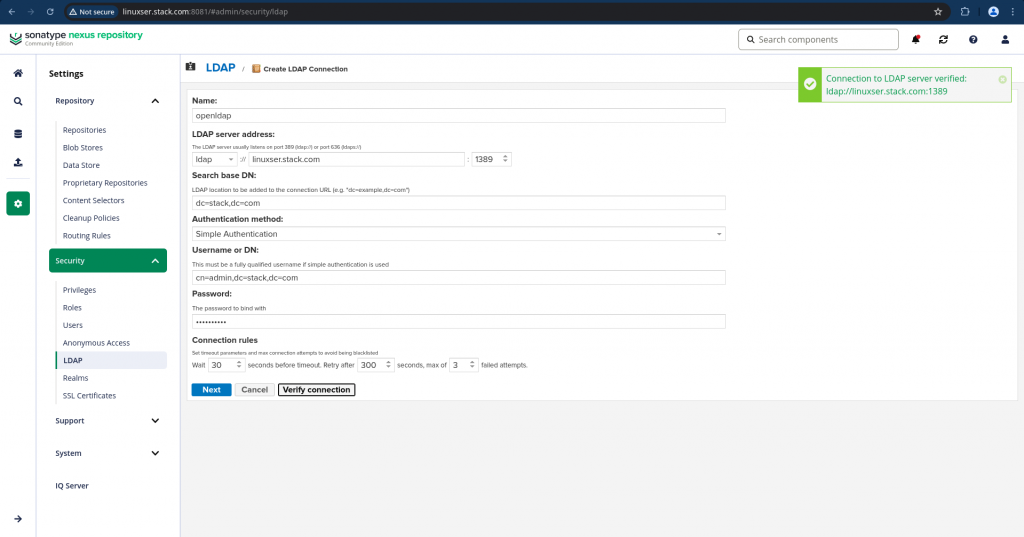
Navigate to Settings – Security – LDAP and click the Create LDAP connection and update the settings as shown below and verify connection.
name: openldap
ldap server address: ldap://linuxser.stack.com:1389
search base dn: dc=stack,dc=com
authentication method: simple authentication
bind username or dn: cn=admin,dc=stack,dc=com
bind password: admin@1234
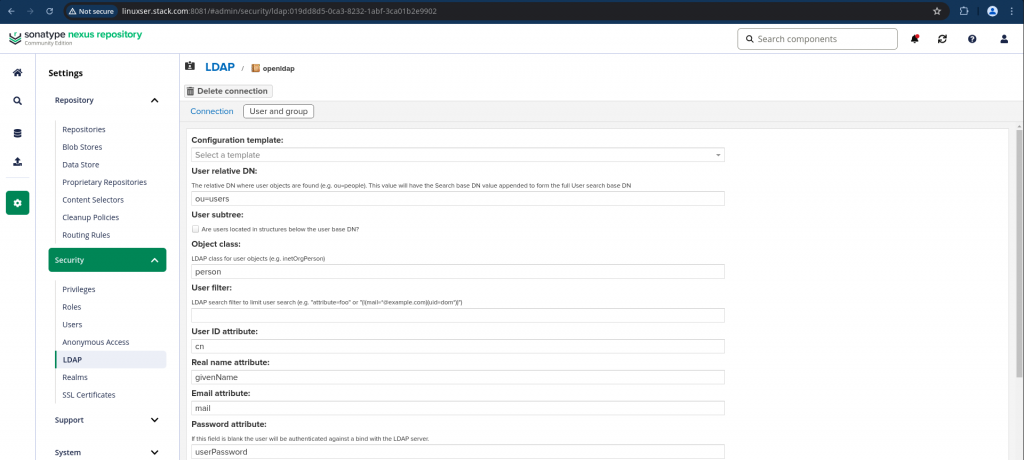
Click next to update the Users and Groups settings once the LDAP connection is verified. Here are the details.
configuration template: generic ldap server
user relative dn: ou=users
objectclass: person
user id attribute: cn
real name attribute: givenName
email attribute: mail
password attribute: userPassword
map ldap groups to roles: true
group type: static groups
group relative dn: ou=groups
group object class: groupOfNames
group id attribute: cn
group member attribute: member
group member format: cn=${username},ou=users,dc=stack,dc=com
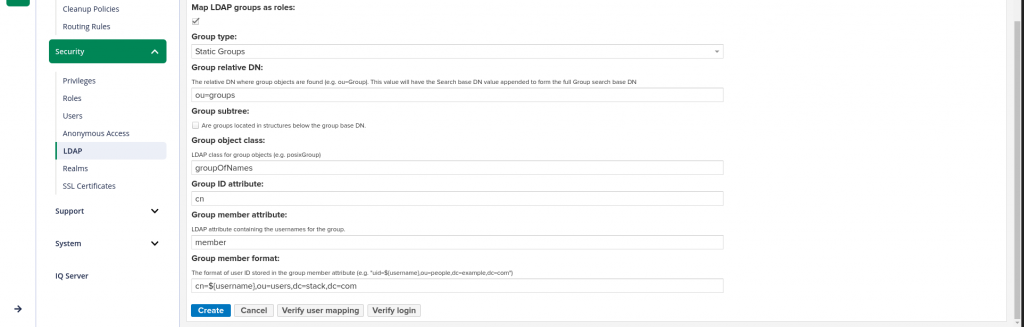
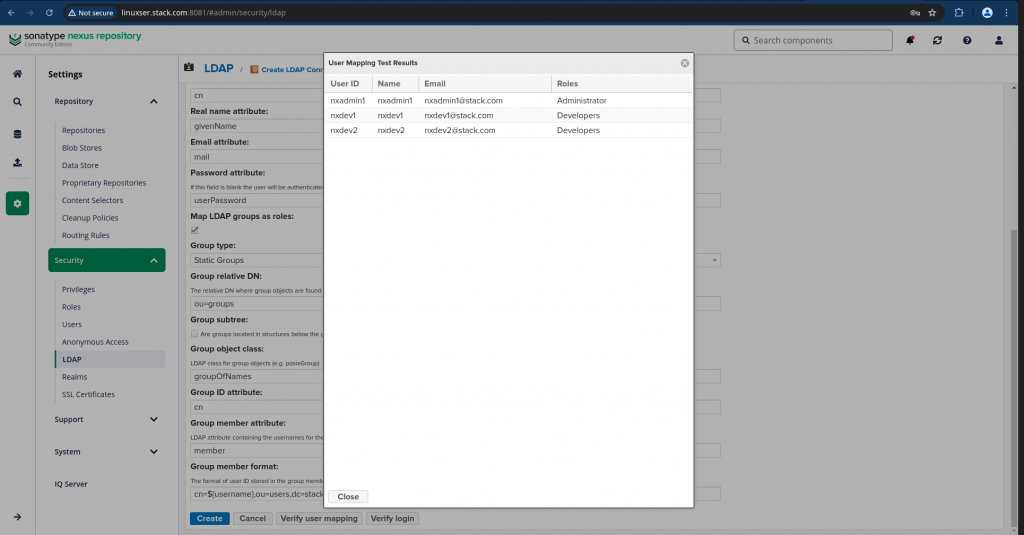
You can click “Verify user mapping” once the users and groups settings are updated and verify that the users are mapped correctly to the role as shown below.
Now click on “Verify login” to ensure that you are able bind to LDAP server using the “admin” password, then verify if you able to login with the LDAP user and password as defined the LDIF file.
Step4: Create Role
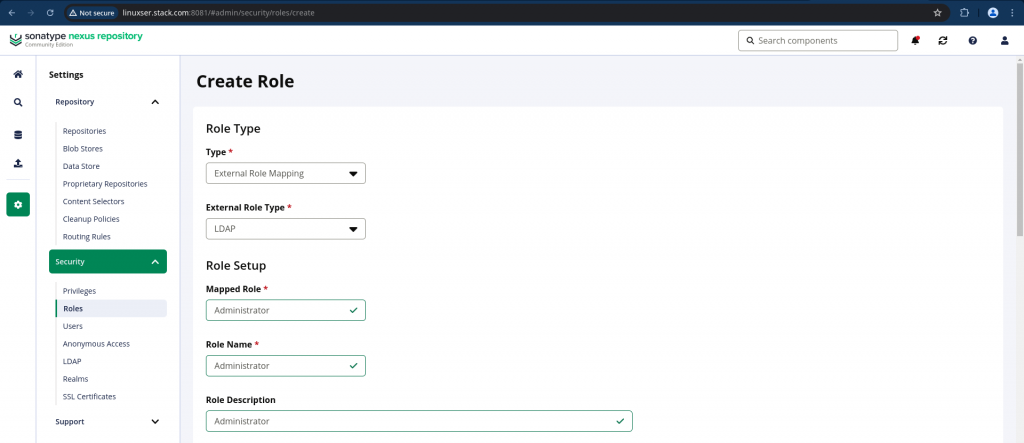
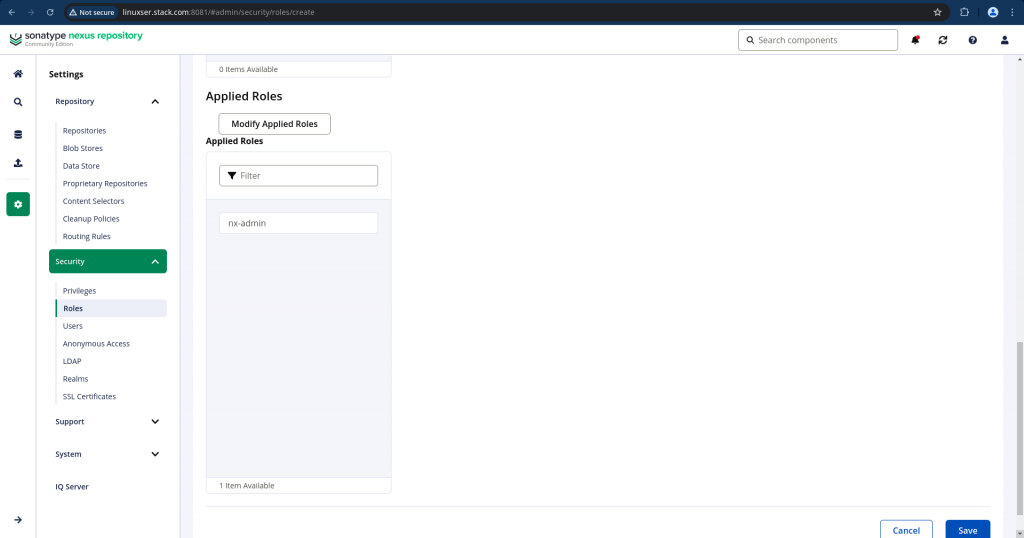
Once we have integrated with the LDAP server, we need to create roles of Type as “External Role Mapping” and External Role Type as “LDAP”. In the Mapped Role you will be able to search the LDAP roles “Administrator” and “Developers” and Map them with the Nexus “nx-admin” and “nx-anonymous” roles under the “Applied Roles” section respectively.
Here are the screenshots for the “Administrator” role. You can create similarly for the “Developers” role.
Step5: Ensure roles are mapped to users
Navigate to Settings – Security – Users and select Source as LDAP to filter all LDAP users. Click on the LDAP user such as “nxadmin1” and ensure “Administrator” role is showing under Granted block as shown below.
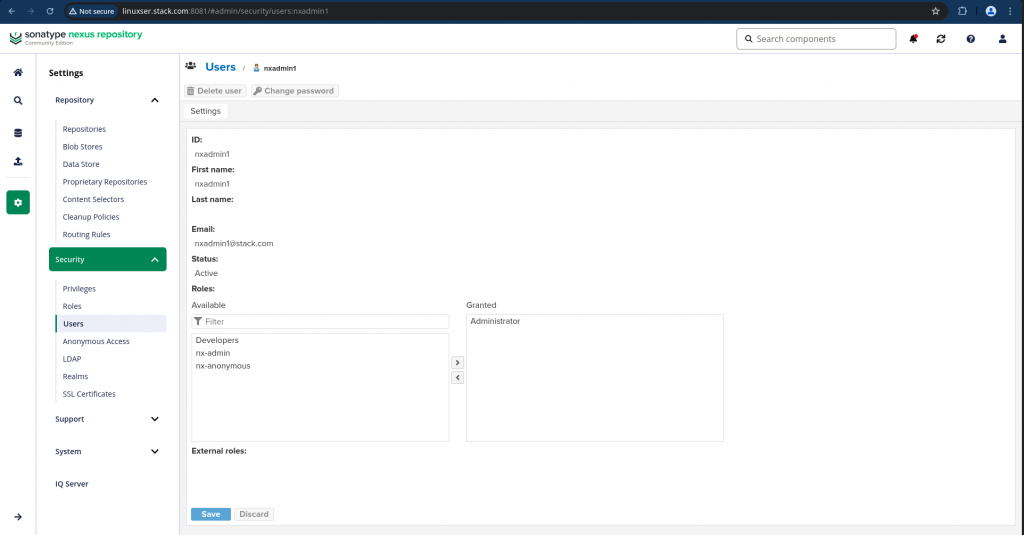
Similarly you can verify the “nxdev1” and “nxdev2” users with “Developers” role granted.
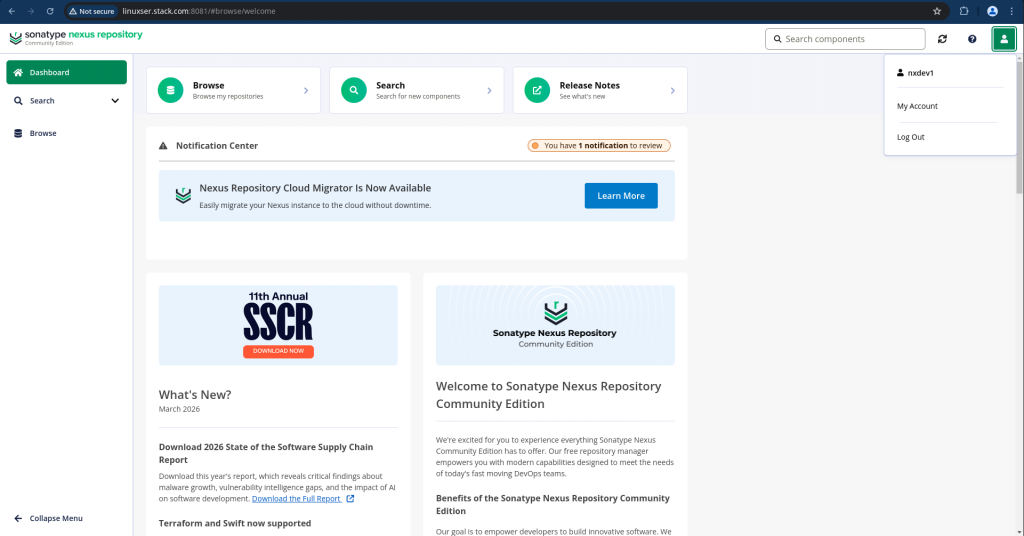
Step6: Validate Nexus with LDAP
Now we are ready to validate our Nexus authentication with LDAP credentials and also verify the access granted to each specific user who is part of “Administrator” or “Developers” group as shown below.

Hope you enjoyed reading this article. Thank you..
Leave a Reply
You must be logged in to post a comment.