How to setup AWS Gateway API Controller on Amazon EKS

Here in this article we will try to setup AWS Gateway API Controller implementation to provide service to service traffic routing capability on EKS kubernetes cluster.
Test Environment
Kubernetes cluster v1.32.0
What is Gateway API
Gateway API is an add-on containing API kinds that provide dynamic infrastructure provisioning and advanced traffic routing features. Gateway API is a set of specifications that are defined as custom resources and are supported by many implementations.
Gateway API Resources
Gateway API has three stable API kinds:
- GatewayClass: Defines a set of gateways with common configuration and managed by a controller that implements the class.
- Gateway: Defines an instance of traffic handling infrastructure, such as cloud load balancer.
- HTTPRoute: Defines HTTP-specific rules for mapping traffic from a Gateway listener to a representation of backend network endpoints. These endpoints are often represented as a Service.
What is AWS Gateway API Controller
The AWS Gateway API Controller is an open-source project and fully supported by Amazon. AWS Gateway API Controller integrates with Amazon VPC Lattice and allows you to manage the following communications.
- Handle network connectivity seamlessly between services across VPCs and accounts
- Discover VPC Lattice services spanning multiple Kubernetes clusters
AWS Gateway API Controller on Amazon EKS

If you are interested in watching the video. Here is the YouTube video on the same step by step procedure outlined below.
Procedure
Step1: Setup AWS CLI
As a first step we need to ensure that we have the AWS CLI installed and configured on our workstation from where we want to manage the AWS servers. Here are the instructions for the same.
Install AWS CLI
$ curl "https://awscli.amazonaws.com/awscli-exe-linux-x86_64.zip" -o "awscliv2.zip"
$ unzip awscliv2.zip
$ sudo ./aws/install
Configure AWS CLI
$ aws configure
AWS Access Key ID [None]: xxx
AWS Secret Access Key [None]: xxx
Default region name [None]: us-east-1
Default output format [None]: json
Step2: Setup kubectl
Kubectl is a command line tool that you use to communicate with the Kubernetes API server.
Install kubectl
$ curl -LO "https://dl.k8s.io/release/$(curl -L -s https://dl.k8s.io/release/stable.txt)/bin/linux/amd64/kubectl"
$ sudo install -o root -g root -m 0755 kubectl /usr/local/bin/kubectl
Validate kubectl version
$ kubectl version --client
Client Version: v1.32.1
Kustomize Version: v5.5.0
Step3: Setup AWS EKSCTL
The eksctl CLI interacts with AWS to create, modify, and delete Amazon EKS clusters.
Install eksctl
$ ARCH=amd64
$ PLATFORM=$(uname -s)_$ARCH
$ curl -sLO "https://github.com/eksctl-io/eksctl/releases/latest/download/eksctl_$PLATFORM.tar.gz"
$ tar -xzf eksctl_$PLATFORM.tar.gz -C /tmp && rm eksctl_$PLATFORM.tar.gz
$ sudo mv /tmp/eksctl /usr/local/bin
Validate eksctl version
$ eksctl version
0.202.0
Step4: Install jq package manager
Here we will install the jq package for some of our CLI commands usage.
$ sudo dnf install jq
Step5: Setup AWS Region and Cluster Name as environment variables
Setup the following environment variables as per your requirements which will be used further in the commands.
$ export AWS_REGION=us-east-1
$ export CLUSTER_NAME=kubestack
Step6: Create cluster with AWS EC2 instance managed nodes
Here we are going to create AWS EKS cluster with AWS EC2 instances as managed worker nodes for the hosting the kubernetes workloads. This command is going to create two cloudformation templates to provision the cluster itself and the initial managed nodegroup consisting of two ec2 instances.
$ eksctl create cluster --name $CLUSTER_NAME --region $AWS_REGION
Step7: Install gatewayapi crd
admin@linuxser:~$ kubectl apply -f https://github.com/kubernetes-sigs/gateway-api/releases/download/v1.2.0/standard-install.yaml
customresourcedefinition.apiextensions.k8s.io/gatewayclasses.gateway.networking.k8s.io created
customresourcedefinition.apiextensions.k8s.io/gateways.gateway.networking.k8s.io created
customresourcedefinition.apiextensions.k8s.io/grpcroutes.gateway.networking.k8s.io created
customresourcedefinition.apiextensions.k8s.io/httproutes.gateway.networking.k8s.io created
customresourcedefinition.apiextensions.k8s.io/referencegrants.gateway.networking.k8s.io created
Step8: Allow traffic from Amazon VPC Lattice
First identify the EKS created security group applied to ENI that is attached to EKS Control Plane master nodes, as well as any managed workloads. Update the Security group ingress rules to allow VPC traffic.
$ CLUSTER_SG=$(aws eks describe-cluster --name $CLUSTER_NAME --output json| jq -r '.cluster.resourcesVpcConfig.clusterSecurityGroupId')

$ echo $CLUSTER_SG
sg-09b1bb956905e7740
$ PREFIX_LIST_ID=$(aws ec2 describe-managed-prefix-lists --query "PrefixLists[?PrefixListName=="\'com.amazonaws.$AWS_REGION.vpc-lattice\'"].PrefixListId" | jq -r '.[]')
$ aws ec2 authorize-security-group-ingress --group-id $CLUSTER_SG --ip-permissions "PrefixListIds=[{PrefixListId=${PREFIX_LIST_ID}}],IpProtocol=-1"
$ PREFIX_LIST_ID_IPV6=$(aws ec2 describe-managed-prefix-lists --query "PrefixLists[?PrefixListName=="\'com.amazonaws.$AWS_REGION.ipv6.vpc-lattice\'"].PrefixListId" | jq -r '.[]')
$ aws ec2 authorize-security-group-ingress --group-id $CLUSTER_SG --ip-permissions "PrefixListIds=[{PrefixListId=${PREFIX_LIST_ID_IPV6}}],IpProtocol=-1"
Step9: Create a IAM policy
Here we are going to create a policy with the required permissions to manage VPC lattice, VPC and other resources.
$ curl https://raw.githubusercontent.com/aws/aws-application-networking-k8s/main/files/controller-installation/recommended-inline-policy.json -o recommended-inline-policy.json
admin@linuxser:~$ aws iam create-policy \
    --policy-name VPCLatticeControllerIAMPolicy \
    --policy-document file://recommended-inline-policy.json
admin@linuxser:~$ export VPCLatticeControllerIAMPolicyArn=$(aws iam list-policies --query 'Policies[?PolicyName==`VPCLatticeControllerIAMPolicy`].Arn' --output text)
admin@linuxser:~$ echo $VPCLatticeControllerIAMPolicyArn
arn:aws:iam::$aws_account_id:policy/VPCLatticeControllerIAMPolicy
Step10: Create the aws-application-networking-system namespace
Let’s create a new namespace wherein we will deploying the AWS Gateway API controller pods.
$ kubectl apply -f https://raw.githubusercontent.com/aws/aws-application-networking-k8s/main/files/controller-installation/deploy-namesystem.yaml
$ kubectl get ns
NAME                                STATUS   AGE
aws-application-networking-system   Active   7s
default                             Active   23m
kube-node-lease                     Active   23m
kube-public                         Active   23m
kube-system                         Active   23m
Step11: Set up the Pod Identities Agent
Amazon EKS Pod Identity associations provide the ability to manage credentials for your applications, similar to the way that Amazon EC2 instance profiles provide credentials to Amazon EC2 instances.
Amazon EKS Pod Identity provides credentials to the workloads with an additional EKS Auth API and an agent pod that runs on each node.
$ aws eks create-addon --cluster-name $CLUSTER_NAME --addon-name eks-pod-identity-agent --addon-version v1.0.0-eksbuild.1
$ kubectl get pods -n kube-system | grep 'eks-pod-identity-agent'
eks-pod-identity-agent-rf6sd     1/1     Running   0          35s
eks-pod-identity-agent-zfwpp     1/1     Running   0          35s
Step12: Create a Service Account
We will now create a new serviceaccount which will further be associated with an IAM role.
$ cat >gateway-api-controller-service-account.yaml <<EOF
apiVersion: v1
kind: ServiceAccount
metadata:
    name: gateway-api-controller
    namespace: aws-application-networking-system
EOF
$ kubectl apply -f gateway-api-controller-service-account.yaml
serviceaccount/gateway-api-controller created
Step13: Create a trust policy file for the IAM role
This is trust relationship policy allows pods in eks cluster to assume the attached role.
$ cat >trust-relationship.json <<EOF
{
    "Version": "2012-10-17",
    "Statement": [
        {
            "Sid": "AllowEksAuthToAssumeRoleForPodIdentity",
            "Effect": "Allow",
            "Principal": {
                "Service": "pods.eks.amazonaws.com"
            },
            "Action": [
                "sts:AssumeRole",
                "sts:TagSession"
            ]
        }
    ]
}
EOF
An IAM role is similar to an IAM user, in that it is an AWS identity with permission policies that determine what the identity can and cannot do in AWS.
$ aws iam create-role --role-name VPCLatticeControllerIAMRole --assume-role-policy-document file://trust-relationship.json --description "IAM Role for AWS Gateway API Controller for VPC Lattice"
$ aws iam attach-role-policy --role-name VPCLatticeControllerIAMRole --policy-arn=$VPCLatticeControllerIAMPolicyArn

$ export VPCLatticeControllerIAMRoleArn=$(aws iam list-roles --query 'Roles[?RoleName==`VPCLatticeControllerIAMRole`].Arn' --output text)

$ echo $VPCLatticeControllerIAMRoleArn
arn:aws:iam::$aws_account_id:role/VPCLatticeControllerIAMRole
Step14: Create the association
Instead of creating and distributing your AWS credentials to the containers or using the Amazon EC2 instance’s role, we associate an IAM role with a Kubernetes service account and configure the Pods to use the service account.
$ aws eks create-pod-identity-association --cluster-name $CLUSTER_NAME --role-arn $VPCLatticeControllerIAMRoleArn --namespace aws-application-networking-system --service-account gateway-api-controller
Step15: Install AWS Gateway API Controller
Let’s now install the AWS Gateway API controller in the namespace “aws-application-networking-system” that was created in earlier step.
admin@linuxser:~$ kubectl apply -f https://raw.githubusercontent.com/aws/aws-application-networking-k8s/main/files/controller-installation/deploy-v1.1.0.yaml
namespace/aws-application-networking-system unchanged
customresourcedefinition.apiextensions.k8s.io/accesslogpolicies.application-networking.k8s.aws created
customresourcedefinition.apiextensions.k8s.io/iamauthpolicies.application-networking.k8s.aws created
customresourcedefinition.apiextensions.k8s.io/serviceexports.application-networking.k8s.aws created
customresourcedefinition.apiextensions.k8s.io/serviceimports.application-networking.k8s.aws created
customresourcedefinition.apiextensions.k8s.io/targetgrouppolicies.application-networking.k8s.aws created
customresourcedefinition.apiextensions.k8s.io/tlsroutes.gateway.networking.k8s.io created
customresourcedefinition.apiextensions.k8s.io/vpcassociationpolicies.application-networking.k8s.aws created
serviceaccount/gateway-api-controller unchanged
clusterrole.rbac.authorization.k8s.io/aws-application-networking-controller created
clusterrole.rbac.authorization.k8s.io/metrics-reader created
clusterrole.rbac.authorization.k8s.io/proxy-role created
clusterrolebinding.rbac.authorization.k8s.io/aws-application-networking-controller created
clusterrolebinding.rbac.authorization.k8s.io/proxy-rolebinding created
configmap/manager-config created
Warning: tls: failed to find any PEM data in certificate input
secret/webhook-cert created
service/gateway-api-controller-metrics-service created
service/webhook-service created
deployment.apps/gateway-api-controller created
mutatingwebhookconfiguration.admissionregistration.k8s.io/aws-appnet-gwc-mutating-webhook created
Step16: Create the amazon-vpc-lattice GatewayClass
Gateways can be implemented by different controllers, often with different configurations. A Gateway must reference a GatewayClass that contains the name of the controller that implements the class.
$ kubectl apply -f https://raw.githubusercontent.com/aws/aws-application-networking-k8s/main/files/controller-installation/gatewayclass.yaml
gatewayclass.gateway.networking.k8s.io/amazon-vpc-lattice created
$ kubectl get gatewayclass
NAME                 CONTROLLER                                              ACCEPTED   AGE
amazon-vpc-lattice   application-networking.k8s.aws/gateway-api-controller   True       3m59s
Step17: Clone Git Samples Repository
$ git clone https://github.com/aws/aws-application-networking-k8s.git
$ cd aws-application-networking-k8s
Step18: Create VPC Lattic service network
$ aws vpc-lattice create-service-network --name my-hotel
Associate the VPC lattice service network with the EKS Cluster VPC to allow communication.
$ SERVICE_NETWORK_ID=$(aws vpc-lattice list-service-networks --query "items[?name=="\'my-hotel\'"].id" | jq -r '.[]')
$ CLUSTER_VPC_ID=$(aws eks describe-cluster --name $CLUSTER_NAME | jq -r .cluster.resourcesVpcConfig.vpcId)
$ aws vpc-lattice create-service-network-vpc-association --service-network-identifier $SERVICE_NETWORK_ID --vpc-identifier $CLUSTER_VPC_ID
$ aws vpc-lattice list-service-network-vpc-associations --vpc-id $CLUSTER_VPC_ID
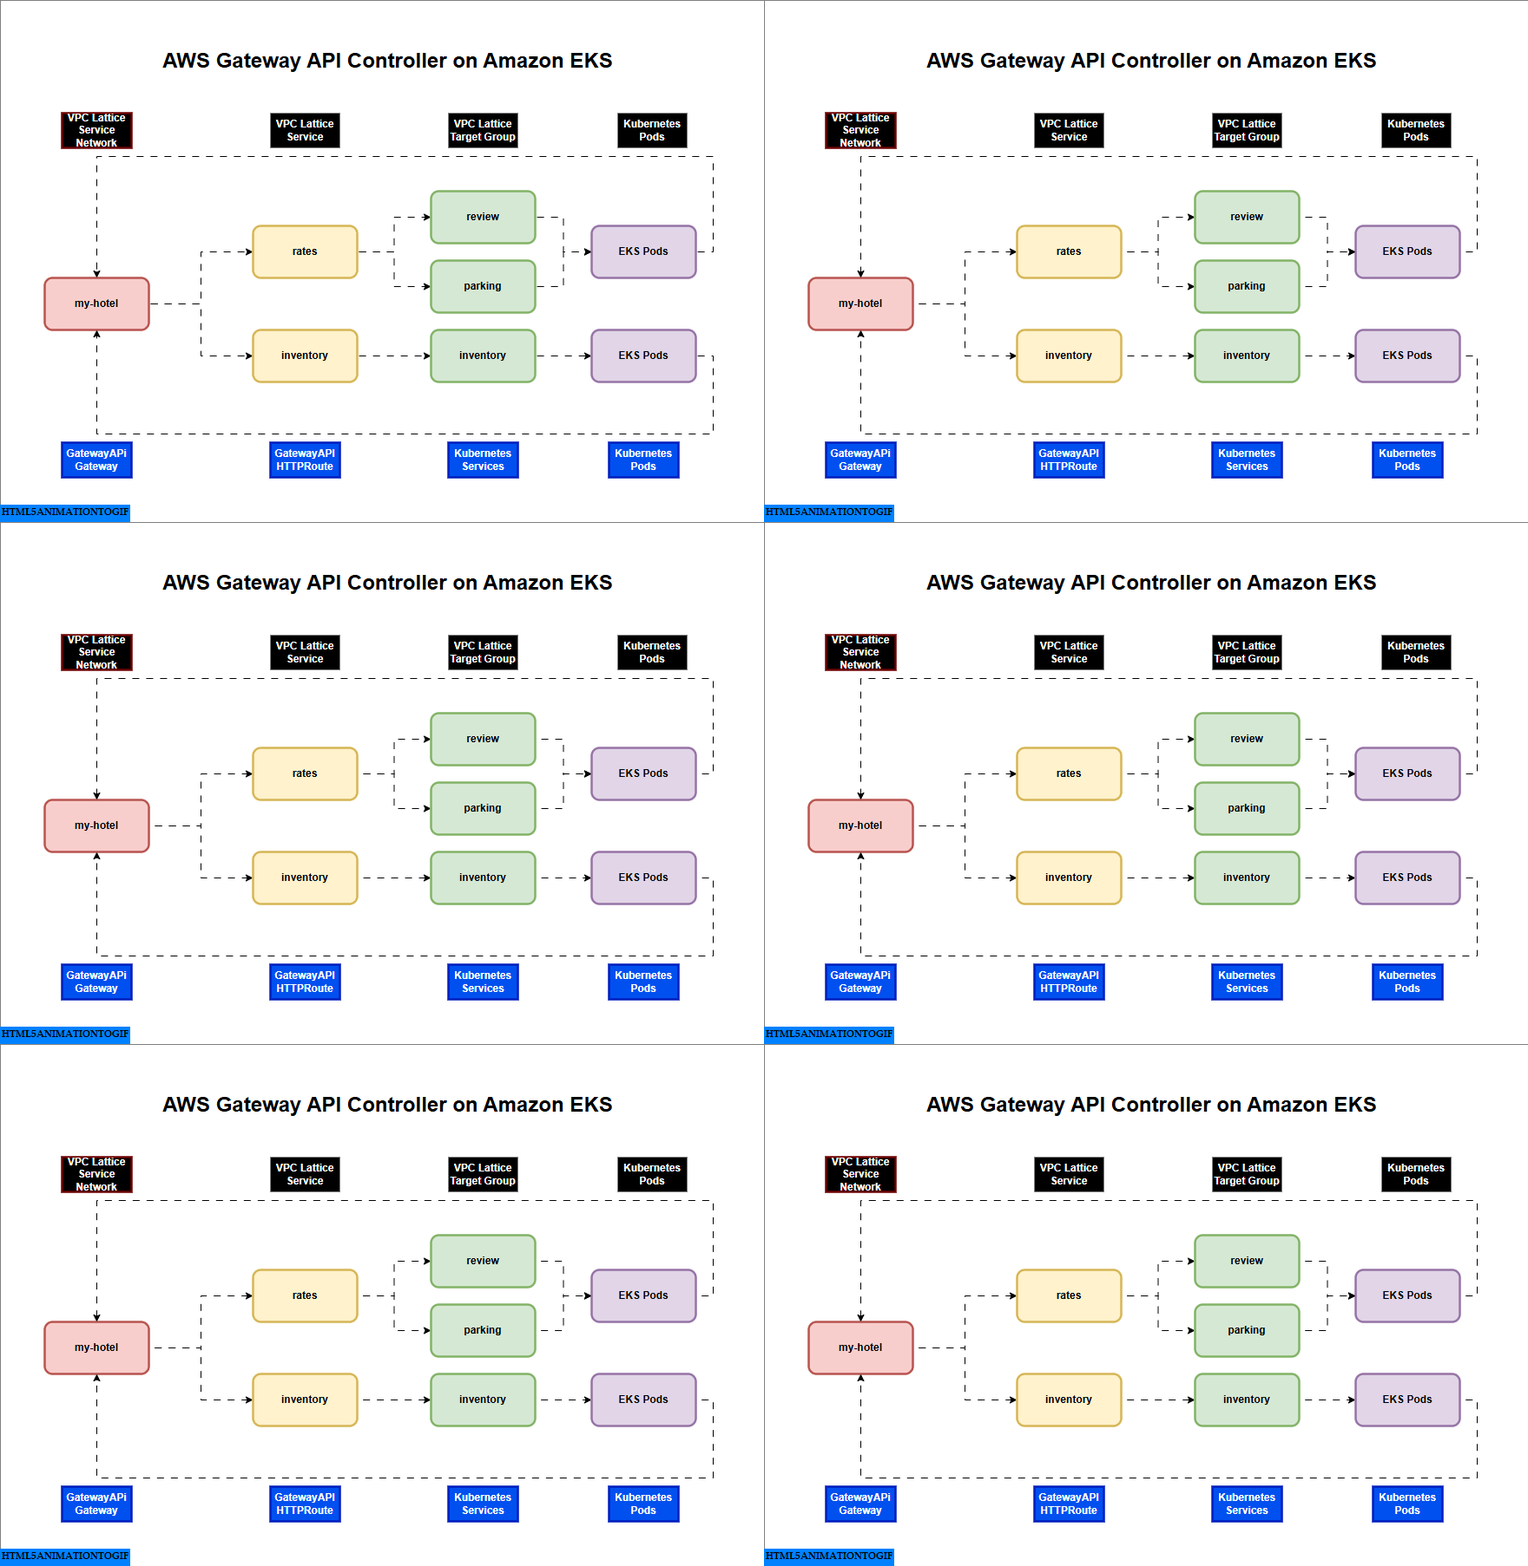
Step19: Create the Kubernetes Gateway my-hotel
A Gateway describes an instance of traffic handling infrastructure. It defines a network endpoint that can be used for processing traffic, i.e. filtering, balancing, splitting, etc. for backends such as a Service. For example, a Gateway may represent a cloud load balancer or an in-cluster proxy server that is configured to accept HTTP traffic.
$ kubectl apply -f files/examples/my-hotel-gateway.yaml
gateway.gateway.networking.k8s.io/my-hotel created
$ kubectl get gateway
NAME       CLASS                ADDRESS   PROGRAMMED   AGE
my-hotel   amazon-vpc-lattice             True         20s
Step20: Create the Kubernetes HTTPRoute rates that can has path matches routing to the parking service and review service
The HTTPRoute kind specifies routing behavior of HTTP requests from a Gateway listener to backend network endpoints.
$ kubectl apply -f files/examples/parking.yaml
deployment.apps/parking created
service/parking created
$ kubectl apply -f files/examples/review.yaml
deployment.apps/review created
service/review created
$ kubectl apply -f files/examples/rate-route-path.yaml
httproute.gateway.networking.k8s.io/rates created
Step21: Create another Kubernetes HTTPRoute inventory
$ kubectl apply -f files/examples/inventory-ver1.yaml
deployment.apps/inventory-ver1 created
service/inventory-ver1 created
$ kubectl apply -f files/examples/inventory-route.yaml
httproute.gateway.networking.k8s.io/inventory created
Step22: Find out HTTPRoute’s DNS name from HTTPRoute status
$ kubectl get httproute
NAME        HOSTNAMES   AGE
inventory               31s
rates                   2m45s
Step23: Check VPC Lattice generated DNS address for HTTPRoute inventory and rates (this could take up to one minute to populate)
$ kubectl get httproute inventory -o yaml
...
    application-networking.k8s.aws/lattice-assigned-domain-name: inventory-default-07b3a701e6cbdcc00.7d67968.vpc-lattice-svcs.us-east-1.on.aws
...
$ kubectl get httproute rates -o yaml
...
    application-networking.k8s.aws/lattice-assigned-domain-name: rates-default-0d720772cfa79f4c2.7d67968.vpc-lattice-svcs.us-east-1.on.aws
...
Step24: Store VPC Lattice assigned DNS names to variables
$ ratesFQDN=$(kubectl get httproute rates -o json | jq -r '.metadata.annotations."application-networking.k8s.aws/lattice-assigned-domain-name"')
$ inventoryFQDN=$(kubectl get httproute inventory -o json | jq -r '.metadata.annotations."application-networking.k8s.aws/lattice-assigned-domain-name"')
$ echo $ratesFQDN
rates-default-0d720772cfa79f4c2.7d67968.vpc-lattice-svcs.us-east-1.on.aws

$ echo $inventoryFQDN
inventory-default-07b3a701e6cbdcc00.7d67968.vpc-lattice-svcs.us-east-1.on.aws
Step25: Verify service-to-service communications
Check connectivity from the inventory-ver1 service to parking and review services.
$ kubectl exec deploy/inventory-ver1 -- curl -s $ratesFQDN/parking $ratesFQDN/review
Requsting to Pod(parking-ccdcd674-pk98s): parking handler pod
Requsting to Pod(review-55df9c7ff4-jwz6z): review handler pod
Check connectivity from the parking service to the inventory-ver1 service.
$ kubectl exec deploy/parking -- curl -s $inventoryFQDN
Requsting to Pod(inventory-ver1-786bfcd779-rnqbx): Inventory-ver1 handler pod
Now you could confirm the service-to-service communications within one cluster is working as expected.
Hope you enjoyed reading this article. Thank you..
Leave a Reply
You must be logged in to post a comment.