How to setup Kerberos authentication system on Ubuntu OS
Here in this article we will try to implement Kerberos V solution into our networking environment. We will be using the MIT based reference implementation of the Kerberos protocol for this setup.
Test Environment
Master KDC – ubreplica.stack.com
KDC client – ubscratch.stack.com
What is Kerberos
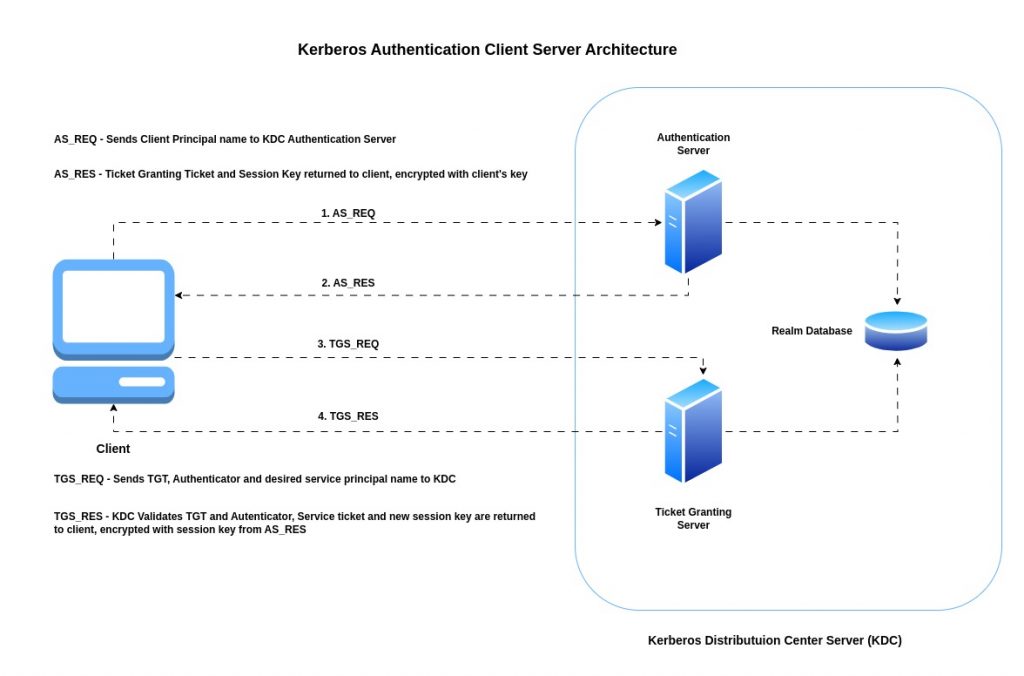
Kerberos is a network authentication system protocol. It operates through a set of centralized Key Distribution Centers, or KDCs. Each KDC on your network contains a database of usernames and passwords for both users and Kerberos-enabled services.
Kerberos uses encrypted tickets to prove the identity of both end users and network servers. These tickets are generated by the centralized Key Distribution Centers on behalf of users who wish to authenticate to the network.
The full definition of what Kerberos provides is a secure, single-sign-on, trusted, third-party mutual authentication service. The latest version of the protocol is called Kerberos V.
For more details refer to Kerberos Documentation.
If you are interested in watching the video. Here is the YouTube video on the same step by step procedure outlined below.
Kerberos Authentication Client Server Architecture
Procedure
Step1: Ensure Clocks synchronised and Working DNS resolution
Kerberos protocol implementation is dependent synchronized clocks and the DNS name resolution (ie. forward and reverse resolution) of the systems that are involved in the Kerberos authentication implementation. Ensure valid forward and reverse DNS mappings for machines in your domain and set all system hostnames to the fully qualified domain names. Ensure that local systems /etc/hosts file, if used, map the hostname to a valid IP address.
Step2: Download and Extract MIT distribution package
Here in this step we are going to download the MIT Kerberos distribution package and extract as shown below.
ubadmin@ubreplica:~$ wget https://kerberos.org/dist/krb5/1.21/krb5-1.21.2.tar.gz
ubadmin@ubreplica:~$ tar -xzvf krb5-1.21.2.tar.gz
Step3: Build Kerberos package
In order to compile the package successfully we need to ensure that the following parser generator and compiler package installed on our system as a pre-requisite.
ubadmin@ubreplica:~/krb5-1.21.2/src$ sudo apt-get install bison byacc
Once the required packages are installed we can continue with the running the configure script with the default and compile our package using make. Once the compilation is completed successfully we can go ahead with the installation of the package with sudo privileges.
The default location for the installation files is /usr/local.
ubadmin@ubreplica:~$ cd krb5-1.21.2/src
ubadmin@ubreplica:~/krb5-1.21.2/src$ ./configure
ubadmin@ubreplica:~/krb5-1.21.2/src$ make
ubadmin@ubreplica:~/krb5-1.21.2/src$ sudo make install
Also we need to ensure that the following directory structure is created. The location “/usr/local/var/krb5kdc” holds the critical data related to our KDC server.
ubadmin@ubreplica:~$ mkdir /usr/local/var
ubadmin@ubreplica:~$ mkdir /usr/local/var/krb5kdc
ubadmin@ubreplica:~$ chown root /usr/local/var/krb5kdc
ubadmin@ubreplica:~$ chmod 700 /usr/local/var/krb5kdc
Step4: Create Realm
In this step we are going to create a new Kerberos realm on the following server which will act as our Master KDC server. The realm setup needs to be performed only the Master KDC server. In this process of creating the realm it will create the necessary KDC realm database files with the necessary principals.
The only configuration file that we need to create is a skeletal /etc/krb5.conf which contains parameters that are used by the Kerberos libraries.
ubadmin@ubreplica:~/krb5-1.21.2/src$ sudo vi /etc/krb5.conf
ubadmin@ubreplica:~/krb5-1.21.2/src$ cat /etc/krb5.conf
[libdefaults]
        default_realm = STACK.COM

[realms]
# use "kdc = ..." if realm admins haven't put SRV records into DNS
        STACK.COM = {
                kdc = ubreplica.stack.com:88
                admin_server = ubreplica.stack.com:749
                default_domain = stack.com
        }

[domain_realm]
        stack.com = STACK.COM
        .stack.com = STACK.COM

[logging]
        kdc = FILE:/var/log/krb5kdc.log
        admin_server = FILE:/var/log/kadmin.log
        default = FILE:/var/log/krb5lib.log
Replace all instances of STACK.COM and stack.com with your realm name and DNS domain name, respectively. Also, replace ubreplica.stack.com with the fully qualified DNS name of the KDC you’re setting up.
There is one more configuration that we will create at the following location “/etc/kdc.conf”. “/etc/kdc.conf” specifies per-realm configuration data to be used by the Kerberos V5 Authentication Service and Key Distribution Center (AS/KDC). This includes database, key and per-realm defaults.
ubadmin@ubreplica:~/krb5-1.21.2/src$ sudo vi /etc/kdc.conf
ubadmin@ubreplica:~/krb5-1.21.2/src$ cat /etc/kdc.conf
[kdcdefaults]
	kdc_ports = 88,750

[realms]
	STACK.COM = {
		database_name = /usr/local/var/krb5kdc/principal
		admin_keytab = /usr/local/var/krb5kdc/kadm5.keytab
		acl_file = /usr/local/var/krb5kdc/kadm5.acl
		dict_file = /usr/local/var/krb5kdc/kadm5.dict
		key_stash_file = /usr/local/var/krb5kdc/.k5.STACK.COM
		kadmind_port = 749
		max_life = 10h 0m 0s
		max_renewable_life = 7d 0h 0m 0s
		master_key_type = des3-hmac-sha1
		supported_enctypes = des3-hmac-sha1:normal des-cbc-crc:normal
	}
Step5: Initialize Kerberos database
We will be using the kdb5_util program, included with the Kerberos distribution to initialize the Kerberos database. The -s option indicates that we’ll be using a stash file to store what Kerberos calls the master key also to ensure that KDC daemon can start without manual intervention.
The master key is an encryption key that is used to encrypt the entire Kerberos database on disk. When the Kerberos KDC daemon starts, it first queries the console for the master key password, once the password is given, it can load the database in memory, decrypt it, and continue.
ubadmin@ubreplica:~/krb5-1.21.2/src$ sudo /usr/local/sbin/kdb5_util create -s
Initializing database '/usr/local/var/krb5kdc/principal' for realm 'STACK.COM',
master key name 'K/M@STACK.COM'
You will be prompted for the database Master Password.
It is important that you NOT FORGET this password.
Enter KDC database master key:
Re-enter KDC database master key to verify:
Now the realm has been initialized, and some of the essential principals have already been created as shown below.
ubadmin@ubreplica:~/krb5-1.21.2/src$ ls -ahl /usr/local/var/krb5kdc/
total 28K
drwxr-xr-x 2 root root 4.0K May 31 12:22 .
drwxr-xr-x 5 root root 4.0K May 31 09:17 ..
-rw------- 1 root root   74 May 31 12:22 .k5.STACK.COM
-rw------- 1 root root 8.0K May 31 12:22 principal
-rw------- 1 root root 8.0K May 31 12:22 principal.kadm5
-rw------- 1 root root    0 May 31 12:22 principal.kadm5.lock
-rw------- 1 root root    0 May 31 12:22 principal.ok
The principal and principal.ok files are our Kerberos database files. The principal.kadm5 and principal.kadm5.lock files are the Kerberos administrative database and administrative database lock files, respectively. The .k5.STACK.COM file is our stash file, created by adding the -s option to kdb5_util.
Step6: Create an admin principal
Kadmin is the administrative interface to the Kerberos database; inside of kadmin, a Kerberos administrator can add principals, modify principals, delete principals, change passwords.
Here in this step we are going to use a fail-safe copy of kadmin (ie. kadmin.local). This fail-safe program needs to be run locally on the KDC as root to make modification to the KDC database directly.
As currently we haven’t created any administrative principal or any other principal in the KDC database. The only way to access the KDC database modification is using the kadmin.local fail safe program.
A Kerberos administrator principal can add principals, modify principals, delete principals, change passwords, and do other administrative tasks.
Let’s launch our kadmin.local program as shown below. We can list the principals that were created with our database initialization using the command “listprincs”.
ubadmin@ubreplica:~/krb5-1.21.2/src$ sudo /usr/local/sbin/kadmin.local
Authenticating as principal root/admin@STACK.COM with password.
kadmin.local:  listprincs
K/M@STACK.COM
kadmin/admin@STACK.COM
kadmin/changepw@STACK.COM
krbtgt/STACK.COM@STACK.COM
kadmin.local:
Now, let us create our administrative principal named “ubadmin/admin ” using the command “addprinc” as shown below. You can ignore the policy warning as currently there isn’t any policy defined.
ubadmin@ubreplica:~/krb5-1.21.2/src$ sudo /usr/local/sbin/kadmin.local
Authenticating as principal root/admin@STACK.COM with password.
kadmin.local:  addprinc ubadmin/admin
No policy specified for ubadmin/admin@STACK.COM; defaulting to no policy
Enter password for principal "ubadmin/admin@STACK.COM":
Re-enter password for principal "ubadmin/admin@STACK.COM":
Principal "ubadmin/admin@STACK.COM" created.
We can now list the principal and see our new administrative principal listed in the output below.
ubadmin@ubreplica:~/krb5-1.21.2/src$ sudo /usr/local/sbin/kadmin.local
Authenticating as principal root/admin@STACK.COM with password.
kadmin.local:  listprincs
K/M@STACK.COM
kadmin/admin@STACK.COM
kadmin/changepw@STACK.COM
krbtgt/STACK.COM@STACK.COM
ubadmin/admin@STACK.COM
Step7: Start KDC daemon process
Let’s now start up our kdc daemon process “krb5kdc” and ensure that its up and running. If we get a prompt back with no error messages, the daemon should now be running in the background, responding to Kerberos client requests.
ubadmin@ubreplica:~/krb5-1.21.2/src$ sudo /usr/local/sbin/krb5kdc
ubadmin@ubreplica:~/krb5-1.21.2/src$ ps -ef | grep krb5kdc
root        1925       1  0 12:31 ?        00:00:00 /usr/local/sbin/krb5kdc
ubadmin     1929    1421  0 12:31 pts/0    00:00:00 grep --color=auto krb5kdc
Once the kdc daemon is running we can try to login as administrative principal “ubadmin/admin” using the kinit program. kinit is the program that we use to login as principal, obtain and cache Kerberos ticket-granting ticket.
ubadmin@ubreplica:~/krb5-1.21.2/src$ sudo /usr/local/bin/kinit ubadmin/admin
Password for ubadmin/admin@STACK.COM:
ubadmin@ubreplica:~/krb5-1.21.2/src$
Step8: Apply ACL permission for principal
The administrative user principal that we created in last step as not been granted any permissions or administrative rights on the Kerberos server. Here we will define what permission a principal can be granted using the “kadm5.acl” ACL file.
The acl file that we will be creating has the following fields. So, each line represents a permission granted or denied to a particular principal. For more information on ACL refer Kerberos ACL definition.
- Principal name
- Permissions
- Target principals for which the permissions apply (optional)
Here we are going to give “ubadmin/admin” permissions to administer all principals.
ubadmin@ubreplica:~/krb5-1.21.2/src$ sudo cat /usr/local/var/krb5kdc/kadm5.acl
ubadmin/admin@STACK.COM         *
Step9: Add kadmin entries to keytab file
Before we can use kadmin over the network, we need to create a keytab file containing the kadmin principals that were created when we initialized our realm.
kadmin provides for the maintenance of Kerberos principals, password policies, and service key tables (keytabs). The remote kadmin client uses Kerberos to authenticate to kadmind using the service principal kadmin/ADMINHOST (where ADMINHOST is the fully-qualified hostname of the admin server) or kadmin/admin.
The ktadd command creates a random key for a principal or set of principals in the Kerberos database, and returns those keys to the client so that they can be saved into a keytab file on the client machine.
ubadmin@ubreplica:~/krb5-1.21.2/src$ sudo /usr/local/sbin/kadmin.local
Authenticating as principal ubadmin/admin@STACK.COM with password.
kadmin.local:  ktadd -k /usr/local/var/krb5kdc/kadm5.keytab kadmin/admin
Entry for principal kadmin/admin with kvno 2, encryption type aes256-cts-hmac-sha1-96 added to keytab WRFILE:/usr/local/var/krb5kdc/kadm5.keytab.
Entry for principal kadmin/admin with kvno 2, encryption type aes128-cts-hmac-sha1-96 added to keytab WRFILE:/usr/local/var/krb5kdc/kadm5.keytab.
kadmin.local:
kadmin.local:  ktadd -k /usr/local/var/krb5kdc/kadm5.keytab kadmin/changepw
Entry for principal kadmin/changepw with kvno 2, encryption type aes256-cts-hmac-sha1-96 added to keytab WRFILE:/usr/local/var/krb5kdc/kadm5.keytab.
Entry for principal kadmin/changepw with kvno 2, encryption type aes128-cts-hmac-sha1-96 added to keytab WRFILE:/usr/local/var/krb5kdc/kadm5.keytab.
Access to keytab files should be restricted to only authorized users and services. Since keytab files contain encrypted keys, they are susceptible to attacks if an unauthorized user gains access to the file.
Step10: Start KDC Administrative daemon
Typically, we will only need to run the krb5kdc and kadmind processes on your master KDC. We already started our krb5kdc daemon in step7. Here we will startup the kadmind daemon.
ubadmin@ubreplica:~/krb5-1.21.2/src$ sudo /usr/local/sbin/kadmind
Verify that both the process are up and running as shown below.
ubadmin@ubreplica:~/krb5-1.21.2/src$ ps -ef | egrep "kadmin|krb5kdc"
root        1925       1  0 12:31 ?        00:00:00 /usr/local/sbin/krb5kdc
root        1963       1  0 12:50 ?        00:00:00 /usr/local/sbin/kadmind
Step11: Validate Kerberos service
Here we will try to login with the administrative user that we created earlier, and use it to add a few other principals using the kadmin administrative interface program.
ubadmin@ubreplica:~/krb5-1.21.2/src$ kinit ubadmin/admin
Password for ubadmin/admin@STACK.COM:
ubadmin@ubreplica:~/krb5-1.21.2/src$
ubadmin@ubreplica:~/krb5-1.21.2/src$ sudo kadmin
Authenticating as principal ubadmin/admin@STACK.COM with password.
Password for ubadmin/admin@STACK.COM:
kadmin:  addprinc ubtest
No policy specified for ubtest@STACK.COM; defaulting to no policy
Enter password for principal "ubtest@STACK.COM":
Re-enter password for principal "ubtest@STACK.COM":
Principal "ubtest@STACK.COM" created.
ubadmin@ubreplica:~/krb5-1.21.2/src$ sudo kadmin
Authenticating as principal ubadmin/admin@STACK.COM with password.
Password for ubadmin/admin@STACK.COM:
kadmin:  listprincs
K/M@STACK.COM
kadmin/admin@STACK.COM
kadmin/changepw@STACK.COM
krbtgt/STACK.COM@STACK.COM
ubadmin/admin@STACK.COM
ubtest@STACK.COM
Step12: Download and Extract MIT distribution package on Client
We will downloading and extract the same kerberos package on client machine as shown below.
ubadmin@ubscratch:~$ wget https://kerberos.org/dist/krb5/1.21/krb5-1.21.2.tar.gz
ubadmin@ubscratch:~$ tar -xzvf krb5-1.21.2.tar.gz
Step13: Build Kerberos package
Once the package is extracted follow the same steps to build and install as we did on master KDC server.
ubadmin@ubscratch:~/krb5-1.21.2/src$ sudo apt-get install bison byacc
ubadmin@ubscratch:~/krb5-1.21.2/src$ ./configure
ubadmin@ubscratch:~/krb5-1.21.2/src$ make
ubadmin@ubscratch:~/krb5-1.21.2/src$ sudo make install
Step14: Copy krb5.conf file
Here we are going to copy the kerberos configuration file “/etc/krb5.conf” onto the client machine.
ubadmin@ubscratch:~/krb5-1.21.2/src$ sudo scp -r ubadmin@ubreplica.stack.com:/etc/krb5.conf /etc/krb5.conf
Step15: Validate Kerberos authentication from Client
Let us try to login with “ubadmin/admin” administrative principal that we created on the Master KDC server. We are using “-V” option to run the command in verbose mode.
ubadmin@ubscratch:~/krb5-1.21.2/src$ kinit ubadmin/admin -V
Using default cache: /tmp/krb5cc_1000
Using principal: ubadmin/admin@STACK.COM
Password for ubadmin/admin@STACK.COM:
Authenticated to Kerberos v5
Let us try to use a Kerberized client program to list the principals on the client machine. The Kerberized client programs include kinit, klist, kdestroy, and kpasswd. All of these programs are in the directory “/usr/local/bin”.
ubadmin@ubscratch:~/krb5-1.21.2/src$ klist
Ticket cache: FILE:/tmp/krb5cc_1000
Default principal: ubadmin/admin@STACK.COM

Valid starting     Expires            Service principal
01/06/24 12:47:33  02/06/24 12:47:33  krbtgt/STACK.COM@STACK.COM
We can also launch our kadmin administrative interface program from the client machine as shown below and list principals as shown below.
ubadmin@ubscratch:~/krb5-1.21.2/src$ kadmin
Couldn't open log file /var/log/kadmin.log: Permission denied
Authenticating as principal ubadmin/admin@STACK.COM with password.
Password for ubadmin/admin@STACK.COM:
kadmin:
kadmin:  listprincs
K/M@STACK.COM
kadmin/admin@STACK.COM
kadmin/changepw@STACK.COM
krbtgt/STACK.COM@STACK.COM
ubadmin/admin@STACK.COM
ubtest@STACK.COM
Hope you enjoyed reading this article. Thank you..
Leave a Reply
You must be logged in to post a comment.