How to integrate Sonarqube with Gitlab using Oauth 2.0
Here in this article we will try to setup Oauth2.0 based authorization system using a SonarQube server which acts as a client application and GitLab server which acts as a Resource provider server. We will delegate the authorization request from SonarQube to GitLab Resource provider. After authorization on Resource provider server, based on the Resource owner decision to Allow or Deny access authorization is granted to Client Application to access the User resources details on the GitLab Server. Finally the Client Applications callback url is loaded successfully.
Test Environment
Fedora 37 workstation
Vagrant
libvirt/kvm
What is Oauth2.0
OAuth 2.0 provides secure delegated server resource access to client applications on behalf of a resource owner. OAuth 2 allows authorization servers to issue access tokens to third-party clients with the approval of the resource owner or the end-user.
Important Parties Involved in Oauth2.0 authorization flow
| Name | Description |
| Client Application | Application Which wants to access your credential |
| Resource Provider/Server | Server providing the resources like Google, Facebook, GitHub, GitLab |
| Authorization Provider/Server | Server providing the Authorization like Google, Facebook, GitHub, GitLab |
| Resource Owner | Owner of the Resource hosted on the Resource Provider or Authorization Provider Server |
Here is the project structure for GitLab and SonarQube server setup using Vagrant and Ansible as the provisioner.
GitLab Server
[admin@fedser gitlab]$ tree .
.
├── ansible
│   ├── linux_provision_gitlab_server.yml
│   └── roles
│       ├── linux_docker_install_server
│       │   ├── tasks
│       │   │   └── main.yml
│       │   └── vars
│       │       └── main.yml
│       └── linux_gitlab_install_server
│           ├── tasks
│           │   └── main.yml
│           ├── templates
│           │   └── docker-compose.yml.j2
│           └── vars
│               └── main.yml
├── gitlab_oauth_config.sh
└── Vagrantfile
SonarQube Server
[admin@fedser sonarqube]$ tree .
.
├── ansible
│   ├── linux_provision_sonar_server.yml
│   └── roles
│       ├── linux_docker_install_server
│       │   ├── tasks
│       │   │   └── main.yml
│       │   └── vars
│       │       └── main.yml
│       └── linux_sonar_install_server
│           ├── tasks
│           │   └── main.yml
│           ├── templates
│           │   ├── docker-compose.yml.j2
│           │   └── sysctl.conf.j2
│           └── vars
│               └── main.yml
├── sonar_oauth_config.sh
└── Vagrantfile
If you are interested in watching the video. Here is the YouTube video on the same step by step procedure outlined below.
Procedure
Step1: Setup GitLab Server
Here is the Vagrantfile which we will use to launch the VM and provision it using “linux_provision_gitlab_server.yml” ansible playbook.
GitLab Server Vagrantfile
[admin@fedser gitlab]$ cat Vagrantfile
# -*- mode: ruby -*-
# vi: set ft=ruby :

Vagrant.configure("2") do |config|

    config.hostmanager.enabled = true
    config.hostmanager.manage_host = true
    config.hostmanager.manage_guest = true

    config.vm.define "gitlab" do |gitlab|
      gitlab.vm.box = "fedora/38-cloud-base"
      gitlab.vm.hostname = "fedgitlab.stack.com"

      gitlab.vm.synced_folder '.', '/vagrant', disabled: true
      gitlab.vm.synced_folder ".", "/home/vagrant/gitlab", type: "sshfs"

      gitlab.vm.provider "libvirt" do |libvirt|
        libvirt.cpus = 2
        libvirt.memory = 4096
      end

      # Switch to "ansible_local" to install and use ansible on guest VM

      gitlab.vm.provision "ansible" do |ansible|
        ansible.playbook = "ansible/linux_provision_gitlab_server.yml"
        ansible.verbose = true
      end
    end
  end
GitLab Server Ansible Playbook
[admin@fedser gitlab]$ cat ansible/linux_provision_gitlab_server.yml
---
- name: linuxn gitlab server management
  hosts: gitlab
  become: true
  become_user: root
  roles:
  - { role: 'linux_docker_install_server' }
  - { role: 'linux_gitlab_install_server' }
The Ansible playbook does the setup in two parts. First it installs the docker and docker-compose as a pre-requisite. Second, it launches the GitLab server using the docker-compose.yml file.
Docker Setup
[admin@fedser gitlab]$ cat ansible/roles/linux_docker_install_server/vars/main.yml
---
docker_repository: "https://download.docker.com/linux/fedora/docker-ce.repo"
docker_compose_repository: "https://github.com/docker/compose/releases/download/v2.20.3/docker-compose-linux-x86_64"
sonar_user: "vagrant"
[admin@fedser gitlab]$ cat ansible/roles/linux_docker_install_server/tasks/main.yml
---
- name: Install pre-requisite packages
  dnf: name={{ item }} state=present
  with_items:
    - dnf-plugins-core

- name: Add Docker repository
  command: "dnf config-manager --add-repo {{docker_repository}}"

- name: Install Docker Engine
  dnf: name={{ item }} state=present
  with_items:
    - docker-ce
    - docker-ce-cli
    - containerd.io

- name: Ensure group "docker" exists
  group:
    name: docker
    state: present

- name: Add the user 'vagrant' to group of 'docker'
  user:
    name: "{{sonar_user}}"
    group: "{{sonar_group}}"
    groups: docker
    append: yes

- name: Reload systemd daemon
  systemd:
    daemon_reload: yes

- name: Enable and Start Docker service
  service:
    name: docker
    enabled: yes
    state: started

- name: Validate Docker installation
  command: "docker run hello-world"

- name: install docker compose
  command: "curl -SL {{docker_compose_repository}} -o /usr/local/bin/docker-compose"

- name: ensure executable perm docker-compose
  file:
    path: /usr/local/bin/docker-compose
    mode: '0755'
GitLab Server Setup
[admin@fedser gitlab]$ cat ansible/roles/linux_gitlab_install_server/vars/main.yml
---
gitlab_host: "fedgitlab.stack.com"
gitlab_home: "/home/vagrant/gitlab"
gitlab_config: "/etc/gitlab"
gitlab_logs: "/var/log/gitlab"
gitlab_data: "/var/opt/gitlab"
[admin@fedser gitlab]$ cat ansible/roles/linux_gitlab_install_server/templates/docker-compose.yml.j2
version: "3"

services:
  gitlab:
    image: "gitlab/gitlab-ce:latest"
    hostname: {{gitlab_host}}
    environment:
      GITLAB_OMNIBUS_CONFIG: |
        external_url 'http://fedgitlab.stack.com'
        gitlab_rails['gitlab_shell_ssh_port'] = 2224
        gitlab_rails['initial_root_password'] = "vF8Cc9PikcWwnyKDn4SbfvKmk42XTD4q8RD8C+WpIuc="
        gitlab_rails['display_initial_root_password'] = true
    ports:
      - "443:443"
      - "80:80"
      - "2224:2224"
    volumes:
      - gitlab_config:{{gitlab_config}}
      - gitlab_logs:{{gitlab_logs}}
      - gitlab_data:{{gitlab_data}}
    shm_size: '256m'

volumes:
  gitlab_config:
  gitlab_logs:
  gitlab_data:
[admin@fedser gitlab]$ cat ansible/roles/linux_gitlab_install_server/tasks/main.yml
---
- name: ensure docker compose file exists
  template:
    src: "docker-compose.yml.j2"
    dest: "{{gitlab_home}}/docker-compose.yml"

- name: ensure gitlab service up
  command: "/usr/local/bin/docker-compose -f {{gitlab_home}}/docker-compose.yml up -d"
Now its time to launch our GitLab server using vagrant as shown below.
[admin@fedser gitlab]$ vagrant up
Once the GitLab server is fully up and running. We can access it using the below.
URL - http://fedgitlab.stack.com/
Step2: Setup SonarQube Server
Here is the Vagrantfile which we will use to launch the VM and provision it using “linux_provision_sonar_server.yml” ansible playbook.
SonarQube Vagrantfile
[admin@fedser sonarqube]$ cat Vagrantfile
# -*- mode: ruby -*-
# vi: set ft=ruby :

Vagrant.configure("2") do |config|

    config.hostmanager.enabled = true
    config.hostmanager.manage_host = true
    config.hostmanager.manage_guest = true

    config.vm.define "sonar" do |sonar|
      sonar.vm.box = "fedora/38-cloud-base"
      sonar.vm.hostname = "fedsonar.stack.com"

      sonar.vm.synced_folder '.', '/vagrant', disabled: true
      sonar.vm.synced_folder ".", "/home/vagrant/sonar", type: "sshfs"

      sonar.vm.provider "libvirt" do |libvirt|
        libvirt.cpus = 2
        libvirt.memory = 2048
      end

      # Switch to "ansible_local" to install and use ansible on guest VM

      sonar.vm.provision "ansible" do |ansible|
        ansible.playbook = "ansible/linux_provision_sonar_server.yml"
        ansible.verbose = true
      end
    end
  end
SonarQube Ansible Playbook
[admin@fedser sonarqube]$ cat ansible/linux_provision_sonar_server.yml
---
- name: linuxn sonar server management
  hosts: sonar
  become: true
  become_user: root
  roles:
  - { role: 'linux_docker_install_server' }
  - { role: 'linux_sonar_install_server' }
The Ansible playbook does the setup in two parts. First it installs the docker and docker-compose as a pre-requisite. Second, it launches the SonarQube server using the docker-compose.yml file.
Docker Setup
[admin@fedser sonarqube]$ cat ansible/roles/linux_docker_install_server/vars/main.yml
---
docker_repository: "https://download.docker.com/linux/fedora/docker-ce.repo"
docker_compose_repository: "https://github.com/docker/compose/releases/download/v2.20.3/docker-compose-linux-x86_64"
sonar_user: "vagrant"
sonar_group: "docker"
[admin@fedser sonarqube]$ cat ansible/roles/linux_docker_install_server/tasks/main.yml
---
  - name: Install pre-requisite packages
    dnf: name={{ item }} state=present
    with_items:
      - dnf-plugins-core

  - name: Add Docker repository
    command: "dnf config-manager --add-repo {{docker_repository}}"

  - name: Install Docker Engine
    dnf: name={{ item }} state=present
    with_items:
      - docker-ce
      - docker-ce-cli
      - containerd.io

  - name: Ensure group "docker" exists
    group:
      name: docker
      state: present

  - name: Add the user 'vagrant' to group of 'docker'
    user:
      name: "{{sonar_user}}"
      group: "{{sonar_group}}"
      groups: docker
      append: yes

  - name: Reload systemd daemon
    systemd:
      daemon_reload: yes

  - name: Enable and Start Docker service
    service:
      name: docker
      enabled: yes
      state: started

  - name: Validate Docker installation
    command: "docker run hello-world"

  - name: install docker compose
    command: "curl -SL {{docker_compose_repository}} -o /usr/local/bin/docker-compose"

  - name: ensure executable perm docker-compose
    file:
      path: /usr/local/bin/docker-compose
      mode: '0755'
SonarQube Setup
[admin@fedser sonarqube]$ cat ansible/roles/linux_sonar_install_server/vars/main.yml
---
sonar_home: "/home/vagrant/sonar"

[admin@fedser sonarqube]$ cat ansible/roles/linux_sonar_install_server/templates/sysctl.conf.j2
# sysctl settings are defined through files in
# /usr/lib/sysctl.d/, /run/sysctl.d/, and /etc/sysctl.d/.
#
# Vendors settings live in /usr/lib/sysctl.d/.
# To override a whole file, create a new file with the same in
# /etc/sysctl.d/ and put new settings there. To override
# only specific settings, add a file with a lexically later
# name in /etc/sysctl.d/ and put new settings there.
#
# For more information, see sysctl.conf(5) and sysctl.d(5).
vm.max_map_count=262144
[admin@fedser sonarqube]$ cat ansible/roles/linux_sonar_install_server/templates/docker-compose.yml.j2
version: "3"

services:
  sonarqube:
    image: sonarqube:community
    depends_on:
      - db
    environment:
      SONAR_JDBC_URL: jdbc:postgresql://db:5432/sonar
      SONAR_JDBC_USERNAME: sonar
      SONAR_JDBC_PASSWORD: sonar
    volumes:
      - sonarqube_data:/opt/sonarqube/data
      - sonarqube_extensions:/opt/sonarqube/extensions
      - sonarqube_logs:/opt/sonarqube/logs
    ports:
      - "80:9000"
  db:
    image: postgres:12
    environment:
      POSTGRES_USER: sonar
      POSTGRES_PASSWORD: sonar
    volumes:
      - postgresql:/var/lib/postgresql
      - postgresql_data:/var/lib/postgresql/data

volumes:
  sonarqube_data:
  sonarqube_extensions:
  sonarqube_logs:
  postgresql:
  postgresql_data:
[admin@fedser sonarqube]$ cat ansible/roles/linux_sonar_install_server/tasks/main.yml
---
- name: ensure docker compose file exists
  template:
    src: "docker-compose.yml.j2"
    dest: "{{sonar_home}}/docker-compose.yml"

- name: ensure max map count set
  template:
    src: "sysctl.conf.j2"
    dest: "/etc/sysctl.conf"

- name: ensure kernel parameters reloaded
  command: "sysctl -p"

- name: ensure sonar service up
  command: "/usr/local/bin/docker-compose -f {{sonar_home}}/docker-compose.yml up -d"
Now its time to launch the SonarQube server using Vagrant as shown below.
[admin@fedser sonarqube]$ vagrant up
Once the server is up and running it can be access using the below.
URL - http://fedsonar.stack.com/
Step3: Create an Oauth Client App
Before we can create the Oauth Client using the REST API, we need to generate a personal access token for the “root” user as shown below and capture the token.
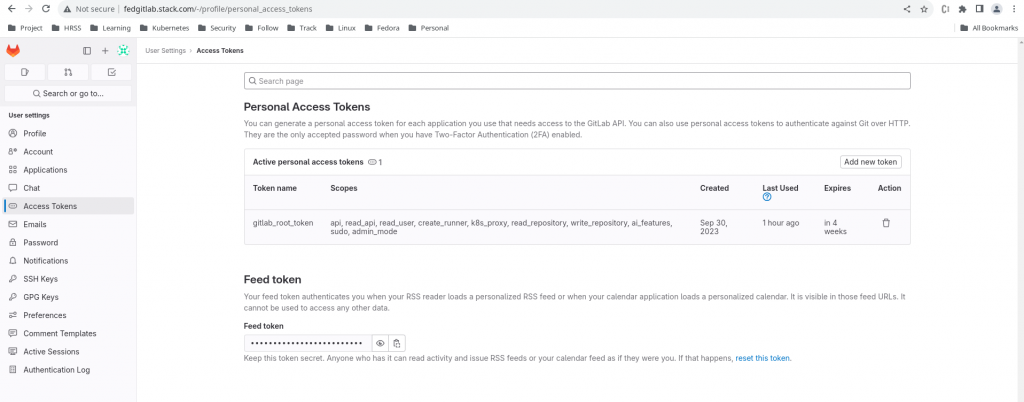
personal access token – glpat-Wp1Jf3XRW91j9BX5E_6E
Create an Instance wide Oauth2 client application. Here is the bash script using the REST API call to setup the Oauth Client.
[admin@fedser gitlab]$ cat gitlab_oauth_config.sh
#!/bin/bash

oauthapp="sonarqube1"
gitlaburl="http://fedgitlab.stack.com"
sonarurl="http://fedsonar.stack.com"
oauthscope="api read_user email"

# Create Oauth2 Client
echo "Create Oauth2 client application"
curl --request POST --header "PRIVATE-TOKEN: glpat-Wp1Jf3XRW91j9BX5E_6E" \
     --data "name=$oauthapp&redirect_uri=$sonarurl/oauth2/callback/gitlab&scopes=$oauthscope" \
     "$gitlaburl/api/v4/applications"
Once we execute the following script with the generated personal access token it should provide us with the Application ID and Secret which can be captured from the JSON response.
Generated Details
Application ID - 11faa63fd46921f90dae1652920cd510a812a99dd36dbc11b90bda4d9d1a28f9
Secret - gloas-ce20a0e6686073f7f7773d2493ed2fc8b763a3673dc2cfe35c497fe993d63979
Here is the screenshot of the Oauth2 Client Application.

Step4: Setup Gitlab Auth in SonarQube
Here in this step we will setup the client application ie. SonarQube to leverage Gitlab as the Authentication provider. Here we will use a bash script to reset the default “admin” user password and trigger REST API calls to update the settings for Gitlab Authentication.
NOTE: Uncomment the resetpassword function if the sonarqube default password is not changed
[admin@fedser sonarqube]$ cat sonar_oauth_config.sh
#!/bin/bash

adminuser="admin"
defaultpassword="admin"
adminpassword="admin@1234"
baseurl="http://fedsonar.stack.com"
enabled=true
gitlaburl="http://fedgitlab.stack.com"
appid="dfa0869ed0248fdf8b5a6ff193dc407bd017eba90233f4370b317e3de39e1f3f"
secret="gloas-8d424318db74bb4b65b0a2d400399e28bfdf2c6587013e2bd7ffda96f6ef1b3a"
allowsignup=true

# Reset admin password
resetpassword()
{
	echo "Reset admin password"
	curl -u $adminuser:$defaultpassword -X POST "$baseurl/api/users/change_password?login=$adminuser&previousPassword=$defaultpassword&password=$adminpassword"
}

# Configure gitlab oauth client
configureoauth()
{
	echo "Configure oauth client settings"
	curl -u $adminuser:$adminpassword -X POST "$baseurl/api/settings/set?key=sonar.core.serverBaseURL&value=$baseurl"
	curl -u $adminuser:$adminpassword -X POST "$baseurl/api/settings/set?key=sonar.auth.gitlab.enabled&value=$enabled"
	curl -u $adminuser:$adminpassword -X POST "$baseurl/api/settings/set?key=sonar.auth.gitlab.url&value=$gitlaburl"
	curl -u $adminuser:$adminpassword -X POST "$baseurl/api/settings/set?key=sonar.auth.gitlab.applicationId.secured&value=$appid"
	curl -u $adminuser:$adminpassword -X POST "$baseurl/api/settings/set?key=sonar.auth.gitlab.secret.secured&value=$secret"
	curl -u $adminuser:$adminpassword -X POST "$baseurl/api/settings/set?key=sonar.auth.gitlab.allowUsersToSignUp&value=$allowsignup"
}

### To be carried out by admin user
#resetpassword
configureoauth
Once we execute the following bash script, it will reset the default “admin” user password, update the sonarqube base url and update the setting for the gitlab authentication. Please note we are using the application id and secret that we generated in GitLab server to configure the client side.
Step5: Authenticate to SonarQube
Once the Oauth setup is completed. Its time to access the SonarQube portal and validate that it now shows us an option to “Login with GitLab” as shown below.
URL - http://fedsonar.stack.com/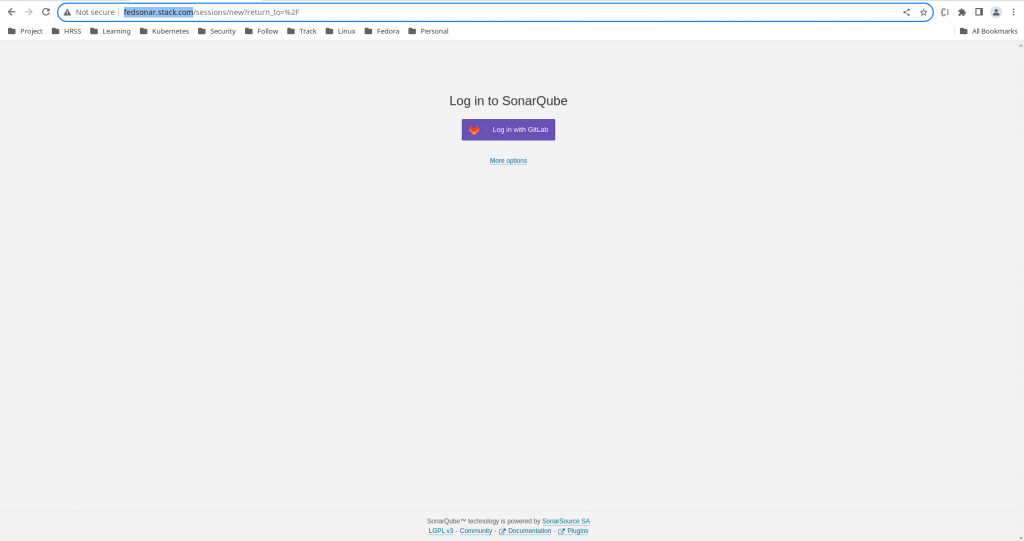
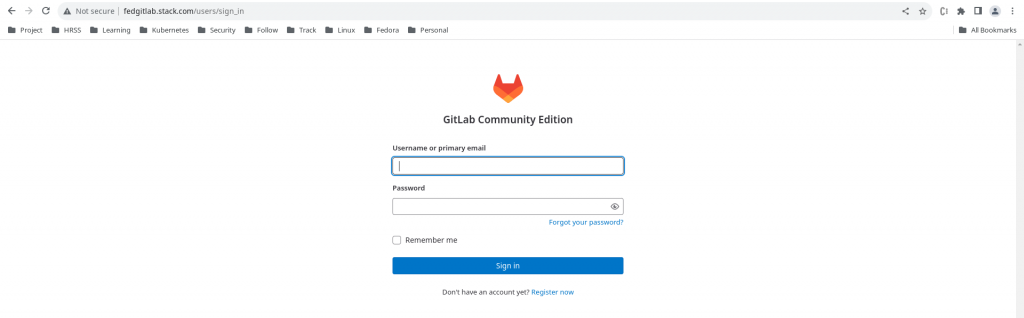
Once we click on the “Login with GitLab” option it redirects us to “GitLab” authentication page as shown below.
Now we can authenticate with the “root” user on the gitlab portal and once we authentication successfully it ask us whether we want to authorize the Sonarqube client to access the user details on Gitlab as shown below.
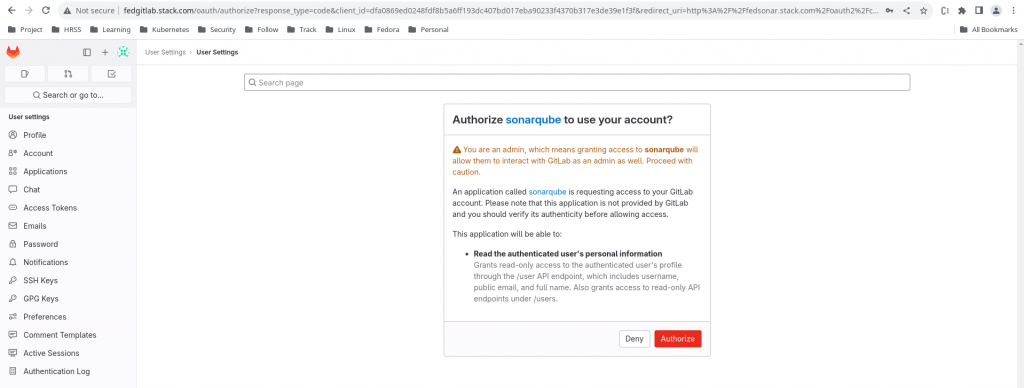
Once we authorize the SonarQube client to access GitLab user resource details, we are redirected back to the SonarQube along with authcode using the redirectUrl. Then SonarQube contacts GitLab server along with the obtained authcode to make sure everything is okay. Then GitLab server grants access token to SonarQube client and we finally are able to access SonarQube.
If you now check the user profile details for the user with which we logged into the SonarQube portal it will be the “root” user of the GitLab server the resource which we are granted access to by Authorization server.
Hope you enjoyed reading this article. Thank you..
Leave a Reply
You must be logged in to post a comment.