How to setup Ubuntu system with Openscap using Vagrant and Ansible

Here in this article we will try to launch an Ubuntu system using Vagrant and provision it using Ansible. We will be installing required packages for setting Openscap on Ubuntu system and will try to scan our system for security setting and vulnerability scanning.
Test Environment
Fedora 37 workstation
What is OpenSCAP
OpenSCAP is an open source tool that helps in managing system security and standards compliance. It uses a set of policies defining a benchmark for system security . These policies are used further to scan our system using the openscap tool to identify how our system security is based on the bench-marking used. OpenSCAP can also be used to scan the system for vulnerabilities that impact our system. It can be used to scan a system, remote vm, containers, container images, virtual machines and even arbitrary filesystems.
If you are interested in watching the video. Here is the YouTube video on the same step by step procedure outlined below.
Procedure
Step1: Vagrant project structure
Here is my Vagrant project structure with the Vagrantfile and linux_openscap_install_server.yml playbook as shown below. We will be using this Vagrantfile to launch our machine which is based on Ubuntu OS and we will be provisioning this machine with Ansible to install and configure as per our requirements.
$ tree .
.
├── ansible
│   ├── linux_openscap_install_server.yml
│   └── roles
│       ├── linux_openscap_install_server
│       │   ├── files
│       │   │   └── openscap_scan.sh
│       │   ├── tasks
│       │   │   └── main.yml
│       │   └── vars
│       │       └── main.yml
│       └── linux_openscap_update_package
│           ├── tasks
│           │   └── main.yml
│           └── vars
│               └── main.yml
└── Vagrantfile
Vagrantfile
$ cat Vagrantfile
# -*- mode: ruby -*-
# vi: set ft=ruby :

Vagrant.configure("2") do |config|

  config.hostmanager.enabled = true
  config.hostmanager.manage_host = true
  config.hostmanager.manage_guest = true

  config.vm.define "openscap" do |openscap|
    openscap.vm.box = "generic/ubuntu2004"
    openscap.vm.hostname = "ubopenscap.stack.com"

    openscap.vm.synced_folder '.', '/vagrant', disabled: true
    openscap.vm.synced_folder ".", "/home/vagrant/openscap", type: "sshfs"

    openscap.vm.provider "libvirt" do |libvirt|
      libvirt.cpus = 2
      libvirt.memory = 2048
    end

    # Switch to "ansible_local" to install and use ansible on guest VM

    openscap.vm.provision "ansible" do |ansible|
      ansible.playbook = "ansible/linux_openscap_install_server.yml"
      ansible.verbose = true
    end
  end
end
Ansible Playbook
$ cat ansible/linux_openscap_install_server.yml
---
- name: linux openscap server management
  hosts: openscap
  become: true
  become_user: root
  roles:
  - {role: 'linux_openscap_install_server'}
Step2: Install OpenSCAP packages
Here is our role ‘linux_openscap_install_server’ which we will use to install the required packages for OpenSCAP setup. Here ‘ssg-debderived’ is a scap security guide package for debian based system which will install all the required policy definition files that we might required for scanning a system.
$ cat ansible/roles/linux_openscap_install_server/tasks/main.yml
- name: ubuntu release name
  command: lsb_release -cs
  register: rel

- name: print ubuntu release
  debug: msg={{ rel.stdout }}

- name: install openscap-scanner
  apt:
    name:
      - libopenscap8
      - ssg-debderived
    state: latest
...
Step3: Validate OpenSCAP installation
Once the required packages are installed we can validate the version of OpenSCAP that is installed as shown in below task. This ensures we have successfully installed OpenSCAP.
$ cat ansible/roles/linux_openscap_install_server/tasks/main.yml
...
- name: validate installation
  shell: oscap --version | grep "command line tool"
  register: oscap_version

- name: print oscap version
  debug: msg={{ oscap_version.stdout }}
...
Step4: Create OpenSCAP scanning script
Here in this step we are going to create a bash script which will be used to scan our system for security and compliance. Here in this script we are downloading an oval definition file which is basically a rules or policy definition file based on which ubuntu system is scanning for CVE vulnerabilities. Here is the list of OVAL definition file supplied by canonical.
Also we are downloading and extracting ssgdebderived package which basically contains the latest defition files for scanning the latest version of Ubuntu system.
Once we have downloaded and extract these files. We are going to scan our system using “oscap oval eval” and “oscap xccdf eval” as shown below. Also we are scanning the Ubuntu machine for system security based on 4 different bench-marking profiles. You can use any one bench-marking profile that is more relevant to your environment.
$ cat ansible/roles/linux_openscap_install_server/files/openscap_scan.sh
#!/bin/bash

DATE=$(date +%m%d%Y)
ovalendpoint=$1
ssgendpoint=$2
ssgversion=$3

# Download oval file
wget -O /home/vagrant/openscap/com.ubuntu.$(lsb_release -cs).usn.oval.xml.bz2 $ovalendpoint

# Extract the xml file
bunzip2 /home/vagrant/openscap/com.ubuntu.$(lsb_release -cs).usn.oval.xml.bz2

# Downlaod ssg file
wget -O /home/vagrant/openscap/ssgdebderived.zip $ssgendpoint

# Extract ssg file
if [[ -d /usr/share/xml/scap/ssg/content/$ssgversion ]]; then
	echo "ssg folder already exists"
else
	unzip /home/vagrant/openscap/ssgdebderived.zip -d /usr/share/xml/scap/ssg/content/
fi

# Scan for oval security vulnerability
oscap oval eval --results /home/vagrant/openscap/oval_report_${DATE}.xml --report /home/vagrant/openscap/oval_report_${DATE}.html /home/vagrant/openscap/com.ubuntu.$(lsb_release -cs).usn.oval.xml

# Scan for cis level1 server security benchmark
oscap xccdf eval --profile xccdf_org.ssgproject.content_profile_cis_level1_server --results-arf /home/vagrant/openscap/cis_level1_results.xml --report /home/vagrant/openscap/cis_level1_report.html /usr/share/xml/scap/ssg/content/$ssgversion/ssg-ubuntu2004-ds-1.2.xml

# Scan for cis level2 server security benchmark
oscap xccdf eval --profile xccdf_org.ssgproject.content_profile_cis_level2_server --results-arf /home/vagrant/openscap/cis_level2_results.xml --report /home/vagrant/openscap/cis_level2_report.html /usr/share/xml/scap/ssg/content/$ssgversion/ssg-ubuntu2004-ds-1.2.xml

# Scan for cis standard server security benchmark
oscap xccdf eval --profile xccdf_org.ssgproject.content_profile_standard --results-arf /home/vagrant/openscap/cis_standard_results.xml --report /home/vagrant/openscap/cis_standard_report.html /usr/share/xml/scap/ssg/content/$ssgversion/ssg-ubuntu2004-ds-1.2.xml

# Scan for cis stig server security benchmark
oscap xccdf eval --profile xccdf_org.ssgproject.content_profile_stig --results-arf /home/vagrant/openscap/cis_stig_results.xml --report /home/vagrant/openscap/cis_stig_report.html /usr/share/xml/scap/ssg/content/$ssgversion/ssg-ubuntu2004-ds-1.2.xml

rm -rf /home/vagrant/openscap/com.ubuntu.$(lsb_release -cs).usn.oval.xml.bz2 /home/vagrant/openscap/ssgdebderived.zip /home/vagrant/openscap/com.ubuntu.focal.usn.oval.xml
Here are the environment variables that are referenced from the following vars/main.yml definition file.
$ cat ansible/roles/linux_openscap_install_server/vars/main.yml
---
oval_endpoint: "https://security-metadata.canonical.com/oval/com.ubuntu.$(lsb_release -cs).usn.oval.xml.bz2"
ssg_endpoint: "https://github.com/ComplianceAsCode/content/releases/download/v0.1.69/scap-security-guide-0.1.69.zip"
ssg_version: "scap-security-guide-0.1.69"
Step5: Update Ansible Role
Now that our script is ready. Let’s try to update our role ‘linux_openscap_install_server’ to copy and run the script on the Ubuntu system. Here is the completed yml definition file for the role ‘linux_openscap_install_server’ as shown below.
$ cat ansible/roles/linux_openscap_install_server/tasks/main.yml
- name: ubuntu release name
  command: lsb_release -cs
  register: rel

- name: print ubuntu release
  debug: msg={{ rel.stdout }}

- name: install openscap-scanner
  apt:
    name:
      - libopenscap8
      - ssg-debderived
    state: latest

- name: validate installation
  shell: oscap --version | grep "command line tool"
  register: oscap_version

- name: print oscap version
  debug: msg={{ oscap_version.stdout }}

- name: copy script
  copy:
    src: openscap_scan.sh
    dest: /home/vagrant/openscap/openscap_scan.sh
    mode: 0755

- name: print oval, ssg, ssg_version
  debug:
    msg: oval {{ oval_endpoint }}, ssg {{ ssg_endpoint }}, ssg_version {{ ssg_version }}

- name: Scan system for vulnerability
  shell: /home/vagrant/openscap/openscap_scan.sh "{{ oval_endpoint }}" "{{ ssg_endpoint }}" "{{ ssg_version }}"
  ignore_errors: true
Step6: Launch and Scan VM
Let’s now launch our VM using vagrant and get it provisioned using the ansible. This will also scan our system for security and vulnerability compliance and generated the reports as shown in below step.
$ vagrant up
Step7: Validate Scan Reports
Here are the scan reports that are generated for each profile and oval definition file.
$ ls -ltr *.xml *.html
-rw-r--r--. 1 admin admin 17754829 Sep 12 17:05 oval_report_09122023.xml
-rw-r--r--. 1 admin admin  1276340 Sep 12 17:05 oval_report_09122023.html
-rw-r--r--. 1 admin admin  2493296 Sep 12 17:06 cis_level1_report.html
-rw-r--r--. 1 admin admin 16612525 Sep 12 17:06 cis_level1_results.xml
-rw-r--r--. 1 admin admin  3692077 Sep 12 17:07 cis_level2_report.html
-rw-r--r--. 1 admin admin 16632998 Sep 12 17:07 cis_level2_results.xml
-rw-r--r--. 1 admin admin   663130 Sep 12 17:07 cis_standard_report.html
-rw-r--r--. 1 admin admin 16106420 Sep 12 17:07 cis_standard_results.xml
-rw-r--r--. 1 admin admin  2272987 Sep 12 17:07 cis_stig_report.html
-rw-r--r--. 1 admin admin 16221851 Sep 12 17:07 cis_stig_results.xml
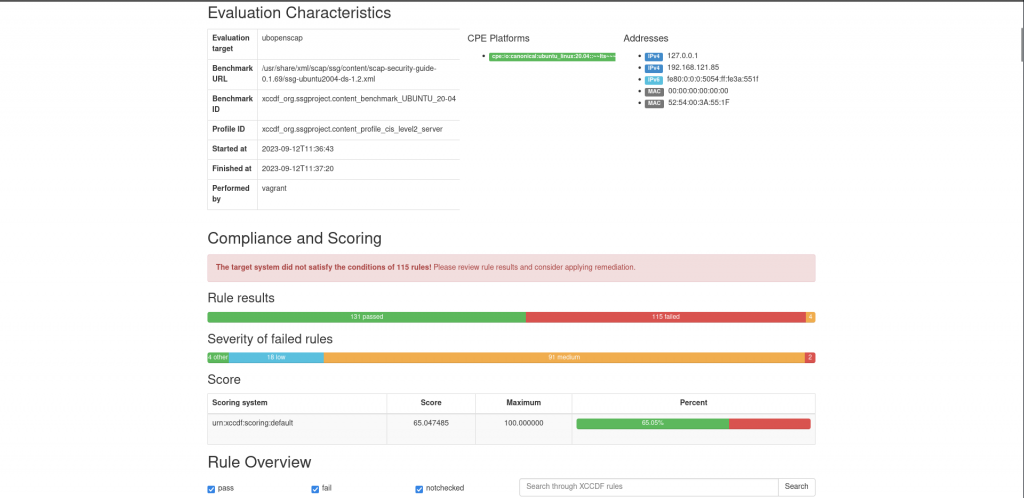
Here are the screenshot of the CIS bench-marking level2 report and OVAL scan report as shown below.

Hope you enjoyed reading this article. Thank you..
Leave a Reply
You must be logged in to post a comment.