How to get SonarQube qualitygate status from Gradle build

Here in this article we will setup a SonarQube server using Vagrant and Ansible. We will be using a docker-compose to launch the SonarQube service. Once the SonarQube service is up and running we will be using a sample Java based project using Gradle build and try to analyze the java code using sonarqube. We will see how we can break a CI gradle build by checking the for projects qualitygate status.
Test Environment
Fedora 37 workstation
java11
vagrant 2.3.7
What is SonarQube
SonarQube is code review or code analysis tool which helps in delivering a clean code. It can be integrated with our existing CICD pipeline and detects issues in our code to help us perform continuous code inspections of your projects. The tool analyses 30+ different programming languages and integrates into your CI pipeline and DevOps platform to ensure that your code meets high-quality standards.
If you are interested in watching the video. Here is the YouTube video on the same step by step procedure outlined below.
Here is my project structure for SonarQube setup.
$ tree .
.
├── ansible
│   ├── linux_provision_sonar_server.yml
│   └── roles
│       ├── linux_docker_install_server
│       │   ├── tasks
│       │   │   └── main.yml
│       │   └── vars
│       │       └── main.yml
│       └── linux_sonar_install_server
│           ├── tasks
│           │   └── main.yml
│           ├── templates
│           │   ├── docker-compose.yml.j2
│           │   └── sysctl.conf.j2
│           └── vars
│               └── main.yml
├── docker-compose.yml
└── Vagrantfile
Procedure
Step1: SonarQube Server Vagrantfile
Here is my basic Vagrantfile which we will use to launch the vm and provision it using ansible provisioner. We are using libvirt as the virtualization provider here. The following ansible playbook “linux_provision_sonar_server.yml” will be executed to setup the SonarQube on this vm.
$ cat Vagrantfile
# -*- mode: ruby -*-
# vi: set ft=ruby :

Vagrant.configure("2") do |config|

    config.hostmanager.enabled = true
    config.hostmanager.manage_host = true
    config.hostmanager.manage_guest = true

    config.vm.define "sonar" do |sonar|
      sonar.vm.box = "fedora/38-cloud-base"
      sonar.vm.hostname = "fedsonar.stack.com"

      sonar.vm.synced_folder '.', '/vagrant', disabled: true
      sonar.vm.synced_folder ".", "/home/vagrant/sonar", type: "sshfs"

      sonar.vm.provider "libvirt" do |libvirt|
        libvirt.cpus = 2
        libvirt.memory = 2048
      end

      # Switch to "ansible_local" to install and use ansible on guest VM

      sonar.vm.provision "ansible" do |ansible|
        ansible.playbook = "ansible/linux_provision_sonar_server.yml"
        ansible.verbose = true
      end
    end
  end
Step2: Provision SonarQube Server
Here is my ansible playbook “linux_provision_sonar_server.yml” which executes two roles. First one “linux_docker_install_server” is to install and setup docker engine. Second one “linux_sonar_install_server” is to install and configure the SonarQube server.
$ cat ansible/linux_provision_sonar_server.yml
---
- name: linuxn sonar server management
  hosts: sonar
  become: true
  become_user: root
  roles:
  - { role: 'linux_docker_install_server' }
  - { role: 'linux_sonar_install_server' }
Step3: Setup Docker
Here are the details of the role “linux_docker_install_server” which does the setup of docker engine on the vm. These are bare minimum steps required to setup docker as per the Docker documentation.
linux_docker_install_server role variables
$ cat ansible/roles/linux_docker_install_server/vars/main.yml
---
docker_repository: "https://download.docker.com/linux/fedora/docker-ce.repo"
docker_compose_repository: "https://github.com/docker/compose/releases/download/v2.20.3/docker-compose-linux-x86_64"
sonar_user: "vagrant"
sonar_group: "docker"
linux_docker_install_server role tasks
$ cat ansible/roles/linux_docker_install_server/tasks/main.yml
---
  - name: Install pre-requisite packages
    dnf: name={{ item }} state=present
    with_items:
      - dnf-plugins-core

  - name: Add Docker repository
    command: "dnf config-manager --add-repo {{docker_repository}}"

  - name: Install Docker Engine
    dnf: name={{ item }} state=present
    with_items:
      - docker-ce
      - docker-ce-cli
      - containerd.io

  - name: Ensure group "docker" exists
    group:
      name: docker
      state: present

  - name: Add the user 'vagrant' to group of 'docker'
    user:
      name: "{{sonar_user}}"
      group: "{{sonar_group}}"
      groups: docker
      append: yes

  - name: Reload systemd daemon
    systemd:
      daemon_reload: yes

  - name: Enable and Start Docker service
    service:
      name: docker
      enabled: yes
      state: started

  - name: Validate Docker installation
    command: "docker run hello-world"

  - name: install docker compose
    command: "curl -SL {{docker_compose_repository}} -o /usr/local/bin/docker-compose"

  - name: ensure executable perm docker-compose
    file:
      path: /usr/local/bin/docker-compose
      mode: '0755'
Step4: Setup SonarQube
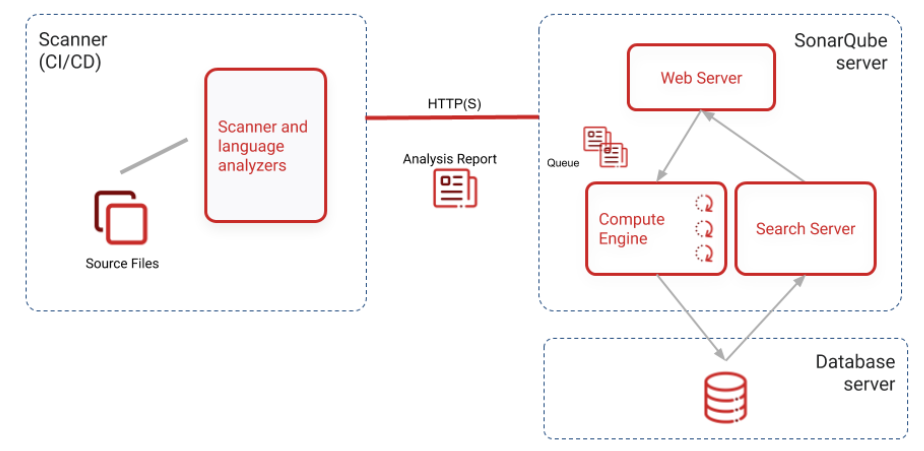
In this step we are going to exeute role “linux_sonar_install_server” which installs SonarQube and Postgres as its backed. It launches SonarQube as a service. SonarQube internally uses elasticsearch for search capabilities. The default user that is setup is “admin/admin” for which the password can be changed on first login to SonarQube portal.
Here is high level architecture diagram of SonarQube setup as per their documentation.
linux_sonar_install_server role variables
$ cat ansible/roles/linux_sonar_install_server/vars/main.yml
---
sonar_home: "/home/vagrant/sonar"
linux_sonar_install_server template files
$ cat ansible/roles/linux_sonar_install_server/templates/sysctl.conf.j2
# sysctl settings are defined through files in
# /usr/lib/sysctl.d/, /run/sysctl.d/, and /etc/sysctl.d/.
#
# Vendors settings live in /usr/lib/sysctl.d/.
# To override a whole file, create a new file with the same in
# /etc/sysctl.d/ and put new settings there. To override
# only specific settings, add a file with a lexically later
# name in /etc/sysctl.d/ and put new settings there.
#
# For more information, see sysctl.conf(5) and sysctl.d(5).
vm.max_map_count=262144
$ cat ansible/roles/linux_sonar_install_server/templates/docker-compose.yml.j2
version: "3"

services:
  sonarqube:
    image: sonarqube:community
    depends_on:
      - db
    environment:
      SONAR_JDBC_URL: jdbc:postgresql://db:5432/sonar
      SONAR_JDBC_USERNAME: sonar
      SONAR_JDBC_PASSWORD: sonar
    volumes:
      - sonarqube_data:/opt/sonarqube/data
      - sonarqube_extensions:/opt/sonarqube/extensions
      - sonarqube_logs:/opt/sonarqube/logs
    ports:
      - "9000:9000"
  db:
    image: postgres:12
    environment:
      POSTGRES_USER: sonar
      POSTGRES_PASSWORD: sonar
    volumes:
      - postgresql:/var/lib/postgresql
      - postgresql_data:/var/lib/postgresql/data

volumes:
  sonarqube_data:
  sonarqube_extensions:
  sonarqube_logs:
  postgresql:
  postgresql_data:
linux_sonar_install_server role tasks
$ cat ansible/roles/linux_sonar_install_server/tasks/main.yml
---
- name: ensure docker compose file exists
  template:
    src: "docker-compose.yml.j2"
    dest: "{{sonar_home}}/docker-compose.yml"

- name: ensure max map count set
  template:
    src: "sysctl.conf.j2"
    dest: "/etc/sysctl.conf"

- name: ensure kernel parameters reloaded
  command: "sysctl -p"

- name: ensure sonar service up
  command: "/usr/local/bin/docker-compose -f {{sonar_home}}/docker-compose.yml up -d"
Step5: Launch SonarQube
Once our ansible playbook and roles are ready we can launch the VM using vagrant as shown below which will launch the vm and provision using ansible.
$ vagrant up
Once the SonarQube service is up and running you can access it using following URL.
URL: http://fedsonar.stack.com:9000/
Step6: Generate Analysis Token
In this step we are going to generate a token for the user “admin” with “analyze” permission as shown below in the screenshot.
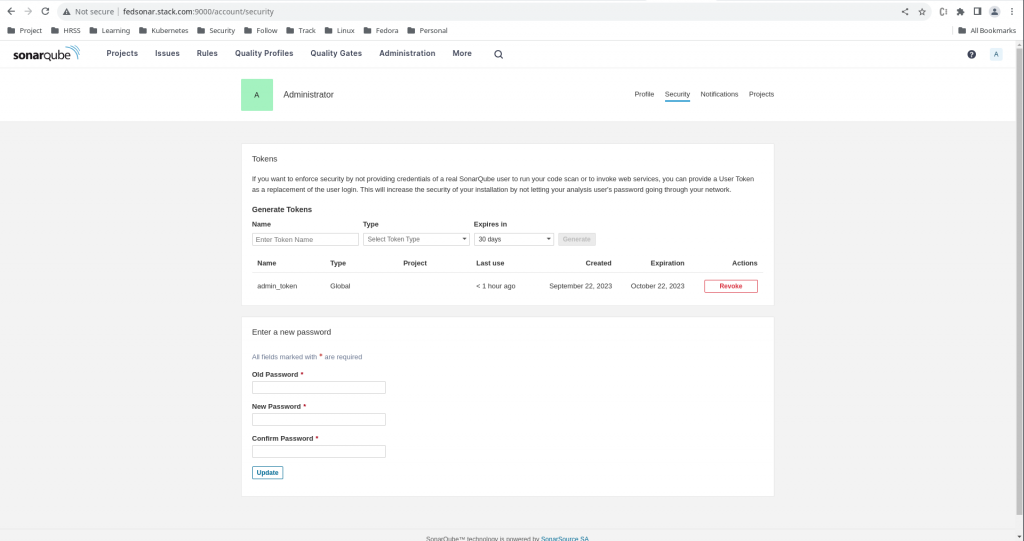
Here is my token name and its corresponding value that you should copy and save as soon as its generated.
admin_token: sqa_eb186b3fd258430363e82cfc457bec03a43d3fe9
Step6: Clone Gradle project
We are going to use the following Gradle github project hosting some sample gradle build based java projects. Let us clone the below repository to get the source code.
$ git clone https://github.com/SonarSource/sonar-scanning-examples.git
Step7: Update build.gradle
Once we have cloned the repository let us switch into the following folder and update the “build.gradle” with the sonarqube plugin version “4.0.0.2929” along with the sonar properties which will help to connect to sonarqube server and analyze the sources and tests folder as mentioned. The minimum java version required for this project is 11.
$ cd sonar-scanning-examples/sonarqube-scanner-gradle/gradle-basic/

$ cat build.gradle
plugins {
    id "jacoco"
    id "java"
    id "application"
    id("org.sonarqube") version "4.0.0.2929"
}

description = 'Example of Sonar Scanner for Gradle Usage'
version = '1.0'

sonar {
    properties {
        property('sonar.projectName', 'Example of SonarQube Scanner for Gradle Usage')
        property("sonar.projectKey", "sonarqube-scanner-gradle")
        property("sonar.token", "sqa_eb186b3fd258430363e82cfc457bec03a43d3fe9")
        property("sonar.sources", "src/main")
        property "sonar.tests", "src/test"
    }
}

// In this section you declare where to find the dependencies of your project
repositories {
    // Use jcenter for resolving your dependencies.
    // You can declare any Maven/Ivy/file repository here.
    mavenCentral()
}

dependencies {
    // This dependency is found on compile classpath of this component and consumers.
    implementation 'com.google.guava:guava:31.1-jre'

    // Use JUnit test framework
    testImplementation 'org.junit.jupiter:junit-jupiter:5.9.2'
    implementation 'org.junit.jupiter:junit-jupiter:5.9.2'
    testRuntimeOnly 'org.junit.platform:junit-platform-launcher'
}

// Apply a specific Java toolchain to ease working on different environments.
java {
    toolchain {
        languageVersion = JavaLanguageVersion.of(17)
    }
    sourceSets.main.java.srcDirs = ['src']
}

application {
    // Define the main class for the application.
    mainClass='com.acme.App'
}

test {
    // Use JUnit Platform for unit tests.
    useJUnitPlatform()
}

jacocoTestReport {
    reports {
        xml.required = true
        html.outputLocation = layout.buildDirectory.dir('jacocoHtml')
    }
}
Step8: Build Gradle Project
Now its time to build the gradle project with two input paramters. “sonar.host.url” is used to point to the sonarqube server ui hosted at port 9000. “sonar.qualitygate.wait” is used to forces the build to wait for the QualityGate status response and the build will continue or fail based on the status of QualityGate.
$ ./gradlew -Dsonar.host.url=http://fedsonar.stack.com:9000 -Dsonar.qualitygate.wait=true sonar --stacktrace --info
...
> Task :sonar
Sensor TextAndSecretsSensor [text] (done) | time=274ms
Sensor VB.NET Project Type Information [vbnet]
Sensor VB.NET Project Type Information [vbnet] (done) | time=1ms
Sensor VB.NET Analysis Log [vbnet]
Sensor VB.NET Analysis Log [vbnet] (done) | time=10ms
Sensor VB.NET Properties [vbnet]
Sensor VB.NET Properties [vbnet] (done) | time=0ms
Sensor IaC Docker Sensor [iac]
Sensor IaC Docker Sensor [iac] (done) | time=50ms
------------- Run sensors on project
Sensor Analysis Warnings import [csharp]
Sensor Analysis Warnings import [csharp] (done) | time=1ms
Sensor Zero Coverage Sensor
Sensor Zero Coverage Sensor (done) | time=2ms
Sensor Java CPD Block Indexer
Sensor Java CPD Block Indexer (done) | time=6ms
CPD Executor 1 file had no CPD blocks
CPD Executor Calculating CPD for 0 files
Analysis report generated in 48ms, dir size=141.6 kB
Analysis report compressed in 9ms, zip size=19.6 kB
Analysis report uploaded in 23ms
------------- Check Quality Gate status
Waiting for the analysis report to be processed (max 300s)
QUALITY GATE STATUS: PASSED - View details on http://fedsonar.stack.com:9000/dashboard?id=sonarqube-scanner-gradle
Analysis total time: 9.457 s
We can also fetch QualityGate Status for a project using the REST API call as shown below.
API Syntax
http://[sonarhost]/api/qualitygates/project_status?projectKey=[key]
API Request
$ curl -k -X GET -s -u admin:admin@1234 http://fedsonar.stack.com:9000/api/qualitygates/project_status?projectKey=sonarqube-scanner-gradle | jq -r '.projectStatus.status'
OK
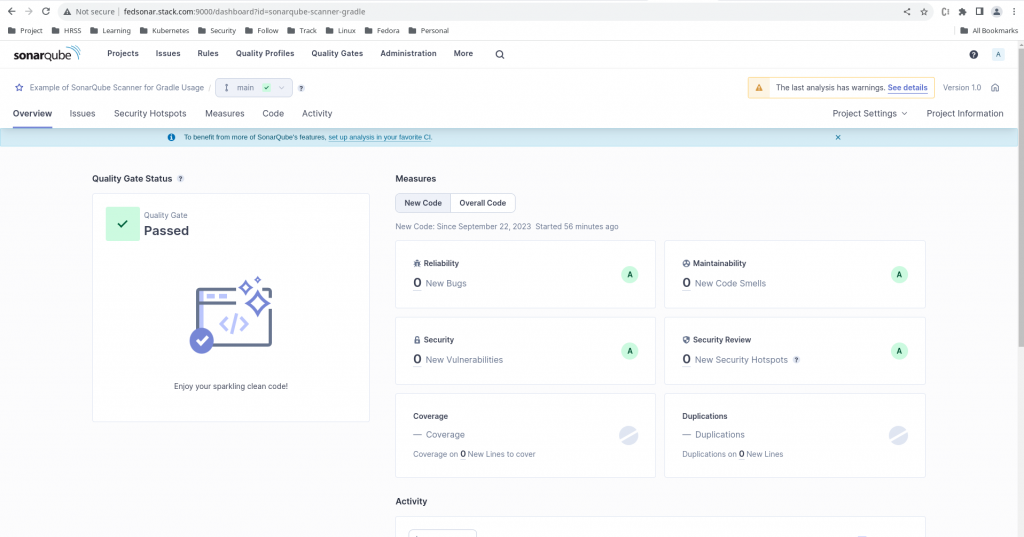
Step9: Validate SonarQube Analysis Report
Now its time to validate our analysis report on the SonarQube portal as shown below.
Hope you enjoyed reading this article. Thank you..
Leave a Reply
You must be logged in to post a comment.