How to build and Package Kivy Android Application using GitHub Actions Workflow
Here in this article we will try to build and package Python Kivy based Android application using GitHub Actions Workflow. Here we are going to use Buildozer as the build tool to convert a Python Kivy based application into an Android APK. We will be carrying out this build remotely on GitHub Workflow runner using Buildozer actions workflow.
Test Environment
Ubuntu 20.04
What is GitHub Actions
GitHub Actions makes it easy to automate every step of a CICD pipeline also can be called as GitHub Workflow to build, package, deploy and test your software projects right from GitHub. GitHub Workflows can be triggered based on any GitHub event like push, pull request or a new release. These workflows are nothing but a combination of GitHub Actions for the services that we use which are build and maintained by the GitHub community.
What is GitHub Workflow
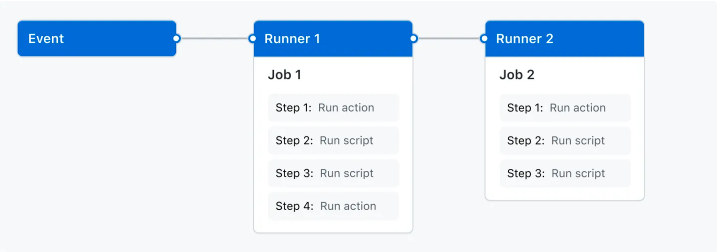
GitHub Workflow contains one or more jobs which can run in sequential order or in parallel. Each job consists of multiple steps which are executed within a GitHub runner which is a isolated environment. This isolated environment can be a virtual machine or container. Each step within a job runs a script or an action, which are reusable extensions that can simplify the workflow. GitHub Workflows are defined using YAML definition.
This Workflow YAML definition file is checked into the repository and is run whenever their is event triggered in the repository, or its executed manually or its scheduled to execute at defined time. There can be multiple Workflows defined for a single repository which can carry different set of tasks.
source – github_actions
If you are interested in watching the video. Here is the YouTube video on the same step by step procedure outlined below.
Procedure
Step1: Clone Repository
This repository is a Python Kivy based application which we will be using to build and package into Android APK.
[admin@fedser github_space]$ git clone https://github.com/novicejava1/KivyLC.git
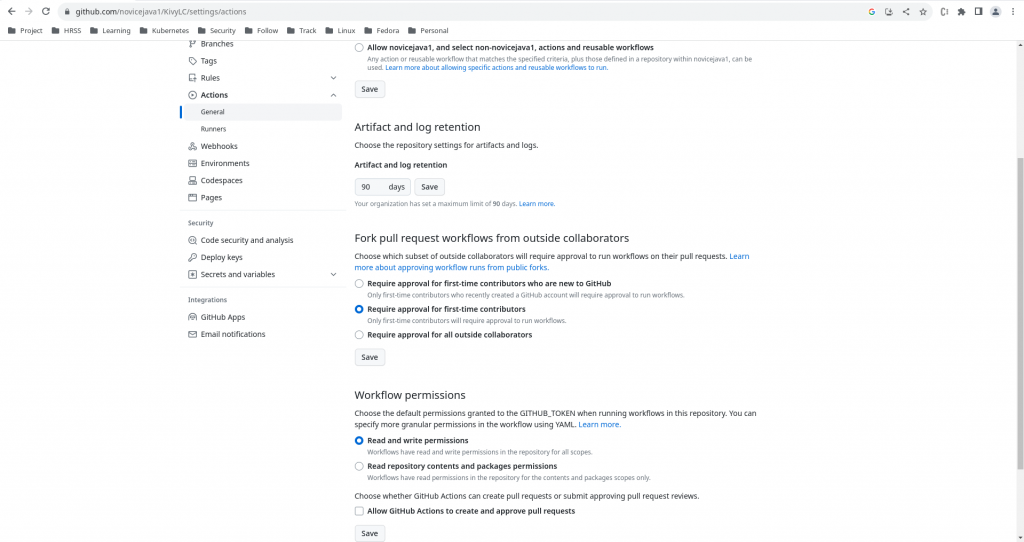
Step2: Update Repository Settings
Update the Repositories Settings – Action – General – Workflow Permissions as shown below. This is required to ensure that whatever Workflow gets created for this project has the required read and write permissions in the repository for all scopes.
Step3: Create GitHub Workflow
Here is the sample workflow which is created to build and package Python Kivy based application. All the workflow definition files needs to be created under Repository Root directory under the following path – .github/workflows/.yml.
As per the workflow definition file, it works as details below.
- This workflow gets triggered whenever there is GitHub push or pull _request event occures on any branch except data and gh-pages
- This workflow executes job named build-android. This job has multiple steps that are executed in a sequential order as explained below
- Step1: Run Action – Checkout
- Step2: Run Action – Build using Buildozer
- Step3: Run Action – Upload Artifacts
- Step4: Run Action – Checkout
- Step5: Run Action – Setup Python
- Step6: Run Shell – Python Script
[admin@fedser KivyLC]$ cat .github/workflows/build.yml
name: Build
on:
  push:
    branches-ignore:
      - data
      - gh-pages
    tags:
      - '**'
  pull_request:
    branches-ignore:
      - data
      - gh-pages

jobs:
  # Build job. Builds app for Android with Buildozer
  build-android:
    name: Build for Android
    runs-on: ubuntu-20.04

    steps:
      - name: Checkout
        uses: actions/checkout@v2
        with:
          path: master

      - name: Set up Python
        uses: actions/setup-python@v2
        with:
          python-version: 3.8
          architecture: x64

      - name: Install dependencies
        run: |
          python -m pip install --upgrade pip
          pip install --upgrade Cython

      - name: Build with Buildozer
        uses: ArtemSBulgakov/buildozer-action@v1
        id: buildozer
        with:
          repository_root: master
          workdir: .
          buildozer_version: stable

      - name: Upload artifacts
        uses: actions/upload-artifact@v2
        with:
          name: package
          path: ${{ steps.buildozer.outputs.filename }}

      - name: Checkout
        uses: actions/checkout@v2
        with:
          path: data
          ref: data # Branch name

      - name: Push binary to data branch
        if: github.event_name == 'push'
        run: python master/.ci/move_binary.py "${{ steps.buildozer.outputs.filename }}" master data bin
Step4: Create Python Script
As per the last step in the workflow we need to create script move_binary.py. The script and workflow source code can be obtained from the buildozer-action page. The last Step in GitHub Workflow executes a Python Script which move the APK Binary file to data branch.
Step5: Push Changes
Once the GitHub Workflow YAML definition file is ready and the Python Script is ready. One last thing that we need to do is create and branched named “data” in our GitHub repository as the Python script moves the binary to that branch.
Now, we are ready to push our changes to the GitHub Repository. Stage, Commit and Push your changes to GitHub repository.
[admin@fedser KivyLC]$ git add .
[admin@fedser KivyLC]$ git commit -m "update github workflow"
[admin@fedser KivyLC]$ git push -u origin main
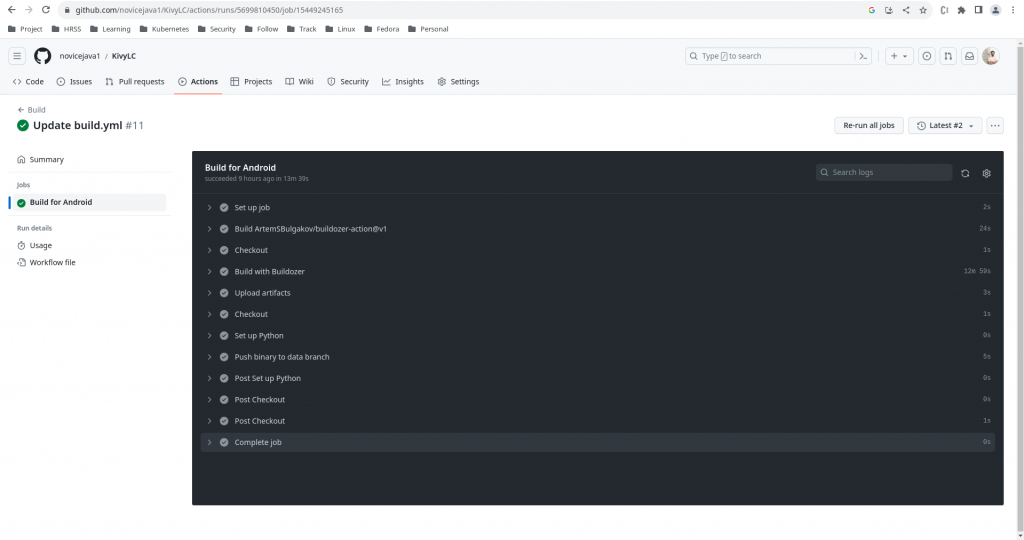
Step6: Validate the Workflow Execution
Once the changes are pushed to the repository. The Github Workflow gets triggered and executes each of the Step as outlined in the Workflow. Here is the screenshot of the GitHub Workflow Status for the repository.
If you encounter any error as shown below in the “Build with Buildozer” step. Please follow the below Temporary Resolution. Here are the details.
Error
[DEBUG]:   	jnius/jnius.c:12406:19: warning: assigning to 'jchar *' (aka 'unsigned short *') from 'const jchar *' (aka 'const unsigned short *') discards qualifiers [-Wincompatible-pointer-types-discards-qualifiers]
[DEBUG]:   	  __pyx_v_j_chars = (__pyx_v_j_env[0])->GetStringChars(__pyx_v_j_env, __pyx_v_j_string, NULL);
[DEBUG]:   	                  ^ ~~~~~~~~~~~~~~~~~~~~~~~~~~~~~~~~~~~~~~~~~~~~~~~~~~~~~~~~~~~~~~~~~~~~~~~~~
[DEBUG]:   	jnius/jnius.c:54433:5: error: expression is not assignable
[DEBUG]:   	    ++Py_REFCNT(o);
[DEBUG]:   	    ^ ~~~~~~~~~~~~
[DEBUG]:   	jnius/jnius.c:54435:5: error: expression is not assignable
[DEBUG]:   	    --Py_REFCNT(o);
[DEBUG]:   	    ^ ~~~~~~~~~~~~
[DEBUG]:   	jnius/jnius.c:54549:5: error: expression is not assignable
Temporary Resolution
Update buildozer.spec file as shown below.
[admin@fedser KivyLC]$ cat buildozer.spec
...
# (str) python-for-android branch to use, defaults to master
#p4a.branch = master
p4a.branch = release-2022.12.20
...
Issue Details
We just hit this issue (buildozer==1.5.0, kivy==2.2, p4a version 20230521). It seems that 20230521 version of p4a is broken.
Ref - https://github.com/kivy/python-for-android/issues/2753
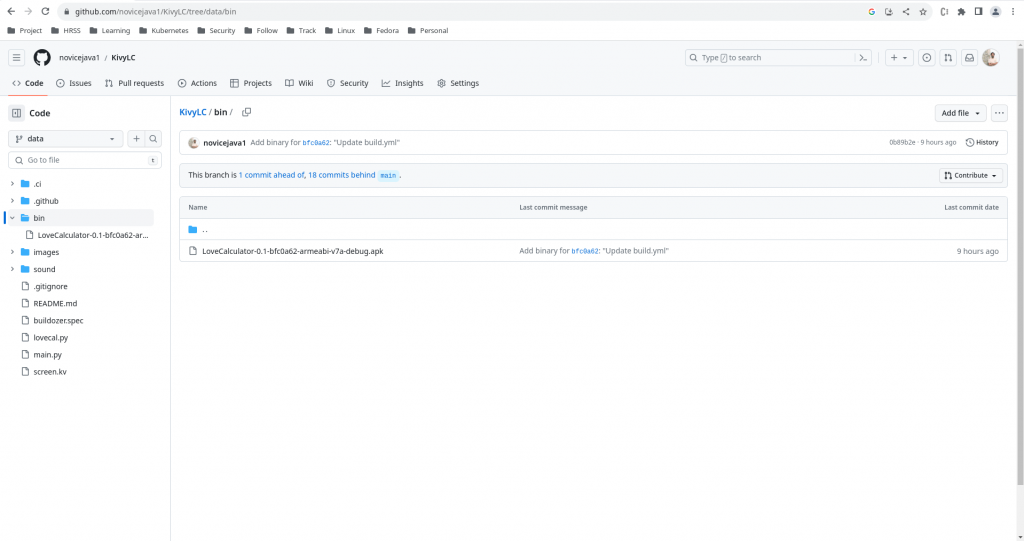
Step7: Validate the Android APK Binary
Once the GitHub Workflow execution is completed. The binary is pushed to data branch under the bin directory as shown below.
Hope you enjoyed reading this article. Thank you..
Leave a Reply
You must be logged in to post a comment.