How to Secure Jenkins with Keycloak OIDC Integration
Here in this article we will try to secure Jenkins access using Keycloak OpenID Connect Authentication and Authorization service provider.
Test Environment
- Fedora Server 41
- Docker v27.5.1
- Docker Compose v2.32.4
What is Jenkins
Jenkins is a popular, open-source automation server used primarily for implementing continuous integration and continuous delivery (CI/CD) pipelines. It automates tasks related to building, testing, and deploying software, allowing teams to streamline their development workflows. Jenkins can be used as a simple CI server or as a comprehensive continuous delivery hub.
What is Keycloak
Keycloak is an open-source Identity and Access Management (IAM) solution developed by Red Hat. It allows you to centralize authentication and authorization for your applications and services, offering features like single sign-on (SSO), social login, user federation, and more. Keycloak simplifies securing applications by handling user authentication and authorization, eliminating the need for developers to build these functionalities from scratch.
If you are interested in watching the video. Here is the YouTube video on the same step by step procedure outlined below.
Procedure
Step1: Ensure Docker and Docker compose installed and running
As a first step ensure that you have docker and docker-compose installed on your system. You can following the official documentation from docker to install these tools.
admin@linuxser:~$ docker -v
Docker version 27.5.1, build 9f9e405

admin@linuxser:~$ docker compose version
Docker Compose version v2.32.4
Start up the docker services if its not already started.
admin@linuxser:~$ sudo systemctl start docker.service
Also let us create a working directory and switch into that folder.
admin@linuxser:~$ mkdir jenkinssso
admin@linuxser:~$ cd jenkinssso/
Step2: Ensure Jenkins service is up and running
In this step we will be instantiating Jenkins services using docker compose file. Here is the minimalistic docker compose file that we will be using for this demo.
admin@linuxser:~/jenkinssso$ cat jenkins_compose.yml
services:

  jenkins:
    image: "jenkins/jenkins:2.504.3-lts-jdk17"
    ports:
      - "8080:8080"
    volumes:
      - jenkins_home:/var/jenkins_home
    networks:
      - jenkins-net

networks:
  jenkins-net:

volumes:
  jenkins_home:
Once the file is created, you can launch the jenkins service as shown below.
admin@linuxser:~/jenkinssso$ docker compose -f jenkins_compose.yml up -d
Ensure that you retrieve the initial password for the admin user that has been generated in the logs.
admin@linuxser:~/jenkinssso$ docker logs -f jenkins_lts
...
*************************************************************
*************************************************************
*************************************************************

Jenkins initial setup is required. An admin user has been created and a password generated.
Please use the following password to proceed to installation:

c54f62e1d76444dc9a0f56e749234b05

This may also be found at: /var/jenkins_home/secrets/initialAdminPassword

*************************************************************
*************************************************************
*************************************************************
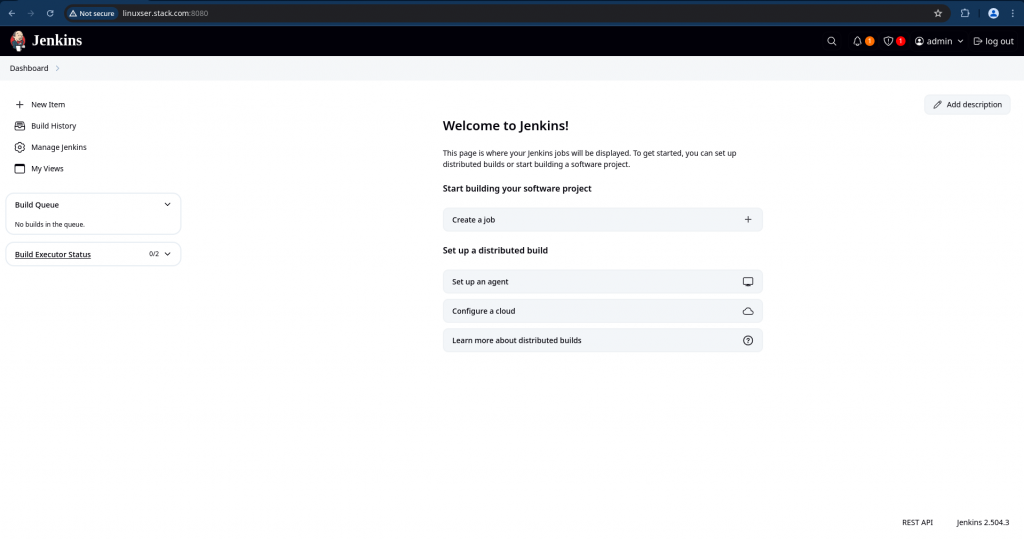
Now you can complete the Jenkins setup by logging in and installing the suggested plugins. You will also be asked to setup an Administrative user which you can use to login later.
URL: http://linuxser.stack.com:8080/login?from=%2F
Its always a good idea to ensure you have a backup of your jenkins home directory so in case something goes wrong you can restore the backup.
admin@linuxser:~/jenkinssso$ sudo cp -pr /var/lib/docker/volumes/jenkinssso_jenkins_home ~/jenkinssso_jenkins_home_backup
We are now ready with our minimalistics Jenkins service setup.
Step3: Ensure Keycloak service is up and running
Let us now instantiate Keycloak services using docker compose file. Here is the minimalistic docker compose file that we will be using for this demo.
admin@linuxser:~/jenkinssso$ cat keycloak_compose.yml
services:

  keycloak:
    image: quay.io/keycloak/keycloak:26.1.4
    container_name: keycloak
    command: start-dev
    environment:
      KC_BOOTSTRAP_ADMIN_USERNAME: admin
      KC_BOOTSTRAP_ADMIN_PASSWORD: admin
    ports:
      - "8081:8080"
      - "8443:8443"
    volumes:
      - keycloak:/opt/keycloak
    networks:
      - keycloak-net

networks:
  keycloak-net:

volumes:
  keycloak:
Once the file is created, you can launch the keycloak service as shown below.
admin@linuxser:~/jenkinssso$ docker compose -f keycloak_compose.yml up -d
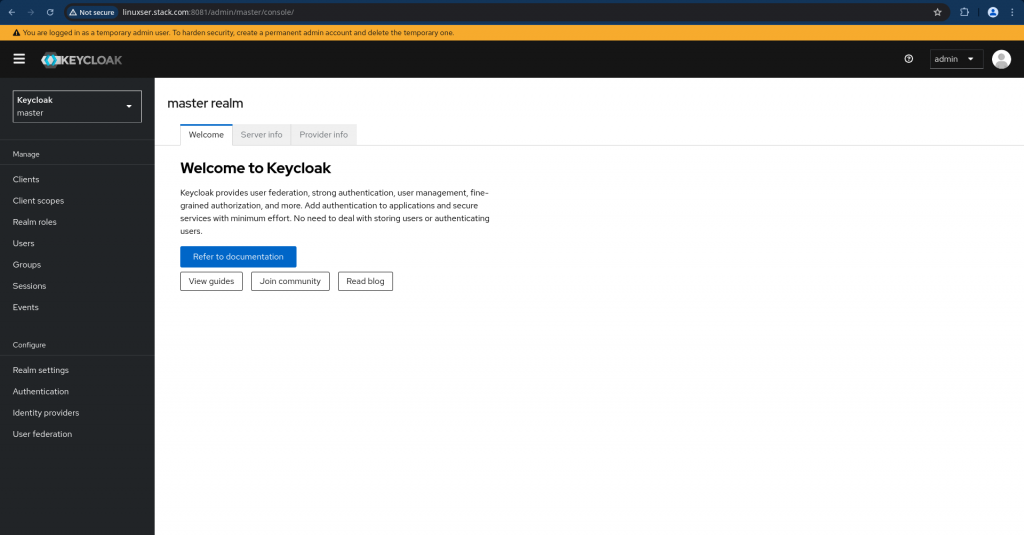
We can now access our Keycloak Admin Console page as shown below with the default credentials mentioned in the docker compose file.
URL: http://linuxser.stack.com:8081/admin/master/console/
Again its always a good idea to take backup of our Keycloak home directory just in case something goes wrong we can restore that backup.
admin@linuxser:~/jenkinssso$ sudo cp -pr /var/lib/docker/volumes/jenkinssso_keycloak ~/jenkinssso_keycloak_backup
Easy enough, we are now ready with our minimalistics Keycloak service setup.
Step4: Configure Keycloak
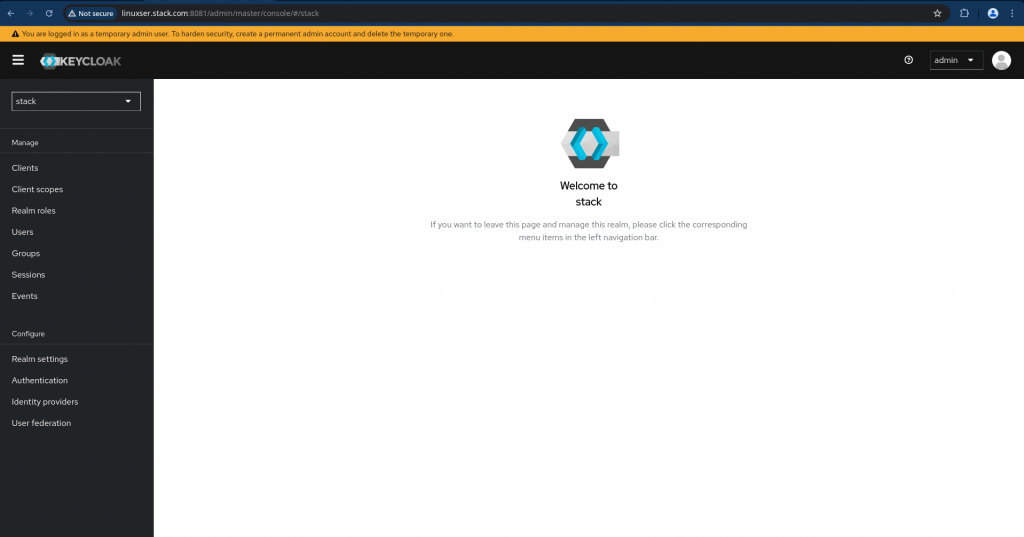
Here let us first create a new realm named “stack” by navigating to top left side and clicking on the drop down to Create Realm. Once you create a realm you will be automatically switched into your new realm.
Now navigate to Clients on left navigation bar and create a new client named “jenkinssso” with the following details.
General Settings
Client Name : jenkinssso
Client ID   : jenkinssso
Capability Config
Client Authentication   : On
Authorization Flow      : Standard flow and Direct access grants enabled
Login Settings
Valid Redirect URls     : http://linuxser.stack.com:8080/securityRealm/finishLogin
Valid post logout redirect URIs : http://linuxser.stack.com:8080/OicLogout
Web Origins             : http://linuxser.stack.com:8080
Once the Client is created you can navigate to “Credentials” tab and retrieve your Client Secret and keep it secure.
Client Secret : U8Gq1QV7ujsK0sXlx7nbfMeVwZeUgh2v
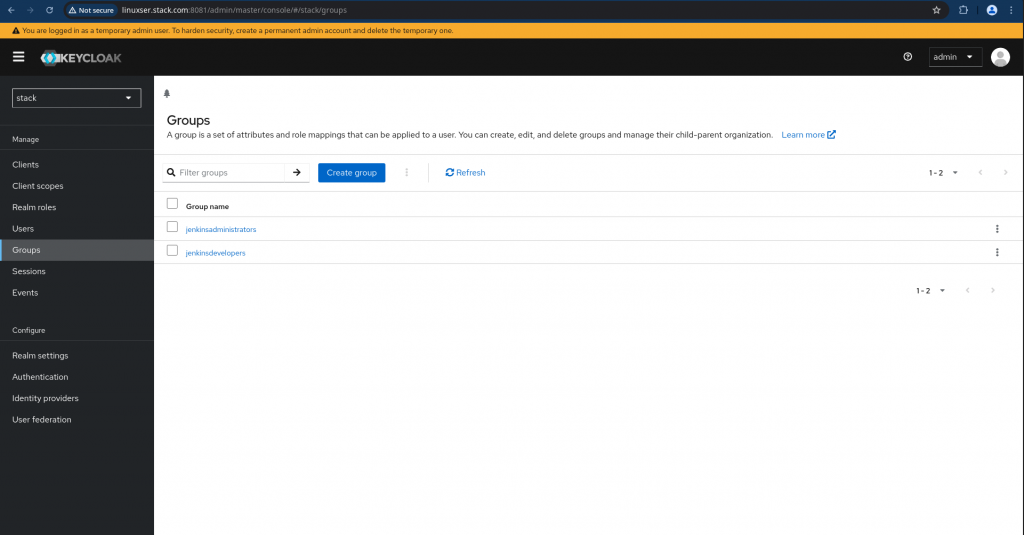
Once the client has been created, its now time to setup groups and users. Let us create groups named “jenkinsadministrators” and “jenkinsdevelopers”.
Navigate to Groups on left navigation bar and create the following groups.
Now let us create two users named “jenkinsadmin” and “jenkinsdev” part of groups “jenkinsadministrators” and “jenkinsdevelopers” respectively.
Username    : jenkinsadmin
Email       : jenkinsadmin@stack.com
First name  : jenkinsadmin
Last name   : jenkinssso
Groups      : jenkinsadministrators
Username    : jenkinsdev
Email       : jenkinsdev@stack.com
First name  : jenkinsdev
Last name   : jenkinssso
Groups      : jenkinsdevelopers
Navigate to “Credentials” tab and “Set Password” for each user and ensure Temporary option is Off so you don’t need to change the password again on first login.
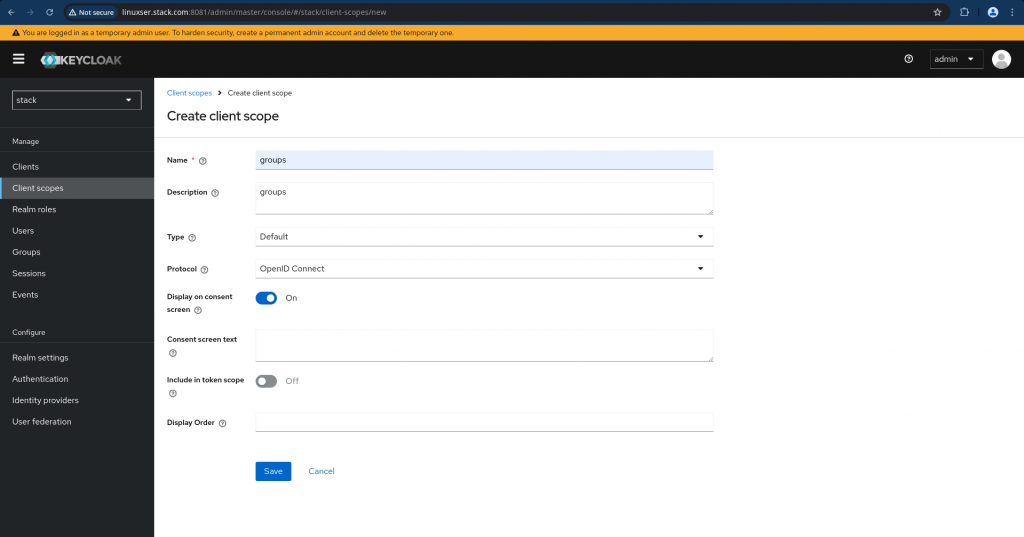
There are two more important steps that we need to carry out. First “Create a client scope with group membership mapping” as shown below.
Navigate to Client scopes on the left navigation bar and click “Create client scope” on that page. Update the details and save the changes.
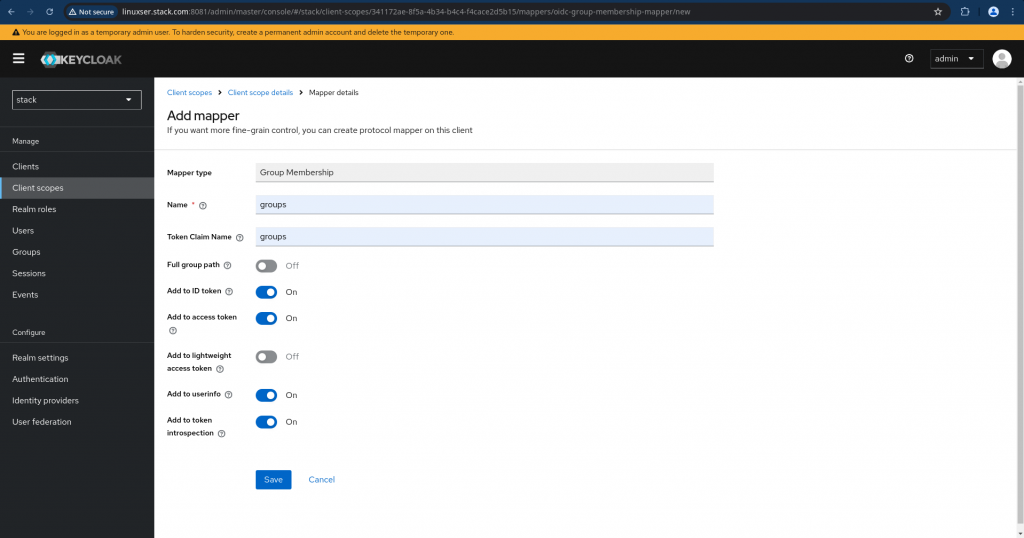
Now we need to go to “Mappers” tab for the Client scope “groups” and click on “Configure a new mapper” and select “Group Membership”. Just disable the “Full group path” as we are going to deal with top level groups only for this demo and create the mappers.
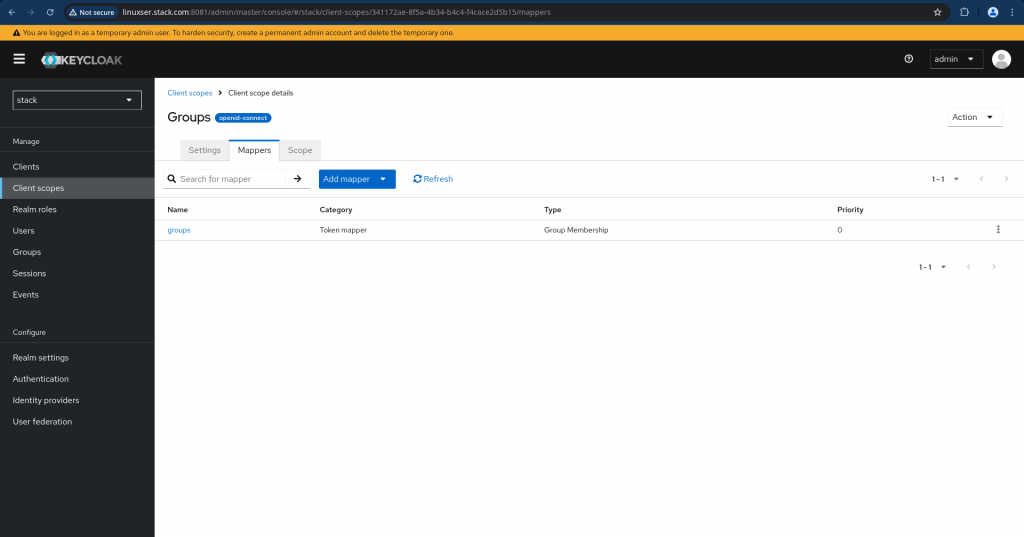
This is how your updated client scope mappers look like.
Now we need to map this client scope to our client “jenkinssso”. Navigate to your client and go to “Client scopes” tab and ensure you click on “groups” to map it to the client as shown below and set the Assigned type as “Default”.
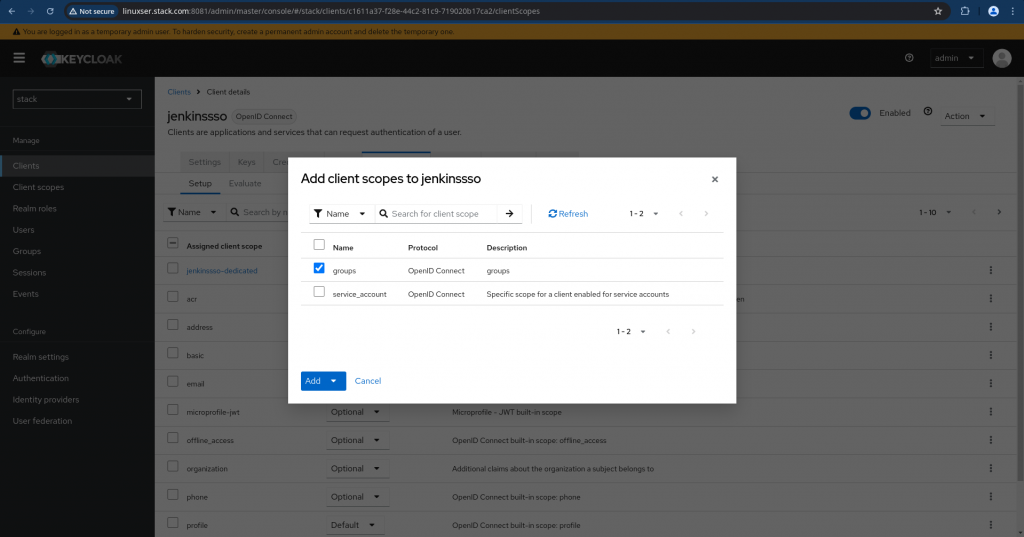
NOTE: By default “Client” is mapped with the following scopes “email” and “profile” which we will be using during SSO communication.
Just to make sure your client is configured correctly and is able to authenticate and issue tokens with the required claims we can validate it using the implicit authentication flow wherein we provide the client id and client secret to get the access token as shown below.
admin@linuxser:~/jenkinssso$ curl -k -d "grant_type=password" -d "scope=openid" -d "client_id=jenkinssso" -d "client_secret=U8Gq1QV7ujsK0sXlx7nbfMeVwZeUgh2v" -d "username=jenkinsadmin" -d "password=jenkinsadmin" http://linuxser.stack.com:8081/realms/stack/protocol/openid-connect/token | jq .
  % Total    % Received % Xferd  Average Speed   Time    Time     Time  Current
                                 Dload  Upload   Total   Spent    Left  Speed
100  3696  100  3552  100   144  61038   2474 --:--:-- --:--:-- --:--:-- 64842
{
  "access_token": "eyJhbGciOiJSUzI1NiIsInR5cCIgOiAiSldUIiwia2lkIiA6ICJpOHJVRWpEVG1TNmlyZFJOeEhyVU8xanB3NTh5Y0RIbDUxdDB3dzkzNkZ3In0.eyJleHAiOjE3NTEwOTYyMDYsImlhdCI6MTc1MTA5NTkwNiwianRpIjoiNzA1MjY3NjEtZWQ0ZS00NTdhLWFiNzYtOWU3OTE1MGQ4ZGQxIiwiaXNzIjoiaHR0cDovL2xpbnV4c2VyLnN0YWNrLmNvbTo4MDgxL3JlYWxtcy9zdGFjayIsImF1ZCI6ImFjY291bnQiLCJzdWIiOiIyMDNmMGI5NC1hYmYwLTQ4Y2MtYjg4YS1hYzQ4MzgyNzlkZWUiLCJ0eXAiOiJCZWFyZXIiLCJhenAiOiJqZW5raW5zc3NvIiwic2lkIjoiZDA3YjE5NTItZjIxMy00YWIzLTgwYzAtZDQwMTE5M2Q0MjRjIiwiYWNyIjoiMSIsImFsbG93ZWQtb3JpZ2lucyI6WyJodHRwOi8vbGludXhzZXIuc3RhY2suY29tOjgwODAiXSwicmVhbG1fYWNjZXNzIjp7InJvbGVzIjpbImRlZmF1bHQtcm9sZXMtc3RhY2siLCJvZmZsaW5lX2FjY2VzcyIsInVtYV9hdXRob3JpemF0aW9uIl19LCJyZXNvdXJjZV9hY2Nlc3MiOnsiYWNjb3VudCI6eyJyb2xlcyI6WyJtYW5hZ2UtYWNjb3VudCIsIm1hbmFnZS1hY2NvdW50LWxpbmtzIiwidmlldy1wcm9maWxlIl19fSwic2NvcGUiOiJvcGVuaWQgcHJvZmlsZSBlbWFpbCIsImVtYWlsX3ZlcmlmaWVkIjpmYWxzZSwibmFtZSI6ImplbmtpbnNhZG1pbiBqZW5raW5zc3NvIiwiZ3JvdXBzIjpbImplbmtpbnNhZG1pbmlzdHJhdG9ycyJdLCJwcmVmZXJyZWRfdXNlcm5hbWUiOiJqZW5raW5zYWRtaW4iLCJnaXZlbl9uYW1lIjoiamVua2luc2FkbWluIiwiZmFtaWx5X25hbWUiOiJqZW5raW5zc3NvIiwiZW1haWwiOiJqZW5raW5zYWRtaW5Ac3RhY2suY29tIn0.OhQjbFgQTsVMu65UmfkTnOwsb4t_xOru2VR4bN9cbtpZFLQOcshBNBiBPQU2LqbPGZWBrO0Be9Fd-zcKJLp8ngzAm95RkWWo02TJU8ETulPrdLOAK_dt-FxhAC07JZ02FCu9IGPavgPn4dHVwEx1xisDxU5k8ZoH20lFkSMka0t7iw9YlrgYlAGLn2tya0GBxhWmUgClmhnyHtMwaag7dISTmHrg2_KmnU3Se3z4JENo99_4yoQqpCnCz_CuVW3Y3fpBB4ERXkkGRPF4Bc7PyrTPvQwFjZP6W670AsIzsmSGGnZ1GTjlObkg1EqLAbgrlIEwJNfJTmUeowfC-YLaRw",
  "expires_in": 300,
  "refresh_expires_in": 1800,
  "refresh_token": "eyJhbGciOiJIUzUxMiIsInR5cCIgOiAiSldUIiwia2lkIiA6ICI4OTBkOTI1MC1iNDA0LTQ4MzctOTI2NS1hODQ1N2VkMjc5ZmYifQ.eyJleHAiOjE3NTEwOTc3MDYsImlhdCI6MTc1MTA5NTkwNiwianRpIjoiMGEzYTNlZGQtMjNhZS00ODRjLTk0YzQtMjcyNjA5ZDdhMzc4IiwiaXNzIjoiaHR0cDovL2xpbnV4c2VyLnN0YWNrLmNvbTo4MDgxL3JlYWxtcy9zdGFjayIsImF1ZCI6Imh0dHA6Ly9saW51eHNlci5zdGFjay5jb206ODA4MS9yZWFsbXMvc3RhY2siLCJzdWIiOiIyMDNmMGI5NC1hYmYwLTQ4Y2MtYjg4YS1hYzQ4MzgyNzlkZWUiLCJ0eXAiOiJSZWZyZXNoIiwiYXpwIjoiamVua2luc3NzbyIsInNpZCI6ImQwN2IxOTUyLWYyMTMtNGFiMy04MGMwLWQ0MDExOTNkNDI0YyIsInNjb3BlIjoib3BlbmlkIHdlYi1vcmlnaW5zIGFjciBwcm9maWxlIGdyb3VwcyBiYXNpYyByb2xlcyBlbWFpbCJ9.anIKzSX5paRtU-5uv3Yxkk0tWz7jJSF7FN_tWKR5mRr5YUZdNa6IPLXENtD2GK_sgObUfbPHdgiiB2YtIJftKw",
  "token_type": "Bearer",
  "id_token": "eyJhbGciOiJSUzI1NiIsInR5cCIgOiAiSldUIiwia2lkIiA6ICJpOHJVRWpEVG1TNmlyZFJOeEhyVU8xanB3NTh5Y0RIbDUxdDB3dzkzNkZ3In0.eyJleHAiOjE3NTEwOTYyMDYsImlhdCI6MTc1MTA5NTkwNiwianRpIjoiZWYwMzIyMzMtNDAyMy00NzBjLTgyYzctMWUwMmFmMjA1MGY3IiwiaXNzIjoiaHR0cDovL2xpbnV4c2VyLnN0YWNrLmNvbTo4MDgxL3JlYWxtcy9zdGFjayIsImF1ZCI6ImplbmtpbnNzc28iLCJzdWIiOiIyMDNmMGI5NC1hYmYwLTQ4Y2MtYjg4YS1hYzQ4MzgyNzlkZWUiLCJ0eXAiOiJJRCIsImF6cCI6ImplbmtpbnNzc28iLCJzaWQiOiJkMDdiMTk1Mi1mMjEzLTRhYjMtODBjMC1kNDAxMTkzZDQyNGMiLCJhdF9oYXNoIjoiNmN5bElQdE5PbHR1ck1nRzhjVWRGUSIsImFjciI6IjEiLCJlbWFpbF92ZXJpZmllZCI6ZmFsc2UsIm5hbWUiOiJqZW5raW5zYWRtaW4gamVua2luc3NzbyIsImdyb3VwcyI6WyJqZW5raW5zYWRtaW5pc3RyYXRvcnMiXSwicHJlZmVycmVkX3VzZXJuYW1lIjoiamVua2luc2FkbWluIiwiZ2l2ZW5fbmFtZSI6ImplbmtpbnNhZG1pbiIsImZhbWlseV9uYW1lIjoiamVua2luc3NzbyIsImVtYWlsIjoiamVua2luc2FkbWluQHN0YWNrLmNvbSJ9.1OFN44f5Y2wYBQt7vAzXjhnoDXlpEWSiZupX5BaTg2cVdh2tFhyDJcbz8Al0eVMZhx7utvwj-vZMkVjQhsmpwwNjz7CyyrHMQPSOle9sY8MomWQSq6JQ8oZ4MeF0IR9FoHlgUeIW3jkrzI_iJ68sFsu0lU3hsaTuUK-JRfocVRAg1NIvDWAj9hOtF3O-HJkDgld0PLEuhU0VWiXC-J1jpDJpPBCOI57d2PwyI_7qLetlaq0DYNz6w-dtFYqz5b1gRbqkE794ffG5yO2JYs1ylQPJusj6xrJs4AznAY1bfZeFvlmaMQm4iAL_NoFsjMtyC6gYMSmmTbRFljh5_yVtgQ",
  "not-before-policy": 0,
  "session_state": "d07b1952-f213-4ab3-80c0-d401193d424c",
  "scope": "openid profile email"
}
You can validate your issued token at JWT token decoder. Here is the JSON token in my case.
{
  "exp": 1751096206,
  "iat": 1751095906,
  "jti": "70526761-ed4e-457a-ab76-9e79150d8dd1",
  "iss": "http://linuxser.stack.com:8081/realms/stack",
  "aud": "account",
  "sub": "203f0b94-abf0-48cc-b88a-ac4838279dee",
  "typ": "Bearer",
  "azp": "jenkinssso",
  "sid": "d07b1952-f213-4ab3-80c0-d401193d424c",
  "acr": "1",
  "allowed-origins": [
    "http://linuxser.stack.com:8080"
  ],
  "realm_access": {
    "roles": [
      "default-roles-stack",
      "offline_access",
      "uma_authorization"
    ]
  },
  "resource_access": {
    "account": {
      "roles": [
        "manage-account",
        "manage-account-links",
        "view-profile"
      ]
    }
  },
  "scope": "openid profile email",
  "email_verified": false,
  "name": "jenkinsadmin jenkinssso",
  "groups": [
    "jenkinsadministrators"
  ],
  "preferred_username": "jenkinsadmin",
  "given_name": "jenkinsadmin",
  "family_name": "jenkinssso",
  "email": "jenkinsadmin@stack.com"
}
With this we have now completed our Realm, Clients, Client Scopes, Users and Groups settings.
Step5: Configure Jenkins Security to support OIDC
If you have setup Jenkins by installing the Suggested plugins, you may not be able to configure jenkins to support OpenID based authentication flow.
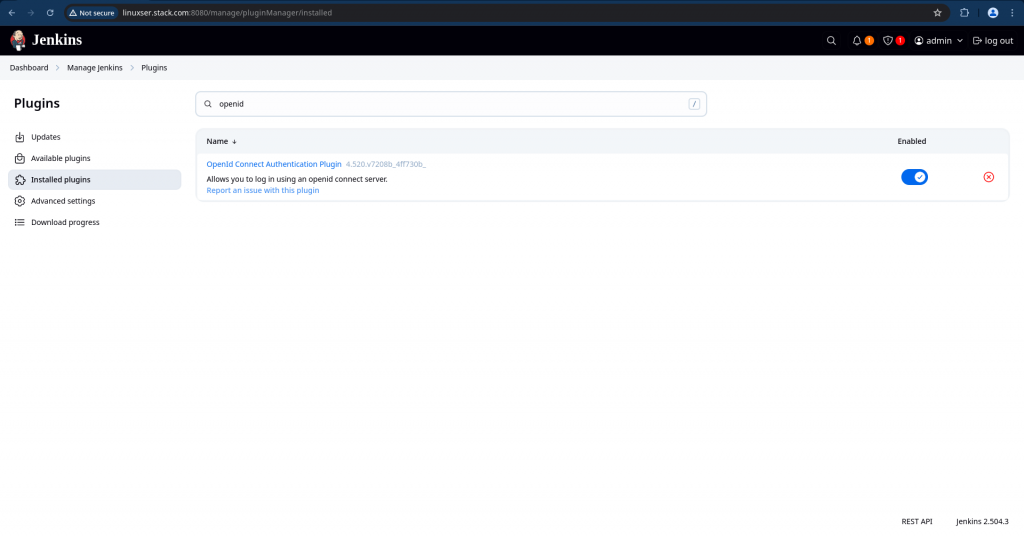
For this we need to install a plugin named “OpenId Connect Authentication”. Navigate to “Manage Jenkins” – “Plugins” – “Available Plugins” and install that plugin.
You should now be able to see your installed plugin in the “Available Plugins” list.
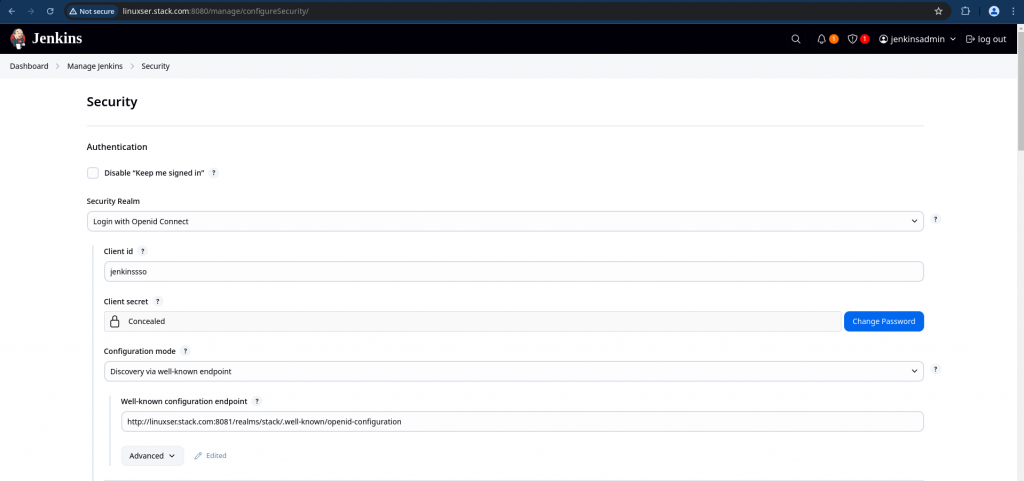
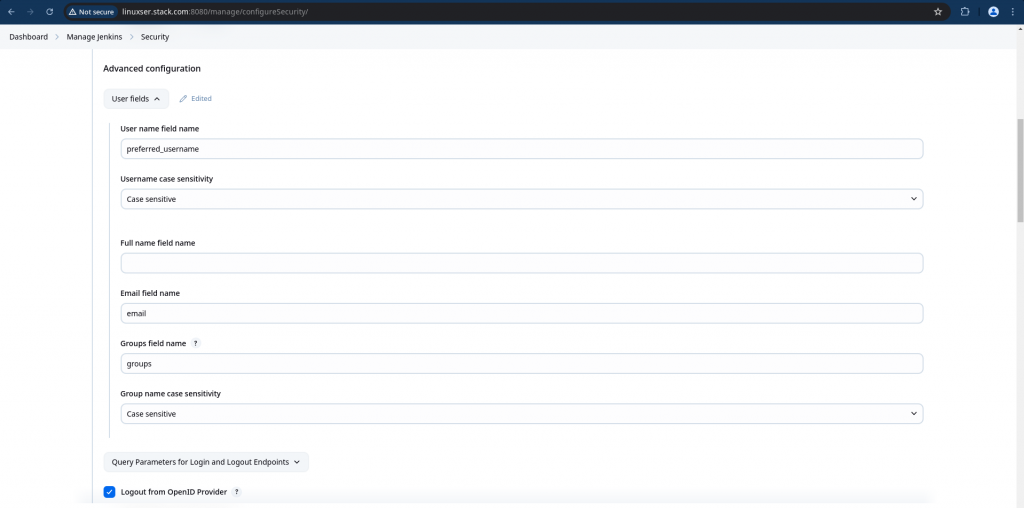
Now navigate to “Manage Jenkins” – “Security” and “Configure security” to authenticate using Keycloak OpenID Connect.
Here are the details you will need for this setup.
Client ID       : jenkinssso
Client Secret   : U8Gq1QV7ujsK0sXlx7nbfMeVwZeUgh2v
Well-known configuration endpoint: http://linuxser.stack.com:8081/realms/stack/.well-known/openid-configuration
Logout redirect URIs : http://linuxser.stack.com:8080/OicLogout
Override scopes : openid profile email
Please enable “Configure escape hatch for when the OpenID Provider is unavailable”. This is very important if you mess up with your OIDC setting you would still be able to access your Jenkins using the credentials that you setup here.
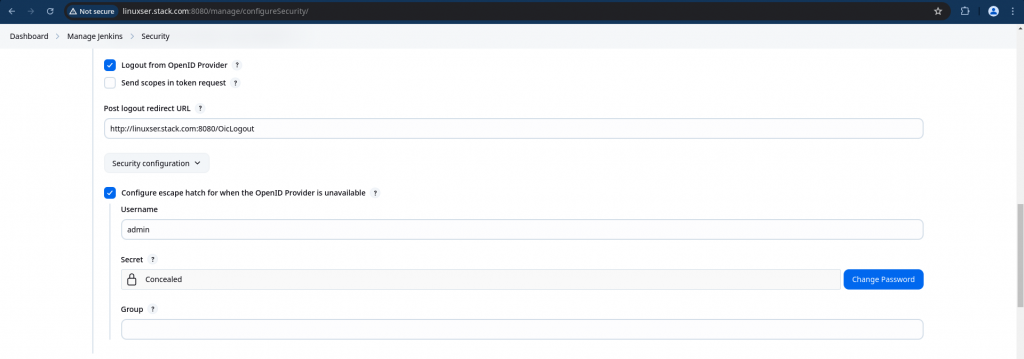
Information: If the openid provider is unavailable or changes location or revokes client credentials, then there is no way to login. These settings allow you to regain access without manually changing the jenkins config on disk. To use the functionally goto ‘/login’ using the username and secret as username and password resp.
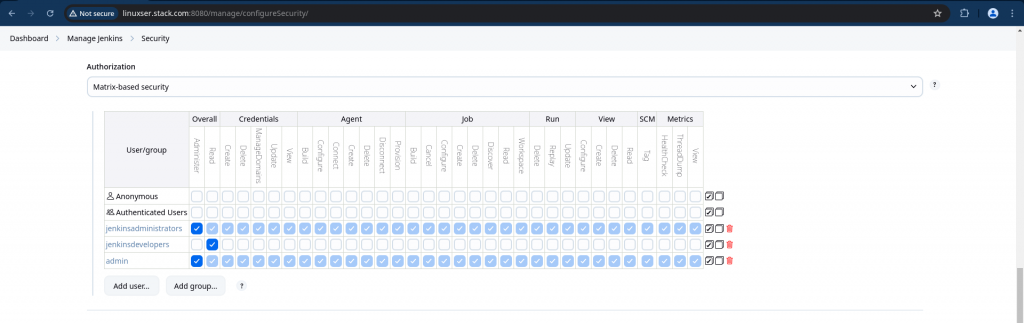
In the Authorization section, select “Matrix based security” and Map “jenkinsadministrators” and “jenkinsdevelopers” as shown below and Also add your default “admin” user with all the permissions as shown below and save the changes.
For more details on the usage and configuration of the OIDC plugin go through “OpenId Connect Authentication“.
With this we have now completed the OIDC setup on Jenkins.
Step6: Validate Jenkins OIDC access
Now if you try to access your Jenkins Portal it will redirect you to Keycloak Authentication page.
URL: http://linuxser.stack.com:8080/
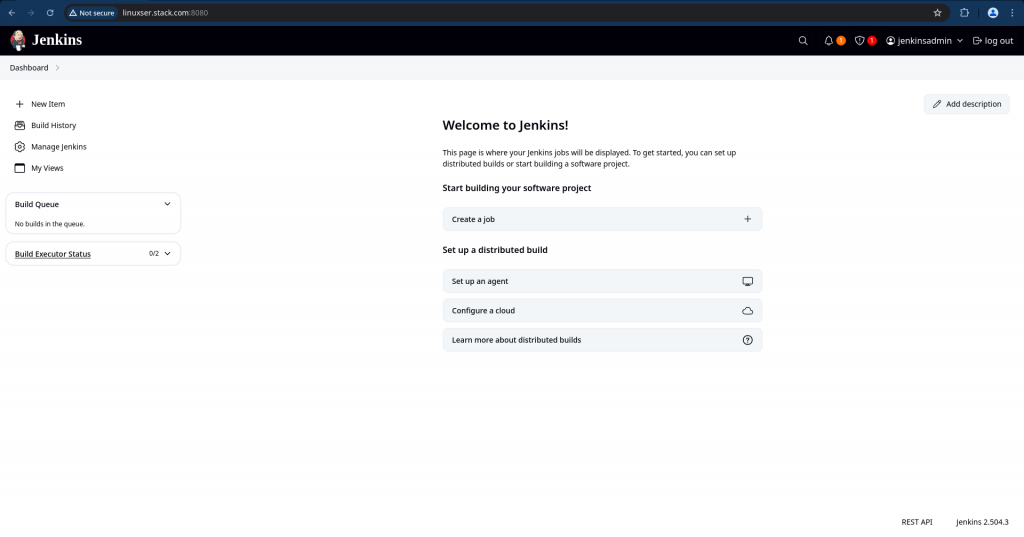
Try login with “jenkinsadmin” user first and you should be able to login successfully and access all the features of jenkins as you are provided with Administrative privileges.
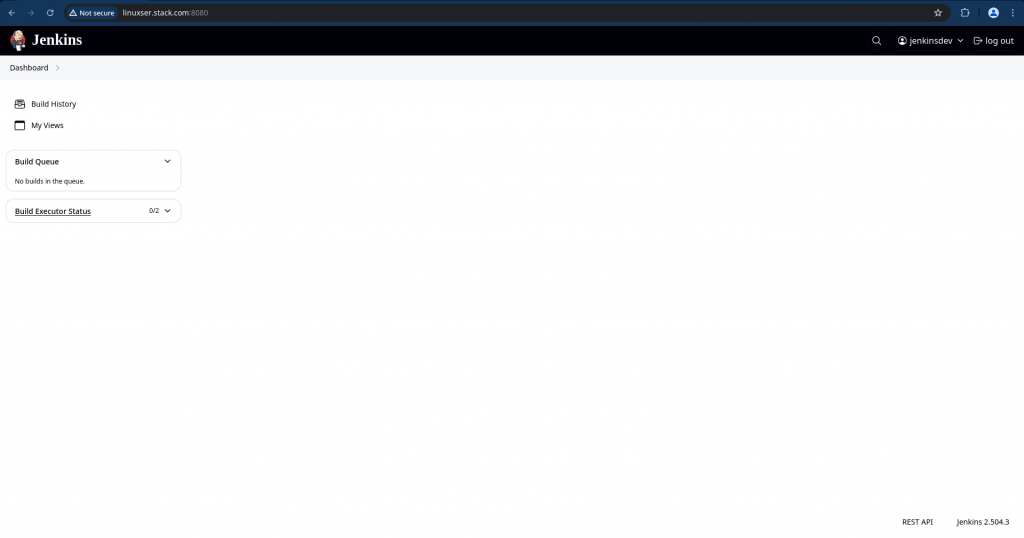
Now try to login with “jenkinsdev” user and you would only have minimal read access as shown below.
You can customize the level of access granted to users in each group as per your requirements.
Also you would still be able to access your Jenkins using the default “admin” user that your configured in the escape hatch configuration by accessing the following.
URL: http://linuxser.stack.com:8080/login
This url will redirect you the Jenkins standard login page for access instead going through the OIDC flow.
Hope you enjoyed reading this article. Thank you..
Leave a Reply
You must be logged in to post a comment.