How to update the gitlab server configuration
Here in this article we will see some of the basic configuration changes that we can carry out in the gitlab instance using the gitlab.rb configuration file. We will see how we can update the gitlab access url, update the git repository data location, update the authentication restrictions and nginx update for http to https redirect.
Test Environment
Ubuntu 20.04 server
Procedure
Step1: Configuring the external url for gitlab access
For updating the gitlab external url we need to updated the gitlab.rb configuration file as shown below.
gitadmin@gitserver:~$ sudo cat /etc/gitlab/gitlab.rb | grep "external_url"
[sudo] password for gitadmin:
##! For more details on configuring external_url see:
external_url 'https://gitserver.stack.com'
After configuration change we need to rerun the reconfigure for the gitlab instance as shown below.
gitadmin@gitserver:~$ sudo gitlab-ctl reconfigure
If we want to configure our gitlab server to be accessible from a relative url context we can update the external_url as shown below.
gitadmin@gitserver:~$ sudo cat /etc/gitlab/gitlab.rb | grep "external_url"
[sudo] password for gitadmin:
##! For more details on configuring external_url see:
external_url 'https://gitserver.stack.com/gitlab'
This will make the gitlab url accessible on custom context ‘/gitlab’. Please make sure you carry out the external_url changes during the initial installation and avoid changing it after the gitlab server is setup and in use by the external users.
Step2: Update the git data storage location
By default the git data storage is located at the following location for omnibus gitlab installation.
gitadmin@gitserver:~$ sudo ls -ltr /var/opt/gitlab/git-data/
total 4
drwxrws--- 4 git git 4096 Jul  6 23:01 repositories
We can update the git data storage location by updating the gitlab.rb configuration file as shown below. First let us stop the gitlab instance.
gitadmin@gitserver:~$ sudo gitlab-ctl stop
ok: down: alertmanager: 1s, normally up
ok: down: gitaly: 0s, normally up
ok: down: gitlab-exporter: 0s, normally up
ok: down: gitlab-kas: 0s, normally up
ok: down: gitlab-workhorse: 1s, normally up
ok: down: grafana: 0s, normally up
ok: down: logrotate: 1s, normally up
ok: down: nginx: 0s, normally up
ok: down: node-exporter: 0s, normally up
ok: down: postgres-exporter: 1s, normally up
ok: down: postgresql: 0s, normally up
ok: down: prometheus: 1s, normally up
ok: down: puma: 0s, normally up
ok: down: redis: 1s, normally up
ok: down: redis-exporter: 0s, normally up
ok: down: sidekiq: 1s, normally up
Now, Let’s uncomment these three lines it will configure our gitlab instance to store the git repositories data in the following location ‘/mnt/nfs-01/git-data’. Also we need to create the new git repository directory structure.
gitadmin@gitserver:~$ sudo mkdir -p /mnt/nfs-01/git-data/

gitadmin@gitserver:~$ sudo cat /etc/gitlab/gitlab.rb
...
 git_data_dirs({
   "default" => {
     "path" => "/mnt/nfs-01/git-data"
    }
 })
...
For already existing git repositories data it needs to be moved to the new location, as we have already stopped the gitlab instance we can now sync the data from current location (ie. /var/opt/gitlab/git-data/ ) to the new location ( /mnt/nfs-01/git-data/ ) and then reconfigure the gitlab instance.
gitadmin@gitserver:~$ sudo rsync -av --delete /var/opt/gitlab/git-data/repositories /mnt/nfs-01/git-data/
sending incremental file list
repositories/
repositories/.gitaly-metadata
repositories/+gitaly/
repositories/+gitaly/tmp/
repositories/@hashed/
repositories/@hashed/2c/
repositories/@hashed/2c/62/
repositories/@hashed/4b/
repositories/@hashed/4b/22/
repositories/@hashed/4e/
repositories/@hashed/4e/07/
repositories/@hashed/6b/
repositories/@hashed/6b/86/
repositories/@hashed/6b/86/6b86b273ff34fce19d6b804eff5a3f5747ada4eaa22f1d49c01e52ddb7875b4b.git/
repositories/@hashed/6b/86/6b86b273ff34fce19d6b804eff5a3f5747ada4eaa22f1d49c01e52ddb7875b4b.git/HEAD
repositories/@hashed/6b/86/6b86b273ff34fce19d6b804eff5a3f5747ada4eaa22f1d49c01e52ddb7875b4b.git/config
repositories/@hashed/6b/86/6b86b273ff34fce19d6b804eff5a3f5747ada4eaa22f1d49c01e52ddb7875b4b.git/objects/
repositories/@hashed/6b/86/6b86b273ff34fce19d6b804eff5a3f5747ada4eaa22f1d49c01e52ddb7875b4b.git/objects/info/
repositories/@hashed/6b/86/6b86b273ff34fce19d6b804eff5a3f5747ada4eaa22f1d49c01e52ddb7875b4b.git/objects/pack/
repositories/@hashed/6b/86/6b86b273ff34fce19d6b804eff5a3f5747ada4eaa22f1d49c01e52ddb7875b4b.git/refs/
repositories/@hashed/6b/86/6b86b273ff34fce19d6b804eff5a3f5747ada4eaa22f1d49c01e52ddb7875b4b.wiki.git/
repositories/@hashed/6b/86/6b86b273ff34fce19d6b804eff5a3f5747ada4eaa22f1d49c01e52ddb7875b4b.wiki.git/HEAD
repositories/@hashed/6b/86/6b86b273ff34fce19d6b804eff5a3f5747ada4eaa22f1d49c01e52ddb7875b4b.wiki.git/config
repositories/@hashed/6b/86/6b86b273ff34fce19d6b804eff5a3f5747ada4eaa22f1d49c01e52ddb7875b4b.wiki.git/objects/
repositories/@hashed/6b/86/6b86b273ff34fce19d6b804eff5a3f5747ada4eaa22f1d49c01e52ddb7875b4b.wiki.git/objects/info/
repositories/@hashed/6b/86/6b86b273ff34fce19d6b804eff5a3f5747ada4eaa22f1d49c01e52ddb7875b4b.wiki.git/objects/pack/
repositories/@hashed/6b/86/6b86b273ff34fce19d6b804eff5a3f5747ada4eaa22f1d49c01e52ddb7875b4b.wiki.git/refs/
repositories/@hashed/79/
repositories/@hashed/79/02/
repositories/@hashed/d4/
repositories/@hashed/d4/73/
repositories/@hashed/e7/
repositories/@hashed/e7/f6/
repositories/@hashed/ef/
repositories/@hashed/ef/2d/

sent 1,674 bytes  received 239 bytes  3,826.00 bytes/sec
total size is 295  speedup is 0.15
gitadmin@gitserver:~$ sudo gitlab-ctl reconfigure

gitadmin@gitserver:~$ sudo ls -ltr /mnt/nfs-01/git-data/repositories
total 8
drwxr-s--- 10 git git 4096 Jul  6 10:32 @hashed
drwxr-sr-x  3 git git 4096 Jul  6 15:40 +gitaly
Finally we can start the gitlab instance if the data is populated into the new location.
gitadmin@gitserver:~$ sudo gitlab-ctl start
Step3: Disallow failed authentication user after a particular number of attempts
We can ban a particular user from accessing the gitlab portal after a number of failed login attempts or if the user is accessing the portal from a non whitelisted ip address. Here is the configuration that we need to update for the same.
gitadmin@gitserver:~$ sudo cat /etc/gitlab/gitlab.rb | grep -A 6 "rack_attack_git_basic_auth"
 gitlab_rails['rack_attack_git_basic_auth'] = {
   'enabled' => false,
   'ip_whitelist' => ["192.168.29.117"],
   'maxretry' => 3,
   'findtime' => 60,
   'bantime' => 3600
 }
gitadmin@gitserver:~$ sudo gitlab-ctl reconfigure
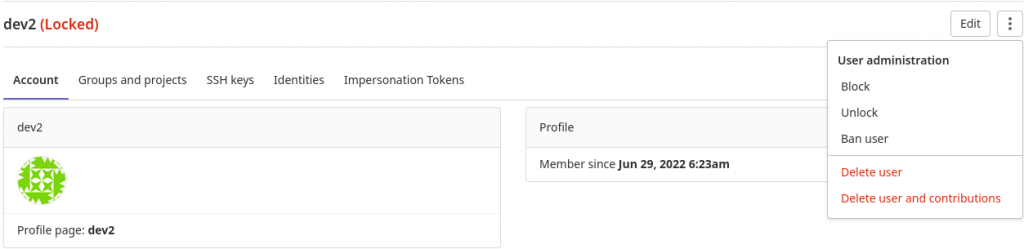
Now, let’s try to access our gitlab instance any user configured. In my case i have a user – dev2 with which i am trying to access the gitlab portal with incorrect credentials for more than 3 times within 60 sec and the user id gets locked as shown below. bantime is applied when we try to access the gitlab portal from an non whitelisted ip address which will be banned for an hour.

Now even if you try with the correct credentials the user will be locked and banned for an hour before he can again attempt for a successful login.
But if you have administrative privilege login you can unlock that user as shown below and the user will again be able to access the portal.
Step4: Configure nginx for http to https redirect
After the HTTP(s) setting for the gitlab instance, we can update our gitlab configuration in such a way that if any user tries to attempt access on HTTP (ie. Port 80) it should be redirected to HTTPS (ie. 443) for secure access. Here is the configuration that we need to update for this redirect to take place.
gitadmin@gitserver:~$ sudo cat /etc/gitlab/gitlab.rb
...
 nginx['redirect_http_to_https'] = true
...
Now if you try to access the gitlab portal on http protocol it will be redirected to https protocol.
URL – http://gitserver.stack.com will be redirected to https://gitserver.stack.com
Hope you enjoyed reading this article. Thank you..
Leave a Reply
You must be logged in to post a comment.