How to build and execute Python based GNOME Application
Here in this article we will try to setup the build and runtime environment for working with the GNOME projects. We will be going to install Flatpak and Builder tool for this setup.
Flatpak is used for software development and package management in Linux OS. Builder is a general purpose integrated development environment for the GNOME platform, primarily designed to aid in writing GNOME-based applications.
GNOME the abbreviated form of GNU Network Object Model Environment is a free and open source desktop environment for linux operating systems. The purpose of GNOME is to make the Linux Operating System easy to use with elegant user interface applications.
Test Environment
Fedora 35 workstation
Procedure
Step1: Install Flatpak
Flatpak is by default installed on Fedora workstation. You can verify if its already installed or not as shown below.
[admin@fedser ~]$ rpm -qa | grep flatpak
plasma-discover-flatpak-5.24.4-1.fc35.x86_64
flatpak-selinux-1.12.7-2.fc35.noarch
flatpak-session-helper-1.12.7-2.fc35.x86_64
flatpak-1.12.7-2.fc35.x86_64
flatpak-libs-1.12.7-2.fc35.x86_64

[admin@fedser ~]$ flatpak --version
Flatpak 1.12.7
Step2: Enable Flathub repository to install Flatpak applications
Here we are going to add the flatpak application repository names as flathub. Flathub is basically a collection of flatpak applications.
[admin@fedser ~]$ sudo flatpak remote-add --if-not-exists flathub https://flathub.org/repo/flathub.flatpakrepo

Name    Title   URL                                    Collection ID Subset Filter Priority Options    … … Homepage             Icon
fedora  Fedora  oci+https://registry.fedoraproject.org -             -      -      1        system,oci … … -                    -
flathub Flathub https://dl.flathub.org/repo/           -             -      -      1        system     … … https://flathub.org/ https://dl.flathub.org/repo/logo.svg
Step3: Install Builder
GNOME Builder is a IDE used for downloading and building GNOME applications. It uses Flatpak to compile and run the projects in sandbox environment.
[admin@fedser flatpakapps]$ wget https://flathub.org/apps/details/org.gnome.Builder
[admin@fedser flatpakapps]$ ls -ltr
total 8
-rw-rw-r--. 1 admin admin 7451 Jun 29 16:41 org.gnome.Builder

[admin@fedser flatpakapps]$ flatpak install org.gnome.Builder -y
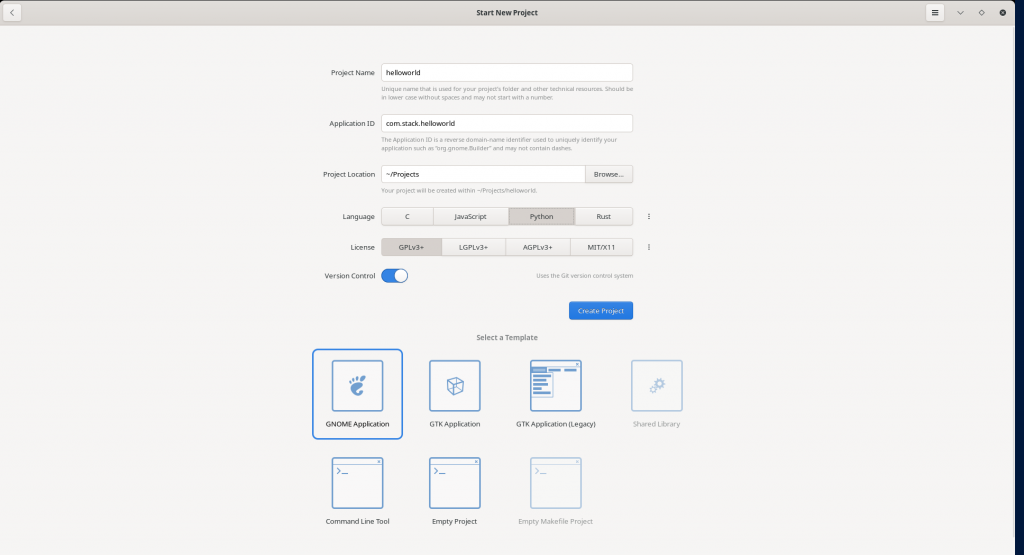
Step4: Launch Builder Application and Create a new Project
Here we are going to create a simple helloworld application with the following information as shown below. Once we hit the create project button it will create our python based gnome project for us to work upon.
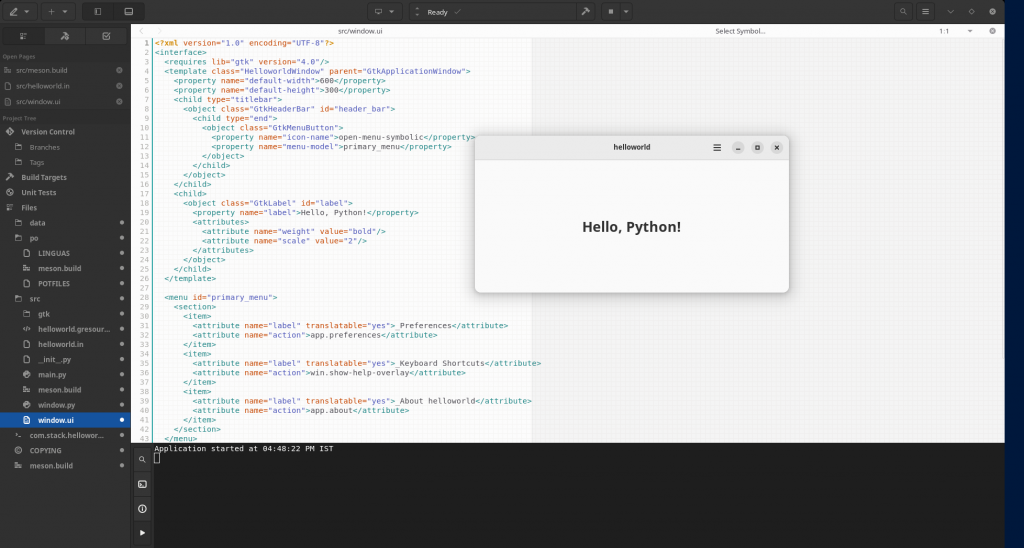
Step4: Update the window.ui label
Here we are going to update the window.ui as shown below to update our label text.
<?xml version="1.0" encoding="UTF-8"?>
<interface>
  <requires lib="gtk" version="4.0"/>
  <template class="HelloworldWindow" parent="GtkApplicationWindow">
    <property name="default-width">600</property>
    <property name="default-height">300</property>
    <child type="titlebar">
      <object class="GtkHeaderBar" id="header_bar">
        <child type="end">
          <object class="GtkMenuButton">
            <property name="icon-name">open-menu-symbolic</property>
            <property name="menu-model">primary_menu</property>
          </object>
        </child>
      </object>
    </child>
    <child>
      <object class="GtkLabel" id="label">
        <property name="label">Hello, Python!</property>
        <attributes>
          <attribute name="weight" value="bold"/>
          <attribute name="scale" value="2"/>
        </attributes>
      </object>
    </child>
  </template>

  <menu id="primary_menu">
    <section>
      <item>
        <attribute name="label" translatable="yes">_Preferences</attribute>
        <attribute name="action">app.preferences</attribute>
      </item>
      <item>
        <attribute name="label" translatable="yes">_Keyboard Shortcuts</attribute>
        <attribute name="action">win.show-help-overlay</attribute>
      </item>
      <item>
        <attribute name="label" translatable="yes">_About helloworld</attribute>
        <attribute name="action">app.about</attribute>
      </item>
    </section>
  </menu>
</interface>
Step5: Execute the Application
After the necessary changes in the code we will try to build and run the project using the Run button at the top and you should now see a Window Pop up with the customised message as shown below.
Hope you enjoyed reading this article. Thank you..
Leave a Reply
You must be logged in to post a comment.