How to setup and connect an agent node to jenkins controller
Here in this article we will see how we will setup a jenkins controller server and a jenkins agent node. Once the servers are ready we will connect a jenkins agent which will act as a build machine to the jenkins controller using the SSH method and different host key verification strategies available.
Test Environment
Fedora 35 workstation
Here are the details of the servers.
jenkinscontrol – Jenkins controller server with jenkins service running
jenkinsagent – jenkins agent server with java installed
If you are interested in watching the video. Here is the YouTube video on the same step by step procedure outlined below.
Procedure
Step1: Setup a secure jenkins service on jenkinscontrol
Here in this step we are going to setup a secure jenkins service using the rpm based installation method. For details please follow ‘How to install and configure a secure Jenkins server‘. Make sure your jenkins service is up and running and you are able to access the jenkins portal.
[admin@jenkinscontrol ~]$ sudo systemctl start jenkins.service
[admin@jenkinscontrol ~]$ sudo systemctl status jenkins.service
● jenkins.service - Jenkins Continuous Integration Server
     Loaded: loaded (/usr/lib/systemd/system/jenkins.service; disabled; vendor preset: disabled)
     Active: active (running) since Sun 2022-03-20 20:41:14 IST; 51s ago
   Main PID: 1576 (java)
      Tasks: 70 (limit: 2309)
     Memory: 558.0M
        CPU: 33.933s
     CGroup: /system.slice/jenkins.service
             └─1576 /usr/bin/java -Djava.awt.headless=true -jar /usr/share/java/jenkins.war --webroot=/var/cache/jenkins/war --httpPort=8080 --httpsPort=8443>
...
URL - https://jenkinscontrol:8443/ (change FQDN as per your hostname)
Step2: Configure FQDN resolution
As i don’t have a DNS server to resolve my hostname i have updated the ‘/etc/hosts’ file for both ‘jenkinscontrol’ and ‘jenkinsagent’ machine as shown below for DNS resolution.
[admin@jenkinscontrol ~]$ cat /etc/hosts
127.0.0.1   localhost localhost.localdomain localhost4 localhost4.localdomain4
::1         localhost localhost.localdomain localhost6 localhost6.localdomain6
192.168.122.162 jenkinscontrol
192.168.122.166 jenkinsagent

[admin@jenkinsagent ~]$ cat /etc/hosts
127.0.0.1   localhost localhost.localdomain localhost4 localhost4.localdomain4
::1         localhost localhost.localdomain localhost6 localhost6.localdomain6
192.168.122.162 jenkinscontrol
192.168.122.166 jenkinsagent
Step3: Install java on jenkinsagent
For a machine to act as a agent node in jenkins we need to make sure it has java installed on it and also has connectivity with the jenkins controller node. Here let’s install below jdk11 package if its not present and verify that java installed successfully.
[admin@jenkinsagent ~]$ sudo dnf install java-11-openjdk
[admin@jenkinsagent ~]$ java --version
openjdk 11.0.12 2021-07-20
OpenJDK Runtime Environment 18.9 (build 11.0.12+7)
OpenJDK 64-Bit Server VM 18.9 (build 11.0.12+7, mixed mode, sharing)
Step4: Create basic authentication credentials on jenkinscontrol
In this step we are going to add credentials which have login access to the agent machine. These credentials will be used to authenticate with the agent machine when the jenkins controller server try’s to connect with it using the SSH based authentication.
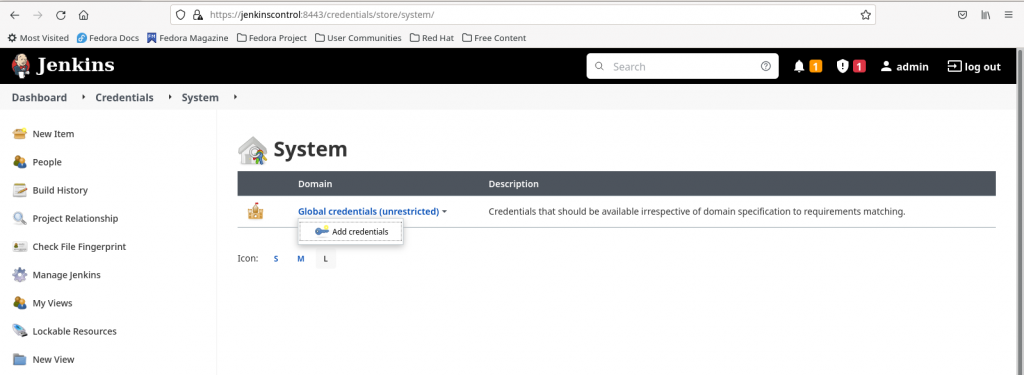
Go to Manage Jenkins – Manage Credentials. Click on Jenkins store and Add credentials to Global credentials domain. Here is the screenshot below.
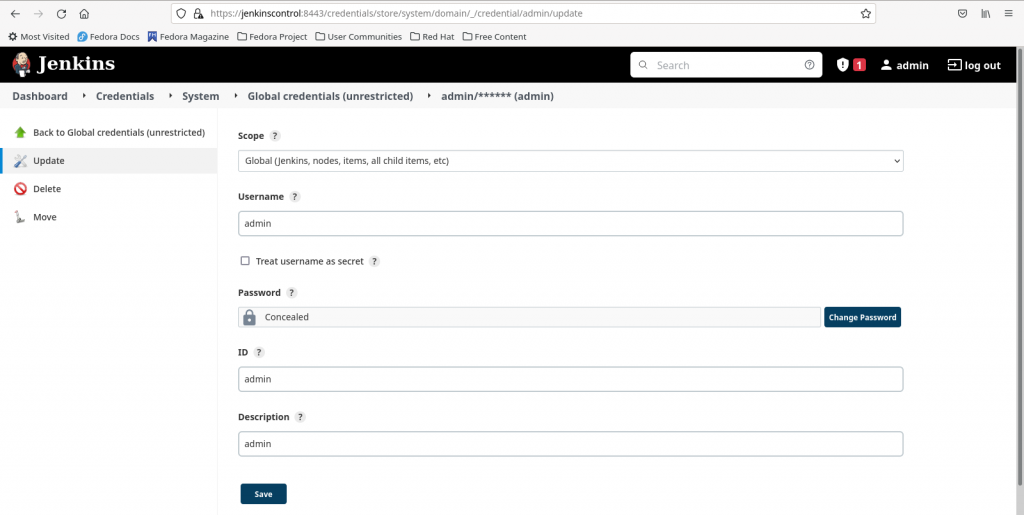
Select the below options to create a basic authentication credentials. Here i am creating a credentials item with user ‘admin’ who has login access to the ‘jenkinsagent’ node.
Kind - Username with Password
Scope - Global
Username - admin
Password - admin@1234
ID - admin
Description - admin
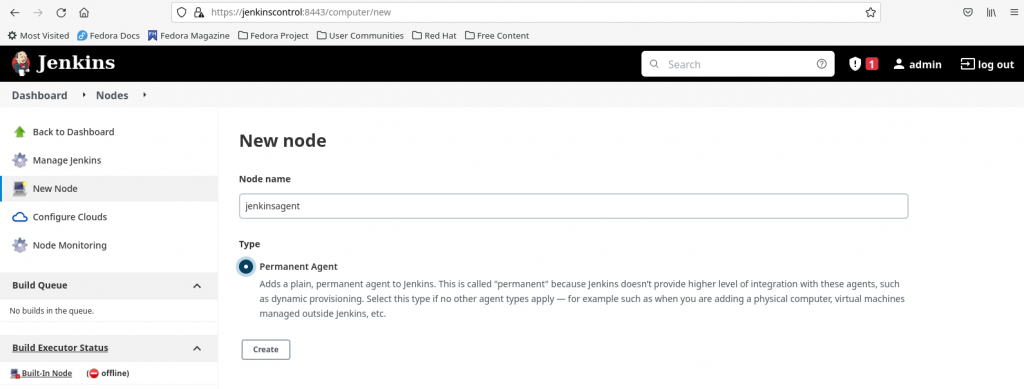
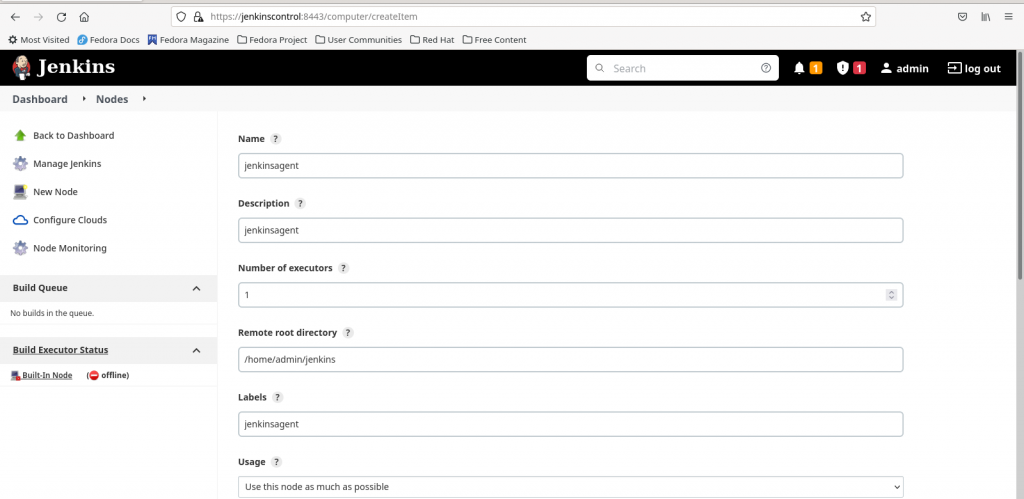
Step4.1: Create node on jenkinscontrol using basic authentication
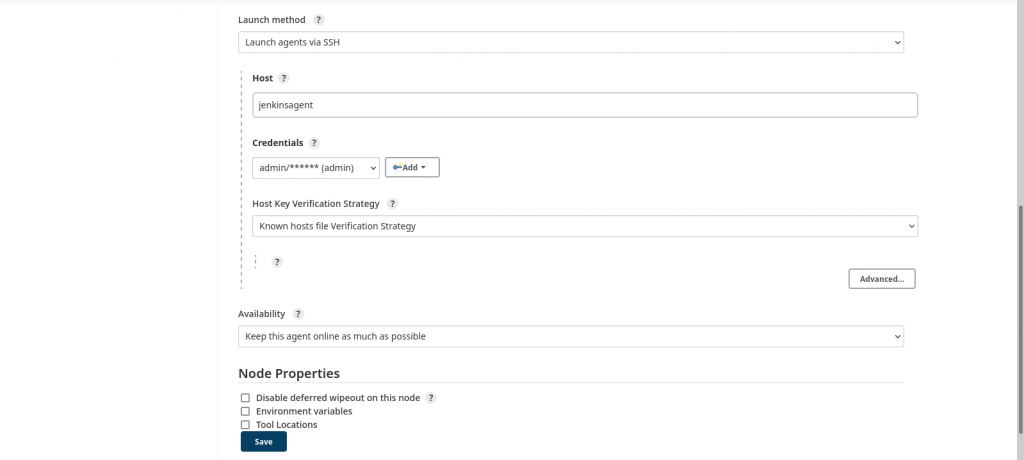
Step4.2: Lauch agent via SSH using basic authentication and ‘known hosts file verification strategy’
For this step we need to make sure that we have added the ‘jenkinsagent’ host key into the ‘jenkinscontrol’ server in the known_hosts file. As the jenkins service run by default using the ‘jenkins’ system id we need to make sure that the known_hosts file is created/updated with the ‘jenkinsagent’ host key under the ‘jenkins’ system id home directory path as shown below.
[admin@jenkinscontrol ~]$ cat /etc/passwd | grep jenkins
jenkins:x:981:977:Jenkins Automation Server:/var/lib/jenkins:/bin/false
[admin@jenkinscontrol ~]$ mkdir -p /var/lib/jenkins/.ssh
[admin@jenkinscontrol ~]$ ssh-keyscan jenkinsagent > known_hosts
[admin@jenkinscontrol ~]$ sudo cp known_hosts /var/lib/jenkins/.ssh/
[admin@jenkinscontrol ~]$ sudo chown -R jenkins:jenkins /var/lib/jenkins/.ssh
[admin@jenkinscontrol ~]$ cat /var/lib/jenkins/.ssh/known_hosts
jenkinsagent ssh-rsa AAAAB3NzaC1yc2EAAAADAQABAAABgQDWEuHb4P7qoW360CofiYz3SqL2/Rfeaapfgffk2NCQ8I1Uj1I6EZaiQZgkOPdmnvmFkNFAfHIEKp2xNQb24RSIRoMikJeaeg6THQs3fjMmH0THm7PXSF4/pO2Q48bsF2taoqiTS70VBGU2AbVN41ERKaFr/RJoKn7HlkrsGaur1WJxL2zvb0SuC7KZz2PJ/OFz0XlqJeDfHHBns0jVnUrIgdYj/D9FqAgCHECckgJS4tT+iKyPz1LhnyEJsOPIM5AO+AX/wIy6y7b2HZ2M+9AbK5qGHzIVNTChL4j8NNlBJfSF+8V+07vg8JTxx6u/Nh9wJLbwnxNeZShkJ07v5M5NZAK4O14AaIfvqopPgyIclmUZz+OAuJK0o8b1hlRFFmhDJbDCRjOdPiXoeVyKl/HaIY2I9q7Kp0EOQKxy1FEWFv0IfqIDDOSXasxILf4qmy0RyhPJvlnyj4wRiO24xa6d/h/hMTbCHJQEi7e1fC51gJboPIE/0/Txel38DEDorN0=
jenkinsagent ecdsa-sha2-nistp256 AAAAE2VjZHNhLXNoYTItbmlzdHAyNTYAAAAIbmlzdHAyNTYAAABBBH2Ch3UMGTRKTvYNzb1GOp66cMMAMDho56sYszJM8b2rYwuvzjfmUX78BWR8vKslh4gouzHoDZsb0nTQAwU98Os=
jenkinsagent ssh-ed25519 AAAAC3NzaC1lZDI1NTE5AAAAIHTaXr1Gs53dlEmUY5YR89+1y7oJq4MbfQQaA5jj7ZXT
Now let’s configure the node to use the basic authentication credentials and ‘known hosts file verification strategy’ for launching the ‘jenkinsagent’ node using SSH method. Here is the screenshot below.
Once the ‘jenkinsagent’ node is configured we can launch the agent and verify its logs to make sure its connected and online as shown in below screenshot.
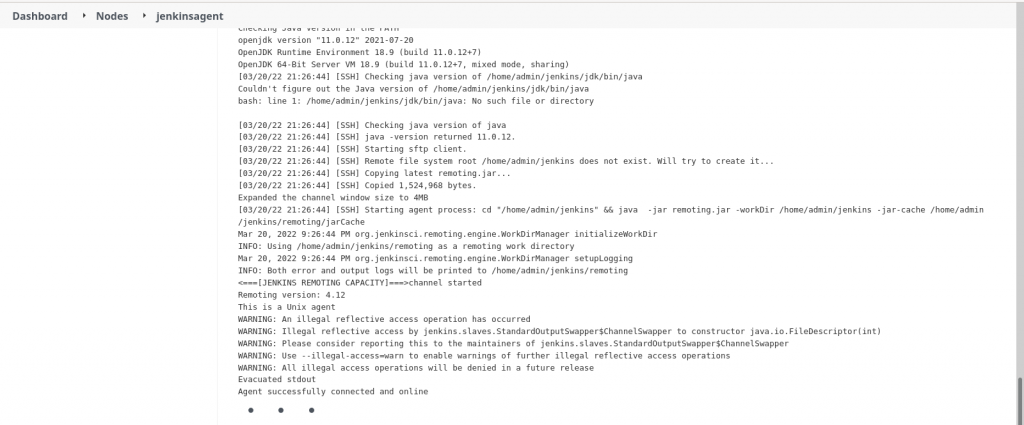
The following jar file will be copied and extracted into ‘jenkinsagent’ as shown below.
[admin@jenkinsagent ~]$ ls -ltr /home/admin/jenkins/
total 1492
-rw-rw-r--. 1 admin admin 1524968 Mar 20 21:26 remoting.jar
drwxrwxr-x. 1 admin admin      24 Mar 20 21:26 remoting
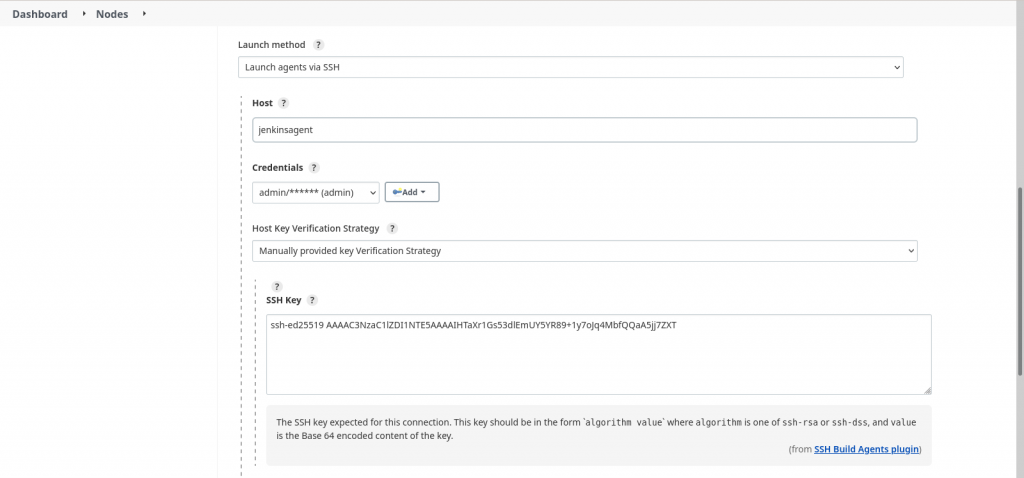
Step4.3: Launch agent via SSH using basic authentication and ‘Manually provided key verification strategy’
Here in this step instead of creating/updating the ‘known_hosts’ file as shown in Step4.2 we are going to provide the ‘jenkinsagent’ host key in the format ‘algorithm value’. Here i am going to update the SSH key with below algorithm and value from the ssh-keyscan output
If you select ‘Manually trusted key verification strategy’ whatever key that is provided by the host machine will be accepted as it is. For ‘Non verifying verification strategy’ there is no host key verification done.
Step5: Create SSH private key credentials on jenkinscontrol
Here in this step instead of providing the username/password which are used to login to ‘jenkinsagent’ we are going to use SSH key based authentication. For this step we need to first generate the SSH keypair as shown below on ‘jenkinscontrol’ and copy the public key to ‘jenkinsagent’ node.
[admin@jenkinscontrol ~]$ ssh-keygen
[admin@jenkinscontrol ~]$ ssh-copy-id -i ~/.ssh/id_rsa.pub admin@jenkinsagent
Please note, i have user ‘admin’ with password ‘admin@1234’ setup on both ‘jenkinscontrol’ and ‘jenkinsagent’ machines. The above step is going to copy the public key to ‘jenkinsagent’ authorized_keys file at below location.
[admin@jenkinsagent ~]$ cat /home/admin/.ssh/authorized_keys
ssh-rsa AAAAB3NzaC1yc2EAAAADAQABAAABgQCw/GIieooUdrtgo6JYgwLrbGf6oPGRDIGm5hYsI8/j5qTtoCg3R1SCK32y2j2mhiXRgJ2L4gHKzIod2sTOh8R5GPaWFmWnVIi2EwzQgn5eC+L66URgFTnInXjgcLO6V6vHaLyZdz33DkhFVpA+m81kuHrTO8yGKgiFV+k8fPKHu9irHAJ4KepgnFM3GIoIQKh1sxqGDw+AagOIlfWOEQAY3zu+Cz9s2wcl+8o0KSSJH0vJbvAnYGzmE83tD0w0AYso9GJMo5Ph8Tr0n6Aqu1MH4dISss4bICwTXAWiPMZhDgYusJQAUBHpDSOoYDVQSkZEdBbL91x5B3F55PVRacCey60G5PeYU3lr8AwaOOJn3szh+6Ws/D+uIYSPPp5QMCk3DCtChDFm/gHcK5EGzgZCzDrQvZpnMP7v5IXgaB1uee7W3PlktBh3xxCQPau95+HU1fdrwi9kEOWPt0dW/uRUHCNpdwake8nTsy0LgX5x+SFZ10M5SKm5ChWIHe5kJIc= admin@jenkinscontrol
Now let’s create SSH private key based credentials as shown in below screenshot. Copy the private key ‘/home/admin/.ssh/id_rsa’ into the Private Key section field.
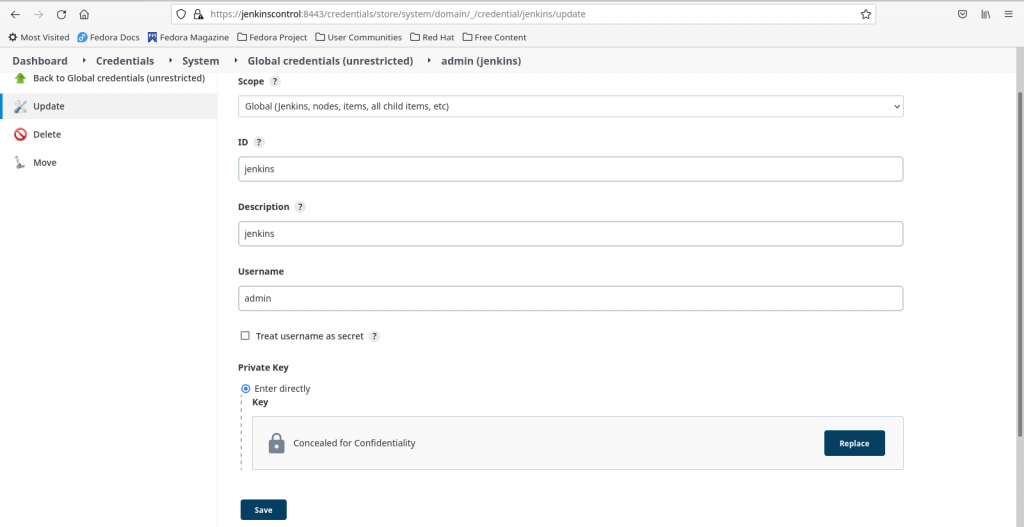
Please note username – ‘admin’ as when jenkins tried to authentication the private key passed from ‘jenkinscontrol’ using the public key on ‘jenkinsagent’ it tries to look for the public key in user – ‘admin’ home directory on ‘jenkinsagent’ at the following location – ‘/home/admin/.ssh/authorized_keys’.
Step5.1: Create node on jenkinscontrol using private key credentails

Step5.2: Launch agent via SSH using SSH private key credentials and ‘Manually trusted key verification strategy’
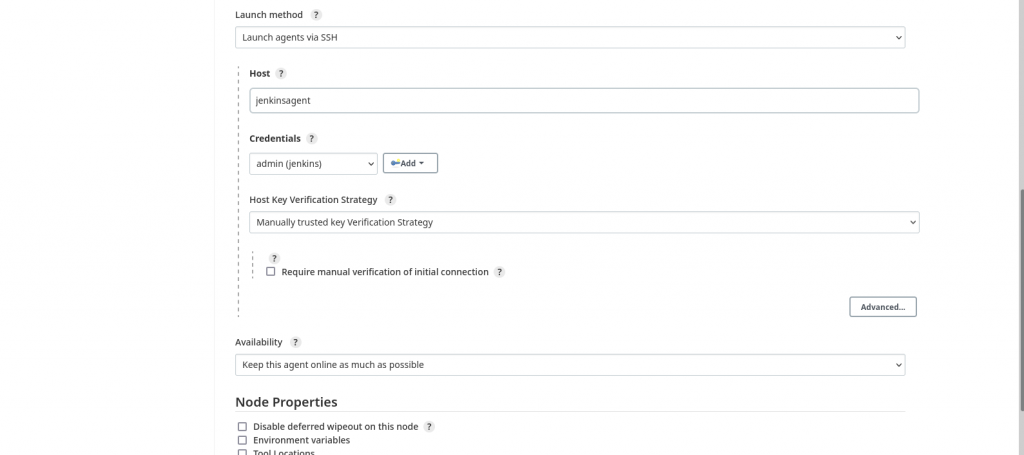
Once the ‘jenkinsagent’ node is configured we can launch the agent and verify its logs to make sure its connected and online.
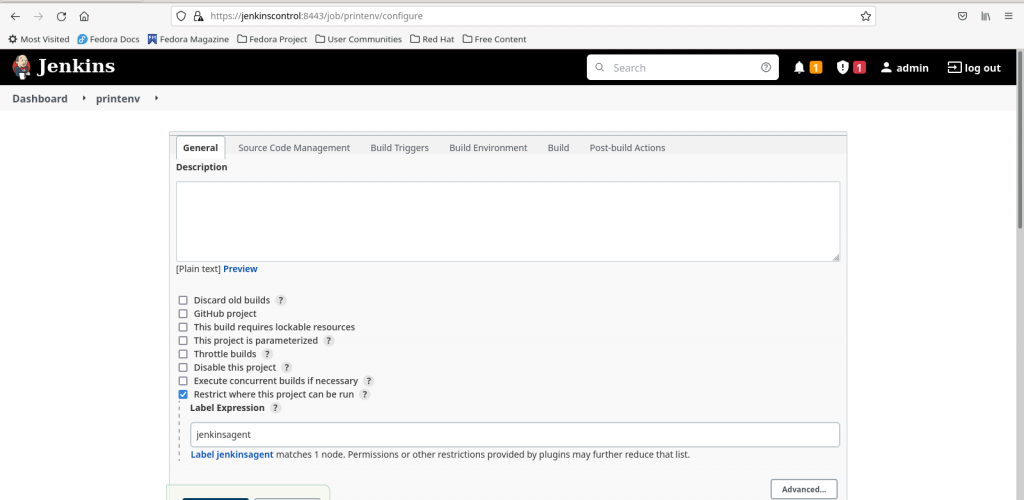
Step6: Create a Jenkins job and execute on agent node
Here is my basic free style jenkins which execute ‘printenv’ in the bash shell and prints the environment variables from the ‘jenkinsagent’ node on which this job gets executed.

You can verify the jenkins job log as shown below to confirm if your job has successfully executed on the configured agent node ‘jenkinsagent’ and printed the environment variables in the output.

Hope you enjoyed reading this article. Thank you..
Leave a Reply
You must be logged in to post a comment.