Integrate GitHub and DockerHub for automatedbuilds of Linux container images

Here in this article we will build a basic Apache Web server container image by integrating GitHub and DockerHub. In GitHub we will be hosting our source code containing our Dockerfile and other Application related files. We will use DockerHub Automated Build feature to integrate with GitHub and run Automated builds based on the changes in the source code.
Test Environment
Fedora 32 installed
Podman installed
DockerHub
Its an Official registry provided by Docker Inc. to Build and Share Images. We can push and pull images for various public repositories available in this registry. Its also possible to integrate it with GitHub and BitBucket to trigger Automated Build of Images based on the changes in the Source code.
GitHub
Its a distributed version control and source code management hosting service. Its used to manage project source code and collaborate with various members for project development.
If you are interested in watching video. Here is the YouTube video on the same step by step procedure outlined below.
Procedure
Step1: Create an account on DockerHub and GitHub if not present already
You need to create an account by Signing up on the DockerHub and GitHub portal if you don’t have an account already.
Step2: Create a repository named PodmanProjects in GitHub
Create a public repository named PodmanProjects in GitHub with optional LICENSE and README.md file. Here the Git repository that i have created for this activity.
GitHub Repository: https://github.com/novicejava1/PodmanProjects.git
Step3: Clone the GitHub Repository
$ git clone https://github.com/novicejava1/PodmanProjects.git
Step4: Push the Dockerfile along with static content web page to this GitHub reposotory
Create a Dockerfile under PodmanProjects repository that is cloned locally.
File: Dockerfile
#: Version 0.0.1

FROM fedora:32

MAINTAINER Sudhir Bhoga "sudhirbhoga@gmail.com"

RUN dnf -y install httpd

COPY hello.html /var/www/html/hello.html

CMD [ "/usr/sbin/httpd" , "-DFOREGROUND" ]

EXPOSE 80
Create a static content web page.
<h1>Hello Everyone. Welcome to Podman Learning</h1>
Push the Dockerfile along with static content web page to the GitHub repository. Initialize the git user name and email address before committing the changes.
$ git config --global user.name "novicejava1"
$ git config --global user.email "sudhirbhoga@gmail.com"
$ git add Dockerfile hello.html
$ git commit -m "Dockerfile for Apache http server with static file
$ git push origin main
Step5: Create a Repository in DockerHub and integrate with GitHub Repository
Here in this step we are going to create a new DockerHub repository named ‘apacheweb’ for pushing our Apache HTTP server image. You can carry out this step from DockerHub portal under Repositories section – Create Repository by providing the repository name and visibility.
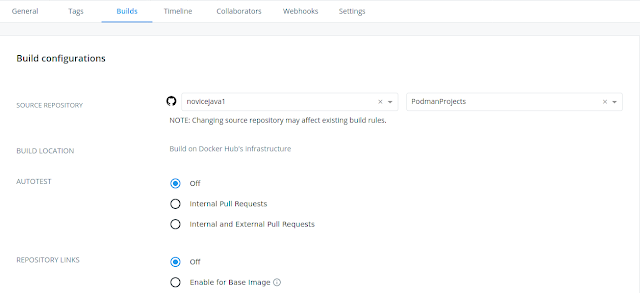
Once this is done you need to configure the Build Settings to integrate DockerHub with GitHub. Click on the GitHub which shows Disconnected and this will take you to the page to Allow Docker Hub Builder to be authorized and allowed access to connect to the GitHub repository as configured with the details shown in below screen shot.


You can click on the Save and Build button which will trigger a build for the Dockerfile present in the Github repository which is connected now.
Step6: Validate the new image named apacheweb:latest under the repository
Once the build process is completed the new image with name apacheweb:latest should be visible under the repository.

This can also be validate by going into Builds – Automated Builds for our repository which will show the latest build status as SUCCESS as shown below if there are no errors.

Hope you enjoyed reading this article. Thank you..
Leave a Reply
You must be logged in to post a comment.