How to build and deploy a Python kivy application for Android device using buildozer
Here in this article we will look at how we can package a Python Kivy application into .apk format for Android device using builddozer.
Test Environment
Feodra 31 with latest updates installed
What is Kivy
Kivy is a Python framework for developing Multitouch GUI Applications for cross platform devices. Kivy provides its own kivy language which help in separating the presentation from the business logic.
What is Buildozer
Buildozer is an automation tool which helps in packaging the mobile applications. Its mostly takes care all the dependencies required for building the package like python-for-android, Android SDK, NDK etc. Currently buildozer supports packaging for Android and iOS devices. Buildozer prepares a buildozer.spec file for your respective applications which describes about the application requirements and settings. These are used to create package for Android and iOS devices.
Here we are working on this build and deploy process using Fedora 31 Linux OS.
What is Android SDK and NDK
Android SDK (ie. software development kit) is a set of development tools used to develop applications for Android platform. Android NDK (i.e native development kit) is a set of tools that allows use of C and C++ code with Android. It provides platform specific libraries to manage native activities.
Given the brief description about some of the terminologies, lets get started with the building an android package from python kivy application.
Procedure
Step1: Clone the buildozer git repository
$ git clone https://github.com/kivy/buildozer.git
Once the git repository is clone it will download the respective files related to the tool as shown below Downloaded files.
$ ls -ltr buildozer
total 144
-rw-rw-r-- 1 admin admin   8017 May 30 17:32 README.md
-rw-rw-r-- 1 admin admin     93 May 30 17:32 MANIFEST.in
-rw-rw-r-- 1 admin admin   1081 May 30 17:32 LICENSE
-rw-rw-r-- 1 admin admin   2149 May 30 17:32 Dockerfile
-rw-rw-r-- 1 admin admin 105372 May 30 17:32 CHANGELOG.md
drwxrwxr-x 6 admin admin   4096 May 30 17:32 buildozer
drwxrwxr-x 3 admin admin   4096 May 30 17:32 docs
-rw-rw-r-- 1 admin admin    921 May 30 17:32 tox.ini
drwxrwxr-x 4 admin admin   4096 May 30 17:32 tests
-rw-rw-r-- 1 admin admin   2551 May 30 17:32 setup.py
Step2: Install the buildozer tool using the setup.py
This step is going to install a lot of packages into the python libraries path.
$ sudo python setup.py install
Step3: Navigate to your kivy application project directory and initialize the project
In this article i am using a simple Kivy custom ball bounce application. The source code for the same is available at the following git repository.
Kivy project directory
$ ls -ltr
total 28
-rw-rw-r-- 1 admin admin   898 May 16 02:15 pong.kv
-rwxr-xr-x 1 admin admin  1905 May 22 09:25 main.py
Now, let’s initialize the application to be built by executing the below.
Initialize project
$ buildozer init
File buildozer.spec created, ready to customize!
$ ls -ltr
total 24
-rw-rw-r-- 1 admin admin   898 May 16 02:15 pong.kv
-rwxr-xr-x 1 admin admin  1905 May 22 09:25 main.py
-rw-rw-r-- 1 admin admin 10489 May 30 17:37 buildozer.spec
As you could see from the above folder structure, after running the init command it has created a buildozer.spec file which can be further customized as per our requirement. As our focus in this article is to build and deploy the application to android, we will the spec file with the default settings.
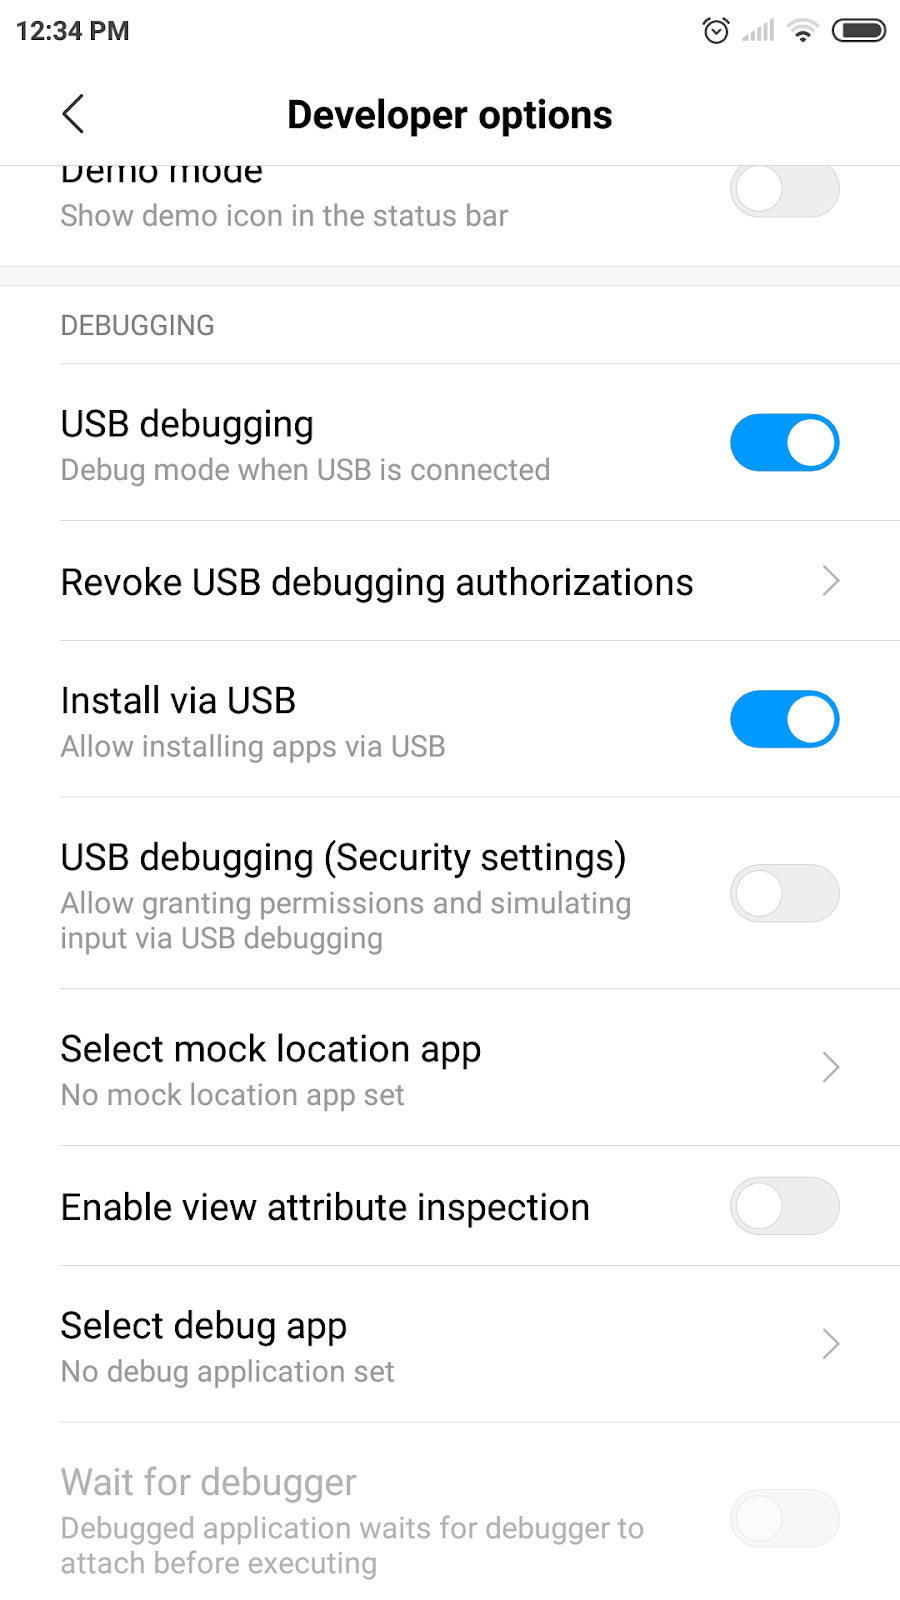
Step4: Enable USB debugging and install via USB
As we are going to build and deploy the Kivy application to the attached Android device. Lets attach the Android device to the Fedora machine and enable USB debugging. Also we need to enable allow for installing application using USB option in the screenshot shown below from an Android device.
Step5: Dependencies to be taken cared
Buildozer will try to take care of a lot of dependencies but there are chances that your build might fail due to some dependencies which could not be taken cared but it will highlight in the STDOUT output indicating where and why it got failed.
Let me highlight a few dependencies that had to be taken cared manually for the below build process to succeed.
Install dependencies
$ sudo dnf install Python3-Cython java-1.8.0-openjdk-devel patch dh-autoreconf zlib-devel libffi-devel openssl-devel
Enable pypi.python.org as trusted host and upgrade pip if required to the latest available version.
$ pip install --trusted-host pypi.python.org pytest-xdist
$ pip install --trusted-host pypi.python.org --upgrade pip
Step6: Run the build and deploy from the application directory
Build project
$ buildozer android debug deploy run
This basically means we are launching the buildozer tool to start android build in debug mode and deploy the application to the device and run it. Here its going to download and install the required packages and softwares (i.e SDK, NDK) to complete the build process.
If everything goes fine and all the dependencies are taken cared. You will be able to see your Android package build in bin directory and also pushed into your device and started.
Here is the sample snippet of the output showing a successful build.
Successful Installation log snippet
...
# Android packaging done!
# APK myapp-0.1-armeabi-v7a-debug.apk available in the bin directory
# Run '/home/admin/.buildozer/android/platform/android-sdk/platform-tools/adb devices'
# Cwd None
List of devices attached
5780e62d device

# Deploy on 5780e62d
# Run '/home/admin/.buildozer/android/platform/android-sdk/platform-tools/adb install -r
"/home/admin/stack/develop/kivy/brick/bin/myapp-0.1-armeabi-v7a-debug.apk"'
# Cwd /home/admin/.buildozer/android/platform
Performing Push Install
/home/admin/stack/develop/kivy/brick/bin/myapp-0.1-armeabi-v7a-debug.apk: 1 file pushed,
0 skipped. 0.8 MB/s (28395173 bytes in 33.751s)
 pkg: /data/local/tmp/myapp-0.1-armeabi-v7a-debug.apk
Success
# Application pushed.
# Run on 5780e62d
...
Starting: Intent { act=org.kivy.android.PythonActivity
cmp=org.test.myapp/org.kivy.android.PythonActivity }
# Application started.
Hope you enjoyed reading this article. Thank you..
3 COMMENTS