How to setup a BIND DNS service to act as DNS server on Fedora 28
Test Environment
Fedora 28 Server edition (installed)
Here in this article we are trying to setup BIND DNS server on a Fedora 28 virtual machine hosted on VMware workstation.
Procedure
Step1: Install the following Bind and related packages
Here as a first step we will install the bind and the related depedent packages as show below.
sudo yum install bind bind-chroot bind-utils
Step2: Take backup of the following files
sudo ls -ltr /etc/hosts*
-rw-r--r--. 1 root root 158 Apr 16  2018 /etc/hosts
-rw-r--r--. 1 root root 158 Jun  2 17:32 /etc/hosts_original
sudo ls -ltr /etc/named.conf*
-rw-r-----. 1 root named 1705 Jan 16 22:37 /etc/named.conf
-rw-r-----. 1 root root  1705 Jun  2 17:37 /etc/named.conf_original
sudo ls -ltr /etc/resolv.conf*
-rw-r--r--. 1 root root 55 Jun  2 17:31 /etc/resolv.conf
-rw-r--r--. 1 root root 55 Jun  2 17:33 /etc/resolv.conf_original
Step3: Edit the resolv.conf to use the host as Cache server
Now let’s edit the resolv.conf to use host server as DNS cache server.
File: /etc/resolv.conf
Output:
# Generated by NetworkManager
nameserver 192.168.184.128
#nameserver 192.168.184.2
Validate the ping service to a public host
ping www.google.com
Output:
ping: www.google.com: Name or service not known
Validate the dig service to a public host.
dig www.google.com
Output:
; <<>> DiG 9.11.4-P2-RedHat-9.11.4-13.P2.fc28 <<>> www.google.com
;; global options: +cmd
;; connection timed out; no servers could be reached
As of now the DNS resolves will fail as we do not any working DNS server which is able to resolve the queries.
Step4: Edit the named.conf as below
This file hold’s the list of DNS servers to which the DNS query could be forwarded. Let’s update it as shown below.
diff /etc/named.conf_original /etc/named.conf
Output:
11,12c11,13
<       listen-on port 53 { 127.0.0.1; };
<       listen-on-v6 port 53 { ::1; };
---
>       listen-on port 53 { 127.0.0.1; 192.168.184.128; };
>       //listen-on-v6 port 53 { ::1; };
>       forwarders {8.8.8.8; 8.8.4.4; };
19c20
<       allow-query     { localhost; };
---
>       allow-query     { localhost; 192.168.184.0/24; };
Step5: Enable and start the DNS named caching service
Now let’s enable and start the bind DNS service as shown below.
sudo systemctl enable named
sudo systemctl start named
sudo systemctl status named.service
Output:
? named.service - Berkeley Internet Name Domain (DNS)
   Loaded: loaded (/usr/lib/systemd/system/named.service; enabled; vendor preset: disabled)
   Active: active (running) since Sun 2019-06-02 18:03:41 IST; 15s ago
  Process: 2103 ExecStart=/usr/sbin/named -u named -c ${NAMEDCONF} $OPTIONS (code=exited, status=0/SUCCESS)
  Process: 2101 ExecStartPre=/bin/bash -c if [ ! "$DISABLE_ZONE_CHECKING" == "yes" ]; then /usr/sbin/named-checkconf -z "$NAMEDCONF";>
 Main PID: 2104 (named)
Step6: Validate the public host resolution
Let’s now validate the public host resolution as shown below.
dig www.ndtv.com
Output:
; <<>> DiG 9.11.4-P2-RedHat-9.11.4-13.P2.fc28 <<>> www.ndtv.com
;; global options: +cmd
;; Got answer:
;; ->>HEADER<<- opcode: QUERY, status: NOERROR, id: 25159
;; flags: qr rd ra; QUERY: 1, ANSWER: 1, AUTHORITY: 13, ADDITIONAL: 1

;; OPT PSEUDOSECTION:
; EDNS: version: 0, flags:; udp: 4096
; COOKIE: e13ef91f386b139a693126635cf3c29c6f73a994d2fc6e23 (good)
;; QUESTION SECTION:
;www.ndtv.com.                  IN      A

;; ANSWER SECTION:
www.ndtv.com.           19      IN      A       104.120.86.175
Now, after setting up the Cache service with the external DNS servers we are able to resolve some of the external DNS hosts as shown above.
Step7: Create forward zone file and include it in the named.conf
File: /var/named/stack.com.zone
Output:
; Authoritative data for stack.com zone
;
$TTL 1D
@   IN SOA  fedmaster.stack.com   root.fedmaster.stack.com. (
                                       2017031301      ; serial
                                       1D              ; refresh
                                       1H              ; retry
                                       1W              ; expire
                                       3H )            ; minimum

$ORIGIN         stack.com.
stack.com.            IN      NS      fedmaster.stack.com.
fedmaster                     IN      A       127.0.0.1
server                  IN      A       192.168.184.128
www                     IN      CNAME   server
diff /etc/named.conf_original /etc/named.conf
Output:
11,12c11,13
<       listen-on port 53 { 127.0.0.1; };
<       listen-on-v6 port 53 { ::1; };
---
>       listen-on port 53 { 127.0.0.1; 192.168.184.128; };
>       //listen-on-v6 port 53 { ::1; };
>       forwarders {8.8.8.8; 8.8.4.4; };
19c20
<       allow-query     { localhost; };
---
>       allow-query     { localhost; 192.168.184.0/24; };
54a56,60
> };
>
> zone "stack.com" IN {
>         type master;
>         file "stack.com.zone";
Step8: Create reverse zone file and include it in the named.conf
File: /var/named/184.168.192.in-addr.arpa
Output:
; Authoritative data for stack.com  reverse zone
;
$TTL 1D
@   IN SOA  fedmaster.stack.com   root.fedmaster.stack.com. (
                                        2017031501      ; serial
                                        1D              ; refresh
                                        1H              ; retry
                                        1W              ; expire
                                        3H )            ; minimum

@       IN      NS      fedmaster.stack.com.
stack.com.    IN      NS      fedmaster.stack.com.
128               IN      PTR     fedmaster.stack.com.
diff /etc/named.conf /etc/named.conf_original
Output:
11,13c11,12
<       listen-on port 53 { 127.0.0.1; 192.168.184.128; };
<       //listen-on-v6 port 53 { ::1; };
<       forwarders {8.8.8.8; 8.8.4.4; };
---
>       listen-on port 53 { 127.0.0.1; };
>       listen-on-v6 port 53 { ::1; };
20c19
<       allow-query     { localhost; 192.168.184.0/24; };
---
>       allow-query     { localhost; };
56,65d54
< };
<
< zone "stack.com" IN {
<         type master;
<         file "stack.com.zone";
< };
<
< zone    "184.168.192.in-addr.arpa" IN {
<        type master;
<        file "184.168.192.in-addr.arpa";
Step9: Validate the reverse DNS lookup using the dig tool
dig -x 192.168.184.128
Output:
; <<>> DiG 9.11.4-P2-RedHat-9.11.4-13.P2.fc28 <<>> -x 192.168.184.128
;; global options: +cmd
;; Got answer:
;; ->>HEADER<<- opcode: QUERY, status: NOERROR, id: 50876
;; flags: qr aa rd ra; QUERY: 1, ANSWER: 1, AUTHORITY: 1, ADDITIONAL: 2

;; OPT PSEUDOSECTION:
; EDNS: version: 0, flags:; udp: 4096
; COOKIE: 5cd7b4029b65deec2f25fd4c5cf72c96fe708418687d72f4 (good)
;; QUESTION SECTION:
;128.184.168.192.in-addr.arpa.  IN      PTR

;; ANSWER SECTION:
128.184.168.192.in-addr.arpa. 86400 IN  PTR     fedmaster.stack.com.

;; AUTHORITY SECTION:
184.168.192.in-addr.arpa. 86400 IN      NS      fedmaster.stack.com.

;; ADDITIONAL SECTION:
fedmaster.stack.com.    86400   IN      A       192.168.184.128

;; Query time: 0 msec
;; SERVER: 192.168.184.128#53(192.168.184.128)
;; WHEN: Wed Jun 05 08:14:38 IST 2019
;; MSG SIZE  rcvd: 148
nslookup 192.168.184.128
Output:
128.184.168.192.in-addr.arpa name = fedmaster.stack.com.
Step10: Allow access from external hosts to connect to the new DNS server and query it
sudo firewall-cmd --add-port=53/udp --permanent
sudo firewall-cmd --reload
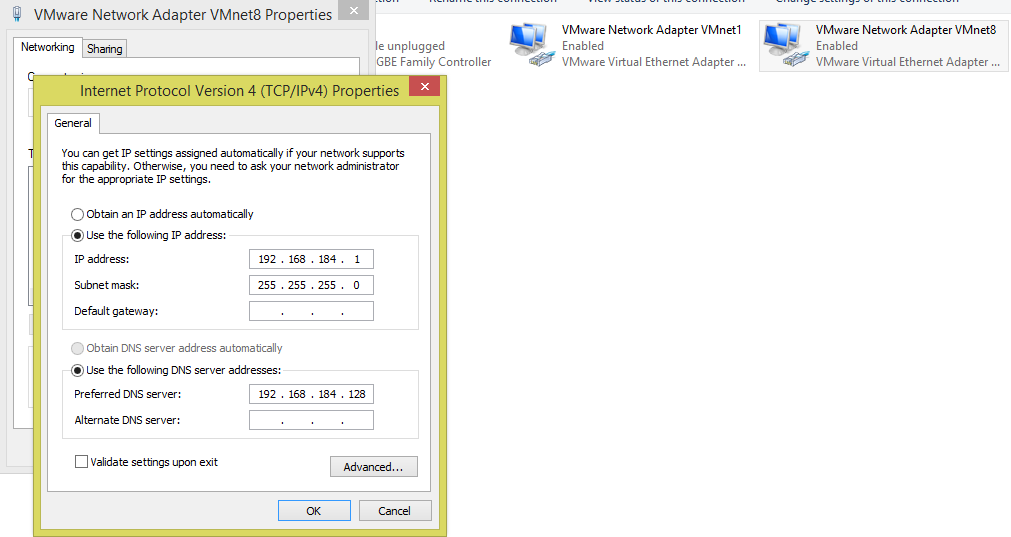
Step11: Edit the Host network setting to point to our new Name server for resolving private hosts
In my case i have used NAT network connection which is equivalent to VMnet8 in custom virtual network of VMware workstation.
Edit the preferred DNS to point to the new Name server which we created.
Step12: Validate the new DNS Host by ping with FQDN from Host OS (i.e where the VMware workstation is installed)
ping fedmaster.stack.com
Output:
Pinging fedmaster.stack.com [192.168.184.128] with 32 bytes of data:
Reply from 192.168.184.128: bytes=32 time<1ms TTL=64
Reply from 192.168.184.128: bytes=32 time<1ms TTL=64
Reply from 192.168.184.128: bytes=32 time<1ms TTL=64
Reply from 192.168.184.128: bytes=32 time<1ms TTL=64

Ping statistics for 192.168.184.128:
    Packets: Sent = 4, Received = 4, Lost = 0 (0% loss),
Approximate round trip times in milli-seconds:
    Minimum = 0ms, Maximum = 0ms, Average = 0ms
Hope you enjoyed reading this article. Thank you..
Leave a Reply
You must be logged in to post a comment.