How to generated charts from JSON file input using Python Django

Here in this article we will trt to build a Web Application based on Python Django framework to generate selected type of Chart graph for the given JSON input data file.
Test Environment
Ubuntu 18.04
Python 3.5 and later
pip3 latest version
Django 2.1 and later
json2html module
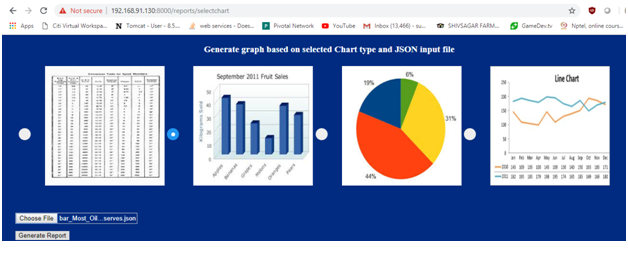
This is a simple web application based on Django framework. In this application in the first view page user is given the ability to select the type of chart he wants to generate and upload a JSON file. The chart types that can be generated with this application are as below.
- Tablechart
- Barchart
- Piechart
- linechart
Also, we have used fushioncharts Javascripts libary and django wrapper to implement the second page which will generated the selected type of chart based on the JSON file which is in a particular standard.
Procedure
Step1: Install the latest Python version 3.5 and later
admin1@admin1host:~$ python3 -V
Python 3.6.7
Step2: Install the latest pip version
admin1@admin1host:~$ pip3 -V
pip 9.0.1 from /usr/lib/python3/dist-packages (python 3.6)
Step3: Install the latest Django version 2.1 or later and validate
admin1@admin1host:~$ pip3 install Django
admin1@admin1host:~$ python3
Python 3.6.7 (default, Oct 22 2018, 11:32:17)
[GCC 8.2.0] on linux
Type "help", "copyright", "credits" or "license" for more information.
>>> import django
>>> print(django.get_version())
2.1.7
>>> quit()
or
admin1@admin1host:~$ python3 -m django --version
2.1.7
With the above steps we have completed the initial setup for running the Django framework based web application. In the next steps we will look setting up our Django Project and simple application to generate selected type of chart for the JSON input file.
Step4: Build a Django Project
This step is basically setting up the initial settings for the Django project like instance of DJango, database configuration, django specific options and application settings.
admin1@admin1host:~$ django-admin startproject mysite
Step5: Now go into toplevel mysite directory create and new application within the project with the below
admin1@admin1host:~$ python manage.py startapp reports
Your folder structions should look something like this.
admin1@admin1host:~/pythonDjango/mysite$ ls -ltr
total 32
-rwxr-xr-x 1 admin1 admin1  538 Feb 14 00:25 manage.py
-rw-r--r-- 1 admin1 admin1    0 Feb 14 00:26 db.sqlite3
drwxrwxr-x 3 admin1 admin1 4096 Feb 23 10:52 mysite
drwxrwxr-x 6 admin1 admin1 4096 Feb 23 11:07 reports
drwxrwxr-x 2 admin1 admin1 4096 Feb 24 08:37 media
admin1@admin1host:~/pythonDjango/mysite$
Step6: Now we will build our reports application
In the reports folder we will be updating the below files.
urls.py – This file is used to configure the context urls for the reports application. Based on what context is being requested the corresponding view functions.
admin1@admin1host:~/pythonDjango/mysite/reports$ cat urls.py
from django.urls import path


from . import views


urlpatterns = [
    path('barchart', views.myFirstChart, name='barchart'),
    path('tablechart', views.mySecondChart, name='tablechart'),
    path('piechart', views.myThirdChart, name='piechart'),
    path('linechart', views.myFourthChart, name='linechart'),
    path('myform', views.get_name, name='myform'),
    path('name', views.get_name, name='myform'),
    path('simpleupload', views.simple_upload, name='simpleupload'),
    path('selectchart', views.select_chart, name='selectchart'),
    path('chart', views.select_chart, name='selectchart'),
]
As you can see the above highlighted line in yellow is the context ‘selectchart’ being requested and the corresponding view function select_chart is being called for the same.
views.py – This file contains the views functions that are being called based on the context that is requested. As show below is the select_chart view function.
def select_chart(request):
    if request.method == 'POST' and request.FILES['myfile']:
        myfile = request.FILES['myfile']
        fs = FileSystemStorage()
        filename = fs.save(myfile.name, myfile)
        uploaded_file_url = fs.url(filename)
        form = ChartForm(request.POST)
        chartName = request.POST.get('chartName')
        if form.is_valid():
            if chartName == "tablechart":
                return mySecondChart(request)
            elif chartName == "piechart":
                return myThirdChart(request)
            elif chartName == "barchart":
                return myFirstChart(request)
            else:
                return myFourthChart(request)
            return HttpResponse("Valid Chart is uploaded : %s " % chartName)
    else:
        form = ChartForm()


    return render(request, 'reports/chart.html', {'form': form})
As per the function you can see, if the request type is GET (i.e we are requesting for the selectchart page first time). It will render and form with options to select the chart type and upload a file based on the highlighted code.
Templates – Based on the called view functions the response is rendered using the template file as shown below in the short code.
admin1@admin1host:~/pythonDjango/mysite/reports/templates/reports$ cat chart.html


<body>


<h3>Generate graph based on selected Chart type and JSON input file</h3>
<form action="/reports/chart" method="post" enctype="multipart/form-data">
    {% csrf_token %}
    <fieldset class="optionGroup">
        {% for x,y in form.fields.chartName.choices %}


                <label class="container">
                        <input type="radio" name="chartName" value="{{ x }}"><img src="/static/{{ y }}" width="250" height="250"</img></input>
                <span class="checkmark"></span>
                </label>


        {% endfor %}
        </fieldset>
        <br><br>
        <div class="chartcss">
            <input type="file" id="file" name="myfile"/>
        </div>
        <div class="chartcss">
            <input type="submit" value="Generate Report"/>
        </div>


</form>


</body>
Here the x and y values are the charttype selected and the corresponding image which are getting captured.
forms.py – This is the file where we define the html elements that needs to be rendered using the template file.
admin1@admin1host:~/pythonDjango/mysite/reports$ cat forms.py
from django import forms


class NameForm(forms.Form):
    your_name = forms.CharField(label='Your name', max_length=100)


#CHART_CHOICES = [
#        ('tablechart', 'tablechart'),
#        ('barchart', 'barchart'),
#        ('piechart', 'piechart'),
#        ('linechart', 'linechart'),
#]


class ChartForm(forms.Form):


    CHART_CHOICES = (
        ("tablechart", "reports/tablechart.jpg"),
        ("barchart", "reports/barchart.jpg"),
        ("piechart", "reports/piechart.jpg"),
        ("linechart", "reports/linechart.jpg")
)


#    chartName = forms.CharField(label="Select the Type of Chart to Generate",widget=forms.RadioSelect(choices=CHART_CHOICES))
#    chartName = forms.ChoiceField(widget=forms.RadioSelect, choices=CHART_CHOICES)
    chartName = forms.ChoiceField(widget=forms.RadioSelect, choices=CHART_CHOICES)
As of now we looked at the code related to how we can render aform for selecting the chart type and upload the JSON file.
Step7: Selecting a chart type, upload JSON file and POST the form data
For accessing the application we need to start the DJango runtime which will run our code as shown below.
admin1@admin1host:~/pythonDjango/mysite$ python3 manage.py runserver 0:8000
Performing system checks...


System check identified no issues (0 silenced).


You have 15 unapplied migration(s). Your project may not work properly until you apply the migrations for app(s): admin, auth, contenttypes, sessions.
Run 'python manage.py migrate' to apply them.


March 03, 2019 - 03:42:34
Django version 2.1.7, using settings 'mysite.settings'
Starting development server at http://0:8000/
Quit the server with CONTROL-C.
[03/Mar/2019 03:42:42] "GET /reports/selectchart HTTP/1.1" 200 3676
[03/Mar/2019 03:42:42] "GET /static/reports/js/themes/fusioncharts.theme.fusion.js HTTP/1.1" 304 0
[03/Mar/2019 03:42:42] "GET /static/reports/js/fusioncharts.js HTTP/1.1" 304 0
[03/Mar/2019 03:42:42] "GET /static/reports/tablechart.jpg HTTP/1.1" 304 0
[03/Mar/2019 03:42:42] "GET /static/reports/barchart.jpg HTTP/1.1" 304 0
[03/Mar/2019 03:42:42] "GET /static/reports/piechart.jpg HTTP/1.1" 304 0
[03/Mar/2019 03:42:42] "GET /static/reports/linechart.jpg HTTP/1.1" 304 0
Not Found: /favicon.ico
[03/Mar/2019 03:42:43] "GET /favicon.ico HTTP/1.1" 404 2191
URL - http://FQDN:8000/reports/selectchart
Once the chart type and file is upload the following actions take place.
def select_chart(request):
    if request.method == 'POST' and request.FILES['myfile']:
        myfile = request.FILES['myfile']
        fs = FileSystemStorage()
        filename = fs.save(myfile.name, myfile)
        uploaded_file_url = fs.url(filename)
        form = ChartForm(request.POST)
        chartName = request.POST.get('chartName')
        if form.is_valid():
            if chartName == "tablechart":
                return mySecondChart(request)
            elif chartName == "piechart":
                return myThirdChart(request)
            elif chartName == "barchart":
                return myFirstChart(request)
            else:
                return myFourthChart(request)
            return HttpResponse("Valid Chart is uploaded : %s " % chartName)
    else:
        form = ChartForm()


    return render(request, 'reports/chart.html', {'form': form})
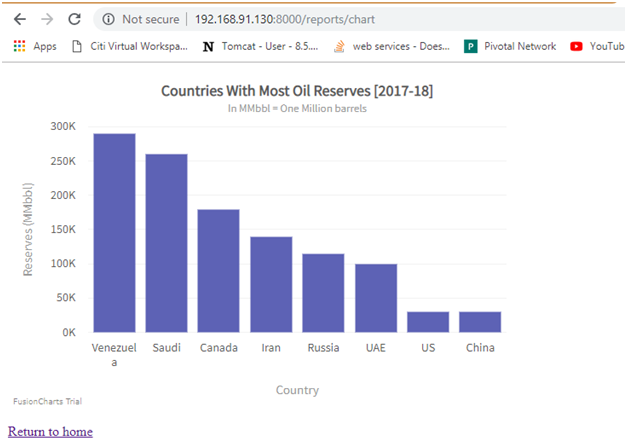
As we have selected the barchart its going to call myFirstChart view by passing the request object data.
Step8: Selected chartype type view rendering
Here is the view functions that is being called based on the selected chart type. Here we are saving the file onto the local filesystem and creating an object for column 2d chart rendering. Here we are using the fusion chart JS libraries and wrapper . Passing the object to myFirstChart.html for rendering purpose.
def myFirstChart(request):


    myfile = request.FILES['myfile']
    fs = FileSystemStorage()
    filename = fs.save(myfile.name, myfile)
    uploaded_file_url = fs.url(filename)


    file = open("/home/admin1/pythonDjango/mysite/%s" % uploaded_file_url, "r")
    mydata = json.load(file)
    dataSource = json.dumps(mydata)


    # Create an object for the column 2D chart using the FusionCharts class constructor
    # The chart data is passed to the `dataSource` parameter.
    column2D = FusionCharts("column2d", "myFirstChart", "600", "400", "myFirstchart-container", "json", dataSource)


    return render(request, 'reports/myFirstChart.html', {
        'output': column2D.render()
    })
Step9: Sample my FirstChart.html rendering
admin1@admin1host:~/pythonDjango/mysite/reports/templates/reports$ cat myFirstChart.html
<!-- Filename: app_name/templates/index.html -->
<!DOCTYPE html>
<html>


<head>
    <title>FC-python wrapper</title>
    {% load static %}
    <script type="text/javascript" src="{% static "reports/js/fusioncharts.js" %}"></script>
    <script type="text/javascript" src="{% static "reports/js/themes/fusioncharts.theme.fusion.js" %}"></script>
</head>
<body>
    <div id="myFirstchart-container">{{ output|safe }}</div>
    <p><a href="selectchart">Return to home</a></p>
</body>
</html>
URL - http://FQDN:8000/reports/chart
This is the sample output which gets generated for the selected chart type and JSON file uplodate.
NOTE: This is the location where we have put the JS library files that are being used in the html files along with jpg files for radio buttons with the image view.
admin1@admin1host:~/pythonDjango/mysite/reports/static/reports$ ls -ltr
total 100
drwxrwxr-x  6 admin1 admin1  4096 Feb 16 19:09 admin
-rw-rw-r--  1 admin1 admin1 24444 Feb 16 19:09 index.html
drwxrwxr-x  6 admin1 admin1  4096 Feb 16 19:09 assets
drwxrwxr-x 14 admin1 admin1  4096 Feb 16 19:09 integrations
drwxrwxr-x  4 admin1 admin1  4096 Feb 16 19:09 js
drwxrwxr-x  2 admin1 admin1  4096 Feb 16 19:09 license
-rw-rw-r--  1 admin1 admin1  5587 Feb 23 09:10 piechart.jpg
-rw-rw-r--  1 admin1 admin1 12059 Feb 23 09:10 tablechart.jpg
-rw-rw-r--  1 admin1 admin1  7608 Feb 23 09:10 barchart.jpg
-rw-rw-r--  1 admin1 admin1 21021 Feb 23 09:10 linechart.jpg
-rw-rw-r--  1 admin1 admin1    15 Feb 23 09:41 hello.html
Also, we need to include out project context urls to be called from base context of the project by eding the below urls.py file related to the project mysite.
admin1@admin1host:~/pythonDjango/mysite/mysite$ cat urls.py
"""mysite URL Configuration


The `urlpatterns` list routes URLs to views. For more information please see:
    https://docs.djangoproject.com/en/2.1/topics/http/urls/
Examples:
Function views
    1. Add an import:  from my_app import views
    2. Add a URL to urlpatterns:  path('', views.home, name='home')
Class-based views
    1. Add an import:  from other_app.views import Home
    2. Add a URL to urlpatterns:  path('', Home.as_view(), name='home')
Including another URLconf
    1. Import the include() function: from django.urls import include, path
    2. Add a URL to urlpatterns:  path('blog/', include('blog.urls'))
"""
from django.contrib import admin
from django.urls import include, path


urlpatterns = [
        path('reports/', include('reports.urls')),
        path('admin/', admin.site.urls),
]
Setting.py file related the project also needs to be edited for the static media files path and local filestorage path where the json files need to be uploaded.
All of the above project code is available at the following GitHub location.
Hope you enjoyed reading this article. Thank you..
Leave a Reply
You must be logged in to post a comment.