How to Federate a Standalone Application Server node to Websphere Deployment Manager
Here in this article we will try to Federate a Standalone Application Server node to Deployment Manager.
Test Environment
RHEL or CentOS 7 with WebSphere Application Server ND v9 installed
Procedure
Step1: Verify that the WAS ND v9 product is installed
[root@desktop1 tools]# ./imcl listInstalledPackages
com.ibm.cic.agent_1.8.5000.20160506_1125
com.ibm.java.jdk.v8_8.0.5000.20170906_1259
com.ibm.websphere.ND.v90_9.0.4.20170523_1327
9.0.0.0-WS-WAS-IFPI79343_9.0.0.20170609_1923
9.0.0.0-WS-WAS-IFPI82078_9.0.0.20170623_1425
9.0.0.0-WS-WASProd-IFPI80889_9.0.0.20170808_1616
9.0.0.0-WS-WASProd-IFPI82308_9.0.0.20170914_1808
9.0.0.1-WS-WASND-IFPI82630_9.0.1.20170609_1745
9.0.0.4-WS-WAS-IFPI82602_9.0.4.20170724_1539
Step2: Create Deployment Manager Profile
[root@desktop1 bin]# ./manageprofiles.sh -create -templatePath ../profileTemplates/management/ -profileName /opt/IBM/WebSphere9/profiles/Dmgr01 -profileName Dmgr01 -enableAdminSecurity true -adminUserName dmgr -adminPassword dmgr
INSTCONFSUCCESS: Success: Profile Dmgr01 now exists. Please consult/opt/IBM/WebSphere9/profiles/Dmgr01/logs/AboutThisProfile.txt for more information about this profile.
Step3: Create Standalone Application Server Profile1
[root@desktop1 bin]# ./manageprofiles.sh -create -templatePath ../profileTemplates/default/ -profileName /opt/IBM/WebSphere9/profiles/AppSrv01 -profileName AppSrv01
INSTCONFSUCCESS: Success: Profile AppSrv01 now exists. Please consult/opt/IBM/WebSphere9/profiles/AppSrv01/logs/AboutThisProfile.txt for more information about this profile.
Step4: Create Standalone Application Server Profile2
[root@desktop1 bin]# ./manageprofiles.sh -create -templatePath ../profileTemplates/default/ -profileName /opt/IBM/WebSphere9/profiles/AppSrv02 -profileName AppSrv02
INSTCONFSUCCESS: Success: Profile AppSrv02 now exists. Please consult/opt/IBM/WebSphere9/profiles/AppSrv02/logs/AboutThisProfile.txt for more information about this profile.
Step5: Start the Deployment Manager – Dmgr01
[root@desktop1 bin]# ./startManager.sh
ADMU0116I: Tool information is being logged in file
           /opt/IBM/WebSphere9/profiles/Dmgr01/logs/dmgr/startServer.log
ADMU0128I: Starting tool with the Dmgr01 profile
ADMU3100I: Reading configuration for server: dmgr
ADMU3200I: Server launched. Waiting for initialization status.
ADMU3000I: Server dmgr open for e-business; process id is 6721
Step6: Federate Standalone Application Server Profile1 using addNode.sh
[root@desktop1 bin]# cat /opt/IBM/WebSphere9/profiles/Dmgr01/logs/AboutThisProfile.txt
Application server environment to create: Management
Location: /opt/IBM/WebSphere9/profiles/Dmgr01
Disk space required: 30 MB
Profile name: Dmgr01
Make this profile the default: True
Node name: desktop1CellManager01
Cell name: desktop1Cell01
Host name: desktop1.example.com
Enable administrative security (recommended): True
Administrative console port: 9060
Administrative console secure port: 9043
Management bootstrap port: 9809
Management SOAP connector port: 8879
Run Management as a service: False
First capture the HOSTNAME and SOAP port details for Dmgr and then run the below addNode.sh command from Application Server profile for federating the Application Server.
[root@desktop1 bin]# ./addNode.sh desktop1.example.com 8879 –username dmgr –password dmgr
ADMU0116I: Tool information is being logged in file
           /opt/IBM/WebSphere9/profiles/AppSrv01/logs/addNode.log
ADMU0128I: Starting tool with the AppSrv01 profile
CWPKI0308I: Adding signer alias "CN=desktop1.example.com, OU=Roo" to local
           keystore "ClientDefaultTrustStore" with the following SHA digest:
           47:7F:9E:61:73:92:5A:E5:A2:A3:62:3F:82:1A:E4:69:4F:91:4F:A4
Realm/Cell Name: <default>
CWPKI0309I: All signers from remote keystore already exist in local keystore.
ADMU0001I: Begin federation of node desktop1Node01 with Deployment Manager at
           desktop1.example.com:8879.
ADMU0009I: Successfully connected to Deployment Manager Server:
           desktop1.example.com:8879
ADMU0505I: Servers found in configuration:
ADMU0506I: Server name: server1
ADMU2010I: Stopping all server processes for node desktop1Node01
ADMU0512I: Server server1 cannot be reached. It appears to be stopped.
ADMU0024I: Deleting the old backup directory.
ADMU0015I: Backing up the original cell repository.
ADMU0012I: Creating Node Agent configuration for node: desktop1Node01
ADMU0014I: Adding node desktop1Node01 configuration to cell: desktop1Cell01
ADMU0016I: Synchronizing configuration between node and cell.
ADMU0018I: Launching Node Agent process for node: desktop1Node01
ADMU0020I: Reading configuration for Node Agent process: nodeagent
ADMU0022I: Node Agent launched. Waiting for initialization status.
ADMU0030I: Node Agent initialization completed successfully. Process id is:
           7276
ADMU0300I: The node desktop1Node01 was successfully added to the desktop1Cell01
           cell.
ADMU0306I: Note:
ADMU0302I: Any cell-level documents from the standalone desktop1Cell01
           configuration have not been migrated to the new cell.
ADMU0307I: You might want to:
ADMU0303I: Update the configuration on the desktop1Cell01 Deployment Manager
           with values from the old cell-level documents.
ADMU0306I: Note:
ADMU0304I: Because -includeapps was not specified, applications installed on
           the standalone node were not installed on the new cell.
ADMU0307I: You might want to:
ADMU0305I: Install applications onto the desktop1Cell01 cell using wsadmin
           $AdminApp or the Administrative Console.
ADMU0003I: Node desktop1Node01 has been successfully federated.
Step7: Federate Standalone Application Server Profile2 using Deployment Manager Admin Console GUI
For Federating Standalone Application Server Profile2 using Admin Console, first the Application Server – server1 (default) needs to be started as below.
[root@desktop1 bin]# pwd
/opt/IBM/WebSphere9/profiles/AppSrv02/bin
[root@desktop1 bin]# ./startServer.sh server1
ADMU0116I: Tool information is being logged in file
           /opt/IBM/WebSphere9/profiles/AppSrv02/logs/server1/startServer.log
ADMU0128I: Starting tool with the AppSrv02 profile
ADMU3100I: Reading configuration for server: server1
ADMU3200I: Server launched. Waiting for initialization status.
ADMU3000I: Server server1 open for e-business; process id is 8605


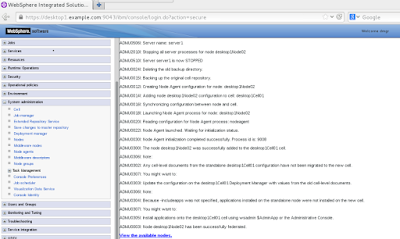
Required Fields: Hostname, SOAP port of Application Server, Dmgr admin console credentials.
Once the above required fields are filled and submitted, the Applicatoin Server profile with SOAP port 8881 gets federated into the Dmgr profile as below.
[root@desktop1 nodes]# pwd
/opt/IBM/WebSphere9/profiles/Dmgr01/config/cells/desktop1Cell01/nodes
[root@desktop1 nodes]# ls -ltr
total 12
drwxr-xr-x. 3 root root 4096 Oct  4 00:07 desktop1CellManager01
drwxr-xr-x. 3 root root 4096 Oct  4 00:24 desktop1Node01
drwxr-xr-x. 3 root root 4096 Oct  4 00:48 desktop1Node02
As you can see, from the above output, both the nodes desktop1Node01 and desktop1Node02 have been federated to the Dmgr Cell using two different methods.
Hope you enjoyed reading this article. Thank you..
Leave a Reply
You must be logged in to post a comment.