How to configure Dynamic Clusters in WebSphere Application Server
Here in this article we will try to setup Dynamic Clusters environment for WebSphere Application Server environment.
Test Environment
- RHEL or CentOS 7 with WAS ND v9 installed
What is Dynamic Clusters
A dynamic cluster is an application deployment target that can expand and contract depending on the workload in your environment. Dynamic clusters work with autonomic managers, including the application placement controller and the dynamic workload manager to maximize the use of your computing resources.
It uses weights and workload management to balance the workloads of its cluster members dynamically, based on performance information that is collected from the cluster members. Dynamic clusters enable application server virtualization.
Dynamic Cluster Membership
- Automatically define cluster members with rules: In this cluster members are automatically defined based the membership policy.
- Manually define cluster members: In this we statically define which servers are cluster members by selecting servers to add to the cluster
Procedure
Step1: Create a Deployment Manager Profile
[root@desktop1 bin]# ./manageprofiles.sh -create -profileName Dmgr01 -profilePath /opt/IBM/WebSphere9/profiles/Dmgr01 -templatePath /opt/IBM/WebSphere9/profileTemplates/management -serverType DEPLOYMENT_MANAGER
INSTCONFSUCCESS: Success: Profile Dmgr01 now exists. Please consult /opt/IBM/WebSphere9/profiles/Dmgr01/logs/AboutThisProfile.txt for more information about this profile.
Step2: Create a Application Server Profile
[root@desktop1 bin]# ./manageprofiles.sh -create -profileName AppSrv01 -profilePath /opt/IBM/WebSphere9/profiles/AppSrv01 -templatePath /opt/IBM/WebSphere9/profileTemplates/default
INSTCONFSUCCESS: Success: Profile AppSrv01 now exists. Please consult /opt/IBM/WebSphere9/profiles/AppSrv01/logs/AboutThisProfile.txt for more information about this profile.
Step3: Federate the Application Server Profile to Deployment Manager Profile with the installed Applications included
[root@desktop1 bin]# pwd
/opt/IBM/WebSphere9/profiles/Dmgr01/bin
[root@desktop1 bin]# ./startManager.sh
ADMU0116I: Tool information is being logged in file
           /opt/IBM/WebSphere9/profiles/Dmgr01/logs/dmgr/startServer.log
ADMU0128I: Starting tool with the Dmgr01 profile
ADMU3100I: Reading configuration for server: dmgr
ADMU3200I: Server launched. Waiting for initialization status.
ADMU3000I: Server dmgr open for e-business; process id is 8510


[root@desktop1 bin]# pwd
/opt/IBM/WebSphere9/profiles/AppSrv01/bin
[root@desktop1 bin]# ./addNode.sh desktop1.example.com 8879 -includeapps
...
ADMU0003I: Node desktop1Node01 has been successfully federated.


[root@desktop1 bin]# ./startServer.sh server1
...
ADMU3000I: Server server1 open for e-business; process id is 9874
Step4: Create a Simple On demand router Server testodr
[root@desktop1 bin]# pwd
/opt/IBM/WebSphere9/bin
[root@desktop1 bin]# ./wsadmin.sh -f ./createodr.jacl desktop1Node01 odr testodr
WASX7209I: Connected to process "dmgr" on node desktop1CellManager01 using SOAP connector;  The type of process is: DeploymentManager
WASX7303I: The following options are passed to the scripting environment and are available as arguments that are stored in the argv variable: "[desktop1Node01, odr, testodr]"
createodr: checking for existence of node desktop1Node01
createodr: checking to see if server testodr is already configured on node desktop1Node01
createodr: checking to see if the nodeagent server mbean is available
createodr: Node type verified as a valid node
createodr: checking for the existence of a NodeSync MBean on node desktop1Node01
createodr: creating a server testodr .....
createodr: saving the configuration
createodr: Invoking synchronization for node WebSphere:name=nodeSync,process=nodeagent,platform=common,node=desktop1Node01,diagnosticProvider=true,version=9.0.0.4,type=NodeSync,mbeanIdentifier=nodeSync,cell=desktop1Cell01,spec=1.0 because serverStartupSyncEnabled is set to false...
createodr: Done with synchronization.
createodr: done.
[root@desktop1 bin]# pwd
/opt/IBM/WebSphere9/profiles/AppSrv01/bin
[root@desktop1 bin]# ./startServer.sh testodr
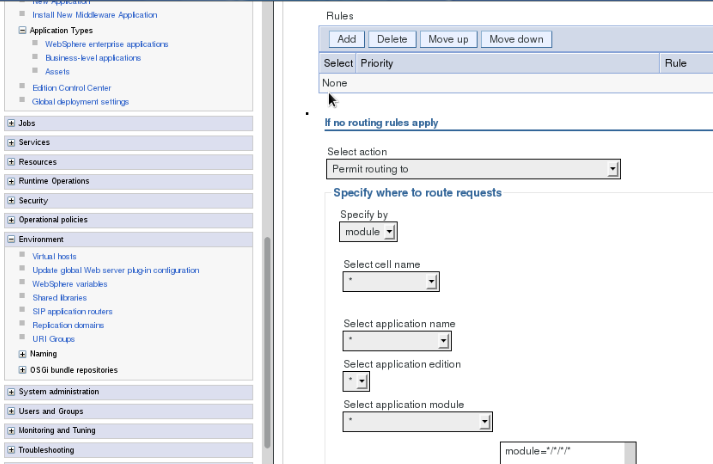
Step5: Validate the ODR basic functionality
By default, if no rules are specified in the testodr – Routing policy HTTP rules section, all the requested contexts are accepted and are routed to the backend application servers within cell as shown below.
Step6: Create a Dynamic Cluster
In this step we are going to create a Dynamic Cluster with below values as explained in detail.
wsadmin>AdminTask.createDynamicCluster('TestDynamicCluster','[-membershipPolicy "node_nodegroup = 'DefaultNodeGroup'" -dynamicClusterProperties "[[operationalMode automatic][minInstances 0][maxInstances -1][numVerticalInstances 1][serverInactivityTime 1440]]" -clusterProperties "[[preferLocal false][createDomain false][templateName default][coreGroup DefaultCoreGroup]]"]')
u'TestDynamicCluster(cells/desktop1Cell01/dynamicclusters/TestDynamicCluster|dynamiccluster.xml)'

wsadmin>AdminConfig.save()

wsadmin>AdminTask.listDynamicClusters()
u'TestDynamicCluster'

Once the dynamic cluster is created, it automatically add a cluster member DynamicCluster_Node name as shown above in the screenshot.
Here are brief details about the parameters that are passed to create the cluster.
Required parameters:
- membershipPolicy – Defines which node group the cluster members would be located
Optional parameters:
- operationalMode – Specifies the operational mode. The valid values are: manual, supervised, and automatic
- minInstances: Specifies the minimum number of cluster instances as an integer
- maxInstances: Specifies the maximum number of cluster instances as an integer. If you do not want a limit to the number of cluster instances that can start, specify -1
- numVerticalInstances: Specifies the number of instances that can start on the same node by creating vertical instances. Specify an integer value
- preferLocal: Specifies whether enterprise bean requests are routed to the node on which the client resides when possible. The valid values are true or false
- createDomain: Specifies that a replication domain is created for this cluster. Replication domains can be created only for WebSphere® Application Server application servers. The valid values are true or false
- coreGroup: Specifies the name of the core group for the dynamic cluster. You only need to specify the core group for WebSphere Application Server application servers. The value can be DefaultCoreGroup or the core group name
- templateName: Specifies the name of the server template. The valid input includes the following values
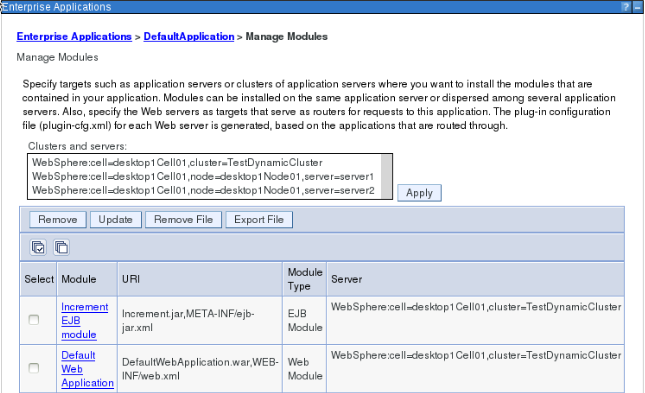
Step7: Map the Default Application to Dynamic Cluster created above
Step8: Access the Default Application using below urls
Once you try to access any one of the below URL’s , the request gets routed to the Dynamic Cluster member from ODR server and the Dynamic Cluster member is initiated/started up. You can verify the list of processes that are running after you try to access any of the below application.
http://desktop1.example.com/hello
http://desktop1.example.com/snoop
http://desktop1.example.com/hitcount
[root@desktop1 bin]# ps -ef | grep WebSphere | grep -v grep | awk '{print $NF}'
dmgr
nodeagent
testodr
TestDynamicCluster_desktop1Node01
Step9: Kill the Dynamic Cluster member
Try to kill the Dynamic Cluster member process. In my case it is ‘6914’ process and see the process list again. It tries to restart the killed member instance again.
[root@desktop1 bin]# ps -ef | grep WebSphere | grep -v grep | awk '{print $2 " " $NF}'
3266 dmgr
5424 nodeagent
5812 testodr
6914 TestDynamicCluster_desktop1Node01
[root@desktop1 bin]#
 [root@desktop1 bin]# kill -9 6914
[root@desktop1 bin]#
 [root@desktop1 bin]# ps -ef | grep WebSphere | grep -v grep | awk '{print $2 " " $NF}'
3266 dmgr
5424 nodeagent
5812 testodr
7209 TestDynamicCluster_desktop1Node01
Hope you enjoyed reading this article. Thank you..
Leave a Reply
You must be logged in to post a comment.