How to setup DNS BIND service in Ubuntu OS

Here in this article we will try to install and configure the DNS BIND server in Ubuntu for hostname (FQDN) to IP address resolution and vice-versa.
Test Environment
Ubuntu 12.04
Procedure
Step1: Update repository data
sudo apt-get update
Step2: Install bind and its dependent packages
sudo apt-get install bind9
Also, install the clients package useful for testing and troubleshooting DNS issues if already not installed.
sudo apt-get install dnsutils
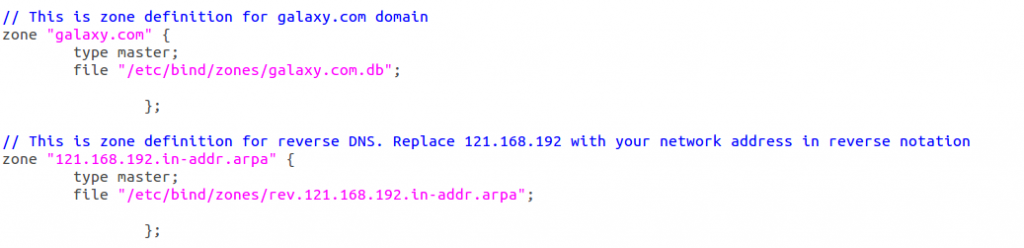
Step3: Add a DNS zone to bind9 configuration
Here we will be updating the named.conf.local DNS configuration file to convert it into a primary master server for the domain “galaxy.com”.
Configure the named.conf.local bind file as show below.
File: /etc/bind/named.conf.local
Step4: Configure the named.conf.options
In this step we will configure the named.conf.options file with the DNS server IP address to which the requests will be forwarded,

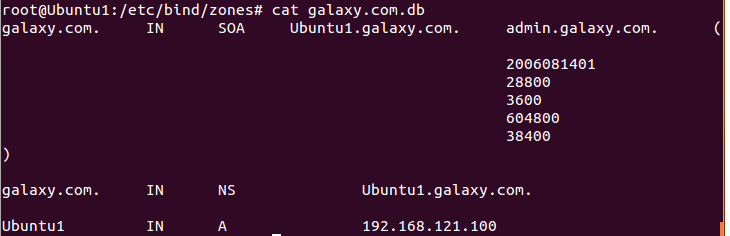
Step5: Update Primary zone database file
Here we will update the new zone database file with the Fully qualified domain name and the machine names that the DNS server will know.
File: /etc/bind/zones/galaxy.com.db
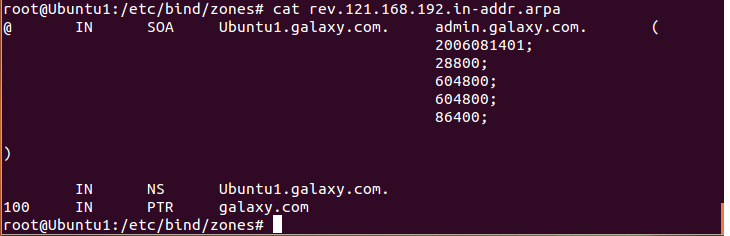
Step6: Edit the reverse zone file
Here we will update the reverse zone database file as shown below.
File: /etc/bind/zones/rev.121.168.192.in-addr.arpa
Step7: Restart the bind9 service as below
Let’s now restart the bind9 service which can be restarted using the below two options.
sudo service bind9 restart
or
sudo /etc/init.d/bind9 restart
Step8: Update the resolv.conf
Here we will update the /etc/resolve.conf file with the search domain_name and nameserver IP address as show below.

Step9: Test the DNS
Now it’s time to test our DNS configuration as shown below.

NOTE: Here a static IP address (192.168.121.100) has been configured for the Host machine.
Hope you enjoyed reading this article. Thank you..
Leave a Reply
You must be logged in to post a comment.