How to build and install Apache Tomcat on Ubuntu OS
Here in this article we will be trying to build and install Apache Tomcat server from source package and get it up and running. We will be installing required versions of JDK and ANT build tool as a pre-requisite. Once the pre-requisite tools are setup we will be downloading the Apache Tomcat source package, extract it and build it using ANT build tool.
Test Environment
Ubuntu 22.04
What is Apache Tomcat
The Apache Tomcat® software is an open source implementation of the Jakarta Servlet, Jakarta Server Pages, Jakarta Expression Language, Jakarta WebSocket, Jakarta Annotations and Jakarta Authentication specifications. These specifications are part of the Jakarta EE platform. Jakarta EE, formerly Java Platform, Enterprise Edition and Java 2 Platform, Enterprise Edition, is a set of specifications, extending Java SE with specifications for enterprise features such as distributed computing and web services.
As of this writing Apache Tomcat 11 is the latest version available in alpha phase. It requires a supported JDK 17 version and implements servlets 6.1, jsp 4.0 and el 6.0 specifications.
Procedure
Step1: Install JDK 17
As a first step we will need to install JDK 17 which is a pre-requisite required for Compiling the Apache Tomcat source package. Here we are going to install “openjdk-17-jdk-headless” package which is provided by openjdk provider.
ubuntu@ubser22:~$ sudo apt-get install openjdk-17-jdk-headless
Once the installation is completed you can validate the java and javac version as shown below.
ubuntu@ubser22:~$ java --version
openjdk 17.0.6 2023-01-17

ubuntu@ubser22:~$ javac --version
javac 17.0.6
We can also verify the location of newly installed java files as shown below.
ubuntu@ubser22:~$ update-alternatives --list java
/usr/lib/jvm/java-17-openjdk-amd64/bin/java
Step2: Set JDK17 as default version
In this step we are going to set the environment variable JAVA_HOME such that it point to the installation location of the JDK package. We will create the following file and update the variables such that it exports the JAVA installation directory and update the PATH variable to point to the binary files within that directory.
ubuntu@ubser22:~$ sudo vi /etc/profile.d/env.sh

ubuntu@ubser22:~$ cat /etc/profile.d/env.sh
export JAVA_HOME=/usr/lib/jvm/java-17-openjdk-amd64
export PATH=$PATH:$JAVA_HOME/bin
We need to logout and login to the shell for the changes to take effect. Now we can get the JAVA_HOME environment variable as shown below.
ubuntu@ubser22:~$ echo $JAVA_HOME
/usr/lib/jvm/java-17-openjdk-amd64
Step3: Install Apache Ant
Here in this step we are going to install Apache ANT build tool which is required to build the Apache Tomcat source code.
ubuntu@ubser22:~$ sudo apt-get install ant
We can validate the ant version installed as shown below.
ubuntu@ubser22:~$ ant -version
Apache Ant(TM) version 1.10.12 compiled on January 17 1970
Step4: Set Apache ANT Home directory
Once Apache ANT is installed we need to set the environment variable ANT_HOME such that it point to the installation location of the ANT package. We will update the following file such that it exports the ANT installation directory and update the PATH variable to point to the binary files within that directory.
ubuntu@ubser22:~$ which ant
/usr/bin/ant
ubuntu@ubser22:~$ ls -ltr /usr/bin/ant
lrwxrwxrwx 1 root root 20 Jan 13  2022 /usr/bin/ant -> ../share/ant/bin/ant
ubuntu@ubser22:~$ sudo vi /etc/profile.d/env.sh

ubuntu@ubser22:~$ cat /etc/profile.d/env.sh
export JAVA_HOME=/usr/lib/jvm/java-17-openjdk-amd64
export ANT_HOME=/usr/share/ant
export PATH=$PATH:$JAVA_HOME/bin:$ANT_HOME/bin
We need to logout and login to the shell for the changes to take effect. Now we can get the ANT_HOME environment variable as shown below.
ubuntu@ubser22:~$ echo $ANT_HOME
/usr/share/ant
Step5: Download and Extract Tomcat from source
Here we are going to download the source distribution of Apache Tomcat from the Apache Tomcat Download Page and extract it to the current directory.
ubuntu@ubser22:~$ pwd
/home/ubuntu
ubuntu@ubser22:~$ wget https://dlcdn.apache.org/tomcat/tomcat-11/v11.0.0-M4/src/apache-tomcat-11.0.0-M4-src.tar.gz

ubuntu@ubser22:~$ tar -xzvf apache-tomcat-11.0.0-M4-src.tar.gz
Step6: Create build.properties file
We need to change into the extracted Apache Tomcat source and create a build.properties file to set the base.path where the dependent binaries will be downloaded and build files will be created as shown below.
ubuntu@ubser22:~$ pwd
/home/ubuntu
ubuntu@ubser22:~$ cd apache-tomcat-11.0.0-M4-src/
ubuntu@ubser22:~/apache-tomcat-11.0.0-M4-src$

ubuntu@ubser22:~/apache-tomcat-11.0.0-M4-src$ cat build.properties
# ----- Default Base Path for Dependent Packages -----
# Replace this path with the directory path where dependencies binaries
# should be downloaded
base.path=/home/ubuntu/apache-tomcat-11.0.0-M4-src
Step7: Build Apache Tomcat source using ant
Once the build.properties file is created we are now ready to carry out the Apache Tomcat source build using the ant tool as shown below.
ubuntu@ubser22:~/apache-tomcat-11.0.0-M4-src$ pwd
/home/ubuntu/apache-tomcat-11.0.0-M4-src

ubuntu@ubser22:~/apache-tomcat-11.0.0-M4-src$ ant
...
deploy:
     [copy] Copying 1 file to /home/ubuntu/apache-tomcat-11.0.0-M4-src/output/build/bin
     [copy] Copying 1 file to /home/ubuntu/apache-tomcat-11.0.0-M4-src/output/build/bin
     [copy] Copying 24 files to /home/ubuntu/apache-tomcat-11.0.0-M4-src/output/build/bin
     [copy] Copying 9 files to /home/ubuntu/apache-tomcat-11.0.0-M4-src/output/build/conf
     [copy] Copying 234 files to /home/ubuntu/apache-tomcat-11.0.0-M4-src/output/build/webapps
     [copy] Copying 1 file to /home/ubuntu/apache-tomcat-11.0.0-M4-src/output/build/webapps
     [copy] Copying 1 file to /home/ubuntu/apache-tomcat-11.0.0-M4-src/output/build/webapps/ROOT
     [copy] Copying 1 file to /home/ubuntu/apache-tomcat-11.0.0-M4-src/output/build/lib
     [copy] Copying 1 file to /home/ubuntu/apache-tomcat-11.0.0-M4-src/output/build/lib

examples-sources:
 [txt2html] Converted 1 file to /home/ubuntu/apache-tomcat-11.0.0-M4-src/output/build/webapps/examples/jsp/jsp2/simpletag
 [txt2html] Converted 4 files to /home/ubuntu/apache-tomcat-11.0.0-M4-src/output/build/webapps/examples/jsp/jsp2/simpletag
 [txt2html] Converted 5 files to /home/ubuntu/apache-tomcat-11.0.0-M4-src/output/build/webapps/examples/jsp/jsp2/simpletag
 [txt2html] Converted 1 file to /home/ubuntu/apache-tomcat-11.0.0-M4-src/output/build/webapps/examples/jsp/jsp2/jspattribute
 [txt2html] Converted 4 files to /home/ubuntu/apache-tomcat-11.0.0-M4-src/output/build/webapps/examples/jsp/jsp2/jspattribute
 [txt2html] Converted 4 files to /home/ubuntu/apache-tomcat-11.0.0-M4-src/output/build/webapps/examples/jsp/cal
 [txt2html] Converted 1 file to /home/ubuntu/apache-tomcat-11.0.0-M4-src/output/build/webapps/examples/jsp/jsptoserv
 [txt2html] Converted 1 file to /home/ubuntu/apache-tomcat-11.0.0-M4-src/output/build/webapps/examples/jsp/jsp2/el
 [txt2html] Converted 2 files to /home/ubuntu/apache-tomcat-11.0.0-M4-src/output/build/webapps/examples/jsp/jsp2/el
 [txt2html] Converted 3 files to /home/ubuntu/apache-tomcat-11.0.0-M4-src/output/build/webapps/examples/jsp/jsp2/el
 [txt2html] Converted 1 file to /home/ubuntu/apache-tomcat-11.0.0-M4-src/output/build/webapps/examples/jsp/jsp2/misc
 [txt2html] Converted 3 files to /home/ubuntu/apache-tomcat-11.0.0-M4-src/output/build/webapps/examples/jsp/jsp2/tagfiles
 [txt2html] Converted 47 files to /home/ubuntu/apache-tomcat-11.0.0-M4-src/output/build/webapps/examples

BUILD SUCCESSFUL
Total time: 46 seconds
NOTE: ROOT privileges are not required for building the Apache Tomcat from source and its not encourage too.
Step8: Run Tomcat Instance
Once the build is successful, we will see an output/build directory getting created in the ${tomcat.source} folder with the Apache Tomcat installation files directory structure laid out.
ubuntu@ubser22:~/apache-tomcat-11.0.0-M4-src/output/build$ pwd
/home/ubuntu/apache-tomcat-11.0.0-M4-src/output/build
ubuntu@ubser22:~/apache-tomcat-11.0.0-M4-src/output/build$ ls -ltr
total 32
drwxrwxr-x 2 ubuntu ubuntu 4096 Mar  7 00:49 webapps-javaee
drwxrwxr-x 2 ubuntu ubuntu 4096 Mar  7 00:49 temp
drwxrwxr-x 2 ubuntu ubuntu 4096 Mar  7 00:50 bin
drwxrwxr-x 7 ubuntu ubuntu 4096 Mar  7 00:50 webapps
drwxrwxr-x 2 ubuntu ubuntu 4096 Mar  7 00:50 lib
drwxrwxr-x 3 ubuntu ubuntu 4096 Mar  7 00:52 conf
drwxr-x--- 3 ubuntu ubuntu 4096 Mar  7 00:52 work
drwxrwxr-x 2 ubuntu ubuntu 4096 Mar  7 00:52 logs
Now we can go into the bin directory and startup the Tomcat instance using startup.sh as shown below.
ubuntu@ubser22:~/apache-tomcat-11.0.0-M4-src$ cd output/build/bin/
ubuntu@ubser22:~/apache-tomcat-11.0.0-M4-src/output/build/bin$ ./startup.sh
Using CATALINA_BASE:   /home/ubuntu/apache-tomcat-11.0.0-M4-src/output/build
Using CATALINA_HOME:   /home/ubuntu/apache-tomcat-11.0.0-M4-src/output/build
Using CATALINA_TMPDIR: /home/ubuntu/apache-tomcat-11.0.0-M4-src/output/build/temp
Using JRE_HOME:        /usr/lib/jvm/java-17-openjdk-amd64
Using CLASSPATH:       /home/ubuntu/apache-tomcat-11.0.0-M4-src/output/build/bin/bootstrap.jar:/home/ubuntu/apache-tomcat-11.0.0-M4-src/output/build/bin/tomcat-juli.jar
Using CATALINA_OPTS:
Tomcat started.
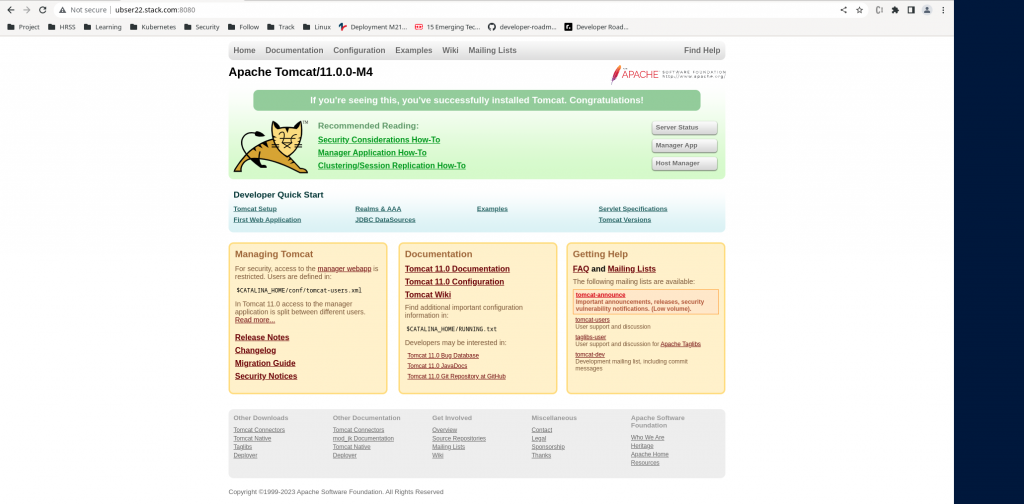
Step9: Verify Tomcat Startup
Once Tomcat is started successfully we can access the default home page of Apache Tomcat instance which listens on port 8080 as shown below.
URL - http://ubser22.stack.com:8080/ # please update ubser22.stack.com with your server FQDN
Step10: Shutdown Tomcat
Once Tomcat installation and startup is verified you can shutdown it using below script as shown below.
ubuntu@ubser22:~/apache-tomcat-11.0.0-M4-src/output/build/bin$ ./shutdown.sh
Using CATALINA_BASE:   /home/ubuntu/apache-tomcat-11.0.0-M4-src/output/build
Using CATALINA_HOME:   /home/ubuntu/apache-tomcat-11.0.0-M4-src/output/build
Using CATALINA_TMPDIR: /home/ubuntu/apache-tomcat-11.0.0-M4-src/output/build/temp
Using JRE_HOME:        /usr/lib/jvm/java-17-openjdk-amd64
Using CLASSPATH:       /home/ubuntu/apache-tomcat-11.0.0-M4-src/output/build/bin/bootstrap.jar:/home/ubuntu/apache-tomcat-11.0.0-M4-src/output/build/bin/tomcat-juli.jar
Using CATALINA_OPTS:
Hope you enjoyed reading this article. Thank you..
Leave a Reply
You must be logged in to post a comment.