How to secure Grafana with Keycloak OIDC
Here in this article we will try to secure Grafana OSS with Keycloak OIDC for authentication and authorization.
Test Environment
- Fedora 41 server
- Grafana v13.1.1
- Keycloak v26.1.4
What is Grafana
Grafana Open source software also know as Grafana OSS is a multi-platform open source analytics and interactive visualization web application. It provides charts, graphs, and alerts for the web when connected to supported data sources. It enables us to query, visualize, alert and explore the metrics, logs and traces from different sources.
Grafana OSS provides us with different tools and plugin framework for integration with different external datasources. Also it provides us with tools to turn the time-series database (TSDB) data into insightful graphs and visualizations.
What is Keycloak
Keycloak is an open-source Identity and Access Management (IAM) solution developed by Red Hat. It allows you to centralize authentication and authorization for your applications and services, offering features like single sign-on (SSO), social login, user federation, and more. Keycloak simplifies securing applications by handling user authentication and authorization, eliminating the need for developers to build these functionalities from scratch.
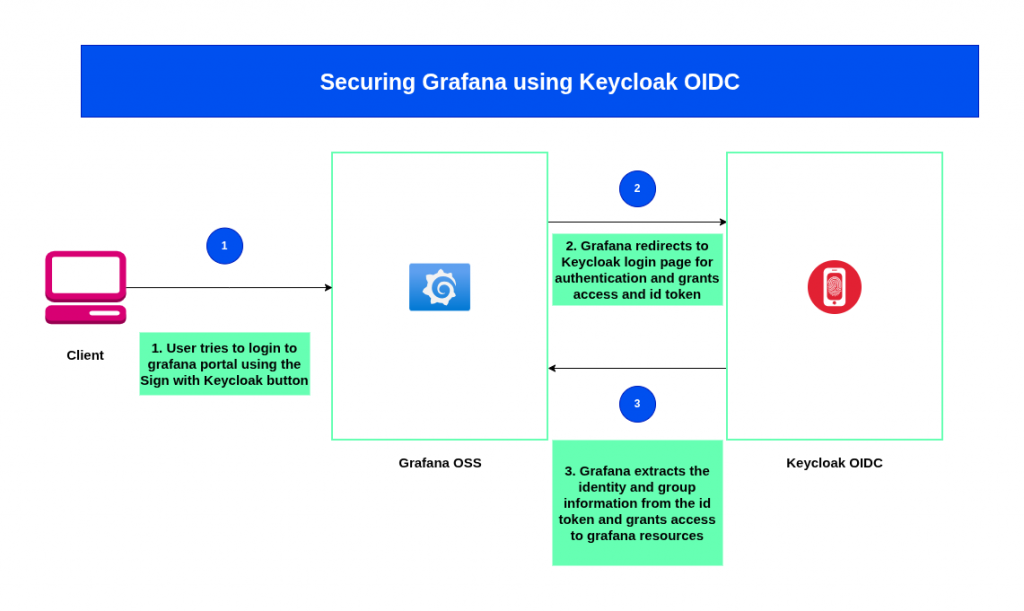
High Level Architecture
If you are interested in watching the video. Here is the YouTube video on the same step by step procedure outlined below.
Procedure
Step1: Ensure Grafana installed and running
Here we are going use the following docker compose file to instantiate grafana service. Please note that we have set the root_url as an environment variable so that grafana picks up the correct url with the FQDN of the host rather than localhost as the FQDN.
admin@linuxser:~/grafana-docker$ cat docker-compose.yml
services:
  grafana:
    image: grafana/grafana:latest
    container_name: grafana
    environment:
      - GF_SERVER_DOMAIN=linuxser.stack.com
      - GF_SERVER_ROOT_URL=http://linuxser.stack.com:3000
    ports:
      - "3000:3000"
    volumes:
      # Mount persistent storage for your dashboards and data
      - grafana-storage:/var/lib/grafana

volumes:
  grafana-storage:
Let’s now start up the docker service and validate it.
admin@linuxser:~/grafana-docker$ docker compose up -d
Now you can validate if you able to login to grafana portal.
URL: http://linuxser.stack.com:3000/login
Step2: Ensure Keycloak service running
Here we are going to setup the Keycloak service using docker-compose.yml file as shown below.
admin@linuxser:keycloak$ cat docker-compose.yml
services:

  keycloak:
    image: quay.io/keycloak/keycloak:26.1.4
    command: start-dev
    environment:
      KC_BOOTSTRAP_ADMIN_USERNAME: admin
      KC_BOOTSTRAP_ADMIN_PASSWORD: admin
    ports:
      - "8080:8080"
      - "8443:8443"
Now let’s startup our Keycloak service using the below command. Ensure that you have docker service installed and running before starting the Keycloak service.
admin@linuxser:keycloak$ docker-compose up -d
Once the Keycloak services is running we can validate it by launching the Keycloak Admin Console.
URL: http://linuxser.stack.com:8080/
Step3: Configure keycloak
Here let us first create a new realm named “stack” by navigating to top left side and clicking on the drop down to Create Realm. Once you create a realm you will be automatically switched into your new realm.
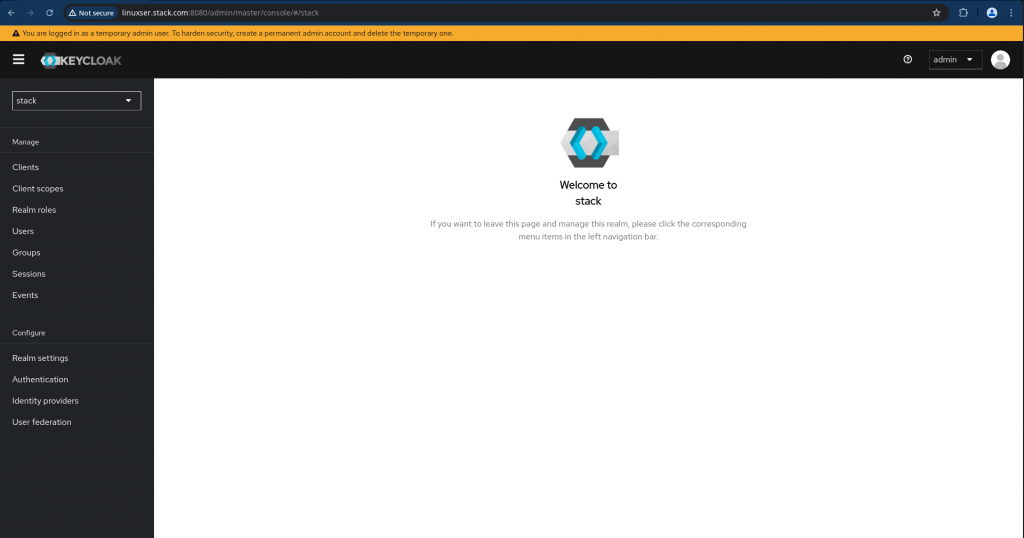
Now navigate to Clients on left navigation bar and create a new client named “grafanasso” with the following details.
General Settings
Client Name : grafanasso
Client ID   : grafanasso
Capability Config
Client Authentication   : On
Authorization Flow      : Standard flow, Direct access grants and Implicit flow enabled
Login Settings
Valid Redirect URls     : http://linuxser.stack.com:3000/login/generic_oauth
Web Origins             : http://linuxser.stack.com:3000
Once the Client is created you can navigate to “Credentials” tab and retrieve your Client Secret and keep it secure.
Client Secret : hrUkSg6BmKt2VRVXBlyPPLcBYk3GqnIi
Once the client has been created, its now time to setup groups and users. Let us create groups named “Administrators” and “Developers”.
Navigate to Groups on left navigation bar and create the following groups.
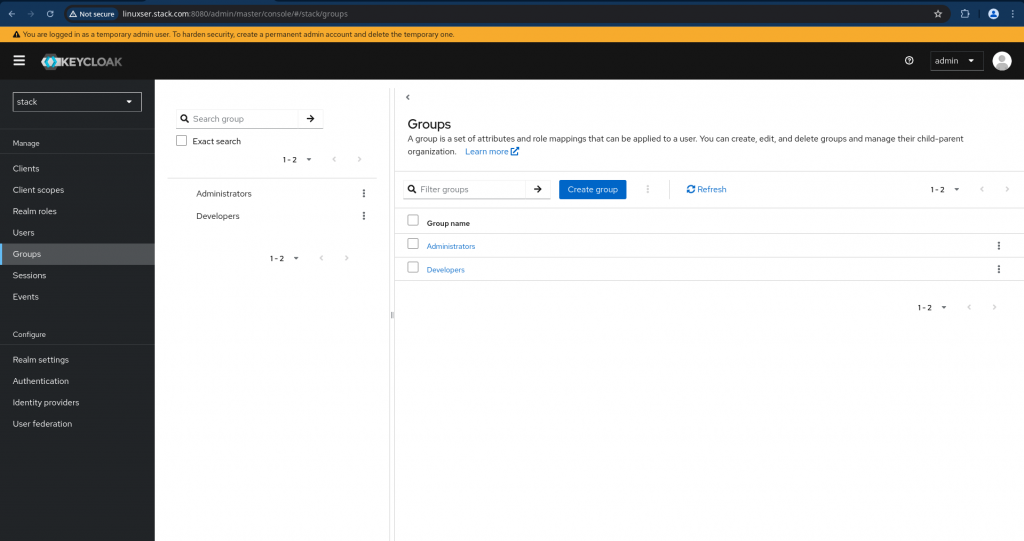
Now let us create two users named “grafanaadmin” and “grafanadev” part of groups “Administrators” and “Developers” respectively.
Username    : grafanaadmin
Email       : grafanaadmin@stack.com
First name  : grafanaadmin
Last name   : grafanaadminsso
Groups      : Administrators
Username    : grafanadev
Email       : grafanadev@stack.com
First name  : grafanadev
Last name   : grafanadevsso
Groups      : Developers
Navigate to “Credentials” tab and “Set Password” for each user and ensure Temporary option is Off so you don’t need to change the password again on first login.
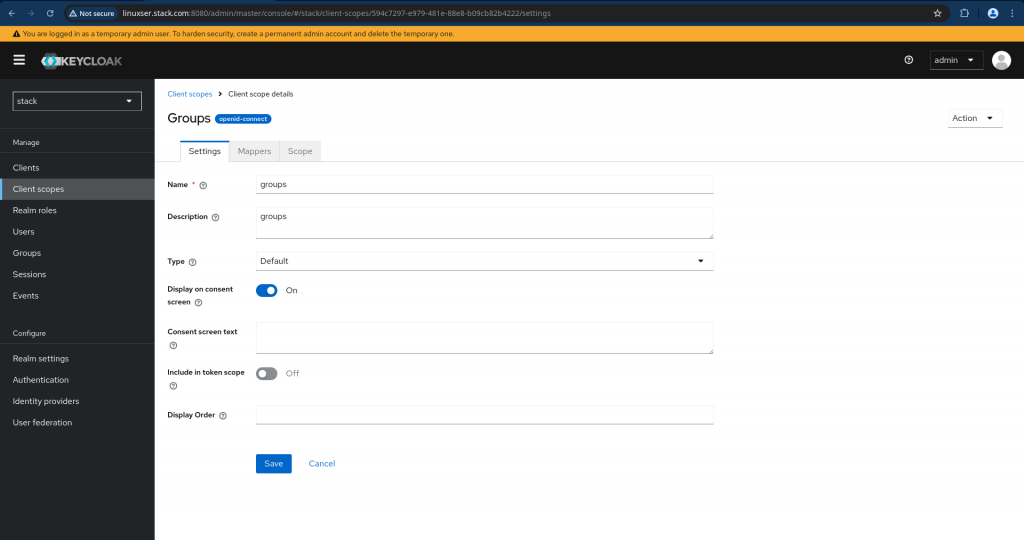
There are two more important steps that we need to carry out. First “Create a client scope with group membership mapping” as shown below.
Navigate to Client scopes on the left navigation bar and click “Create client scope” on that page. Update the details and save the changes.
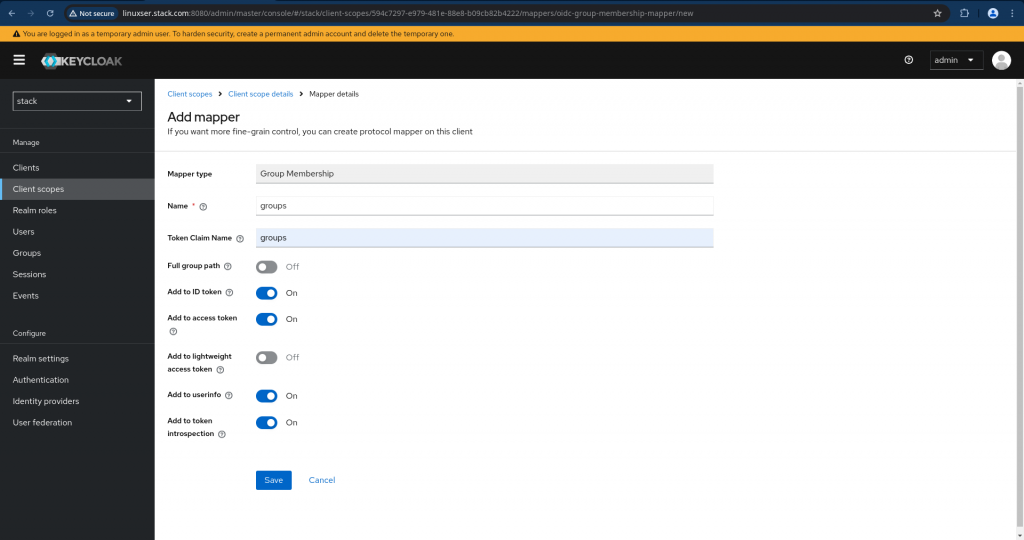
Now we need to go to “Mappers” tab for the Client scope “groups” and click on “Configure a new mapper” and select “Group Membership”. Just disable the “Full group path” as we are going to deal with top level groups only for this demo and create the mappers.
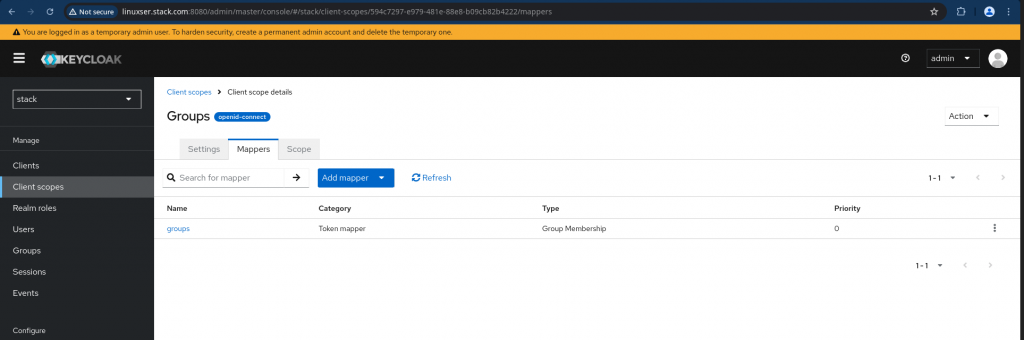
This is how your updated client scope mappers look like.
Now we need to map this client scope to our client “grafanasso”. Navigate to your client and go to “Client scopes” tab and ensure you click on “groups” to map it to the client as shown below and set the Assigned type as “Default”.
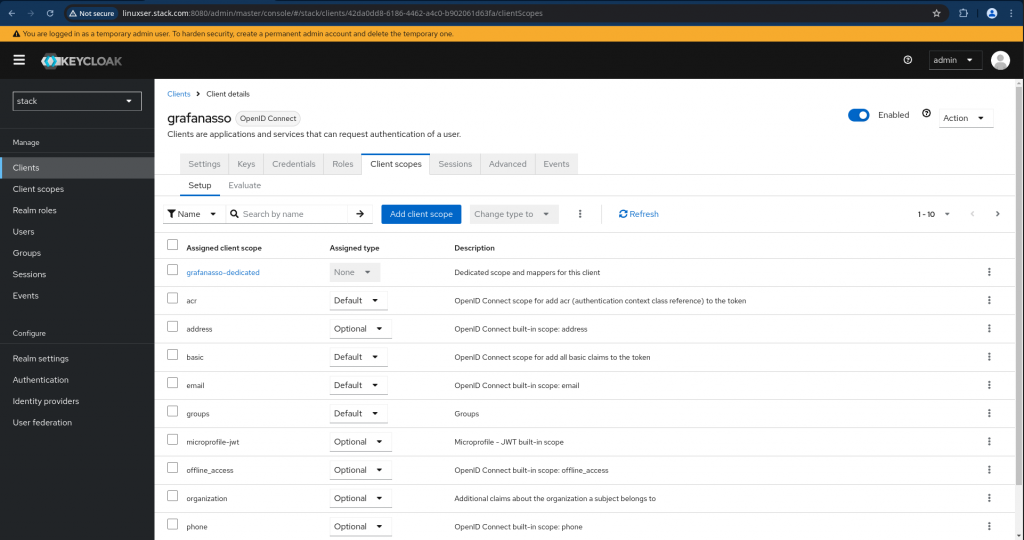
NOTE: By default “Client” is mapped with the following scopes “email” and “profile” which we will be using during SSO communication.
Just to make sure your client is configured correctly and is able to authenticate and issue tokens with the required claims we can validate it using the implicit authentication flow wherein we provide the client id and client secret to get the access token as shown below.
admin@linuxser:~/keycloak$ curl -k -d "grant_type=password" -d "scope=openid" -d "client_id=grafanasso" -d "client_secret=hrUkSg6BmKt2VRVXBlyPPLcBYk3GqnIi" -d "username=grafanaadmin" -d "password=grafanaadmin@1234" http://linuxser.stack.com:8080/realms/stack/protocol/openid-connect/token | jq .
  % Total    % Received % Xferd  Average Speed   Time    Time     Time  Current
                                 Dload  Upload   Total   Spent    Left  Speed
100  3709  100  3560  100   149  35446   1483 --:--:-- --:--:-- --:--:-- 37090
{
  "access_token": "eyJhbGciOiJSUzI1NiIsInR5cCIgOiAiSldUIiwia2lkIiA6ICJRTGZCNERZSzhKdkcwTVNZcTE1UXJlRnE1dndnbDVFVlc4VGhpdlpHNVhNIn0.eyJleHAiOjE3ODgwMDA1NzksImlhdCI6MTc4ODAwMDI3OSwianRpIjoiN2I5YjQ4YWUtYzMyYS00ODljLWEwZTQtNGU3YzJjNDA0MDBiIiwiaXNzIjoiaHR0cDovL2xpbnV4c2VyLnN0YWNrLmNvbTo4MDgwL3JlYWxtcy9zdGFjayIsImF1ZCI6ImFjY291bnQiLCJzdWIiOiIwMDgxOWMyMy0yZTg4LTQ2MDQtYTg3OC1mOGEzMTMyOTRiMDciLCJ0eXAiOiJCZWFyZXIiLCJhenAiOiJncmFmYW5hc3NvIiwic2lkIjoiNzE5MmVlZDItZjI1Ni00OWNmLTgyODAtZGE0MTFlZmQ4MGJmIiwiYWNyIjoiMSIsImFsbG93ZWQtb3JpZ2lucyI6WyJodHRwOi8vbGludXhzZXIuc3RhY2suY29tOjMwMDAiXSwicmVhbG1fYWNjZXNzIjp7InJvbGVzIjpbImRlZmF1bHQtcm9sZXMtc3RhY2siLCJvZmZsaW5lX2FjY2VzcyIsInVtYV9hdXRob3JpemF0aW9uIl19LCJyZXNvdXJjZV9hY2Nlc3MiOnsiYWNjb3VudCI6eyJyb2xlcyI6WyJtYW5hZ2UtYWNjb3VudCIsIm1hbmFnZS1hY2NvdW50LWxpbmtzIiwidmlldy1wcm9maWxlIl19fSwic2NvcGUiOiJvcGVuaWQgcHJvZmlsZSBlbWFpbCIsImVtYWlsX3ZlcmlmaWVkIjpmYWxzZSwibmFtZSI6ImdyYWZhbmFhZG1pbiBncmFmYW5hYWRtaW5zc28iLCJncm91cHMiOlsiQWRtaW5pc3RyYXRvcnMiXSwicHJlZmVycmVkX3VzZXJuYW1lIjoiZ3JhZmFuYWFkbWluIiwiZ2l2ZW5fbmFtZSI6ImdyYWZhbmFhZG1pbiIsImZhbWlseV9uYW1lIjoiZ3JhZmFuYWFkbWluc3NvIiwiZW1haWwiOiJncmFmYW5hYWRtaW5Ac3RhY2suY29tIn0.j15bPkX0bpKbW1_TW1oYVHrPfTaka9MY8zLYbUb-01Ql5_efuHRM41kIup9arZWN7PlV4ZNI1V5PrXpHVdqSNTdNNBnhsDiK7J9ST8cArPOniThTt_MTBzzyoCQ1YgAal0QRjzRTLbv0B2Dxmn1to8z6ysl4HlQ4N_l1_CrHYMsOQ_hxXhGzTFtB0JY8hLKc3AoJEByN_DOk0yIcPbfKB9pw-Hp83a184bFeGwi3NbusCTL9A3GGRGLZ3BUdoCNTePH2xWFolkXIsiO1yzlYS0LpGfN2Q42B55dOOvDgNWOOB4XjeZHTcaC2Y5cIMtmV4hxcn3R_JXnb5E5J5YsPjQ",
  "expires_in": 300,
  "refresh_expires_in": 1800,
  "refresh_token": "eyJhbGciOiJIUzUxMiIsInR5cCIgOiAiSldUIiwia2lkIiA6ICJjYzM2OGE4Yy01OWUwLTRkZDgtOWY2OS05ZWQ5NDliNTM1ODEifQ.eyJleHAiOjE3ODgwMDIwNzksImlhdCI6MTc4ODAwMDI3OSwianRpIjoiMzg0NWRhNWEtOTJjMy00NDAxLTkxYWUtZTI3NmFhYmZhNDQwIiwiaXNzIjoiaHR0cDovL2xpbnV4c2VyLnN0YWNrLmNvbTo4MDgwL3JlYWxtcy9zdGFjayIsImF1ZCI6Imh0dHA6Ly9saW51eHNlci5zdGFjay5jb206ODA4MC9yZWFsbXMvc3RhY2siLCJzdWIiOiIwMDgxOWMyMy0yZTg4LTQ2MDQtYTg3OC1mOGEzMTMyOTRiMDciLCJ0eXAiOiJSZWZyZXNoIiwiYXpwIjoiZ3JhZmFuYXNzbyIsInNpZCI6IjcxOTJlZWQyLWYyNTYtNDljZi04MjgwLWRhNDExZWZkODBiZiIsInNjb3BlIjoib3BlbmlkIHJvbGVzIGFjciBiYXNpYyBncm91cHMgcHJvZmlsZSB3ZWItb3JpZ2lucyBlbWFpbCJ9.WlQNufEOj8Us3KleMX2nE-zmhyeX8X-cQEUbR3QPN6BJrSUSHB35zhbFnV-mMmgTZESunqCs0GFPvfnPBmRwIQ",
  "token_type": "Bearer",
  "id_token": "eyJhbGciOiJSUzI1NiIsInR5cCIgOiAiSldUIiwia2lkIiA6ICJRTGZCNERZSzhKdkcwTVNZcTE1UXJlRnE1dndnbDVFVlc4VGhpdlpHNVhNIn0.eyJleHAiOjE3ODgwMDA1NzksImlhdCI6MTc4ODAwMDI3OSwianRpIjoiY2NmMmJhYWQtMGQ1Yy00OGI5LWFmNDYtMzE3MzllNWUxYTg0IiwiaXNzIjoiaHR0cDovL2xpbnV4c2VyLnN0YWNrLmNvbTo4MDgwL3JlYWxtcy9zdGFjayIsImF1ZCI6ImdyYWZhbmFzc28iLCJzdWIiOiIwMDgxOWMyMy0yZTg4LTQ2MDQtYTg3OC1mOGEzMTMyOTRiMDciLCJ0eXAiOiJJRCIsImF6cCI6ImdyYWZhbmFzc28iLCJzaWQiOiI3MTkyZWVkMi1mMjU2LTQ5Y2YtODI4MC1kYTQxMWVmZDgwYmYiLCJhdF9oYXNoIjoiSjJnbUlsWGQ5OE9ZaDcwdnl6NWFLUSIsImFjciI6IjEiLCJlbWFpbF92ZXJpZmllZCI6ZmFsc2UsIm5hbWUiOiJncmFmYW5hYWRtaW4gZ3JhZmFuYWFkbWluc3NvIiwiZ3JvdXBzIjpbIkFkbWluaXN0cmF0b3JzIl0sInByZWZlcnJlZF91c2VybmFtZSI6ImdyYWZhbmFhZG1pbiIsImdpdmVuX25hbWUiOiJncmFmYW5hYWRtaW4iLCJmYW1pbHlfbmFtZSI6ImdyYWZhbmFhZG1pbnNzbyIsImVtYWlsIjoiZ3JhZmFuYWFkbWluQHN0YWNrLmNvbSJ9.Gh5SP5GFV--dCV9MXzryfXWY0b3EnjjxHam8QZDQQoq05qmxAZkptNvo2Q-w4mslNZJwLQUXbWFPqMDc5SIBIR-4PKbckvD_mmi2dgA7MuKPw9Unrl5sT5hPtCeVXHQzpKdo38BZLj6Mnq_04KHqWSAPYp_OmF12AckZHbhbW9x35N3nb4aLwoMWbB_XBomOl_NOR7NDTPgy-LuzpMrC9DUMEJa_oktz8xNO_GjHj7dL3Mqaigw28ftlYG_mw0e0ytbCl1O6xdxWgtewlJUMHs6b4zos-c6zURx6Y0sLw3jPhXT8v9caeVU6lotwPJpMkPC0RmGgZlYFCCmT8eogag",
  "not-before-policy": 0,
  "session_state": "7192eed2-f256-49cf-8280-da411efd80bf",
  "scope": "openid profile email"
}
You can validate your issued token at JWT token decoder. Here is the JSON token in my case.
{
  "exp": 1788000579,
  "iat": 1788000279,
  "jti": "7b9b48ae-c32a-489c-a0e4-4e7c2c40400b",
  "iss": "http://linuxser.stack.com:8080/realms/stack",
  "aud": "account",
  "sub": "00819c23-2e88-4604-a878-f8a313294b07",
  "typ": "Bearer",
  "azp": "grafanasso",
  "sid": "7192eed2-f256-49cf-8280-da411efd80bf",
  "acr": "1",
  "allowed-origins": [
    "http://linuxser.stack.com:3000"
  ],
  "realm_access": {
    "roles": [
      "default-roles-stack",
      "offline_access",
      "uma_authorization"
    ]
  },
  "resource_access": {
    "account": {
      "roles": [
        "manage-account",
        "manage-account-links",
        "view-profile"
      ]
    }
  },
  "scope": "openid profile email",
  "email_verified": false,
  "name": "grafanaadmin grafanaadminsso",
  "groups": [
    "Administrators"
  ],
  "preferred_username": "grafanaadmin",
  "given_name": "grafanaadmin",
  "family_name": "grafanaadminsso",
  "email": "grafanaadmin@stack.com"
}
With this we have now completed our Realm, Clients, Client Scopes, Users and Groups settings.
Step4: Configure Grafana
Now its time to configure grafana to use Keycloak as the authentication and authorization service provider.
- Navigate to Administration – Authentication and select Generic OAuth
- Configure the General Settings and User mapping as shown in below screenshots
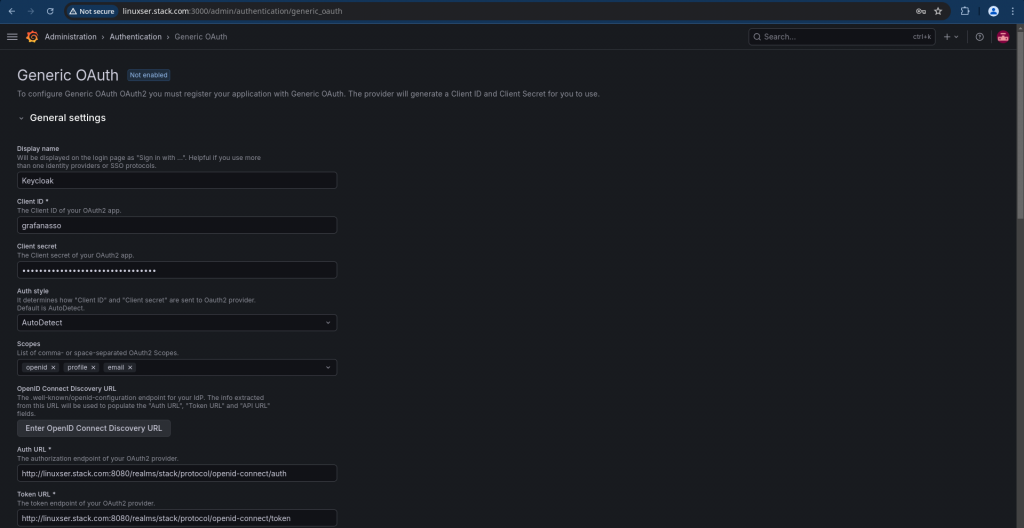
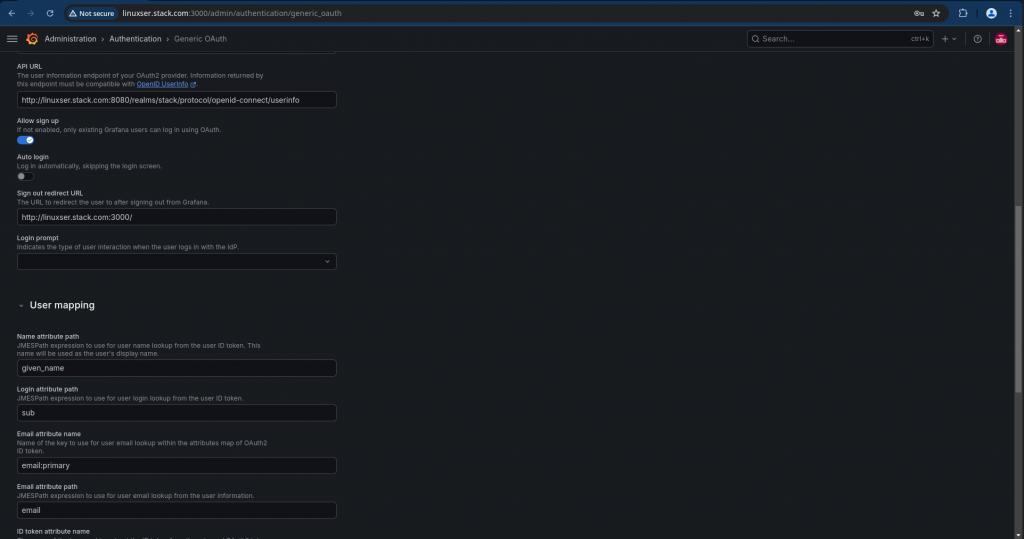
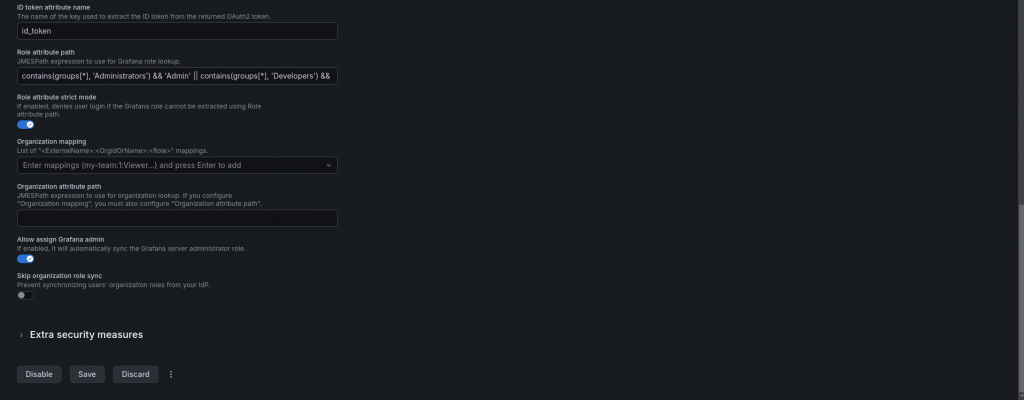
Here is the summary of the configuration carried out for Grafana with Keycloak OIDC.
display_name: Keycloak
client_id: grafanasso
client_secret: hrUkSg6BmKt2VRVXBlyPPLcBYk3GqnIi
auth_style: AutoDetect
scopes: openid profile email
auth_url: http://linuxser.stack.com:8080/realms/stack/protocol/openid-connect/auth
token_url: http://linuxser.stack.com:8080/realms/stack/protocol/openid-connect/token
api_url: http://linuxser.stack.com:8080/realms/stack/protocol/openid-connect/userinfo
allow_sign_up: true
auto_login: false
signout_redirect_url: http://linuxser.stack.com:3000/
name_attribute_path: given_name
login_attribute_path: sub
email_attribute_name: email:primary
email_attribute_path: email
id_token_attribute_name: id_token
role_attribute_path: contains(groups[*], 'Administrators') && 'Admin' || contains(groups[*], 'Developers') && 'Editor' || 'Viewer'
role_attribute_strict_mode: true
allow_assign_grafana_admin: true
Step5: Validate Grafana access with Keycloak OIDC
Once the Keycloak OIDC configuration is completed, you can access the grafana portal and you should now be able to see Sign in with Keycloak button.
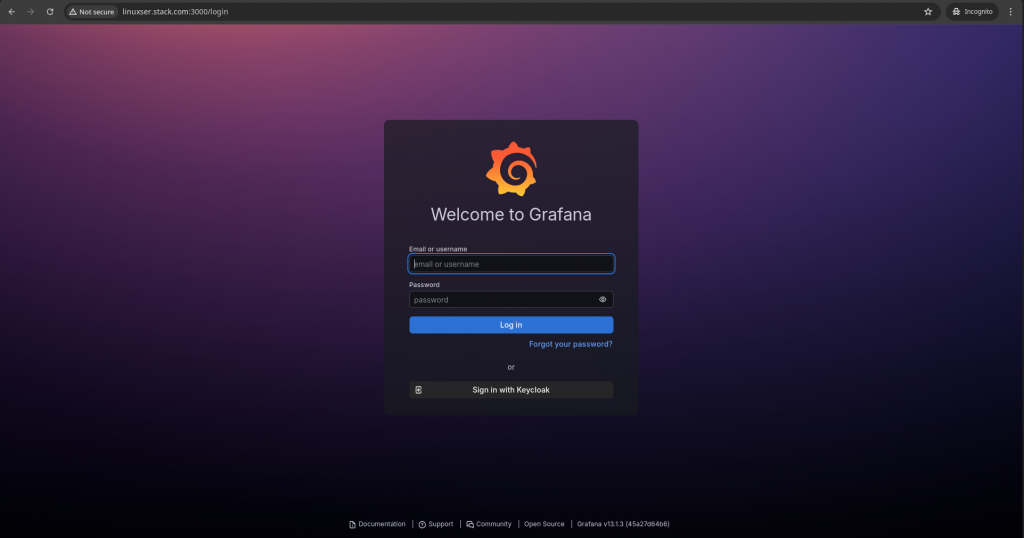
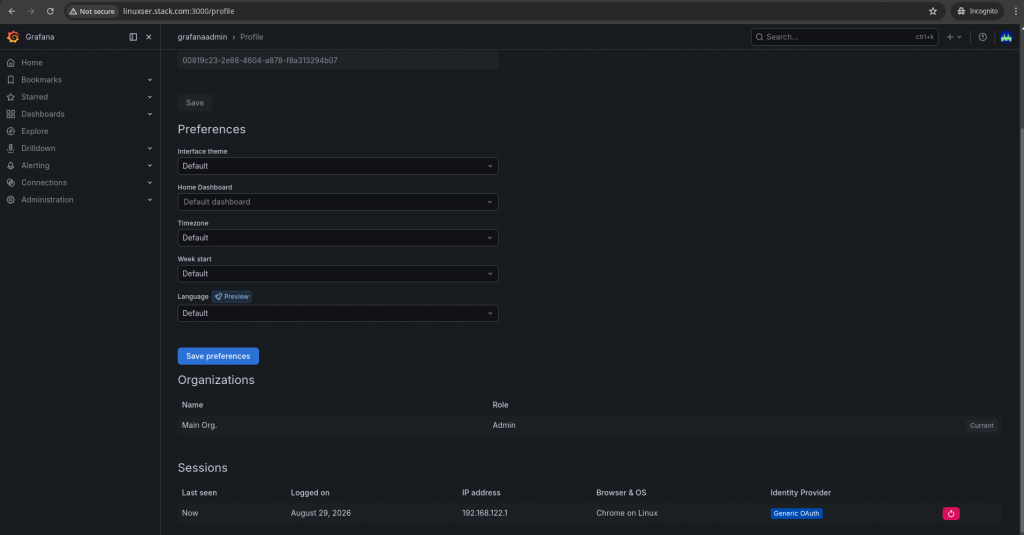
Login with grafanaadmin user and validate that the following user is granted the Admin privileges.
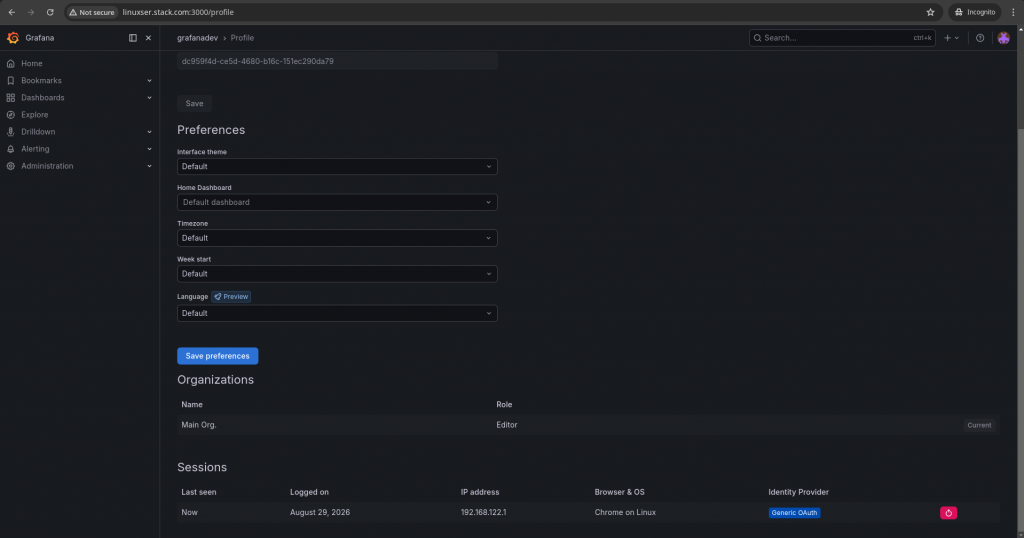
Login with grafanadev user and validate that the following user is granted the Editor privileges.
Hope you enjoyed reading this article. Thank you..

Leave a Reply
You must be logged in to post a comment.