How to setup secure Docker registry in Nexus OSS
Here in this article we will try to setup a secure docker registry to manage docker images using the Nexus OSS repository manager.
Test Environment
- Fedora 41 server
- Nexus 3.91.1
- Postgres 16.11
- Docker v28.5.2
- Docker Compose v5.1.0
Path Based Routing
Nexus OSS Path-Based Routing for storing docker images is a newer feature that allows multiple Docker repositories to share the same port (usually 8081) by using their repository names in the URL.
WARNING
There is a known issue with Docker v29.x.x, wherein it is unable to validate the self sign certificate for private registry.
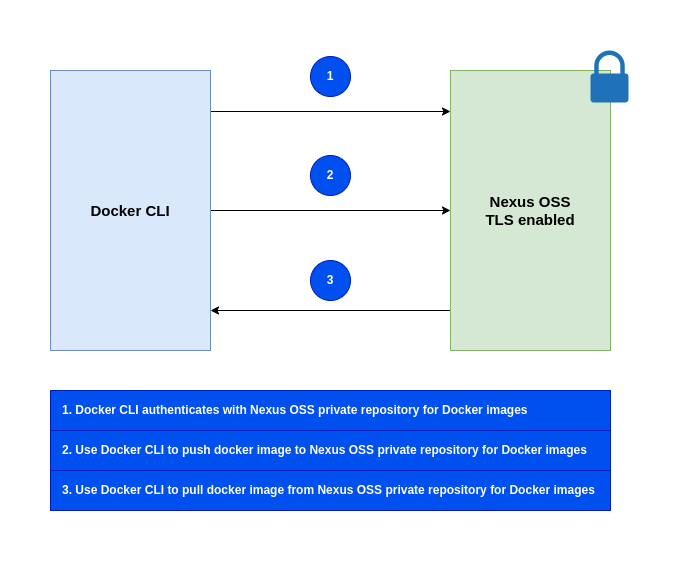
High Level Architecture
If you are interested in watching the video. Here is the YouTube video on the same step by step procedure outlined below.
Procedure
Step1: Ensure Nexus OSS running with TLS enabled
As a first step ensure that you have a instance of Nexus OSS running with TLS enabled. Follow “How to secure communication with Nexus OSS” for the same.
Step2: Ensure Docker installed and running
Here we are going to specifically insatll Docker v28.x.x due to know issue mentioned above.
admin@linuxser:~$ sudo dnf install docker-ce-28.5.2-1.fc41 docker-ce-cli-28.5.2-1.fc41 containerd.io docker-buildx-plugin docker-compose-plugin

admin@linuxser:~$ docker --version
Docker version 28.5.2, build ecc6942

admin@linuxser:~$ docker compose version
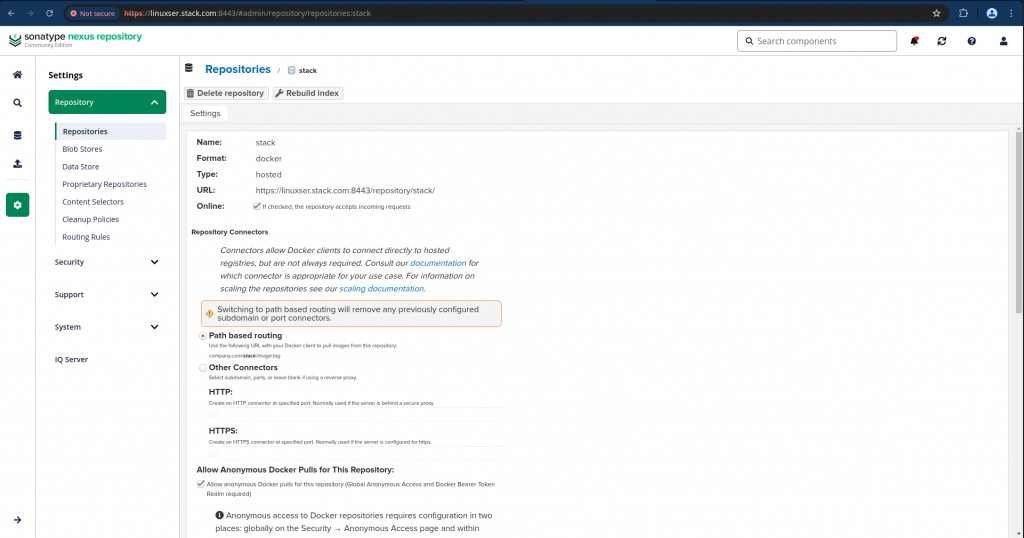
Step3: Create a Docker repository with Path based routing
Login as admin user and navigate to Settings – Repository and click on “Create Repository” and select “docker (hosted)” as we are going to setup a private docker registry repository for this demo.
Here are the settings details for the same.
Step4: Create a directory and load the self sign cert
Here we first need to create a directory “/etc/docker/certs.d/”. Under this directory we need to create another directory with nexus oss repository FQDN along with port as shown below.
We need to copy the self sign certificate that we extracted in “How to secure communication with Nexus OSS” to this location.
admin@linuxser:~$ sudo mkdir -p /etc/docker/certs.d/linuxser.stack.com:8443
admin@linuxser:~$ sudo cp ~/sonatype-work/nexus3/etc/ssl/linuxser.crt /etc/docker/certs.d/linuxser.stack.com\:8443/
Step5: Restart docker service
We need to restart the docker daemon for the certificate updates to take effect.
admin@linuxser:~$ sudo systemctl restart docker.service
Step6: Update nexus active realms
Now we need to navigate to Security – Realms and Add docker bearer token realm as the active realm as shown below.
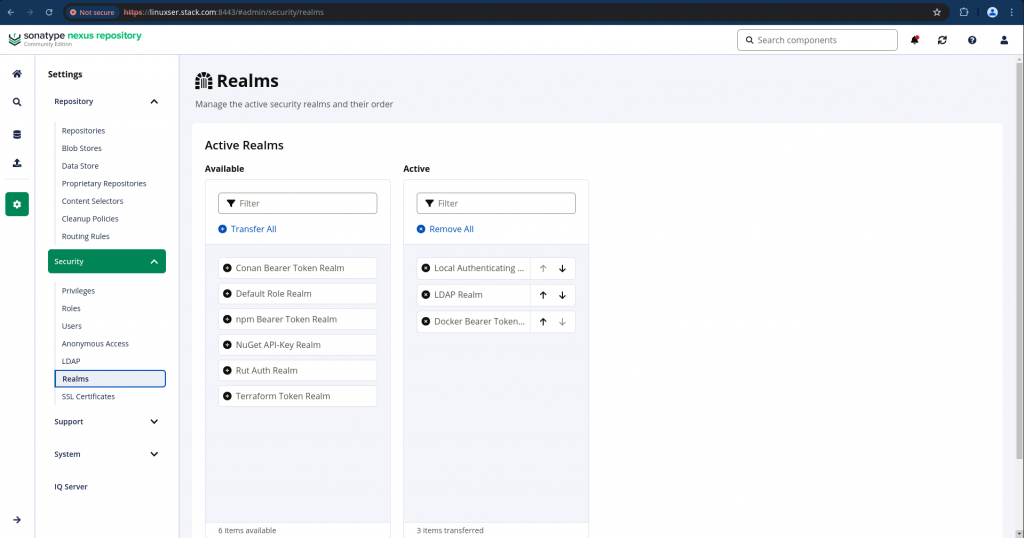
Nexus requires this specific security realm to handle the token-based authentication used by the Docker CLI.
Step7: Validate docker login with nexus repository
Let’s now try to authenticate with nexus oss private docker registry using docker as shown below.
admin@linuxser:~$ docker login linuxser.stack.com:8443
Username: admin
Password:

WARNING! Your credentials are stored unencrypted in '/home/admin/.docker/config.json'.
Configure a credential helper to remove this warning. See
https://docs.docker.com/go/credential-store/

Login Succeeded
Step8: Build docker images
Let’s clone the openldap repository and build the docker image as shown below for this demo.
admin@linuxser:~/openldapbuild$ git clone https://github.com/bitnami/containers.git
admin@linuxser:~/openldapbuild$ cd containers/bitnami/openldap/2.6/debian-12
admin@linuxser:~/openldapbuild/containers/bitnami/openldap/2.6/debian-12$ docker build -t linuxser.stack.com:8443/stack/openldap:2 .

admin@linuxser:~/openldapbuild/containers/bitnami/openldap/2.6/debian-12$ docker images | grep linuxser.stack.com
WARNING: This output is designed for human readability. For machine-readable output, please use --format.
linuxser.stack.com:8443/stack/openldap:2   ffaed8ba849e        248MB         60.6MB   U
Step9: Push docker images
Now let’s try to push this image to the docker repository that we created in Nexus OSS.
admin@linuxser:~$ docker push linuxser.stack.com:8443/stack/openldap:2
The push refers to repository [linuxser.stack.com:8443/stack/openldap]
17b8ff14fcb5: Pushed
e3108ef1cd24: Pushed
7b4144ebd8e9: Pushed
29cf62d8617c: Pushed
8221c3e33e8a: Pushed
d6a18e53cf01: Pushed
add101112d9c: Pushed
b98396c64aea: Pushed
38126ded394c: Pushed
7cb18c501124: Pushed
2: digest: sha256:adc168e0e7c299c408f338d03ab27f46b38821e259502fd7ec98467a18bf7995 size: 2413
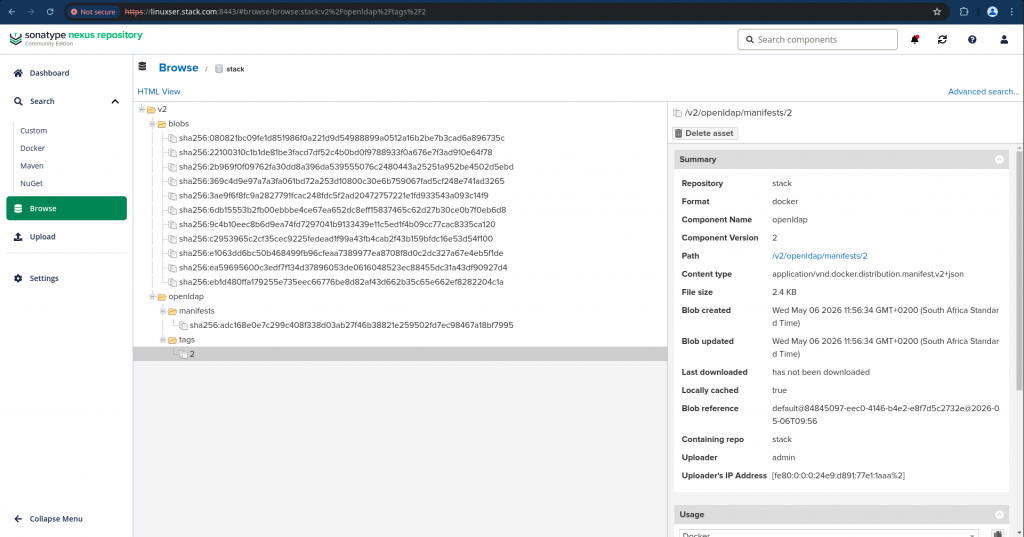
Step10: Validate Docker repository on Nexus OSS
We can now validate the image that has been pushed to the Nexus OSs docker repository by navigating to Browse expanding the v2 as shown below.
Step11: Pull docker images
First let’s delete the image locally available and pull the image from our Nexus OSS private repository.
admin@linuxser:~$ docker rmi linuxser.stack.com:8443/stack/openldap:2
Untagged: linuxser.stack.com:8443/stack/openldap:2
Untagged: linuxser.stack.com:8443/stack/openldap@sha256:adc168e0e7c299c408f338d03ab27f46b38821e259502fd7ec98467a18bf7995
Deleted: sha256:c2953965c2cf35cec9225fedead1f99a43fb4cab2f43b159bfdc16e53d54f100
admin@linuxser:~$ docker pull linuxser.stack.com:8443/stack/openldap:2
2: Pulling from stack/openldap
369c4d9e97a7: Already exists
22100310c1b1: Already exists
080821bc09fe: Already exists
2b969f0f0976: Already exists
ea59695600c3: Already exists
9c4b10eec8b6: Already exists
eb1d480ffa17: Already exists
e1063dd6bc50: Already exists
6db15553b2fb: Already exists
3ae9f6f8fc9a: Already exists
Digest: sha256:adc168e0e7c299c408f338d03ab27f46b38821e259502fd7ec98467a18bf7995
Status: Downloaded newer image for linuxser.stack.com:8443/stack/openldap:2
linuxser.stack.com:8443/stack/openldap:2

admin@linuxser:~$ docker images
REPOSITORY                               TAG       IMAGE ID       CREATED          SIZE
linuxser.stack.com:8443/stack/openldap   2         c2953965c2cf   12 minutes ago   168MB
Hope you enjoyed reading this article. Thank you..
Leave a Reply
You must be logged in to post a comment.