How to Build your Own Linux from Scratch – LFS

Here in this article we will be following the stable version of “Linux From Scratch – Version 12.3” to build our own Minimalistic Linux Distribution.
Test Environment
- Fedora 41 Workstation
Why Build Linux From Scratch
If you look at Distrowatch, there are hundreds of Linux Distributions present in the market. These distributions are built and designed for some specific use cases or sometimes taking into consideration their end users.
They are user-friendly desktops like Ubuntu and Manjaro, server environments with stable options like Debian and Rocky Linux, and specialized tasks such as penetration testing with Kali Linux or high-performance computing with distributions designed for minimal resource usage.
So, there is no such thing as single Linux OS or distribution, we can Custom build a Linux Distribution as per our requirements and needs by installing only the necessary packages.
Making my Own LFS distribution
The primary source of documentation to build Linux From Scratch distribution would be “Linux From Scratch – Version 12.3“. This Documentation, its actually a book that you can download as PDF is the golden source with so many details mentioned in it.
I am writing this article, to just help all the Linux enthusiast with the procedure that i followed, the issues that i encountered and checks that we need to ensure that they are in place before proceding with any step in the documentation and also to make it less daunting task and encourage you all to go for it and build your own Linux Distribution.
This is going to be a great learning experience where in you will able to know about the different packages that are needed to build your own Linux Distribution, understand the details and importance of different packages that we are going to compile and install. Also it provides us with some hands on experiences with different Linux commands and tools that we will use to achieve our task.
Moreover it will help you to understand and learn how a Linux system works internally.
If you are interested in watching the video. Here is the YouTube video on the same step by step procedure outlined below.
Procedure
Step1: Install Virtualization Packages
So here i am actually working on a Fedora OS installed on my x86_64 architecture platform or Host system on top of which we will be spinning up a virtual machine using the KVM virtualization.
Important: The reason we are doing this exercise on a KVM virtual machine with virtualization tools installed is it provides with the facility of creating a snapshot which will help us with restoration to last known good snapshot in case something goes wrong.
admin@fedser:~$ uname -a
Linux fedser 6.11.9-100.fc39.x86_64 #1 SMP PREEMPT_DYNAMIC Sun Nov 17 18:52:19 UTC 2024 x86_64 GNU/Linux
To get your virtualization environment setup ready you can follow “Virtualization – Getting Started” to install the necessary packages that are needed.
If you want to launch your Virtual Machines without root user privileges, you can update your current logged in user to be part of group “libvirt”.
admin@fedser:~$ id
uid=1001(admin) gid=1001(admin) groups=1001(admin),10(wheel),949(wireshark),972(docker),983(libvirt) context=unconfined_u:unconfined_r:unconfined_t:s0-s0:c0.c1023
Step2: Create a Virtual Machine
Here let us create a Virtual Machine with the following configuration. Though this is not the minimum required configuration to build the LFS distribtuion its better to allocate the below resources to our VM if possible to ensure that the packages are compiled, tested and installed without much delay.
Name: linuxscratch.stack.com
CPU: 8 Core
RAM: 8 GB
Disk: 100 GB
Firmware: BIOS
ISO: Fedora-Workstation-Live-x86_64-41-1.4.iso
Before we start with installation process of Fedora Workstation, you need to setup the Language, Locale and Timezone to use for your workstation and also there is an option to Customize the Virtual Hard Disk setup.
This is important here you need to ensure that you create the following partitions as shown in the screenshot below by leaving 70G unallocated space that we will use to build our LFS system.
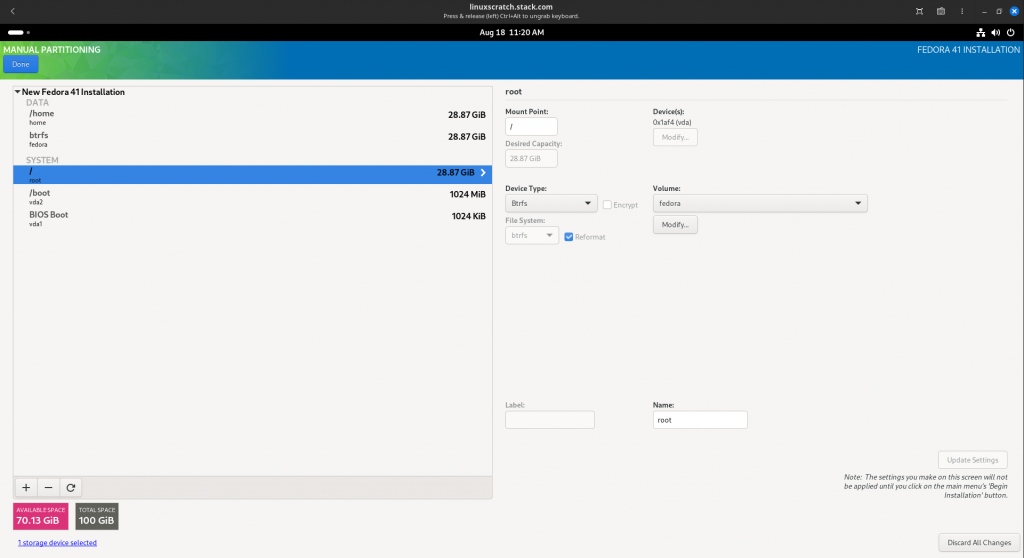
Now you can “Begin Installation” of Fedora Workstation Packages. Once installation is completed, you need to setup a user. Let’s create a user named “admin” with root privilages.
Once you are logged into your Fedora workstation, just ensure that you have updated all the packages with the latest version to ensure you are up to date and your partition configuration looks as shown below.
admin@linuxscratch:~$ sudo dnf -y update
admin@linuxscratch:~$ lsblk
NAME   MAJ:MIN RM  SIZE RO TYPE MOUNTPOINTS
sr0     11:0    1  2.3G  0 rom
zram0  251:0    0  7.7G  0 disk [SWAP]
vda    253:0    0  100G  0 disk
├─vda1 253:1    0    1M  0 part
├─vda2 253:2    0    1G  0 part /boot
└─vda3 253:3    0 28.9G  0 part /home
                             /
LFS usually is installed on a dedicated partition. The recommended approach to building an LFS system is to use an available empty partition or, if you have enough unpartitioned space, to create one.
Here we have created a partition on existing disk “/dev/vda” of 70GB size as shown below. We will require this partition to store all the source tarballs and compile the packages. Usually 30 GB partition is a reasonable size to provide for growth.
This recommended partition space of 30GB is to provide sufficient free temporary storage as well as for adding additional capabilities after LFS is complete. Additionally, compiling packages can require a lot of disk space which will be reclaimed after the package is installed.
Now let’s create a partition named “lfs” on the unallocated 70GB space which we will use to build our LFS system. Let’s set the Filesystem type as ext4 that we will create on this partition.
root@linuxscratch:~# parted /dev/vda
GNU Parted 3.6
Using /dev/vda
Welcome to GNU Parted! Type 'help' to view a list of commands.
(parted) mkpart
Partition name?  []? lfs
File system type?  [ext2]? ext4
Start? 29GB
End? 100%
Warning: You requested a partition from 29.0GB to 107GB (sectors 56640625..209715199).
The closest location we can manage is 32.1GB to 107GB (sectors 62646272..209715166).
Is this still acceptable to you?
Now if we look at the list block devices the output will show our newly created partition “/dev/vda4”.
root@linuxscratch:~# lsblk
NAME   MAJ:MIN RM  SIZE RO TYPE MOUNTPOINTS
sr0     11:0    1  2.3G  0 rom
zram0  251:0    0  7.7G  0 disk [SWAP]
vda    253:0    0  100G  0 disk
├─vda1 253:1    0    1M  0 part
├─vda2 253:2    0    1G  0 part /boot
├─vda3 253:3    0 28.9G  0 part /home
│                               /
└─vda4 253:4    0 70.1G  0 part
Let’s now create a filesystem of type “ext4” on this partition “/dev/vda4” as shown below.
root@linuxscratch:~# mkfs -v -t ext4 /dev/vda4
mke2fs 1.47.1 (20-May-2024)
fs_types for mke2fs.conf resolution: 'ext4'
Discarding device blocks: done
Filesystem label=
OS type: Linux
Block size=4096 (log=2)
Fragment size=4096 (log=2)
Stride=0 blocks, Stripe width=0 blocks
4603904 inodes, 18383611 blocks
919180 blocks (5.00%) reserved for the super user
First data block=0
Maximum filesystem blocks=2166358016
562 block groups
32768 blocks per group, 32768 fragments per group
8192 inodes per group
Filesystem UUID: 5877575f-c525-4fa0-a750-85e6b59884cb
Superblock backups stored on blocks:
	32768, 98304, 163840, 229376, 294912, 819200, 884736, 1605632, 2654208,
	4096000, 7962624, 11239424

Allocating group tables: done
Writing inode tables: done
Creating journal (131072 blocks): done
Writing superblocks and filesystem accounting information: done
Once our filesystem is created, its time to mount our partion and update the “/etc/fstab” so its gets auto mounted on reboot.
Here we are creating a mount point directory “/mnt/lfs” onto which we will mount our newly created partition “/dev/vda4” with filesystem type as “ext4” as shown below.
root@linuxscratch:~# mkdir -pv /mnt/lfs
mkdir: created directory '/mnt/lfs'

root@linuxscratch:~# mount -v -t ext4 /dev/vda4 /mnt/lfs
mount: /mnt/lfs does not contain SELinux labels.
       You just mounted a file system that supports labels which does not
       contain labels, onto an SELinux box. It is likely that confined
       applications will generate AVC messages and not be allowed access to
       this file system.  For more details see restorecon(8) and mount(8).
mount: /dev/vda4 mounted on /mnt/lfs.
Let’s update our “/etc/fstab” also with mount details so its gets auto mounted on every reboot.
root@linuxscratch:~# cat /etc/fstab

#
# /etc/fstab
# Created by anaconda on Mon Aug 18 11:24:09 2025
#
# Accessible filesystems, by reference, are maintained under '/dev/disk/'.
# See man pages fstab(5), findfs(8), mount(8) and/or blkid(8) for more info.
#
# After editing this file, run 'systemctl daemon-reload' to update systemd
# units generated from this file.
#
UUID=ccc081fa-5414-4b3d-a83e-e0f960023448 /                       btrfs   subvol=root,compress=zstd:1 0 0
UUID=3a2aaf31-dd82-47b1-8256-c4399dfd3963 /boot                   ext4    defaults        1 2
UUID=ccc081fa-5414-4b3d-a83e-e0f960023448 /home                   btrfs   subvol=home,compress=zstd:1 0 0
/dev/vda4 /mnt/lfs ext4 defaults 0 1
IMPORTANT: LFS system that we are going to build does not support selinux feature, so we need to disable selinux on host system so that the filesystem that we are going to later mount into the LFS system does not provide issues later. Especially when we build and install “Attr” package in which one of test case validates for extended filesystem attributes check.
admin@linuxscratch:~$ cat /etc/selinux/config

# This file controls the state of SELinux on the system.
# SELINUX= can take one of these three values:
#     enforcing - SELinux security policy is enforced.
#     permissive - SELinux prints warnings instead of enforcing.
#     disabled - No SELinux policy is loaded.
# See also:
# https://docs.fedoraproject.org/en-US/quick-docs/getting-started-with-selinux/#getting-started-with-selinux-selinux-states-and-modes
#
# NOTE: In earlier Fedora kernel builds, SELINUX=disabled would also
# fully disable SELinux during boot. If you need a system with SELinux
# fully disabled instead of SELinux running with no policy loaded, you
# need to pass selinux=0 to the kernel command line. You can use grubby
# to persistently set the bootloader to boot with selinux=0:
#
#    grubby --update-kernel ALL --args selinux=0
#
# To revert back to SELinux enabled:
#
#    grubby --update-kernel ALL --remove-args selinux
#
SELINUX=disabled
# SELINUXTYPE= can take one of these three values:
#     targeted - Targeted processes are protected,
#     minimum - Modification of targeted policy. Only selected processes are protected.
#     mls - Multi Level Security protection.
SELINUXTYPE=targeted
Now its time to reboot your system and verify that you are able to login and validate your new filesystem is loaded properly.
If everything looks good its a good time to take a snapshot of your VM from your host system. Shutdown your VM and take a snapshot from your host system as shown below.
admin@fedser:~$ virsh snapshot-create-as linuxscratch linuxscratch_snapshot
Step3: Required Software’s on Host system
We need to ensure that the host system has the following software version installed. Also, many distributions will place software headers into separate packages, often in the form of <package-name>-devel or <package-name>-dev. We need to ensure that we install those if the distribution provides them.
Refer Host System Requirements for package details.
Important**: Note that the symlinks mentioned in the document are required to build an LFS system using the instructions contained within this book. Symlinks that point to other software (such as dash, mawk, etc.) may work, but are not tested.
Step4: Verify Software’s installed on Host system
Here we will use a script to detect what software versions are installed on host system that required for LFS build and output an error in case it does not find the required package.
admin@linuxscratch:~$ cat version-check.sh
#!/bin/bash
# A script to list version numbers of critical development tools

# If you have tools installed in other directories, adjust PATH here AND
# in ~lfs/.bashrc (section 4.4) as well.

LC_ALL=C
PATH=/usr/bin:/bin

bail() { echo "FATAL: $1"; exit 1; }
grep --version > /dev/null 2> /dev/null || bail "grep does not work"
sed '' /dev/null || bail "sed does not work"
sort   /dev/null || bail "sort does not work"

ver_check()
{
   if ! type -p $2 &>/dev/null
   then
     echo "ERROR: Cannot find $2 ($1)"; return 1;
   fi
   v=$($2 --version 2>&1 | grep -E -o '[0-9]+\.[0-9\.]+[a-z]*' | head -n1)
   if printf '%s\n' $3 $v | sort --version-sort --check &>/dev/null
   then
     printf "OK:    %-9s %-6s >= $3\n" "$1" "$v"; return 0;
   else
     printf "ERROR: %-9s is TOO OLD ($3 or later required)\n" "$1";
     return 1;
   fi
}

ver_kernel()
{
   kver=$(uname -r | grep -E -o '^[0-9\.]+')
   if printf '%s\n' $1 $kver | sort --version-sort --check &>/dev/null
   then
     printf "OK:    Linux Kernel $kver >= $1\n"; return 0;
   else
     printf "ERROR: Linux Kernel ($kver) is TOO OLD ($1 or later required)\n" "$kver";
     return 1;
   fi
}

# Coreutils first because --version-sort needs Coreutils >= 7.0
ver_check Coreutils      sort     8.1 || bail "Coreutils too old, stop"
ver_check Bash           bash     3.2
ver_check Binutils       ld       2.13.1
ver_check Bison          bison    2.7
ver_check Diffutils      diff     2.8.1
ver_check Findutils      find     4.2.31
ver_check Gawk           gawk     4.0.1
ver_check GCC            gcc      5.2
ver_check "GCC (C++)"    g++      5.2
ver_check Grep           grep     2.5.1a
ver_check Gzip           gzip     1.3.12
ver_check M4             m4       1.4.10
ver_check Make           make     4.0
ver_check Patch          patch    2.5.4
ver_check Perl           perl     5.8.8
ver_check Python         python3  3.4
ver_check Sed            sed      4.1.5
ver_check Tar            tar      1.22
ver_check Texinfo        texi2any 5.0
ver_check Xz             xz       5.0.0
ver_kernel 5.4

if mount | grep -q 'devpts on /dev/pts' && [ -e /dev/ptmx ]
then echo "OK:    Linux Kernel supports UNIX 98 PTY";
else echo "ERROR: Linux Kernel does NOT support UNIX 98 PTY"; fi

alias_check() {
   if $1 --version 2>&1 | grep -qi $2
   then printf "OK:    %-4s is $2\n" "$1";
   else printf "ERROR: %-4s is NOT $2\n" "$1"; fi
}
echo "Aliases:"
alias_check awk GNU
alias_check yacc Bison
alias_check sh Bash

echo "Compiler check:"
if printf "int main(){}" | g++ -x c++ -
then echo "OK:    g++ works";
else echo "ERROR: g++ does NOT work"; fi
rm -f a.out

if [ "$(nproc)" = "" ]; then
   echo "ERROR: nproc is not available or it produces empty output"
else
   echo "OK: nproc reports $(nproc) logical cores are available"
fi
NOTE: LFS is designed to be built in one session. That is, the instructions assume that the system will not be shut down during the process. This does not mean that the system has to be built in one sitting. The issue is that certain procedures must be repeated after a reboot when resuming LFS at different points.
Step5: Set LFS environment variable and Umask value
The LFS environment variable will be used throughout the LFS build process. We need to ensure that we set it to the name of the directory where we will be building your LFS system (ie. /mnt/lfs in this case).
To ensure that its permanently set as a part of root user session, we will update the root user’s “.bashrc” file as shown below.
Switch to root user.
admin@linuxscratch:~$ sudo su -
root@linuxscratch:~# cat ~/.bashrc
# .bashrc

# Source global definitions
if [ -f /etc/bashrc ]; then
	. /etc/bashrc
fi

# User specific environment
if ! [[ "$PATH" =~ "$HOME/.local/bin:$HOME/bin:" ]]
then
    PATH="$HOME/.local/bin:$HOME/bin:$PATH"
fi
export PATH

# Uncomment the following line if you don't like systemctl's auto-paging feature:
# export SYSTEMD_PAGER=

# User specific aliases and functions

alias rm='rm -i'
alias cp='cp -i'
alias mv='mv -i'
export LFS=/mnt/lfs
Let’s do the same for the currently logged in user (ie. ‘admin’ in my case).
admin@linuxscratch:~$ cat ~/.bashrc
# .bashrc

# Source global definitions
if [ -f /etc/bashrc ]; then
    . /etc/bashrc
fi

# User specific environment
if ! [[ "$PATH" =~ "$HOME/.local/bin:$HOME/bin:" ]]; then
    PATH="$HOME/.local/bin:$HOME/bin:$PATH"
fi
export PATH

# Uncomment the following line if you don't like systemctl's auto-paging feature:
# export SYSTEMD_PAGER=

# User specific aliases and functions
if [ -d ~/.bashrc.d ]; then
    for rc in ~/.bashrc.d/*; do
        if [ -f "$rc" ]; then
            . "$rc"
        fi
    done
fi
unset rc
export LFS=/mnt/lfs
Now let’s set the file mode creation mask (umask) to 022 in case the host distro uses a different default for both current user and root user.
root@linuxscratch:~# umask 022
0022
Step6: Filesystem Ownership update
Set the owner and permission mode of the $LFS directory (i.e. the root directory in the newly created file system for the LFS system) to root and 755.
root@linuxscratch:/mnt/lfs# chown root:root $LFS
root@linuxscratch:/mnt/lfs# chmod 755 $LFS

root@linuxscratch:/mnt/lfs# ls -ld $LFS
drwxr-xr-x. 3 root root 4096 Aug 18 19:00 /mnt/lfs
Step7: Download Packages and Patches
Here we will download a list of packages and some patches that are needed to build a basic Linux system. $LFS/sources can be used both as the place to store the tarballs and patches and as a working directory. By using this directory, the required elements will be located on the LFS partition and will be available during all stages of the building process.
Let create the sources directory and update its permission such that its writable and sticky.
root@linuxscratch:~# mkdir -v $LFS/sources
mkdir: created directory '/mnt/lfs/sources'

root@linuxscratch:~# chmod -v a+wt $LFS/sources
mode of '/mnt/lfs/sources' changed from 0755 (rwxr-xr-x) to 1777 (rwxrwxrwt)
root@linuxscratch:~# wget https://www.linuxfromscratch.org/lfs/view/stable/wget-list-sysv -O $LFS/sources/wget-list-sysv

root@linuxscratch:~# ls -ltr $LFS/sources/wget-list-sysv
-rw-r--r--. 1 root root 5989 Mar  5 01:27 /mnt/lfs/sources/wget-list-sysv

root@linuxscratch:~# wget --input-file=$LFS/sources/wget-list-sysv --continue --directory-prefix=$LFS/sources
Ensure that you have got all the packages downloaded and are owned by root user. Also you need to ensure that you have the same exact version of the packages as listed in the file. You can also verify the checksum of the packages that are downloaded by following “Packages and Patches“.
root@linuxscratch:~# chown root:root $LFS/sources/*
admin@linuxscratch:~# ls -ltr $LFS/sources/* | wc -l
94
At the time of this writing i was having issues downloading one of the package “expat-2.6.4.tar.xz” from the source. So i got it from its GitHub release page.
If you face any issue downloading other packages you can always try to download it from a mirror site by update the “wget-list-sysv” list manually.
Its time now to take another snapshot of the virtual machine. Stop the VM and take the snapshot.
admin@fedser:~$ virsh snapshot-create-as linuxscratch linuxscratch_snapshot_downloaded_packages
Before proceeding with the next steps ensure you have started your virtual machine and you are logged in as ROOT user. Also ensure that $LFS environment variable and UMASK values are set as per done in previous steps.
Step8: Final Preparation of Host System
Here we will perform few additional tasks to prepare for building the temporary system. We will create a set of directories in $LFS (in which we will install the temporary tools), add an unprivileged user, and create an appropriate build environment for that user.
Created Limited LFS directory layout
mkdir -pv $LFS/{etc,var} $LFS/usr/{bin,lib,sbin}

for i in bin lib sbin; do
  ln -sv usr/$i $LFS/$i
done

case $(uname -m) in
  x86_64) mkdir -pv $LFS/lib64 ;;
esac
root@linuxscratch:/mnt/lfs# ls -ltr /mnt/lfs
total 36
drwx------. 2 root root 16384 Aug 18 21:26 lost+found
drwxrwxrwt. 2 root root  4096 Aug 18 22:30 sources
drwxr-xr-x. 2 root root  4096 Aug 18 22:40 etc
drwxr-xr-x. 2 root root  4096 Aug 18 22:40 var
drwxr-xr-x. 5 root root  4096 Aug 18 22:40 usr
lrwxrwxrwx. 1 root root     7 Aug 18 22:41 bin -> usr/bin
lrwxrwxrwx. 1 root root     7 Aug 18 22:41 lib -> usr/lib
lrwxrwxrwx. 1 root root     8 Aug 18 22:41 sbin -> usr/sbin
drwxr-xr-x. 2 root root  4096 Aug 18 22:42 lib64
root@linuxscratch:/mnt/lfs# mkdir -pv $LFS/tools
NOTE: The LFS editors have deliberately decided not to use a /usr/lib64 directory. Several steps are taken to be sure the toolchain will not use it. If for any reason this directory appears (either because you made an error in following the instructions, or because you installed a binary package that created it after finishing LFS), it may break your system. You should always be sure this directory does not exist.
Add LFS user
We will create a new user called lfs as a member of a new group (also named lfs) and run commands as lfs during the installation process.
root@linuxscratch:/mnt/lfs# groupadd lfs
root@linuxscratch:/mnt/lfs# useradd -s /bin/bash -g lfs -m -k /dev/null lfs
root@linuxscratch:/mnt/lfs# passwd lfs
Here are the user credentials that we set.
user: lfs
password: lfs1234
Grant lfs full access to all the directories under $LFS by making lfs the owner,
root@linuxscratch:/mnt/lfs# chown -v lfs $LFS/{usr{,/*},var,etc,tools}
case $(uname -m) in
  x86_64) chown -v lfs $LFS/lib64 ;;
esac
Next, start a shell running as user lfs. This can be done by logging in as lfs on a virtual console, or with the following substitute/switch user command.
root@linuxscratch:/mnt/lfs# su - lfs
lfs@linuxscratch:~$
While logged in as user lfs, issue the following command to create a new .bash_profile.
lfs@linuxscratch:~$ cat > ~/.bash_profile << "EOF"
exec env -i HOME=$HOME TERM=$TERM PS1='\u:\w\$ ' /bin/bash
EOF
This will replaces the running shell with a new one with a completely empty environment, except for the HOME, TERM, and PS1 variables. This ensures that no unwanted and potentially hazardous environment variables from the host system leak into the build environment.
lfs:~$ echo $HOME
/home/lfs
lfs:~$ printenv
PWD=/home/lfs
HOME=/home/lfs
TERM=xterm-256color
SHLVL=1
PS1=\u:\w\$
OLDPWD=/mnt/lfs
_=/usr/bin/printenv
The new instance of the shell is a non-login shell, which does not read, and execute, the contents of the /etc/profile or .bash_profile files, but rather reads, and executes, the .bashrc file instead. Create the .bashrc file now.
cat > ~/.bashrc << "EOF"
set +h
umask 022
LFS=/mnt/lfs
LC_ALL=POSIX
LFS_TGT=$(uname -m)-lfs-linux-gnu
PATH=/usr/bin
if [ ! -L /bin ]; then PATH=/bin:$PATH; fi
PATH=$LFS/tools/bin:$PATH
CONFIG_SITE=$LFS/usr/share/config.site
export LFS LC_ALL LFS_TGT PATH CONFIG_SITE
EOF
To use all logical cores available for building packages in Chapter 5 and Chapter 6, set MAKEFLAGS now in .bashrc.
lfs:~$ cat >> ~/.bashrc << "EOF"
export MAKEFLAGS=-j$(nproc)
EOF
Finally, to ensure the environment is fully prepared for building the temporary tools, force the bash shell to read the new user profile.
lfs:~$ source ~/.bash_profile
Now your shell environment variable should be looking something like this.
lfs:~$ cat ~/.bash_profile
exec env -i HOME=$HOME TERM=$TERM PS1='\u:\w\$ ' /bin/bash

lfs:~$ printenv
PWD=/home/lfs
HOME=/home/lfs
MAKEFLAGS=-j8
TERM=xterm-256color
SHLVL=1
PS1=\u:\w\$
LFS_TGT=x86_64-lfs-linux-gnu
LC_ALL=POSIX
LFS=/mnt/lfs
CONFIG_SITE=/mnt/lfs/usr/share/config.site
PATH=/mnt/lfs/tools/bin:/usr/bin
_=/usr/bin/printenv
Standard Build Unit (SBU)
A Standard Build Unit (SBU) is a relative measure of software compilation and installation time, used in projects like Linux from Scratch (LFS) to estimate build durations across different hardware. It’s defined as the time it takes to compile the first package, such as Binutils, to provide a baseline. Any other package’s build time is then expressed as a multiple of this standard, allowing users to predict their own build times relative to the SBU.
Test Suites
The test suites for the core toolchain packages—GCC, binutils, and glibc—are of the utmost importance due to their central role in a properly functioning system. The test suites for GCC and glibc can take a very long time to complete, especially on slower hardware, but are strongly recommended.
Unit this point we have covered most of the part that are required to be carried out from Part I and Part II of the LFS from Scratch book.
Let us now head towards Part III “[Building the LFS Cross Toolchain and Temporary Tools](https://www.linuxfromscratch.org/lfs/view/stable/part3.html)”. This part is basically divided into three stages as listed below.
1. Building a cross compiler and its associated libraries
2. Using this cross toolchain to build several utilities in a way that isolates them from the host distribution
3. Entering the chroot environment (which further improves host isolation) and constructing the remaining tools needed to build the final system
Step9: General Compilations Instructions and Checks
Before proceeding into the Cross Compilations of package, let us ensure that the Host System Requirements, including symbolic links, have been set properly.
lfs:~$ ls -ltr /usr/bin/bash
-rwxr-xr-x. 1 root root 1414688 Aug 12  2024 /usr/bin/bash
lfs:~$ ls -ltr /usr/bin/sh
lrwxrwxrwx. 1 root root 4 Aug 12  2024 /usr/bin/sh -> bash
lfs:~$ ls -ltr /usr/bin/awk
lrwxrwxrwx. 1 root root 4 Jul 18  2024 /usr/bin/awk -> gawk
lfs:~$ ls -ltr /usr/bin/yacc
lrwxrwxrwx. 1 root root 14 Aug 19 07:50 /usr/bin/yacc -> /usr/bin/bison
Here are the generic instructions that we need to follow for each package that we are going to compile and install.
Synopsis on Build Process
Place all the sources and patches in a directory that will be accessible from the chroot environment, such as /mnt/lfs/sources/.
Change to the /mnt/lfs/sources/ directory.
For each package:
- Using the tar program, extract the package to be built. In Chapter 5 and Chapter 6, ensure you are the lfs user when extracting the package.
- Do not use any method except the tar command to extract the source code. Notably, using the cp -R command to copy the source code tree somewhere else can destroy timestamps in the source tree, and cause the build to fail.
- Change to the directory created when the package was extracted.
- Follow the instructions for building the package.
- Change back to the sources directory when the build is complete.
- Delete the extracted source directory unless instructed otherwise.
Step10: Compiling a Cross-Toolchain
Now we need to enter into LFS Chapter 5 Compiling a Cross-Toolchain.
Here i am going to just show the first package that we are going to build ie. binutils. Same procedure needs to be followed for all the other packages as defined in the LFS documentation.
It is important that Binutils be the first package compiled because both Glibc and GCC perform various tests on the available linker and assembler to determine which of their own features to enable.
lfs:/mnt/lfs/sources$ pwd
/mnt/lfs/sources
The Binutils documentation recommends building Binutils in a dedicated build directory.
lfs:/mnt/lfs/sources$ tar -xf binutils-2.44.tar.xz
lfs:/mnt/lfs/sources$ cd binutils-2.44
lfs:/mnt/lfs/sources/binutils-2.44$ mkdir -v build
lfs:/mnt/lfs/sources/binutils-2.44$ cd build
Configure:
lfs:/mnt/lfs/sources/binutils-2.44/build$ ../configure --prefix=$LFS/tools \
             --with-sysroot=$LFS \
             --target=$LFS_TGT   \
             --disable-nls       \
             --enable-gprofng=no \
             --disable-werror    \
             --enable-new-dtags  \
             --enable-default-hash-style=gnu

checking build system type... x86_64-pc-linux-gnu
checking host system type... x86_64-pc-linux-gnu
...
checking where to find the target windmc... just compiled
checking whether to enable maintainer-specific portions of Makefiles... no
configure: creating ./config.status
config.status: creating Makefile
Make:
lfs:/mnt/lfs/sources/binutils-2.44/build$ make
Make Install:
lfs:/mnt/lfs/sources/binutils-2.44/build$ make install
Remove Package:
lfs:/mnt/lfs/sources/binutils-2.44/build$ cd ../..
lfs:/mnt/lfs/sources$ rm -rf binutils-2.44
The above compile and installation took approx 6 min on 8 core processor. This going to be base value of 1 SBU.
All other packages compilation and installation will be based on this value.
Continue with the Cross Compilation of Cross-Toolchain for all the packages listed in LFS Chapter 5 Compiling a Cross-Toolchain.
Step11: Cross Compiling Temporary Tools
Here we see how to cross-compile basic utilities using the just built cross-toolchain. Those utilities are installed into their final location, but cannot be used yet. Basic tasks still rely on the host’s tools. Nevertheless, the installed libraries are used when linking.
These utilities that we build here will later be utilized after entering the “chroot” environment. Follow Chapter 6: “Cross Compiling Temporary Tools“.
Ensure that you are doing this activity with the “lfs” user rather than root user.
Step12: Entering Chroot and Building Additional Temporary Tools
This is LFS Chapter 7: “Entering Chroot and Building Additional Temporary Tools” where in build the last missing bits of the temporary system.
Here we will be entering into “chroot” environment to compelete the build and installation of additional temporary tools.
For proper operation of the isolated environment, some communication with the running kernel must be established. This is done via the so-called Virtual Kernel File Systems, which will be mounted before entering the chroot environment. You may want to verify that they are mounted by issuing the findmnt command.
Change Ownership for $LFS
root@linuxscratch:~# ls -ltr /mnt/lfs
total 40
drwx------. 2 root root 16384 Aug 18 21:26 lost+found
lrwxrwxrwx. 1 root root     7 Aug 18 22:41 bin -> usr/bin
lrwxrwxrwx. 1 root root     7 Aug 18 22:41 lib -> usr/lib
lrwxrwxrwx. 1 root root     8 Aug 18 22:41 sbin -> usr/sbin
drwxr-xr-x. 9 lfs  root  4096 Aug 19 09:40 tools
drwxr-xr-x. 2 lfs  root  4096 Aug 19 12:59 lib64
drwxr-xr-x. 2 lfs  root  4096 Aug 19 13:11 etc
drwxr-xr-x. 3 lfs  root  4096 Aug 19 13:11 var
drwxr-xr-x. 9 lfs  root  4096 Aug 19 17:00 usr
drwxrwxrwt. 2 root root  4096 Aug 19 17:25 sources
root@linuxscratch:~# chown --from lfs -R root:root $LFS/{usr,lib,var,etc,bin,sbin,tools}
case $(uname -m) in
  x86_64) chown --from lfs -R root:root $LFS/lib64 ;;
esac
root@linuxscratch:~# ls -ltr /mnt/lfs
total 40
drwx------. 2 root root 16384 Aug 18 21:26 lost+found
lrwxrwxrwx. 1 root root     7 Aug 18 22:41 bin -> usr/bin
lrwxrwxrwx. 1 root root     7 Aug 18 22:41 lib -> usr/lib
lrwxrwxrwx. 1 root root     8 Aug 18 22:41 sbin -> usr/sbin
drwxr-xr-x. 9 root root  4096 Aug 19 09:40 tools
drwxr-xr-x. 2 root root  4096 Aug 19 12:59 lib64
drwxr-xr-x. 2 root root  4096 Aug 19 13:11 etc
drwxr-xr-x. 3 root root  4096 Aug 19 13:11 var
drwxr-xr-x. 9 root root  4096 Aug 19 17:00 usr
drwxrwxrwt. 2 root root  4096 Aug 19 17:25 sources
Preparing Virtual Kernel Filesystem
Applications running in userspace utilize various file systems created by the kernel to communicate with the kernel itself. These file systems are virtual: no disk space is used for them. The content of these file systems resides in memory. These file systems must be mounted in the $LFS directory tree so the applications can find them in the chroot environment.
root@linuxscratch:~# mkdir -pv $LFS/{dev,proc,sys,run}
mkdir: created directory '/mnt/lfs/dev'
mkdir: created directory '/mnt/lfs/proc'
mkdir: created directory '/mnt/lfs/sys'
mkdir: created directory '/mnt/lfs/run'

root@linuxscratch:~# ls -ltr /mnt/lfs
total 56
drwx------. 2 root root 16384 Aug 18 21:26 lost+found
lrwxrwxrwx. 1 root root     7 Aug 18 22:41 bin -> usr/bin
lrwxrwxrwx. 1 root root     7 Aug 18 22:41 lib -> usr/lib
lrwxrwxrwx. 1 root root     8 Aug 18 22:41 sbin -> usr/sbin
drwxr-xr-x. 9 root root  4096 Aug 19 09:40 tools
drwxr-xr-x. 2 root root  4096 Aug 19 12:59 lib64
drwxr-xr-x. 2 root root  4096 Aug 19 13:11 etc
drwxr-xr-x. 3 root root  4096 Aug 19 13:11 var
drwxr-xr-x. 9 root root  4096 Aug 19 17:00 usr
drwxrwxrwt. 2 root root  4096 Aug 19 17:25 sources
drwxr-xr-x. 2 root root  4096 Aug 19 17:44 dev
drwxr-xr-x. 2 root root  4096 Aug 19 17:44 sys
drwxr-xr-x. 2 root root  4096 Aug 19 17:44 run
drwxr-xr-x. 2 root root  4096 Aug 19 17:44 proc
The only host-agnostic way to populate the $LFS/dev directory is by bind mounting the host system’s /dev directory. A bind mount is a special type of mount that makes a directory subtree or a file visible at some other location.
root@linuxscratch:~# mount -v --bind /dev $LFS/dev
mount: /dev bound on /mnt/lfs/dev.
Mount Virtual Kernel Filesystems
root@linuxscratch:~# mount -vt devpts devpts -o gid=5,mode=0620 $LFS/dev/pts
root@linuxscratch:~# mount -vt proc proc $LFS/proc
root@linuxscratch:~# mount -vt sysfs sysfs $LFS/sys
root@linuxscratch:~# mount -vt tmpfs tmpfs $LFS/run

root@linuxscratch:~# if [ -h $LFS/dev/shm ]; then
  echo "Mounting /dev/shm into chroot if symlink found"
  install -v -d -m 1777 $LFS$(realpath /dev/shm)
else
  echo "Mounting tmpfs into chroot if symlink not found"
  mount -vt tmpfs -o nosuid,nodev tmpfs $LFS/dev/shm
fi
Verify all the Virtual Kernel Filesystems have been mounted
root@linuxscratch:~# findmnt -n
...
├─/mnt/lfs                            /dev/vda4 ext4        rw,relatime,seclabel
│ ├─/mnt/lfs/dev                      devtmpfs  devtmpfs    rw,nosuid,seclabel,size=4040240k,nr_inodes=1010060,mode=755,inode64
│ │ ├─/mnt/lfs/dev/pts                devpts    devpts      rw,relatime,seclabel,gid=5,mode=620,ptmxmode=000
│ │ └─/mnt/lfs/dev/shm                tmpfs     tmpfs       rw,nosuid,nodev,relatime,seclabel,inode64
│ ├─/mnt/lfs/proc                     proc      proc        rw,relatime
│ ├─/mnt/lfs/sys                      sysfs     sysfs       rw,relatime,seclabel
│ └─/mnt/lfs/run                      tmpfs     tmpfs       rw,relatime,seclabel,inode64
Enter chroot environment
Now that all the packages which are required to build the rest of the needed tools are on the system, it is time to enter the chroot environment and finish installing the temporary tools. This environment will also be used to install the final system. As user root, run the following command to enter the environment that is, at the moment, populated with nothing but temporary tools.
root@linuxscratch:~# chroot "$LFS" /usr/bin/env -i   \
    HOME=/root                  \
    TERM="$TERM"                \
    PS1='(lfs chroot) \u:\w\$ ' \
    PATH=/usr/bin:/usr/sbin     \
    MAKEFLAGS="-j$(nproc)"      \
    TESTSUITEFLAGS="-j$(nproc)" \
    /bin/bash --login
(lfs chroot) I have no name!:/#
From this point on, there is no need to use the LFS variable any more because all work will be restricted to the LFS file system; the chroot command runs the Bash shell with the root (/) directory set to $LFS.
Notice that /tools/bin is not in the PATH. This means that the cross toolchain will no longer be used.
(lfs chroot) I have no name!:/# echo $PATH
/usr/bin:/usr/sbin
Also note that the bash prompt will say I have no name! This is normal because the /etc/passwd file has not been created yet.
It is important that all the commands throughout the remainder of this chapter and the following chapters are run from within the chroot environment. If you leave this environment for any reason (rebooting for example), ensure that the virtual kernel filesystems are mounted as explained in Section 7.3.1, “Mounting and Populating /dev” and Section 7.3.2, “Mounting Virtual Kernel File Systems” and enter chroot again before continuing with the installation.
Create Directories
(lfs chroot) I have no name!:/# mkdir -pv /{boot,home,mnt,opt,srv}
mkdir: created directory '/boot'
mkdir: created directory '/home'
mkdir: created directory '/mnt'
mkdir: created directory '/opt'
mkdir: created directory '/srv'

(lfs chroot) I have no name!:/# ls -ltr
total 60
drwx------   2 0 0 16384 Aug 18 15:56 lost+found
lrwxrwxrwx   1 0 0     7 Aug 18 17:11 bin -> usr/bin
lrwxrwxrwx   1 0 0     7 Aug 18 17:11 lib -> usr/lib
lrwxrwxrwx   1 0 0     8 Aug 18 17:11 sbin -> usr/sbin
drwxr-xr-x   9 0 0  4096 Aug 19 04:10 tools
drwxr-xr-x   2 0 0  4096 Aug 19 07:29 lib64
drwxr-xr-x   2 0 0  4096 Aug 19 07:41 etc
drwxr-xr-x   3 0 0  4096 Aug 19 07:41 var
drwxr-xr-x   9 0 0  4096 Aug 19 11:30 usr
drwxrwxrwt   2 0 0  4096 Aug 19 11:55 sources
dr-xr-xr-x  13 0 0     0 Aug 19 12:09 sys
drwxr-xr-x  21 0 0  4060 Aug 19 12:09 dev
dr-xr-xr-x 326 0 0     0 Aug 19 12:18 proc
drwxrwxrwt   2 0 0    40 Aug 19 12:19 run
drwxr-xr-x   2 0 0  4096 Aug 19 12:48 opt
drwxr-xr-x   2 0 0  4096 Aug 19 12:48 mnt
drwxr-xr-x   2 0 0  4096 Aug 19 12:48 home
drwxr-xr-x   2 0 0  4096 Aug 19 12:48 boot
drwxr-xr-x   2 0 0  4096 Aug 19 12:48 srv
(lfs chroot) I have no name!:/# mkdir -pv /etc/{opt,sysconfig}
mkdir -pv /lib/firmware
mkdir -pv /media/{floppy,cdrom}
mkdir -pv /usr/{,local/}{include,src}
mkdir -pv /usr/lib/locale
mkdir -pv /usr/local/{bin,lib,sbin}
mkdir -pv /usr/{,local/}share/{color,dict,doc,info,locale,man}
mkdir -pv /usr/{,local/}share/{misc,terminfo,zoneinfo}
mkdir -pv /usr/{,local/}share/man/man{1..8}
mkdir -pv /var/{cache,local,log,mail,opt,spool}
mkdir -pv /var/lib/{color,misc,locate}

ln -sfv /run /var/run
ln -sfv /run/lock /var/lock

install -dv -m 0750 /root
install -dv -m 1777 /tmp /var/tmp
Creating Essential Files and Symlinks
(lfs chroot) I have no name!:/# ln -sv /proc/self/mounts /etc/mtab
'/etc/mtab' -> '/proc/self/mounts'

(lfs chroot) I have no name!:/# cat > /etc/hosts << EOF
127.0.0.1  localhost $(hostname)
::1        localhost
EOF
Create the /etc/passwd file by running the following command
(lfs chroot) I have no name!:/# cat > /etc/passwd << "EOF"
root:x:0:0:root:/root:/bin/bash
bin:x:1:1:bin:/dev/null:/usr/bin/false
daemon:x:6:6:Daemon User:/dev/null:/usr/bin/false
messagebus:x:18:18:D-Bus Message Daemon User:/run/dbus:/usr/bin/false
uuidd:x:80:80:UUID Generation Daemon User:/dev/null:/usr/bin/false
nobody:x:65534:65534:Unprivileged User:/dev/null:/usr/bin/false
EOF
Create the /etc/group file by running the following comman
(lfs chroot) I have no name!:/# cat > /etc/group << "EOF"
root:x:0:
bin:x:1:daemon
sys:x:2:
kmem:x:3:
tape:x:4:
tty:x:5:
daemon:x:6:
floppy:x:7:
disk:x:8:
lp:x:9:
dialout:x:10:
audio:x:11:
video:x:12:
utmp:x:13:
cdrom:x:15:
adm:x:16:
messagebus:x:18:
input:x:24:
mail:x:34:
kvm:x:61:
uuidd:x:80:
wheel:x:97:
users:x:999:
nogroup:x:65534:
EOF
(lfs chroot) I have no name!:/# echo "tester:x:101:101::/home/tester:/bin/bash" >> /etc/passwd
echo "tester:x:101:" >> /etc/group
install -o tester -d /home/tester
(lfs chroot) I have no name!:/# exec /usr/bin/bash --login
(lfs chroot) root:/#
(lfs chroot) root:/# touch /var/log/{btmp,lastlog,faillog,wtmp}
chgrp -v utmp /var/log/lastlog
chmod -v 664  /var/log/lastlog
chmod -v 600  /var/log/btmp
changed group of '/var/log/lastlog' from root to utmp
mode of '/var/log/lastlog' changed from 0644 (rw-r--r--) to 0664 (rw-rw-r--)
mode of '/var/log/btmp' changed from 0644 (rw-r--r--) to 0600 (rw-------)
Build Gettext
(lfs chroot) root:/sources# tar -xf gettext-0.24.tar.xz
(lfs chroot) root:/sources# cd gettext-0.24

(lfs chroot) root:/sources/gettext-0.24# ./configure --disable-shared
(lfs chroot) root:/sources/gettext-0.24# make
(lfs chroot) root:/sources/gettext-0.24# cp -v gettext-tools/src/{msgfmt,msgmerge,xgettext} /usr/bin
'gettext-tools/src/msgfmt' -> '/usr/bin/msgfmt'
'gettext-tools/src/msgmerge' -> '/usr/bin/msgmerge'
'gettext-tools/src/xgettext' -> '/usr/bin/xgettext'
Continue with Build and Install of the remaining package in Chapter 7: Entering Chroot and Building Additional Temporary Tools.
Step13: Cleaning up and Saving the Temporary System
(lfs chroot) root:/sources# rm -rf /usr/share/{info,man,doc}/*

(lfs chroot) root:/sources# find /usr/{lib,libexec} -name \*.la -delete

(lfs chroot) root:/sources# rm -rf /tools
At this point the essential programs and libraries have been created and your current LFS system is in a good state. Your system can now be backed up for later reuse. In case of fatal failures in the subsequent chapters, it often turns out that removing everything and starting over (more carefully) is the best way to recover. Unfortunately, all the temporary files will be removed, too. To avoid spending extra time to redo something which has been done successfully, creating a backup of the current LFS system may prove useful.
Step14: Backup
Get out from the chroot environment and as root user on host system run the following to unmount the virtual kernel filesystem.
root@linuxscratch:~# mountpoint -q $LFS/dev/shm && umount $LFS/dev/shm
umount $LFS/dev/pts
umount $LFS/{sys,proc,run,dev}
root@linuxscratch:~# echo $LFS
/mnt/lfs
root@linuxscratch:~# echo $HOME
/root
root@linuxscratch:~# cd $LFS
tar -cJpf $HOME/lfs-temp-tools-12.3.tar.xz .

root@linuxscratch:/mnt/lfs# du -sh $HOME/lfs-temp-tools-12.3.tar.xz
998M	/root/lfs-temp-tools-12.3.tar.xz
Step15: Restore
In case of any failure in further steps we can restore the LFS build chroot environment using the following.
cd $LFS
rm -rf ./*
tar -xpf $HOME/lfs-temp-tools-12.3.tar.xz
Its time now to take another snapshot of the virtual machine. Stop the VM and take the snapshot.
admin@fedser:~$ virsh snapshot-create-as linuxscratch linuxscratch_enter_chroot_build_temp_tools_chapter7_end
Step16: Building the LFS System
Now here we are entering into Part IV: Building the LFS System wherein we will build and install all the basic system software package under the chroot environment.
Follow Chapter 8: Installing Basic System Software to install all the basic software packages needed for LFS system under chroot environment.
Its time now to take another snapshot of the virtual machine. Stop the VM and take the snapshot.
admin@fedser:~$ virsh snapshot-create-as linuxscratch linuxscratch_install_basic_system_software_chapter8_end
Step17: System Configuration
Now we are entering into Chapter 9: System Configuration. So we are going to build LFS system based on SystemV init scripts. Let’s install that package “LFS-Bootscripts-20240825” scripts under chroot environment as per “LFS-Bootscripts-20240825“.
Configure Network
cd /etc/sysconfig/
cat > ifconfig.eth0 << "EOF"
ONBOOT=yes
IFACE=eth0
SERVICE=ipv4-static
IP=192.168.122.3
GATEWAY=192.168.122.1
PREFIX=24
BROADCAST=192.168.122.255
EOF
Configure DNS
cat > /etc/resolv.conf << "EOF"
# Begin /etc/resolv.conf

search
nameserver 8.8.8.8


# End /etc/resolv.conf
EOF
Configure Hostname
echo lfs > /etc/hostname
Configure Hosts file
cat > /etc/hosts << "EOF"
# Begin /etc/hosts

127.0.0.1 localhost.localdomain localhost
127.0.1.1 lfs lfs.stack.com
192.168.122.3 <FQDN> lfs lfs.stack.com
::1       localhost ip6-localhost ip6-loopback
ff02::1   ip6-allnodes
ff02::2   ip6-allrouters

# End /etc/hosts
EOF
Configure profile file
cat > /etc/profile << "EOF"
# Begin /etc/profile

for i in $(locale); do
  unset ${i%=*}
done

if [[ "$TERM" = linux ]]; then
  export LANG=C.UTF-8
else
  export LANG=en_US.ISO-8859-1
fi

# End /etc/profile
EOF
Creating the /etc/inputrc File
cat > /etc/inputrc << "EOF"
# Begin /etc/inputrc
# Modified by Chris Lynn <roryo@roryo.dynup.net>

# Allow the command prompt to wrap to the next line
set horizontal-scroll-mode Off

# Enable 8-bit input
set meta-flag On
set input-meta On

# Turns off 8th bit stripping
set convert-meta Off

# Keep the 8th bit for display
set output-meta On

# none, visible or audible
set bell-style none

# All of the following map the escape sequence of the value
# contained in the 1st argument to the readline specific functions
"\eOd": backward-word
"\eOc": forward-word

# for linux console
"\e[1~": beginning-of-line
"\e[4~": end-of-line
"\e[5~": beginning-of-history
"\e[6~": end-of-history
"\e[3~": delete-char
"\e[2~": quoted-insert

# for xterm
"\eOH": beginning-of-line
"\eOF": end-of-line

# for Konsole
"\e[H": beginning-of-line
"\e[F": end-of-line

# End /etc/inputrc
EOF
Creating /etc/shells File
cat > /etc/shells << "EOF"
# Begin /etc/shells

/bin/sh
/bin/bash

# End /etc/shells
EOF
Configure SysVinit
cat > /etc/inittab << "EOF"
# Begin /etc/inittab

id:3:initdefault:

si::sysinit:/etc/rc.d/init.d/rc S

l0:0:wait:/etc/rc.d/init.d/rc 0
l1:S1:wait:/etc/rc.d/init.d/rc 1
l2:2:wait:/etc/rc.d/init.d/rc 2
l3:3:wait:/etc/rc.d/init.d/rc 3
l4:4:wait:/etc/rc.d/init.d/rc 4
l5:5:wait:/etc/rc.d/init.d/rc 5
l6:6:wait:/etc/rc.d/init.d/rc 6

ca:12345:ctrlaltdel:/sbin/shutdown -t1 -a -r now

su:S06:once:/sbin/sulogin
s1:1:respawn:/sbin/sulogin

1:2345:respawn:/sbin/agetty --noclear tty1 9600
2:2345:respawn:/sbin/agetty tty2 9600
3:2345:respawn:/sbin/agetty tty3 9600
4:2345:respawn:/sbin/agetty tty4 9600
5:2345:respawn:/sbin/agetty tty5 9600
6:2345:respawn:/sbin/agetty tty6 9600

# End /etc/inittab
Configure System Clock
cat > /etc/sysconfig/clock << "EOF"
# Begin /etc/sysconfig/clock

UTC=1

# Set this to any options you might need to give to hwclock,
# such as machine hardware clock type for Alphas.
CLOCKPARAMS=

# End /etc/sysconfig/clock
Customizing the Boot and Shutdown Scripts
The LFS boot scripts boot and shut down a system in a fairly efficient manner, but there are a few tweaks you can make in the rc.site file to improve speed even more, and to adjust messages according to your preferences. To do this, adjust the settings in the /etc/sysconfig/rc.site file above.
During the boot script udev, there is a call to udev settle that requires some time to complete. This time may or may not be required depending on the devices in the system. If you only have simple partitions and a single ethernet card, the boot process will probably not need to wait for this command. To skip it, set the variable OMIT_UDEV_SETTLE=y.
The boot script udev_retry also runs udev settle by default. This command is only needed if the /var directory is separately mounted, because the clock needs the /var/lib/hwclock/adjtime file. Other customizations may also need to wait for udev to complete, but in many installations it is not necessary. Skip the command by setting the variable OMIT_UDEV_RETRY_SETTLE=y.
By default, the file system checks are silent. This can appear to be a delay during the bootup process. To turn on the fsck output, set the variable VERBOSE_FSCK=y.
When rebooting, you may want to skip the filesystem check, fsck, completely. To do this, either create the file /fastboot or reboot the system with the command /sbin/shutdown -f -r now. On the other hand, you can force all file systems to be checked by creating /forcefsck or running shutdown with the -F parameter instead of -f.
Setting the variable FASTBOOT=y will disable fsck during the boot process until it is removed. This is not recommended on a permanent basis.
Normally, all files in the /tmp directory are deleted at boot time. Depending on the number of files or directories present, this can cause a noticeable delay in the boot process. To skip removing these files set the variable SKIPTMPCLEAN=y.
During shutdown, the init program sends a TERM signal to each program it has started (e.g. agetty), waits for a set time (default 3 seconds), then sends each process a KILL signal and waits again. This process is repeated in the sendsignals script for any processes that are not shut down by their own scripts. The delay for init can be set by passing a parameter. For example to remove the delay in init, pass the -t0 parameter when shutting down or rebooting (e.g. /sbin/shutdown -t0 -r now). The delay for the sendsignals script can be skipped by setting the parameter KILLDELAY=0.
Step18: Making the LFS System Bootable
Now that our “chroot” environment is full configured with all the necessary configuration files, we need to create the “/etc/fstab” file with all the required mount for the new LFS system.
All of these activity should be completed within the “chroot” environment. We are ensuring that our “/dev/vda4” filesystem along with proc, sysfs, devpts, tmpfs, devtmpfs and cgroup2 will all get mounted when the LFS is booted.
cat > /etc/fstab << "EOF"
# Begin /etc/fstab

# file system  mount-point    type     options             dump  fsck
#                                                                order

/dev/vda4     /              ext4    defaults            1     1
#/dev/zram0     swap           swap     pri=1               0     0
proc           /proc          proc     nosuid,noexec,nodev 0     0
sysfs          /sys           sysfs    nosuid,noexec,nodev 0     0
devpts         /dev/pts       devpts   gid=5,mode=620      0     0
tmpfs          /run           tmpfs    defaults            0     0
devtmpfs       /dev           devtmpfs mode=0755,nosuid    0     0
tmpfs          /dev/shm       tmpfs    nosuid,nodev        0     0
cgroup2        /sys/fs/cgroup cgroup2  nosuid,noexec,nodev 0     0

# End /etc/fstab
EOF
Step19: Build Linux-6.13.4 Kernel
This is going to be very important step wherein we need to configure Linux kernel with different options as per the LFS documentation “Making the LFS System Bootable“.
Extract the Linux kernel package and ensures that the kernel tree is absolutely clean by running the below.
(lfs chroot) root:/sources# tar -xf linux-6.13.4.tar.xz
(lfs chroot) root:/sources# cd linux-6.13.4
(lfs chroot) root:/sources/linux-6.13.4# make mrproper
Now let’s create kernel base configuration file to a good state that takes your current system architecture into account by running the command “make defconfig”.
(lfs chroot) root:/sources/linux-6.13.4# make defconfig
  HOSTCC  scripts/kconfig/conf.o
  HOSTLD  scripts/kconfig/conf
*** Default configuration is based on 'x86_64_defconfig'
#
# configuration written to .config
#
Once the configuration file is created, we need to customize it as per the LFS documentation “Making the LFS System Bootable” by launching the X terminal for kernel configuration.
(lfs chroot) root:/sources/linux-6.13.4# make menuconfig # Update the kernel config
After completing the customization its time to compile the kernel.
(lfs chroot) root:/sources/linux-6.13.4# make			# Compile kernel and modules
  BUILD   arch/x86/boot/bzImage
Kernel: arch/x86/boot/bzImage is ready  (#1)
Let’s now install the modules.
(lfs chroot) root:/sources/linux-6.13.4# make modules_install
Copy the following files from the source to destination as shown below.
(lfs chroot) root:/sources/linux-6.13.4# cp -iv arch/x86/boot/bzImage /boot/vmlinuz-6.13.4-lfs-12.3
'arch/x86/boot/bzImage' -> '/boot/vmlinuz-6.13.4-lfs-12.3'

(lfs chroot) root:/sources/linux-6.13.4# cp -iv System.map /boot/System.map-6.13.4
'System.map' -> '/boot/System.map-6.13.4'

(lfs chroot) root:/sources/linux-6.13.4# cp -iv .config /boot/config-6.13.4
'.config' -> '/boot/config-6.13.4'

(lfs chroot) root:/sources/linux-6.13.4# cp -r Documentation -T /usr/share/doc/linux-6.13.4
Configuring Linux Module Load Order
This configuration is just to ensure that USB modules are loaded in correct.
install -v -m755 -d /etc/modprobe.d
cat > /etc/modprobe.d/usb.conf << "EOF"
# Begin /etc/modprobe.d/usb.conf

install ohci_hcd /sbin/modprobe ehci_hcd ; /sbin/modprobe -i ohci_hcd ; true
install uhci_hcd /sbin/modprobe ehci_hcd ; /sbin/modprobe -i uhci_hcd ; true

# End /etc/modprobe.d/usb.conf
EOF
Its time now to take another snapshot of the virtual machine. Stop the VM and take the snapshot.
admin@fedser:~$ virsh snapshot-create-as linuxscratch linuxscratch_making_lfs_bootable_chapter9_and_chapter10_end
Step20: Install Grub for Boot Process
The VM that we initially created is based on BIOS firmware, so we are not going to do anything for UEFI boot process.
Let’s install the grub boot loaded to our filesystem “/dev/vda” on which our LFS partition exists.
(lfs chroot) root:/# grub-install /dev/vda
Installing for i386-pc platform.
Installation finished. No error reported.
Now its time to create the grub bootloader configuration file as shown below. Please note the line starting with “set root=(hd0,4)”. Here we are telling the grub bootloader to look the vmlinuz image on 4th partition of our hard disk “/dev/vda4” wherein we copied the image.
Also ensure that in the line starting with “menuentry”, you have update the root as “/dev/vda4” which is basically our “chroot” environment where the LFS system is installed.
cat > /boot/grub/grub.cfg << "EOF"
# Begin /boot/grub/grub.cfg
set default=0
set timeout=5

insmod part_gpt
insmod ext2
set root=(hd0,4)
set gfxpayload=1024x768x32

menuentry "GNU/Linux, Linux 6.13.4-lfs-12.3" {
        linux   /boot/vmlinuz-6.13.4-lfs-12.3 root=/dev/vda4 ro
}
EOF
Let’s create release identification file as shown below.
(lfs chroot) root:/# echo 12.3 > /etc/lfs-release
Let’s also ensure that we create a password for the root user in our chroot environment. This is the user that we will use to login once our LFS system is rebooted.
(lfs chroot) root:/# passwd
Step21: Exit chroot and unmount filesystem
Now we are ready to exit our chroot environment and unmount all the filesystem that have been loaded into $LFS mountpoint.
(lfs chroot) root:/# logout
root@linuxscratch:~# umount -v $LFS/dev/pts
mountpoint -q $LFS/dev/shm && umount -v $LFS/dev/shm
umount -v $LFS/dev
umount -v $LFS/run
umount -v $LFS/proc
umount -v $LFS/sys
umount: /mnt/lfs/dev/pts unmounted
umount: /mnt/lfs/dev/shm unmounted
umount: /mnt/lfs/dev unmounted
umount: /mnt/lfs/run unmounted
umount: /mnt/lfs/proc unmounted
umount: /mnt/lfs/sys unmounted
umount -v $LFS
Step22: Reboot System
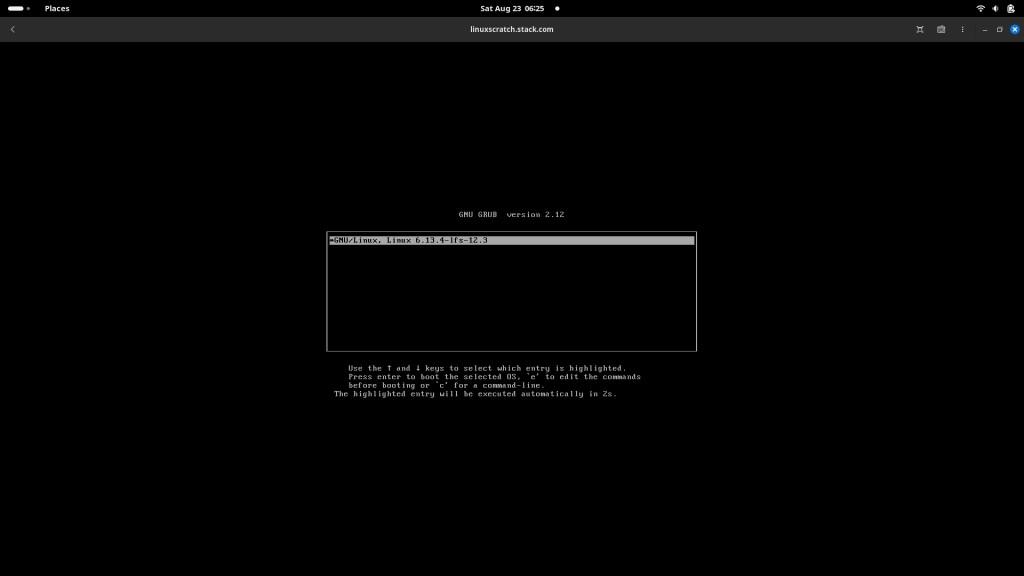
Now your GRUB boot loader is installed and configured with the disk information where to look for the vmlinuz image and other details, we are ready to reboot our system.
If everything goes as planned you should see an entry to select your new Linux distribution with version 12.3 as shown below.
Once you select your version to load, you will be take to login screen as shown below.
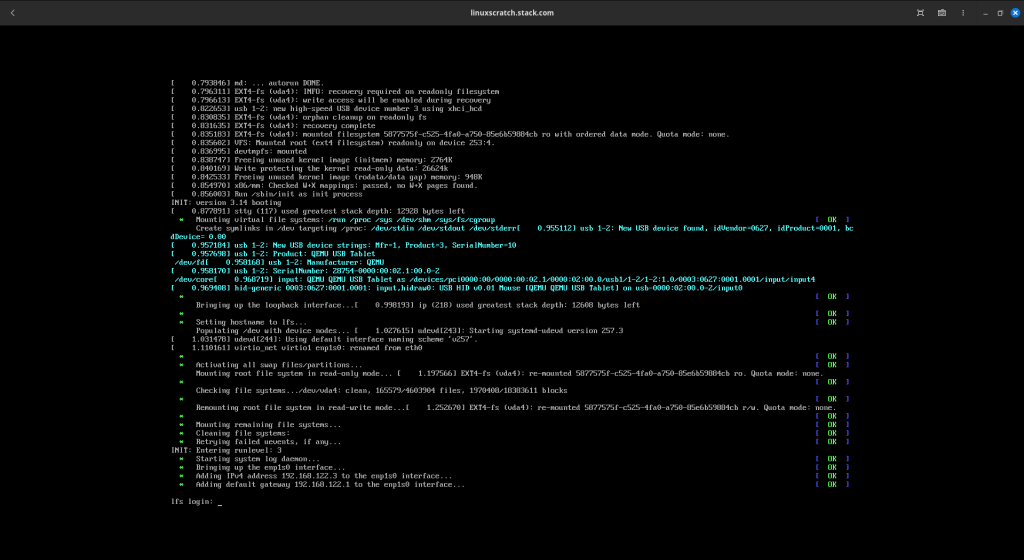
Login to the LFS system with root user.
Here i encounted an issue wherein my network interface failed to startup which was configured with interface name “etho”. As the udev documentation, my network was getting configured with a default interface name. So i updated my network configuration and change the name of the file as shown below and brought up my network interface manually with “ifup enp1s0” which fixed the issue.

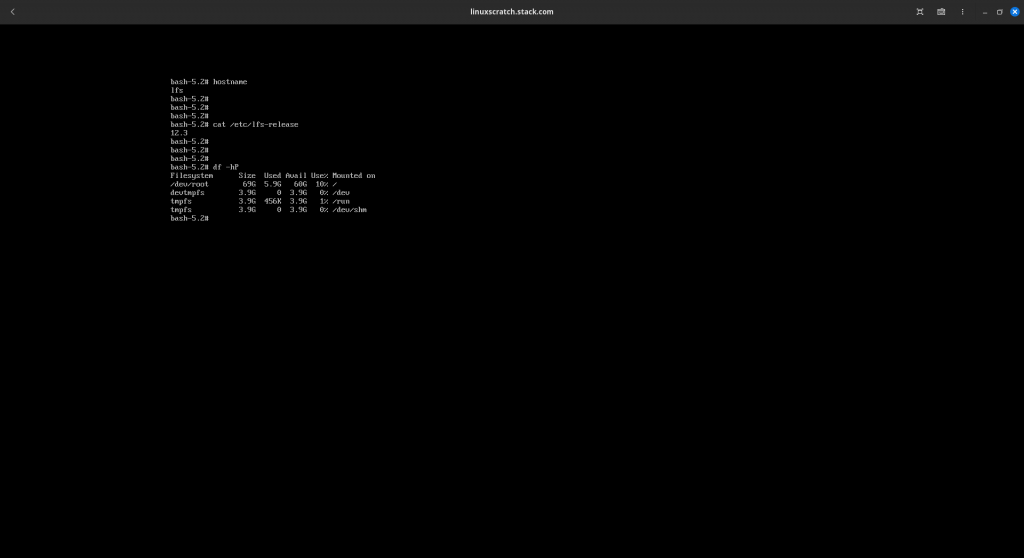
You can reboot your LFS system now and verify that your network interface is coming up automatically as a part of reboot and check the system if its working as expected..
I would highly recomment you to go through all the LFS documentation as that’s the detailed documentation providing detailed information for each step that we do as a part of LFS system build.
Finally you can take take another snapshot of the virtual machine. Stop the VM and take the snapshot store your hard work.
admin@fedser:~$ virsh snapshot-create-as linuxscratch linuxscratch_making_lfs_bootable_chapter10_and_chapter11_end
Hope you enjoyed reading this article. Thank you.
Leave a Reply
You must be logged in to post a comment.