How to use Jakarta RESTAPI for Building RESTful Web Services

Here in this article we will try to understand about RESTful Web Services and build a sample RESTful Webserivce with resources using the Jakarta RESTAPI.
Test Environment
- OpenJDK 17.0.13
- Eclipse GlassFish 7.0.20
- Apache Maven 3.9.1
- VSCode Editor 1.97.2
What are RESTful Web Services
Today every software application aims to provide API’s for their application to be consumed by the clients. RESTful web services are lightweight, loosely coupled web services which help in developing these REST API’s.
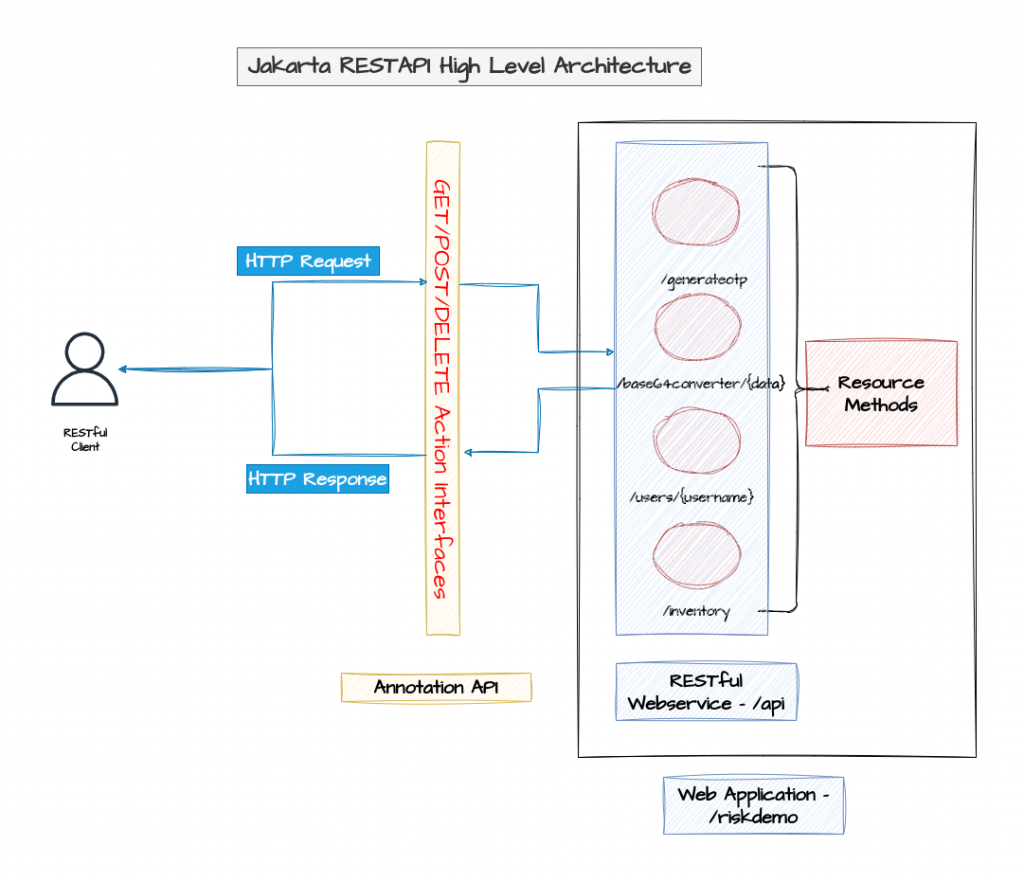
Representational State Transfer (REST) is an architectural style of client-server application centered around the transfer of representations of resources through requests and responses. In the REST architectural style, data and functionality are considered resources and are accessed using Uniform Resource Identifiers (URIs), typically links on the Web. The resources are represented by documents and are acted upon by using a set of simple, well-defined operations.
The REST architectural style is designed to use a stateless communication protocol, typically HTTP. In the REST architecture style, clients and servers exchange representations of resources by using a standardized interface and protocol.
What is Jakarta REST
Jakarta REST is a Java programming language API designed to make it easy to develop applications that use the REST architecture.
The Jakarta REST API uses Java programming language annotations to simplify the development of RESTful web services. Developers decorate Java programming language class files with Jakarta REST annotations to define resources and the actions that can be performed on those resources.
High Level Architecture Diagram
If you are interested in watching the video. Here is the YouTube video on the same step by step procedure outlined below.
Procedure
Step1: Ensure the following Pre-requisite installed
Ensure that you have JDK, Maven and Glassfish Enterprise application server installed on your workstation.
admin@fedser:~$ javac --version
javac 17.0.13

admin@fedser:~$ mvn --version
Apache Maven 3.9.1 (Red Hat 3.9.1-3)
Download and install the Glassfish Enterprise Application server. Also ensure that your PATH variable is set to the bin directory of the glassfish application server.
admin@fedser:~$ export PATH=$PATH:/home/admin/middleware/stack/glassfish7/bin
Update your glassfish server adminconsole user “admin” password by editing the following file.
admin@fedser:~$ cat /home/admin/middleware/stack/glassfish7/glassfish/domains/password.properties
#AS_ADMIN_PASSWORD=adminadmin
AS_ADMIN_PASSWORD=admin@1234
Ensure that the Glassfish application server is up and running.
admin@fedser:~$ asadmin start-domain
Waiting for domain1 to start .........
Waiting finished after 8,101 ms.
Successfully started the domain : domain1
domain  Location: /home/admin/middleware/stack/glassfish7/glassfish/domains/domain1
Log File: /home/admin/middleware/stack/glassfish7/glassfish/domains/domain1/logs/server.log
Admin Port: 4,848
Command start-domain executed successfully.
Validate if you able to access the Admin Console page for the Glassfish Server.
URL - http://localhost:4848/common/index.jsf
Step2: Create a jakartaee10-minimal archetype project
Here we will create a maven archetype project using the CLI with the below mentioned options to generate a minimal jakartaee version 10 project.
admin@fedser:vscodeprojects$ mvn archetype:generate -DarchetypeArtifactId="jakartaee10-minimal" -DarchetypeGroupId="org.eclipse.starter" -DarchetypeVersion="1.1.0" -DgroupId="com.stack" -DartifactId="restdemo"
Now let’s change into the project directory that just got created.
admin@fedser:vscodeprojects$ cd restdemo/
admin@fedser:restdemo$ tree .
.
├── pom.xml
└── src
    └── main
        ├── java
        │   └── com
        │       └── stack
        │           └── restdemo
        │               ├── ApplicationConfig.java
        │               └── resources
        │                   ├── HelloRecord.java
        │                   └── RestResource.java
        ├── resources
        │   └── META-INF
        │       └── beans.xml
        └── webapp

11 directories, 5 files
Step3: Update Application Context Root
The @ApplicationPath annotation is used to define the URL mapping for the application. The path specified by @ApplicationPath is the base URI for all resource URIs specified by @Path annotations in the resource class. You may only apply @ApplicationPath to a subclass of jakarta.ws.rs.core.Application.
Let’s update our class ApplicationConfig which is a subclass of Application as shown below. Here we are updating the application context for our application to “/api”.
NOTE: Web Application Context Root is /restdemo and the RESTAPI Web Services Base resource url is /api relative to Application Context Root.
admin@fedser:restdemo$ cat src/main/java/com/stack/restdemo/ApplicationConfig.java
package com.stack.restdemo;

import jakarta.ws.rs.ApplicationPath;
import jakarta.ws.rs.core.Application;

@ApplicationPath("/api")
public class ApplicationConfig extends Application {

}
Step4: Create RESTAPI Resource to Generate OTP
In this step we will build a resource which will help to generate a 6 digit OTP number for the client. Let us try to understand about the different Annotation that we used in this code.
- @GET: The @GET annotation is a request method designator and corresponds to the similarly named HTTP method. The Java method annotated with this request method designator will process HTTP GET requests. The behavior of a resource is determined by the HTTP method to which the resource is responding.
- @PATH: The @Path annotation’s value is a relative URI path indicating where the Java class will be hosted: for example, /helloworld. You can also embed variables in the URIs to make a URI path template. For example, you could ask for the name of a user and pass it to the application as a variable in the URI: /helloworld/{username}.
- @Produces: The @Produces annotation is used to specify the MIME media types of representations a resource can produce and send back to the client: for example, “text/plain”.
admin@fedser:restdemo$ cat src/main/java/com/stack/restdemo/resources/GenerateOTP.java
package com.stack.restdemo.resources;

import jakarta.ws.rs.GET;
import jakarta.ws.rs.Path;
import jakarta.ws.rs.Produces;
import jakarta.ws.rs.core.MediaType;

import java.security.SecureRandom;

@Path("generateotp")
public class GenerateOTP {

    private static final String CHARACTERS = "0123456789";
    private static final int OTP_LENGTH = 6;
    private SecureRandom random = new SecureRandom();

    @GET
    @Produces(MediaType.TEXT_PLAIN)
    public String generateOtp() {
        StringBuilder otp = new StringBuilder(OTP_LENGTH);
        for (int i = 0; i < OTP_LENGTH; i++) {
            int index = random.nextInt(CHARACTERS.length());
            otp.append(CHARACTERS.charAt(index));
        }
        return otp.toString();
    }

}
Step5: Create RESTAPI Resource to Convert String to Base64 format
Here we are creating another REStful resource which will help us in encoding and decoding a string to base64 format and vice-versa. We are using another annotation “@PathParam” to provide the URI parameters.
- @PathParam: The @PathParam annotation is a type of parameter that you can extract for use in your resource class. URI path parameters are extracted from the request URI, and the parameter names correspond to the URI path template variable names specified in the @Path class-level annotation.
admin@fedser:restdemo$ cat src/main/java/com/stack/restdemo/resources/Base64Converter.java
package com.stack.restdemo.resources;

import java.util.Base64;

import jakarta.ws.rs.GET;
import jakarta.ws.rs.core.MediaType;
import jakarta.ws.rs.Path;
import jakarta.ws.rs.PathParam;
import jakarta.ws.rs.Produces;

@Path("base64converter")
public class Base64Converter {

    /**
     * Converts a given string to its Base64 encoded format.
     *
     * @param input the string to be encoded
     * @return the Base64 encoded string
     */
    @GET
    @Path("encode/{data}")
    @Produces(MediaType.TEXT_PLAIN)
    public String toBase64(@PathParam("data") String data) {
        return Base64.getEncoder().encodeToString(data.getBytes());
    }

    /**
     * Converts a given Base64 encoded string back to its original format.
     *
     * @param base64 the Base64 encoded string
     * @return the original string
     */
    @GET
    @Path("decode/{base64}")
    @Produces(MediaType.TEXT_PLAIN)
    public String fromBase64(@PathParam("base64") String base64) {
        return new String(Base64.getDecoder().decode(base64));
    }
}
Step6: Create RESTAPI Resource to Greet User
Here is another RESTful resource which accepts a @PathParam but it generates an HTML response to client.
admin@fedser:resources$ cat GreetUser.java
package com.stack.restdemo.resources;

import jakarta.ws.rs.GET;
import jakarta.ws.rs.core.MediaType;
import jakarta.ws.rs.Path;
import jakarta.ws.rs.Produces;
import jakarta.ws.rs.PathParam;

@Path("users/{username}")
public class GreetUser {

    @GET
    @Produces(MediaType.TEXT_HTML)
    public String greetUser(@PathParam("username") String userName) {
        return "<html lang=\\\"en\\\"><body><h1>Hello, " + userName + "!!</h1></body></html>";
    }

}
Step7: Create RESTAPI Resource to Manage inventory
Now let’s create another RESTful resource which will manage our inventory of products. Here we are using different Annotation to support different operation related to our resources as shown below.
- @POST: The @POST annotation is a request method designator and corresponds to the similarly named HTTP method. The Java method annotated with this request method designator will process HTTP POST requests. The behavior of a resource is determined by the HTTP method to which the resource is responding.
- @DELETE: The @DELETE annotation is a request method designator and corresponds to the similarly named HTTP method. The Java method annotated with this request method designator will process HTTP DELETE requests. The behavior of a resource is determined by the HTTP method to which the resource is responding.
- @Consumes: The @Consumes annotation is used to specify the MIME media types of representations a resource can consume that were sent by the client.
admin@fedser:resources$ cat inventory.java
package com.stack.restdemo.resources;

import java.util.ArrayList;
import java.util.Collection;
import jakarta.ws.rs.GET;
import jakarta.ws.rs.POST;
import jakarta.ws.rs.Consumes;
import jakarta.ws.rs.DELETE;
import jakarta.ws.rs.core.MediaType;
import jakarta.ws.rs.Path;
import jakarta.ws.rs.Produces;
import jakarta.ws.rs.core.Response;
import jakarta.ws.rs.PathParam;

@Path("inventory")
public class inventory {

    static Collection<String> collection = new ArrayList<>();

    @POST
    @Path("add")
    @Consumes(MediaType.TEXT_PLAIN)
    @Produces(MediaType.TEXT_PLAIN)
    public String addproducts(String product) {
        collection.add(product);
        return "Product : " + product + " Added successfully";
    }

    @GET
    @Path("get")
    @Produces(MediaType.TEXT_PLAIN)
    public String getproducts() {
        return collection.toString();
    }

    @DELETE
    @Path("delete/{product}")
    @Produces(MediaType.TEXT_PLAIN)
    public Response deleteproducts(@PathParam("product") String product) {
        if (product == null || product.isEmpty()) {
            return Response.status(Response.Status.BAD_REQUEST).entity("Product cannot be null or empty").build();
        }
        boolean removed = collection.remove(product);
        if (removed) {
            return Response.ok("Product: " + product + " removed successfully").build();
        } else {
            return Response.status(Response.Status.NOT_FOUND).entity("Product not found").build();
        }
        // collection.remove(product);
        //return "Product : " + product + " Removed successfully";
    }

}
Step8: Update pom.xml to deploy to Glassfish server
Here we are updating the pom.xml “properties” section to add “glassfish.home” directory where the glassfish server is installed. Also we are updating the plugins section with “org.codehaus.cargo” plugin to carry out automated deployment using the mvn cli to the glassfish server based on configuration properties that are provided. If you are not using this plugin you can generate the war package and deploy it manually to your glassfish server.
admin@fedser:restdemo$ cat pom.xml
<project xmlns="http://maven.apache.org/POM/4.0.0" xmlns:xsi="http://www.w3.org/2001/XMLSchema-instance"
         xsi:schemaLocation="http://maven.apache.org/POM/4.0.0 http://maven.apache.org/xsd/maven-4.0.0.xsd">
    <modelVersion>4.0.0</modelVersion>

    <groupId>com.stack</groupId>
    <artifactId>restdemo</artifactId>
    <version>1.0-SNAPSHOT</version>
    <packaging>war</packaging>

    <name>restdemo</name>

    <properties>
        <maven.compiler.release>17</maven.compiler.release>
        <project.build.sourceEncoding>UTF-8</project.build.sourceEncoding>
        <glassfish.home>/home/admin/middleware/stack/glassfish7</glassfish.home>
    </properties>

    <dependencies>
        <dependency>
            <groupId>jakarta.platform</groupId>
            <artifactId>jakarta.jakartaee-api</artifactId>
            <version>10.0.0</version>
            <scope>provided</scope>
        </dependency>
    </dependencies>

    <build>
        <finalName>restdemo</finalName>
        <plugins>
            <plugin>
                <groupId>org.apache.maven.plugins</groupId>
                <artifactId>maven-compiler-plugin</artifactId>
                <version>3.10.1</version>
            </plugin>
            <plugin>
                <groupId>org.apache.maven.plugins</groupId>
                <artifactId>maven-war-plugin</artifactId>
                <version>3.3.2</version>
                <configuration>
                    <failOnMissingWebXml>false</failOnMissingWebXml>
                </configuration>
            </plugin>
            <plugin>
                <groupId>org.codehaus.cargo</groupId>
                <artifactId>cargo-maven3-plugin</artifactId>
		<version>1.10.6</version>
                <executions>
                    <execution>
                        <id>deploy</id>
                        <phase>integration-test</phase>
                        <goals>
                            <goal>redeploy</goal>
                        </goals>
                    </execution>
                </executions>
                <configuration>
                    <container>
                        <containerId>glassfish7x</containerId>
                        <type>installed</type>
                        <home>${glassfish.home}</home>
                    </container>
                    <configuration>
                        <type>existing</type>
                        <home>${glassfish.home}/glassfish/domains</home>
                        <properties>
                            <cargo.glassfish.domain.name>domain1</cargo.glassfish.domain.name>
                        </properties>
                    </configuration>
                </configuration>
            </plugin>
        </plugins>
    </build>
</project>
Step9: Build and Deploy Application
Now it’s time to build, package and deploy the application to glassfish application server as shown below.
admin@fedser:restdemo$ mvn clean package cargo:deploy
[INFO] Scanning for projects...
[INFO]
[INFO] -------------------------< com.stack:restdemo >-------------------------
[INFO] Building restdemo 1.0-SNAPSHOT
[INFO]   from pom.xml
[INFO] --------------------------------[ war ]---------------------------------
[INFO]
[INFO] --- clean:3.2.0:clean (default-clean) @ restdemo ---
[INFO] Deleting /home/admin/middleware/stack/vscodeprojects/restdemo/target
[INFO]
[INFO] --- resources:3.3.0:resources (default-resources) @ restdemo ---
[INFO] Copying 1 resource
[INFO]
[INFO] --- compiler:3.10.1:compile (default-compile) @ restdemo ---
[INFO] Changes detected - recompiling the module!
[INFO] Compiling 4 source files to /home/admin/middleware/stack/vscodeprojects/restdemo/target/classes
[INFO]
[INFO] --- resources:3.3.0:testResources (default-testResources) @ restdemo ---
[INFO] skip non existing resourceDirectory /home/admin/middleware/stack/vscodeprojects/restdemo/src/test/resources
[INFO]
[INFO] --- compiler:3.10.1:testCompile (default-testCompile) @ restdemo ---
[INFO] No sources to compile
[INFO]
[INFO] --- surefire:3.0.0:test (default-test) @ restdemo ---
[INFO] No tests to run.
[INFO]
[INFO] --- war:3.3.2:war (default-war) @ restdemo ---
[INFO] Packaging webapp
[INFO] Assembling webapp [restdemo] in [/home/admin/middleware/stack/vscodeprojects/restdemo/target/restdemo]
[INFO] Processing war project
[INFO] Copying webapp resources [/home/admin/middleware/stack/vscodeprojects/restdemo/src/main/webapp]
[INFO] Building war: /home/admin/middleware/stack/vscodeprojects/restdemo/target/restdemo.war
[INFO]
[INFO] --- cargo:1.10.6:deploy (default-cli) @ restdemo ---
[INFO] [edDeployerDeployMojo] Resolved container artifact org.codehaus.cargo:cargo-core-container-glassfish:jar:1.10.6 for container glassfish7x
[INFO] [talledLocalContainer] Parsed GlassFish version = [7.0.20]
[INFO] ------------------------------------------------------------------------
[INFO] BUILD SUCCESS
[INFO] ------------------------------------------------------------------------
[INFO] Total time:  2.037 s
[INFO] Finished at: 2025-02-25T09:18:12+02:00
[INFO] ----------------------------------------MediaType.TEXT_PLAIN--------------------------------
Step10: Validate RESTAPI’s
Once the application has been deployed to glassfish application server we can validate the RESTAPI’s for each of the resources as shown below.
RESTAPI to Get Helloworld message. This is the default API that gets generate as a part of project generation.
admin@fedser:restdemo$ curl -X GET -H "Content-Type: text/plain" http://localhost:8080/restdemo/api/hello
RESTAPI to Get OTP number.
admin@fedser:restdemo$ curl -X GET -H "Content-Type: text/plain" http://localhost:8080/restdemo/api/generateotp
RESTAPI for Base64 Encoder
admin@fedser:restdemo$ curl -X GET -H "Content-Type: text/plain" http://localhost:8080/restdemo/api/base64converter/encode/Hello%2C%20World!
RESTAPI for Base64 Decoder
admin@fedser:restdemo$ curl -X GET -H "Content-Type: text/plain" http://localhost:8080/restdemo/api/base64converter/decode/SGVsbG8sIFdvcmxkIQ==
RESTAPI to Greet User
admin@fedser:restdemo$ curl -X GET -H "Content-Type: text/plain" http://localhost:8080/restdemo/api/users/bob
RESTAPI to Manage Inventory
dmin@fedser:restdemo$ curl -X POST -H "Content-Type: text/plain" -d "python" http://localhost:8080/restdemo/api/inventory/add
admin@fedser:restdemo$ curl -X POST -H "Content-Type: text/plain" -d "java" http://localhost:8080/restdemo/api/inventory/add
admin@fedser:restdemo$ curl -X POST -H "Content-Type: text/plain" -d "ruby" http://localhost:8080/restdemo/api/inventory/add

admin@fedser:restdemo$ curl -X GET -H "Content-Type: text/plain" http://localhost:8080/restdemo/api/inventory/get

admin@fedser:restdemo$ curl -X DELETE -H "Content-Type: text/plain" -d "python" http://localhost:8080/api/inventory/delete
Hope you enjoyed reading this article. Thank you..
Leave a Reply
You must be logged in to post a comment.