CloudEvents: A Unified Approach to Inter-System Messaging
Here in this article we will try to understand about CloudEvents a specification for event data format which can be used for communication between different systems. We will demonstrate its usage using a sample python application based on IoT domain.
What is CloudEvents
Cloudevents is a specification for describing event data in a common way. In a distributed system architecture disparate systems may need to communicate with each other through events. If these events do not follow a consistent format or specification it may lead to development of multiple event handling logic or libraries for each event source or destination.
Cloudevents project came into existence as a part of the recommendation in the CNCF Serverless Working group technology to investigate the creation of a common event format to aid in the portability of functions between Cloud providers and the interoperability of processing of event streams.
High Level Architecture
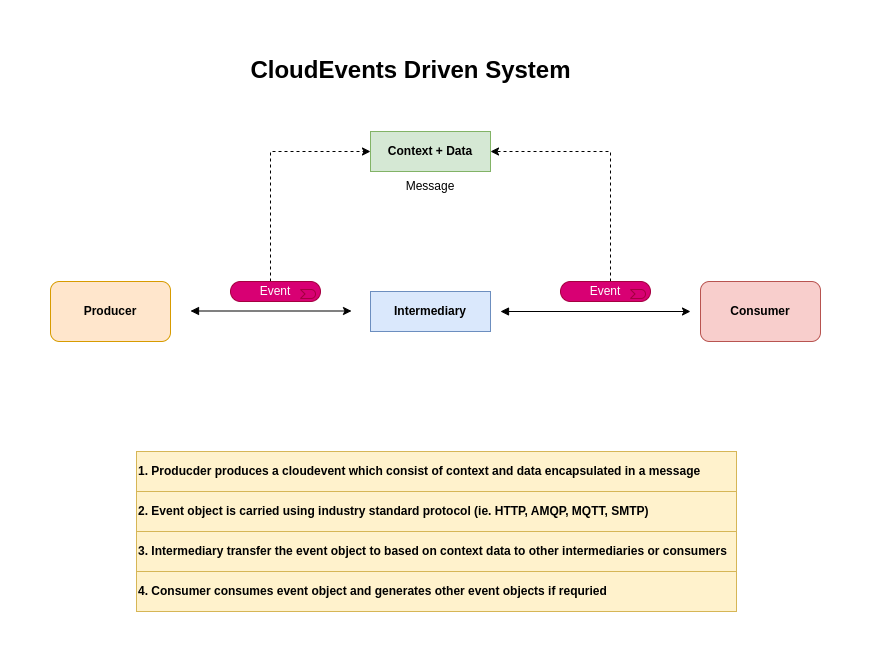
If you are interested in watching the video. Here is the YouTube video on the same step by step procedure outlined below.
CloudEvents concepts
Here are some of the important terminologies that we need to have understanding from the CloudEvents specifications.
- Occurence: An “occurrence” is the capture of a statement of fact during the operation of a software system. For example, a device might go into an alert state because the battery is low, or a virtual machine is about to perform a scheduled reboot.
- Event: An “event” is a data record expressing an occurrence and its context. Events are routed from an event producer (the source) to interested event consumers with the help of information contained in the event.
- Producer: The “producer” is a specific instance, process or device that creates the data structure describing the CloudEvent.
- Source: The “source” is the context in which the occurrence happened. In a distributed system it might consist of multiple Producers.
- Consumer: A “consumer” receives the event and acts upon it. It uses the context and data to execute some logic, which might lead to the occurrence of new events.
- Intermediary: An “intermediary” receives a message containing an event for the purpose of forwarding it to the next receiver, which might be another intermediary or a Consumer. A typical task for an intermediary is to route the event to receivers based on the information in the Context.
- Context: Context metadata will be encapsulated in the Context Attributes.
- Data: Domain-specific information about the occurrence (i.e. the payload).
- Event Format: An Event Format specifies how to serialize a CloudEvent as a sequence of bytes. Stand-alone event formats, such as the JSON format, specify serialization independent of any protocol or storage medium.
- Message: Events are transported from a source to a destination via messages.
- A “structured-mode message” is one where the entire event (attributes and data) are encoded in the message body, according to a specific event format.
- A “binary-mode message” is one where the event data is stored in the message body, and event attributes are stored as part of message metadata.
- Protocol: Messages can be delivered through various industry standard protocol (e.g. HTTP, AMQP, MQTT, SMTP), open-source protocols (e.g. Kafka, NATS), or platform/vendor specific protocols (AWS Kinesis, Azure Event Grid).
Events represent facts and therefore do not include a destination, whereas messages convey intent, transporting data from a source to a given destination.
NOTE: A binary formatted CloudEvent would work for both a CloudEvents enabled receiver as well as one that is unaware of CloudEvents.
Required Attributes
Here are the required attributes that are suppose to be present in every event data that is generated from the system.
- id: Identifies the event. Producers MUST ensure that source + id is unique for each distinct event.
- source: This will include information such as the type of the event source, the organization publishing the event or the process that produced the event.
- specversion: The version of the CloudEvents specification which the event uses.
- type: This attribute contains a value describing the type of event related to the originating occurrence.
Procedure
Step1: Install Python Dependencies
As a first step let us install the dependencies that we will need to build an IoT based sample client-controller application.
Flask: Flask is a lightweight web application framework for Python. It allows you to build web servers and APIs with minimal setup. It is highly extensible and popular for small to medium-sized web applications.
Requests: Requests is a simple and elegant HTTP library for Python. It allows you to send HTTP requests (like GET, POST, PUT, DELETE) to interact with web services and APIs, handling things like authentication, cookies, and redirects easily.
Pytest: Pytest is a testing framework for Python. It makes it easy to write simple and scalable test cases for your code. It supports fixtures, parameterized tests, and has a rich set of plugins for extended functionality.
Cloudevents: The cloudevents Python library helps you create, parse, and send CloudEvents, a specification for describing event data across services and platforms. It’s useful when building event-driven or serverless applications that need to standardize how events are structured.
admin@linuxscratch:~/cloudeventsdemo$ cat requirements.txt
flask
requests
pytest
cloudevents
admin@linuxscratch:~/cloudeventsdemo$ pip3 install -r requirements.txt
Step2: Create IoT Controller
This script basically run a IoT Controller or server which accepts a HTTP POST request with the cloudevent attributes and data.
The from_http reads an HTTP request and converts it into a CloudEvent Python object, making it easy to handle event data and metadata in your application.
Finally we are printing the cloudevent attributes and payload data received from the IoT client device in the output.
admin@linuxscratch:~/cloudeventsdemo$ cat iotcontroller.py
from flask import Flask, request
from cloudevents.http import from_http

app = Flask(__name__)


# create an endpoint at http://localhost:/3000/
@app.route("/", methods=["POST"])
def home():
    # create a CloudEvent
    event = from_http(request.headers, request.get_data())
    print(event)
    # you can access cloudevent fields as seen below
    print(
        f"Found {event['id']} from {event['source']} with type "
        f"{event['type']} and specversion {event['specversion']} {event.data}"
    )

    return "", 204


if __name__ == "__main__":
    app.run(port=3000)
Step3: Create IoT Client
Here we are preparing an IoT client script to simulate an IoT device that generates an cloudevent for every temperature reading that fall under a particular range.
The CloudEvent class lets you create, inspect, and manipulate CloudEvent objects in Python. These objects contain both the event metadata (like id, type, source) and the actual data payload.
The two functions to_binary and to_structured are used to convert a CloudEvent object into HTTP representations that follow the CloudEvents specification: binary mode and structured mode.
admin@linuxscratch:~/cloudeventsdemo$ cat iotclient.py
#!/usr/bin/python

import sys
import random
import time

import requests
from cloudevents.conversion import to_binary, to_structured
from cloudevents.http import CloudEvent

def generateBinaryCloudEvent(url, alert):
    # This data defines a binary cloudevent
    attributes = {
        "type": "com.stack.iot.alert",
        "source": "https://iot.stack.com/generator",
    }
    alert_data = alert + " alert generated"
    data = {"message": alert_data}

    event = CloudEvent(attributes, data)
    headers, body = to_binary(event)

    # send and print event
    print("======================================================")
    requests.post(url, headers=headers, data=body)
    print(headers)
    print(body)
    print(f"Sent {event['id']} from {event['source']} with {event.data}")

def generateStructuredCloudEvent(url, alert):
    # This data defines a binary cloudevent
    attributes = {
        "type": "com.stack.iot.alert",
        "source": "https://iot.stack.com/generator",
    }
    alert_data = alert + " alert generated"
    data = {"message": alert_data}

    event = CloudEvent(attributes, data)
    headers, body = to_structured(event)

    # send and print event
    print("======================================================")
    requests.post(url, headers=headers, data=body)
    print(headers)
    print(body)
    print(f"Sent {event['id']} from {event['source']} with {event.data}")

if __name__ == "__main__":
  if len(sys.argv) < 2:
    sys.exit("Usage: python iotclient.py <iot_controller_url>")
  url = sys.argv[1]

  while True:
    temperature = random.randint(0, 50)
    #print(temperature)
    if temperature < 20:
      alert="green"
      generateBinaryCloudEvent(url, alert)
      generateStructuredCloudEvent(url, alert)
    elif 20 < temperature < 30:
      alert="yellow"
      generateBinaryCloudEvent(url, alert)
      generateStructuredCloudEvent(url, alert)
    elif 30 < temperature < 40:
      alert="orange"
      generateBinaryCloudEvent(url, alert)
      generateStructuredCloudEvent(url, alert)
    else:
      alert="red"
      generateBinaryCloudEvent(url, alert)
      generateStructuredCloudEvent(url, alert)
    time.sleep(10)
Step4: Run the IoT Controller
Now, let’s launch our IoT controller script to listen for HTTP POST requests from the IoT client device.
admin@linuxscratch:~/cloudeventsdemo$ python iotcontroller.py
 * Serving Flask app 'iotcontroller'
 * Debug mode: off
WARNING: This is a development server. Do not use it in a production deployment. Use a production WSGI server instead.
 * Running on http://127.0.0.1:3000
Press CTRL+C to quit
Step5: Run IoT Client
Let’s now launch our IoT client application to generate random temperature reading and generate cloudevents that are further posted to the IoT controller server.
Check the format of the event object in both binary mode and structured mode as explained previously.
admin@linuxscratch:~/cloudeventsdemo$ python iotclient.py http://127.0.0.1:3000
======================================================
{'ce-specversion': '1.0', 'ce-id': '08b3b62b-a578-42c8-96fe-0bf10bbd581f', 'ce-source': 'https://iot.stack.com/generator', 'ce-type': 'com.stack.iot.alert', 'ce-time': '2025-09-12T13:17:28.406663+00:00'}
b'{"message": "green alert generated"}'
Sent 08b3b62b-a578-42c8-96fe-0bf10bbd581f from https://iot.stack.com/generator with {'message': 'green alert generated'}
======================================================
{'content-type': 'application/cloudevents+json'}
b'{"specversion": "1.0", "id": "ef5b2876-fbc0-438f-bd97-084f517fc485", "source": "https://iot.stack.com/generator", "type": "com.stack.iot.alert", "time": "2025-09-12T13:17:28.409635+00:00", "data": {"message": "green alert generated"}}'
Sent ef5b2876-fbc0-438f-bd97-084f517fc485 from https://iot.stack.com/generator with {'message': 'green alert generated'}
Step6: Validate CloudEvents on controller side
Finally you can validate that your IoT controller is receving the POST requests and printing the cloudevent data as shown below.
{'attributes': {'specversion': '1.0', 'id': '08b3b62b-a578-42c8-96fe-0bf10bbd581f', 'source': 'https://iot.stack.com/generator', 'type': 'com.stack.iot.alert', 'time': '2025-09-12T13:17:28.406663+00:00'}, 'data': {'message': 'green alert generated'}}
Found 08b3b62b-a578-42c8-96fe-0bf10bbd581f from https://iot.stack.com/generator with type com.stack.iot.alert and specversion 1.0 {'message': 'green alert generated'}
127.0.0.1 - - [12/Sep/2025 18:47:28] "POST / HTTP/1.1" 204 -
{'attributes': {'specversion': '1.0', 'id': 'ef5b2876-fbc0-438f-bd97-084f517fc485', 'source': 'https://iot.stack.com/generator', 'type': 'com.stack.iot.alert', 'time': '2025-09-12T13:17:28.409635+00:00'}, 'data': {'message': 'green alert generated'}}
Found ef5b2876-fbc0-438f-bd97-084f517fc485 from https://iot.stack.com/generator with type com.stack.iot.alert and specversion 1.0 {'message': 'green alert generated'}
127.0.0.1 - - [12/Sep/2025 18:47:28] "POST / HTTP/1.1" 204 -
{'attributes': {'specversion': '1.0', 'id': 'a407bd88-c510-4205-99c3-99b315c11f7f', 'source': 'https://iot.stack.com/generator', 'type': 'com.stack.iot.alert', 'time': '2025-09-12T13:17:38.412586+00:00'}, 'data': {'message': 'orange alert generated'}}
Found a407bd88-c510-4205-99c3-99b315c11f7f from https://iot.stack.com/generator with type com.stack.iot.alert and specversion 1.0 {'message': 'orange alert generated'}
127.0.0.1 - - [12/Sep/2025 18:47:38] "POST / HTTP/1.1" 204 -
{'attributes': {'specversion': '1.0', 'id': '1bf1da81-9827-47fb-bd17-993d842f140e', 'source': 'https://iot.stack.com/generator', 'type': 'com.stack.iot.alert', 'time': '2025-09-12T13:17:38.424908+00:00'}, 'data': {'message': 'orange alert generated'}}
Found 1bf1da81-9827-47fb-bd17-993d842f140e from https://iot.stack.com/generator with type com.stack.iot.alert and specversion 1.0 {'message': 'orange alert generated'}
127.0.0.1 - - [12/Sep/2025 18:47:38] "POST / HTTP/1.1" 204 -
Hope you enjoyed reading this article. Thank you..
Leave a Reply
You must be logged in to post a comment.