How to use Jakarta Servlet API to build Web Applications

Here in this article we will try to implement a very basic servlet based application using Jakarta Servlet API to provide us with OTP Number.
Test Environment
- OpenJDK 17.0.13
- Eclipse GlassFish 7.0.20
- Apache Maven 3.9.1
- VSCode Editor 1.97.2
Web Applications
Web Applications are networking applications which are usually deployed onto Web and Application Server. They are usually accessed through Web browser of a network. The advantage of Web Applications over Desktop and Mobile Applications is being platform independent.
Types of Web Applications
- Presentation Oriented Applications: These applications serve dynamic web pages as a response to requests. The response is usually an HTML document. Jakarta Faces technology is used to build presentation oriented application
- Service Oriented Applications: These applications generated HTTP response in the form of dynamic data structure such as JSON or XML. These application are often used by the presentation oriented applications or other service oriented applications
JakartaEE Technologies to Build Web Applications
A Web Application consist of Web Components which can be built using Jakarta Servlet, Jakarta Faces or Jakarta REST API technologies.
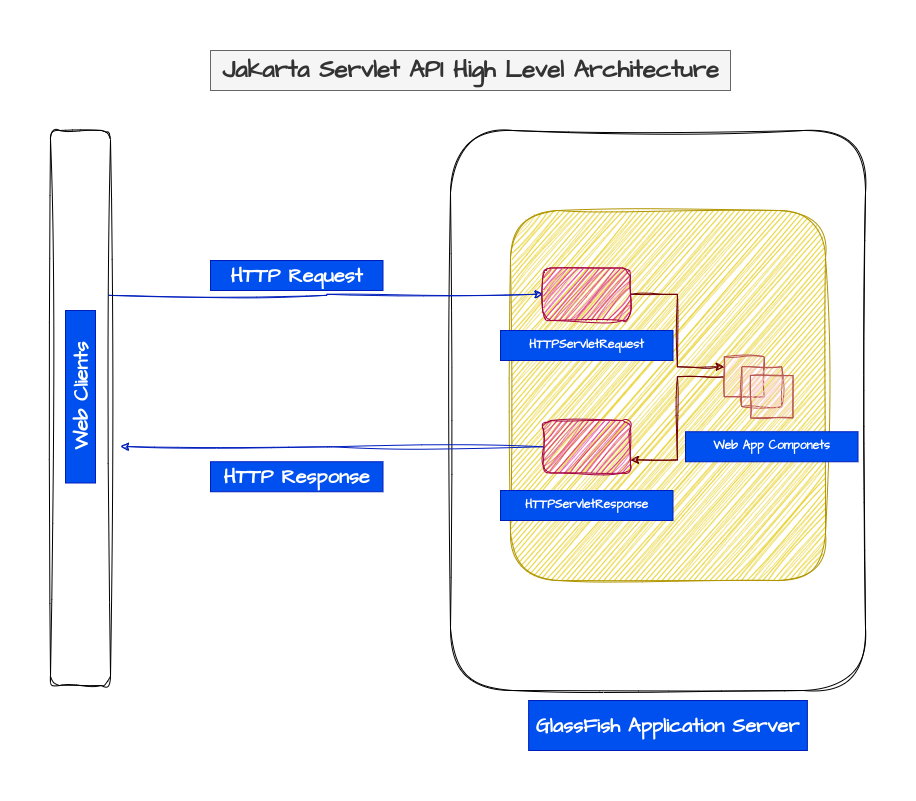
- Jakarta Servlet: It’s used to build both presentation and service-oriented web applications. It provides with the boilerplate code to convert HTTP request and response to HTTPServletRequest and HTTPServletResponse java objects and provides with the lifecycle management capabilities
- Jakarta Faces: Its used to build presentation oriented applications. It intends to reduce the boilerplate code needed to collect the request parameters, convert and validate them, update bean properties with them, invoke bean methods, and generate HTML output as response
- Jakarta REST: It’s used to build service-oriented applications. It provides with the boilerplate code to map the request parameters with the backend beans and generate response in a structured format such as JSON or XML which can be consumed by other service oriented application or presentation oriented application to provide end user view
These Web Application technologies are implemented by Jakarta Runtime environment such as Application Servers. These implementation are called as servlet or portlet containers. The web application components that are deployed to these container can be configured using annotations or XML deployment descriptors. The configuration provided in the deployment descriptor file takes precedence over the configuration defined using annotations.
High Level Architecture
If you are interested in watching the video. Here is the YouTube video on the same step by step procedure outlined below.
Procedure
Step1: Ensure the following Pre-requisite installed
Ensure that you have JDK, Maven and Glassfish Enterprise application server installed on your workstation.
admin@fedser:~$ javac --version
javac 17.0.13

admin@fedser:~$ mvn --version
Apache Maven 3.9.1 (Red Hat 3.9.1-3)
Download and install the Glassfish Enterprise Application server.
Ensure that the Glassfish application server is up and running.
admin@fedser:~$ asadmin start-domain
Waiting for domain1 to start .........
Waiting finished after 8,101 ms.
Successfully started the domain : domain1
domain  Location: /home/admin/middleware/stack/glassfish7/glassfish/domains/domain1
Log File: /home/admin/middleware/stack/glassfish7/glassfish/domains/domain1/logs/server.log
Admin Port: 4,848
Command start-domain executed successfully.
Validate if you able to access the Admin Console page for the Glassfish Server.
URL - http://localhost:4848/common/index.jsf
Step2: Create a maven jakartaee minimal project
Here we will create a maven archetype project using the CLI with the below mentioned options to generate a minimal jakartaee version 10 project.
admin@fedser:vscodeprojects$ mvn archetype:generate -DarchetypeArtifactId="jakartaee10-minimal" -DarchetypeGroupId="org.eclipse.starter" -DarchetypeVersion="1.1.0" -DgroupId="com.stack" -DartifactId="servletdemo"
Now let’s change into the project directory that just got created.
admin@fedser:vscodeprojects$ cd servletdemo/
Let’s remove the files and folder that we dont need for this demo.
admin@fedser:cdidemo$ rm -rf src/main/java/com/stack/servletdemo/*
admin@fedser:cdidemo$ rm -rf src/main/resources
Step3: Create GenerateOTP.java
Here we are going to create a Servlet class named “GenerateOTP.java”. This class must extend jakarta.servlet.http.HttpServlet and override one of the doXxx() methods where Xxx represents the HTTP method of interest. Such a class is in the Jakarta Servlet world called a Servlet.
Here we are overriding the “doGet” method of the HttpServlet as shown below.
- @WebServlet: This annotation is used to declare a servlet. It is processed by the container at deployment time, and the corresponding servlet made available at the specified URL patterns.
admin@fedser:servletdemo$ cat src/main/java/com/stack/servletdemo/GenerateOTP.java
package com.stack.servletdemo;

import java.io.IOException;
import java.security.SecureRandom;

import jakarta.servlet.ServletException;
import jakarta.servlet.annotation.WebServlet;
import jakarta.servlet.http.HttpServlet;
import jakarta.servlet.http.HttpServletRequest;
import jakarta.servlet.http.HttpServletResponse;

@WebServlet("/generateotp")
public class GenerateOTP extends HttpServlet {

    private static final String CHARACTERS = "0123456789";
    private SecureRandom random = new SecureRandom();

    @Override
    public void doGet(HttpServletRequest request, HttpServletResponse response) throws ServletException, IOException {

        int otplength;

        try {
            otplength = Integer.parseInt(request.getParameter("otplength"));;
         }
         catch (NumberFormatException e) {
            otplength = 6;
         }

        StringBuilder otp = new StringBuilder(otplength);
        for (int i = 0; i < otplength; i++) {
            int index = random.nextInt(CHARACTERS.length());
            otp.append(CHARACTERS.charAt(index));
        }

        response.setContentType("text/plain");
        response.getWriter().write("Generated OTP for " + otplength + " digit OTP: " + otp.toString());

    }

}
Step4: Update pom.xml to deploy to Glassfish server
Here we are updating the pom.xml “properties” section to add “glassfish.home” directory where the glassfish server is installed. Also we are updating the plugins section with “org.codehaus.cargo” plugin to carry out automated deployment using the mvn cli to the glassfish server based on configuration properties that are provided. If you are not using this plugin you can generate the war package and deploy it manually to your glassfish server.
admin@fedser:servletdemo$ cat pom.xml
<project xmlns="http://maven.apache.org/POM/4.0.0" xmlns:xsi="http://www.w3.org/2001/XMLSchema-instance"
         xsi:schemaLocation="http://maven.apache.org/POM/4.0.0 http://maven.apache.org/xsd/maven-4.0.0.xsd">
    <modelVersion>4.0.0</modelVersion>

    <groupId>com.stack</groupId>
    <artifactId>servletdemo</artifactId>
    <version>1.0-SNAPSHOT</version>
    <packaging>war</packaging>

    <name>servletdemo</name>

    <properties>
        <maven.compiler.release>17</maven.compiler.release>
        <project.build.sourceEncoding>UTF-8</project.build.sourceEncoding>
        <glassfish.home>/home/admin/middleware/stack/glassfish7</glassfish.home>
    </properties>

    <dependencies>
        <dependency>
            <groupId>jakarta.platform</groupId>
            <artifactId>jakarta.jakartaee-api</artifactId>
            <version>10.0.0</version>
            <scope>provided</scope>
        </dependency>
    </dependencies>

    <build>
        <finalName>servletdemo</finalName>
        <plugins>
            <plugin>
                <groupId>org.apache.maven.plugins</groupId>
                <artifactId>maven-compiler-plugin</artifactId>
                <version>3.10.1</version>
            </plugin>
            <plugin>
                <groupId>org.apache.maven.plugins</groupId>
                <artifactId>maven-war-plugin</artifactId>
                <version>3.3.2</version>
                <configuration>
                    <failOnMissingWebXml>false</failOnMissingWebXml>
                </configuration>
            </plugin>
            <plugin>
                <groupId>org.codehaus.cargo</groupId>
                <artifactId>cargo-maven3-plugin</artifactId>
		<version>1.10.6</version>
                <executions>
                    <execution>
                        <id>deploy</id>
                        <phase>integration-test</phase>
                        <goals>
                            <goal>redeploy</goal>
                        </goals>
                    </execution>
                </executions>
                <configuration>
                    <container>
                        <containerId>glassfish7x</containerId>
                        <type>installed</type>
                        <home>${glassfish.home}</home>
                    </container>
                    <configuration>
                        <type>existing</type>
                        <home>${glassfish.home}/glassfish/domains</home>
                        <properties>
                            <cargo.glassfish.domain.name>domain1</cargo.glassfish.domain.name>
                        </properties>
                    </configuration>
                </configuration>
            </plugin>
        </plugins>
    </build>
</project>
Step5: Build and Deploy Application
Now it’s time to build, package and deploy the application to glassfish application server as shown below.
admin@fedser:servletdemo$ mvn clean package cargo:deploy
Step6: Validate Application
Once the application has been deployed to glassfish application server we can validate the servlet endpoints as shown below.
First we will try to call the servlet with url pattern “/generateotp” without any parameters passed. In this case the GenerateOTP application default to 6 as the OTP length. Here is the output of five “6” digit OTP numbers generated.
admin@fedser:servletdemo$ for i in {1..5}; do curl http://localhost:8080/servletdemo/generateotp; echo -e ; done
Generated OTP for 6 digit OTP: 456162
Generated OTP for 6 digit OTP: 424880
Generated OTP for 6 digit OTP: 985760
Generated OTP for 6 digit OTP: 389975
Generated OTP for 6 digit OTP: 814647
Now, let’s pass the “otplength” parameter with value “4” to generate five “4” digit OTP numbers as shown below.
admin@fedser:servletdemo$ for i in {1..5}; do curl http://localhost:8080/servletdemo/generateotp?otplength=4; echo -e ; done
Generated OTP for 4 digit OTP: 6482
Generated OTP for 4 digit OTP: 0424
Generated OTP for 4 digit OTP: 9698
Generated OTP for 4 digit OTP: 0857
Generated OTP for 4 digit OTP: 1664
Hope you enjoyed reading this article. Thank you..
Leave a Reply
You must be logged in to post a comment.