How to use Sphinx to generate elegant documentation

Here in this article we will see how we can use Sphinx to generate documentation for a project. We will try to add table of content to our landing page and add documents. Also we will try to use a different theme to generate the html content.
Test Environment
Fedora 37 workstation
What is Sphinx
Sphinx a Python based documentation generator tool which can be used to generated documents in differnet formats (ie. html, LaTex, ePub, Texinfo, manual pages, plain text). Sphinx uses the reStructuredText markup language by default and can read MyST markdown via third-party extensions. Sphinx is also used to generate the Official Python documentation.
If you are interested in watching the video. Here is the YouTube video on the same step by step procedure outlined below.
Procedure
Step1: Install Sphinx
There are different options available for Installing Sphinx. We can install Sphinx using an .rpm or .deb package. It can also be installed using the pip package or we can launch it using a docker image. Here we are going to install Sphinx using the python pip package as shown below.
[admin@fedser ~]$ pip install -U sphinx
Once the installation is completed you can verify the sphinx version that is installed as shown below.
[admin@fedser ~]$ sphinx-build --version
sphinx-build 7.0.1
Step2: Create Documentation Source
As a part of this step we can generate a directory structure which we can use as source of our plain text documents. Also this directory will contain the Sphinx configuration file which can be used to configure all aspects of how Sphinx reads source files and build the documentation.
In order to generate this directory structure we can use a tool named “sphinx-quickstart” which comes with Sphinx. This is an interactive tool for which we need to answer a couple of questions as shown below.
Let us create a directory for this activity. We will use this directory to create our sphinx directory structure.
[admin@fedser sphinx]$ mkdir learnsphinx
[admin@fedser sphinx]$ cd learnsphinx/

[admin@fedser learnsphinx]$ sphinx-quickstart
Welcome to the Sphinx 7.0.1 quickstart utility.

Please enter values for the following settings (just press Enter to
accept a default value, if one is given in brackets).

Selected root path: .

You have two options for placing the build directory for Sphinx output.
Either, you use a directory "_build" within the root path, or you separate
"source" and "build" directories within the root path.
> Separate source and build directories (y/n) [n]: n

The project name will occur in several places in the built documentation.
> Project name: learnsphinx
> Author name(s): novicejava1
> Project release []: v1.0

If the documents are to be written in a language other than English,
you can select a language here by its language code. Sphinx will then
translate text that it generates into that language.

For a list of supported codes, see
https://www.sphinx-doc.org/en/master/usage/configuration.html#confval-language.
> Project language [en]: en

Creating file /home/admin/middleware/stack/development/sphinx/learnsphinx/conf.py.
Creating file /home/admin/middleware/stack/development/sphinx/learnsphinx/index.rst.
Creating file /home/admin/middleware/stack/development/sphinx/learnsphinx/Makefile.
Creating file /home/admin/middleware/stack/development/sphinx/learnsphinx/make.bat.

Finished: An initial directory structure has been created.

You should now populate your master file /home/admin/middleware/stack/development/sphinx/learnsphinx/index.rst and create other documentation
source files. Use the Makefile to build the docs, like so:
   make builder
where "builder" is one of the supported builders, e.g. html, latex or linkcheck.
Step3: Understand directory structure
Here is our documentation directory that gets created once we run the sphinx-quickstart.
The index.rst is the root document which also serves as the welcome page. It hold the table of content tree for all the other documents in the source. Also as you can notice we have conf.py file which is the configuration file used by sphinx while generating the documentation.
The _build is target directory where the documentation gets generated. The _static directory is a place holder for any static css, images, fonts, videos, javascript files that we want to use. The _template directory holds any template files that we want to apply to our documentation.
[admin@fedser learnsphinx]$ tree .
.
├── _build
├── conf.py
├── index.rst
├── make.bat
├── Makefile
├── _static
└── _templates
Step4: Add additional rst documents
In this step let us try to add two additional documents named installation.rst userguide.rst.
[admin@fedser learnsphinx]$ cat installation.rst
Installation Guide
==================

1. Install Pre-requisite

.. parsed-literal::

   sudo dnf install curl

2. Download Package

.. parsed-literal::

   curl -sSL https://example.com/netcap.rpm

3. Install Package

.. parsed-literal::

   sudo dnf install netcap

[admin@fedser learnsphinx]$ cat userguide.rst
User Guide
==================

1. Get Version

.. parsed-literal::

   netcap --version

2. Get Help

.. parsed-literal::

   netcap --help

3. List Components

.. parsed-literal::

   netcap --list-all
Update index.rst to include the “installation.rst” and “userguide.rst” in the toctree directive as shown below.
[admin@fedser learnsphinx]$ cat index.rst
.. learnsphinx documentation master file, created by
   sphinx-quickstart on Sat Jun 24 10:15:30 2023.
   You can adapt this file completely to your liking, but it should at least
   contain the root `toctree` directive.

Welcome to learnsphinx's documentation!
=======================================

.. toctree::
   :maxdepth: 2
   :caption: Contents:

   installation
   userguide

Indices and tables
==================

* :ref:`genindex`
* :ref:`modindex`
* :ref:`search`
Step5: Build HTML content
Now we are ready with our plain text content in .rst format. We have two methods to build our HTML content from these RST documents. Using the “sphinx-build” command line utility and other is using the make.
Let us first look how we can use “sphinx-build” to generate our HTML documentation. “sphinx-build” take the following arguments as shown below. In our case sourcedir is “.” and builddir is “_build”. The -b option selects a builder, in our case we want to build html documents so its “html” builder.
[admin@fedser learnsphinx]$ sphinx-build -b html <sourcedir> <builddir>
[admin@fedser learnsphinx]$ sphinx-build -b html . _build
Running Sphinx v7.0.1
building [mo]: targets for 0 po files that are out of date
writing output...
building [html]: targets for 3 source files that are out of date
updating environment: [new config] 3 added, 0 changed, 0 removed
reading sources... [100%] userguide
looking for now-outdated files... none found
pickling environment... done
checking consistency... done
preparing documents... done
writing output... [100%] userguide
generating indices... genindex done
writing additional pages... search done
copying static files... done
copying extra files... done
dumping search index in English (code: en)... done
dumping object inventory... done
build succeeded.

The HTML pages are in _build.
Now if we look at our documentation directory structure. It should be as shown below. Now the _build directory is populated with “html” content. The _static folder is populated with the css and javascript files that will be used in our HTML content.
[admin@fedser learnsphinx]$ tree .
.
├── _build
│   ├── genindex.html
│   ├── index.html
│   ├── installation.html
│   ├── objects.inv
│   ├── search.html
│   ├── searchindex.js
│   ├── _sources
│   │   ├── index.rst.txt
│   │   ├── installation.rst.txt
│   │   └── userguide.rst.txt
│   ├── _static
│   │   ├── alabaster.css
│   │   ├── basic.css
│   │   ├── custom.css
│   │   ├── doctools.js
│   │   ├── documentation_options.js
│   │   ├── file.png
│   │   ├── language_data.js
│   │   ├── minus.png
│   │   ├── plus.png
│   │   ├── pygments.css
│   │   ├── searchtools.js
│   │   └── sphinx_highlight.js
│   └── userguide.html
├── conf.py
├── index.rst
├── installation.rst
├── make.bat
├── Makefile
├── _static
├── _templates
└── userguide.rst
Instead of passing all these options to “sphinx-build” to generate the documentation, we can simply use the “make” command line utility to build our documentation as the sphinx-quickstart which we ran in Step2 has already created a Makefile which we can leverage as shown below.
[admin@fedser learnsphinx]$ make html
Step6: Validate the Generated Documentation
We can open our generated documentation using the Firefox as shown below.
[admin@fedser learnsphinx]$ firefox _build/html/index.html
Here is how our documentation home page looks like. As you can notice, this html is generated using the theme “Alabaster” as in our conf.py it is configured to use it as shown below.
[admin@fedser learnsphinx]$ cat conf.py | grep "html_theme"
html_theme = 'alabaster'

If you run make without any arguments it will show you all the different builder arguments or the targets that can be build as shown below.
[admin@fedser learnsphinx]$ make
Sphinx v7.0.1
Please use `make target' where target is one of
  html        to make standalone HTML files
  dirhtml     to make HTML files named index.html in directories
  singlehtml  to make a single large HTML file
  pickle      to make pickle files
  json        to make JSON files
  htmlhelp    to make HTML files and an HTML help project
  qthelp      to make HTML files and a qthelp project
  devhelp     to make HTML files and a Devhelp project
  epub        to make an epub
  latex       to make LaTeX files, you can set PAPER=a4 or PAPER=letter
  latexpdf    to make LaTeX and PDF files (default pdflatex)
  latexpdfja  to make LaTeX files and run them through platex/dvipdfmx
  text        to make text files
  man         to make manual pages
  texinfo     to make Texinfo files
  info        to make Texinfo files and run them through makeinfo
  gettext     to make PO message catalogs
  changes     to make an overview of all changed/added/deprecated items
  xml         to make Docutils-native XML files
  pseudoxml   to make pseudoxml-XML files for display purposes
  linkcheck   to check all external links for integrity
  doctest     to run all doctests embedded in the documentation (if enabled)
  coverage    to run coverage check of the documentation (if enabled)
  clean       to remove everything in the build directory
Step7: Install Theme
Let us try to install the “furo” theme and update the conf.py to use this theme to generate the HTML documentation.
[admin@fedser learnsphinx]$ pip install furo
Defaulting to user installation because normal site-packages is not writeable
Collecting furo
  Downloading furo-2023.5.20-py3-none-any.whl (326 kB)
     ━━━━━━━━━━━━━━━━━━━━━━━━━━━━━━━━━━━━━━━━ 326.8/326.8 kB 8.4 MB/s eta 0:00:00
Requirement already satisfied: beautifulsoup4 in /usr/lib/python3.11/site-packages (from furo) (4.12.2)
Requirement already satisfied: sphinx<8.0,>=6.0 in /home/admin/.local/lib/python3.11/site-packages (from furo) (7.0.1)
Collecting sphinx-basic-ng (from furo)
  Downloading sphinx_basic_ng-1.0.0b1-py3-none-any.whl (22 kB)
Requirement already satisfied: pygments>=2.7 in /home/admin/.local/lib/python3.11/site-packages (from furo) (2.15.1)
Requirement already satisfied: sphinxcontrib-applehelp in /home/admin/.local/lib/python3.11/site-packages (from sphinx<8.0,>=6.0->furo) (1.0.4)
Requirement already satisfied: sphinxcontrib-devhelp in /home/admin/.local/lib/python3.11/site-packages (from sphinx<8.0,>=6.0->furo) (1.0.2)
Requirement already satisfied: sphinxcontrib-jsmath in /home/admin/.local/lib/python3.11/site-packages (from sphinx<8.0,>=6.0->furo) (1.0.1)
Requirement already satisfied: sphinxcontrib-htmlhelp>=2.0.0 in /home/admin/.local/lib/python3.11/site-packages (from sphinx<8.0,>=6.0->furo) (2.0.1)
Requirement already satisfied: sphinxcontrib-serializinghtml>=1.1.5 in /home/admin/.local/lib/python3.11/site-packages (from sphinx<8.0,>=6.0->furo) (1.1.5)
Requirement already satisfied: sphinxcontrib-qthelp in /home/admin/.local/lib/python3.11/site-packages (from sphinx<8.0,>=6.0->furo) (1.0.3)
Requirement already satisfied: Jinja2>=3.0 in /usr/lib/python3.11/site-packages (from sphinx<8.0,>=6.0->furo) (3.0.3)
Requirement already satisfied: docutils<0.21,>=0.18.1 in /home/admin/.local/lib/python3.11/site-packages (from sphinx<8.0,>=6.0->furo) (0.20.1)
Requirement already satisfied: snowballstemmer>=2.0 in /home/admin/.local/lib/python3.11/site-packages (from sphinx<8.0,>=6.0->furo) (2.2.0)
Requirement already satisfied: babel>=2.9 in /usr/lib/python3.11/site-packages (from sphinx<8.0,>=6.0->furo) (2.10.3)
Requirement already satisfied: alabaster<0.8,>=0.7 in /home/admin/.local/lib/python3.11/site-packages (from sphinx<8.0,>=6.0->furo) (0.7.13)
Requirement already satisfied: imagesize>=1.3 in /home/admin/.local/lib/python3.11/site-packages (from sphinx<8.0,>=6.0->furo) (1.4.1)
Requirement already satisfied: requests>=2.25.0 in /usr/lib/python3.11/site-packages (from sphinx<8.0,>=6.0->furo) (2.28.1)
Requirement already satisfied: packaging>=21.0 in /usr/lib/python3.11/site-packages (from sphinx<8.0,>=6.0->furo) (21.3)
Requirement already satisfied: soupsieve>1.2 in /usr/lib/python3.11/site-packages (from beautifulsoup4->furo) (2.3.2.post1)
Requirement already satisfied: pytz>=2015.7 in /usr/lib/python3.11/site-packages (from babel>=2.9->sphinx<8.0,>=6.0->furo) (2023.3)
Requirement already satisfied: MarkupSafe>=2.0 in /usr/lib64/python3.11/site-packages (from Jinja2>=3.0->sphinx<8.0,>=6.0->furo) (2.1.1)
Requirement already satisfied: pyparsing!=3.0.5,>=2.0.2 in /usr/lib/python3.11/site-packages (from packaging>=21.0->sphinx<8.0,>=6.0->furo) (3.0.9)
Requirement already satisfied: charset-normalizer<3,>=2 in /usr/lib/python3.11/site-packages (from requests>=2.25.0->sphinx<8.0,>=6.0->furo) (2.1.0)
Requirement already satisfied: idna<4,>=2.5 in /usr/lib/python3.11/site-packages (from requests>=2.25.0->sphinx<8.0,>=6.0->furo) (3.3)
Requirement already satisfied: urllib3<1.27,>=1.21.1 in /usr/lib/python3.11/site-packages (from requests>=2.25.0->sphinx<8.0,>=6.0->furo) (1.26.15)
Installing collected packages: sphinx-basic-ng, furo
Successfully installed furo-2023.5.20 sphinx-basic-ng-1.0.0b1
[admin@fedser learnsphinx]$ cat conf.py | grep html_theme
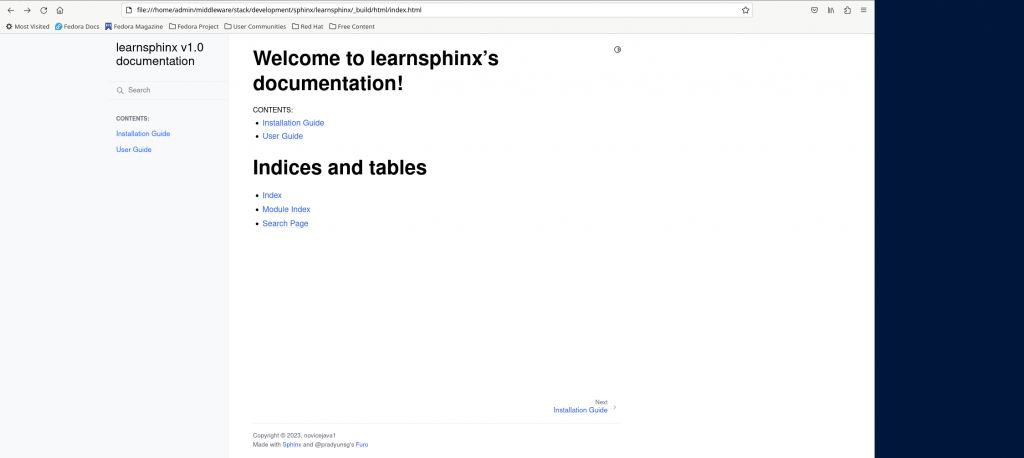
html_theme = 'furo'
Step8: Re-build HTML documentation
[admin@fedser learnsphinx]$ make html

Hope you enjoyed reading this article. Thank you..
Leave a Reply
You must be logged in to post a comment.