How to Integrate Opensearch with LDAP for authentication and authorization

Here in this article we will see how we can integrate LDAP service with Opensearch for authentication and authorization. We will be setting up an Opensearch cluster with LDAP configuration to connect to LDAP server for user authentication and create custom role with read only access and role mapping for user authorization.
Test Environment
Fedora Workstation 37
Docker
Docker Compose
What is LDAP server
LDAP server can be used for Authentication and Authorization services. Authentication is used to check whether the credentials entered by the user are valid and Authorization is used to check whether an user is allowed to carry out a particular action based on the permissions or roles (ie. set of permissions) that are mapped that user.
Let’s assume that you already have an secure LDAP server configured in your environment and try to integrate it with Opensearch Cluster.
If you are interested in watching the video. Here is the YouTube video on the same step by step procedure outlined below.
Procedure
Step1: Gather LDAP server details
As a first step let’s try to gather some of the important details about the LDAP server that we want to integrate with Opensearch cluster. These details can be secured from your LDAP server administrator in your organization.
Here are the sample details from my setup.
| LDAP Key | LDAP value |
| hostname | fedser.stack.com |
| port | 636 |
| ssl_enabled | true |
| bind_dn | CN=opensearch-stack,OU=Services,DC=stack,DC=com |
| bind_password | xxx |
| user_base | DC=stack,DC=com |
| user_attributes | The user object entry attribute to use to carry out an LDAP query for searching that user |
| trusted_ca_cert | The CA singer certificate of the LDAP server |
For LDAP server CA signer certificate you can retrieve the details using the below openssl command and extract the issuer certificate and save it in a PEM file named “trusted_cas.pem”.
openssl s_client -showcerts -connect fedser.stack.com:636
Step2: Configure the LDAP Authentication section
LDAP authentication and authorization configuration is carried out in the following configuration file – “/usr/share/opensearch/config/opensearch-security/config.yml”. The authc and authz sections of the configuration are used for configuring the authentication and authorization settings respectively.
Here is the configuration for the authc section of LDAP.
The “authc” section is configured in such a way that when a user tries to authentication using their LDAP id from the Opensearch basic authentication page.
Connection is established with LDAP server based on the bind dn and password along with the ldap server and port details.
The LDAP id is passed as an input to the following “usersearch: ‘(sAMAccountName={0})'” where “0” is substituted with the LDAP id and an LDAP search is carried out in user base “userbase: ‘DC=stack,DC=com'”.
The username attribute to use from the user object entry is “username_attribute: cn” which is common name of the object is set here which is shown in the profile details on GUI.
File: config.yml
...
config:
  dynamic:
    authc:
    ...
      ldap:
        description: "Authenticate via LDAP or Active Directory"
        http_enabled: true
        transport_enabled: true
        order: 5
        http_authenticator:
          type: basic
          challenge: false
        authentication_backend:
          # LDAP authentication backend (authenticate users against a LDAP or Active Directory)
          type: ldap
          config:
            # enable ldaps
            enable_ssl: true
            # add trust ca file
            pemtrustedcas_filepath: /usr/share/opensearch/config/trusted_cas.pem
            # enable start tls, enable_ssl should be false
            enable_start_tls: false
            # send client certificate
            enable_ssl_client_auth: false
            # verify ldap hostname
            verify_hostnames: true
            hosts:
            - fedser.stack.com:636
            bind_dn: CN=opensearch-stack,OU=Services,DC=stack,DC=com
            password: xxx
            userbase: 'DC=stack,DC=com'
            # Filter to search for users (currently in the whole subtree beneath userbase)
            # {0} is substituted with the username
            usersearch: '(sAMAccountName={0})'
            # Use this attribute from the user as username (if not set then DN is used)
            username_attribute: cn
Step3: Configure the LDAP Authorization section
In this section we configure the authorization section of the LDAP. It contains the same details as authentication section as far as LDAP server connection and user search is concerned.
Once a user is authentication, the roles or the groups that this user is a member of are fetched using “rolesearch: ‘(member={0})'” where “0” is substituted with the LDAP id.
The role base “OU=opensearch_groups,DC=stack,DC=com” is used to match if any user role is a part of this role base and get the common name of the role “rolename: cn”.
Assume this role or group name is “ldapusergroup” which is present in the LDAP role base.
File: config.yml
...
config:
  dynamic:
    authc:
    ... update as above ...
    authz:
    ...
      ldap:
        description: "Authorize via LDAP or Active Directory"
        http_enabled: true
        transport_enabled: true
        authorization_backend:
          # LDAP authorization backend (gather roles from a LDAP or Active Directory, you have to configure the above LDAP authentication backend settings too)
          type: ldap
          config:
            # enable ldaps
            enable_ssl: true
            # add trust ca file
            pemtrustedcas_filepath: /usr/share/opensearch/config/trusted_cas.pem
            # enable start tls, enable_ssl should be false
            enable_start_tls: false
            # send client certificate
            enable_ssl_client_auth: false
            # verify ldap hostname
            verify_hostnames: true
            hosts:
            - fedser.stack.com:636
            bind_dn: CN=opensearch-stack,OU=Services,DC=stack,DC=com
            password: xxx
            rolebase: 'OU=opensearch_groups,DC=stack,DC=com'
            # Filter to search for roles (currently in the whole subtree beneath rolebase)
            # {0} is substituted with the DN of the user
            # {1} is substituted with the username
            # {2} is substituted with an attribute value from user's directory entry, of the authenticated user. Use userroleattribute to specify the name of the attribute
            rolesearch: '(member={0})'
            # Specify the name of the attribute which value should be substituted with {2} above
            userroleattribute: null
            # Roles as an attribute of the user entry
            userrolename: disabled
            #userrolename: memberOf
            # The attribute in a role entry containing the name of that role, Default is "name".
            # Can also be "dn" to use the full DN as rolename.
            rolename: cn
            # Resolve nested roles transitive (roles which are members of other roles and so on ...)
            resolve_nested_roles: true
            userbase: 'DC=stack,DC=com'
            # Filter to search for users (currently in the whole subtree beneath userbase)
            # {0} is substituted with the username
            #usersearch: '(uid={0})'
            #username_attribute: uid
            usersearch: '(sAMAccountName={0})'
            username_attribute: cn
            # Skip users matching a user name, a wildcard or a regex pattern
            #skip_users:
            #  - 'cn=Michael Jackson,ou*people,o=TEST'
            #  - '/\S*/'
            skip_users:
              - admin
              - kibanaserver
Step4: Update Docker Compose with LDAP configuration and LDAP CA cert file
Now that we are ready with the LDAP configuration, Here we are going to volume mount the LDAP configuration file and the trusted CA file containing the CA signer certificate of the LDAP server in the docker-compose.yml file as shown below.
File: docker-compose.yml
version: '3'
services:
  opensearchldap-node1: # This is also the hostname of the container within the Docker network (i.e. https://opensearch-node1/)
    image: opensearchproject/opensearch:2.3.0 # Specifying the latest available image - modify if you want a specific version
    container_name: opensearchldap-node1
    environment:
      - cluster.name=opensearch-cluster # Name the cluster
      - node.name=opensearchldap-node1 # Name the node that will run in this container
      - discovery.seed_hosts=opensearchldap-node1,opensearchldap-node2 # Nodes to look for when discovering the cluster
      - cluster.initial_cluster_manager_nodes=opensearchldap-node1,opensearchldap-node2 # Nodes eligibile to serve as cluster manager
      - bootstrap.memory_lock=true # Disable JVM heap memory swapping
      - "OPENSEARCH_JAVA_OPTS=-Xms512m -Xmx512m" # Set min and max JVM heap sizes to at least 50% of system RAM
      - compatibility.override_main_response_version=true
    ulimits:
      memlock:
        soft: -1 # Set memlock to unlimited (no soft or hard limit)
        hard: -1
      nofile:
        soft: 65536 # Maximum number of open files for the opensearch user - set to at least 65536
        hard: 65536
    volumes:
      - opensearchldap-data1:/usr/share/opensearch/data # Creates volume called opensearch-data1 and mounts it to the container
      - ./config.yml:/usr/share/opensearch/config/opensearch-security/config.yml
      - ./trusted_cas.pem:/usr/share/opensearch/config/trusted_cas.pem
    ports:
      - 9200:9200 # REST API
      - 9600:9600 # Performance Analyzer
    networks:
      - opensearchldap-net # All of the containers will join the same Docker bridge network
  opensearchldap-node2:
    image: opensearchproject/opensearch:2.3.0 # This should be the same image used for opensearch-node1 to avoid issues
    container_name: opensearchldap-node2
    environment:
      - cluster.name=opensearch-cluster
      - node.name=opensearchldap-node2
      - discovery.seed_hosts=opensearchldap-node1,opensearchldap-node2
      - cluster.initial_cluster_manager_nodes=opensearchldap-node1,opensearchldap-node2
      - bootstrap.memory_lock=true
      - "OPENSEARCH_JAVA_OPTS=-Xms512m -Xmx512m"
      - compatibility.override_main_response_version=true
    ulimits:
      memlock:
        soft: -1
        hard: -1
      nofile:
        soft: 65536
        hard: 65536
    volumes:
      - opensearchldap-data2:/usr/share/opensearch/data
      - ./config.yml:/usr/share/opensearch/config/opensearch-security/config.yml
      - ./trusted_cas.pem:/usr/share/opensearch/config/trusted_cas.pem
    networks:
      - opensearchldap-net
  opensearchldap-dashboards:
    image: opensearchproject/opensearch-dashboards:2.3.0 # Make sure the version of opensearch-dashboards matches the version of opensearch installed on other nodes
    container_name: opensearchldap-dashboards
    ports:
      - 5601:5601 # Map host port 5601 to container port 5601
    expose:
      - "5601" # Expose port 5601 for web access to OpenSearch Dashboards
    environment:
      OPENSEARCH_HOSTS: '["https://opensearchldap-node1:9200","https://opensearchldap-node2:9200"]' # Define the OpenSearch nodes that OpenSearch Dashboards will query
    networks:
      - opensearchldap-net

volumes:
  opensearchldap-data1:
  opensearchldap-data2:

networks:
  opensearchldap-net:
Step5: Start the Opensearch Cluster with LDAP configuration
Let’s start up the Opensearch CLuster with LDAP configuration and ensure that is up and running.
docker-compose up -d
You can login to Opensearch Dashboard using the default internal user credentials (ie. admin/admin).
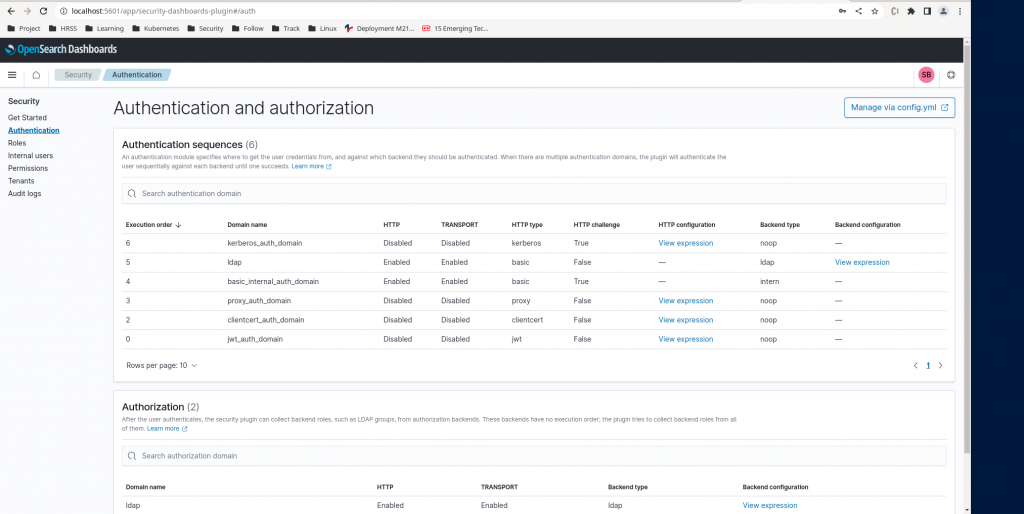
LDAP authentication and authorization domain will be shown as enabled as shown in below screenshot.

Step6: Create a Generic User Role for read access
Here in this step we are going to create a “genericaccess.json” file containing the permissions that we want to grant at the cluster, index and tenant level as shown below.
As you can see we are providing the permissions for a read only access to the Opensearch cluster at all these three levels.
File: genericaccess.json
{
  "cluster_permissions": [
    "cluster_composite_ops_ro"
  ],
  "index_permissions": [{
    "index_patterns": [
      "*"
    ],
    "dls": "",
    "fls": [],
    "masked_fields": [],
    "allowed_actions": [
	    "read"
    ]
  }],
  "tenant_permissions": [{
    "tenant_patterns": [
      "*"
    ],
    "allowed_actions": [
      "kibana_all_read"
    ]
  }]
}
Let’s create this role as shown below using the REST API call.
curl -X PUT -H 'Content-Type: application/json' https://localhost:9200/_plugins/_security/api/roles/genericaccess -d @genericaccess.json -u admin:admin --insecure
Output:
{"status":"OK","message":"'genericaccess' created."}
Step7: Map Generic User Role to backend roles
Here in this step we are going to map the LDAP role that the user is a part of (ie. ldapusergroup) with the backend_roles and map these backend_roles to the role “genericaccess” which we created in earlier step. So backend roles can be anything like custom roles “ie. opensearch_dashboards_user, opensearch_dashboards_read_only” or roles fetched from the LDAP server (ie. ldapusergroup).

Map genericaccess role to backend roles as shown below.
curl -X PUT -H 'Content-Type: application/json' https://localhost:9200/_plugins/_security/api/rolesmapping/genericaccess -d '{ "backend_roles" : [ "ldapusergroup", "opensearch_dashboards_user", "opensearch_dashboards_read_only" ] }' -u admin:admin --insecure
Output:
{"status":"OK","message":"'genericaccess' created."}
Step8: Validate LDAP user authentication and authorization
Once the role and role mapping is completed. You can login with your LDAP credentails and validate that you have only read only access to the Opensearch Cluster. You can Login to the Opensearch Dashboard portal and verify the access.
URL - http://localhost:5601/
Hope you enjoyed reading this article. Thank you..
Leave a Reply
You must be logged in to post a comment.