How to install Gitlab using the Omnibus package on Ubuntu OS
Here in this article we will see how we can install the Omnibus gitlab package on Ubuntu OS. Installing gitlab server using the Omnibus gitlab package is the recommended method as it bundles all the requires services and dependent component for the gitlab server to operate.
Test Environment
Ubuntu 20.04
What is GitLab
As stated on the office gitlab page, its a complete DevOps platform rather than a distributed version control system alone. Its a web-based Git repository that provides free open and private repositories, issue-following capabilities, and wikis. It is a complete DevOps platform that provides the relevant tools for each stage of a project lifecycle (ie. Plan, Create, Verify, Package, Secure, Release, Configure, Monitor, Protect and Manage).
Procedure
Step1: Enable SSH service
Make sure you have SSH service installed, enable on the server and able to SSH remotely onto the server.
gitadmin@gitserver:~$ sudo apt-get install openssh-server
gitadmin@gitserver:~$ sudo systemctl status sshd.service
Step2: Verify your gitlab server hostname is DNS resolvable
In order to have your gitlab server ui accessible on a FQDN, you need to have a DNS resolvable FQDN. Please make sure you are able to nslookup your hostname as shown below.
gitadmin@gitserver:~$ nslookup gitserver.stack.com
Server:		127.0.0.53
Address:	127.0.0.53#53

Non-authoritative answer:
Name:	gitserver.stack.com
Address: 192.168.122.67
Step3: Install and configure the necessary dependencies on gitlab server
Here in this step we are installing all the dependent packages as shown below. We have already installed openssh-server as a first step so that we can ssh onto gitlab server for remote management. ca-certificates provides the trust stores with the all the Singer certificates in case you are enabling SSL for your gitlab server and need the certificate to be validated and trusted.
gitadmin@gitserver:~$ sudo apt-get update
gitadmin@gitserver:~$ sudo apt-get install -y curl openssh-server ca-certificates tzdata perl
Step4: Add the GitLab package repository
Here in this step we are getting install the gpg keys and create the repositories for the gitlab enterprise edition package.
gitadmin@gitserver:~$ curl https://packages.gitlab.com/install/repositories/gitlab/gitlab-ee/script.deb.sh | sudo bash
  % Total    % Received % Xferd  Average Speed   Time    Time     Time  Current
                                 Dload  Upload   Total   Spent    Left  Speed
100  6865  100  6865    0     0  19502      0 --:--:-- --:--:-- --:--:-- 19502
Detected operating system as Ubuntu/focal.
Checking for curl...
Detected curl...
Checking for gpg...
Detected gpg...
Running apt-get update... done.
Installing apt-transport-https... done.
Installing /etc/apt/sources.list.d/gitlab_gitlab-ee.list...done.
Importing packagecloud gpg key... done.
Running apt-get update... done.

The repository is setup! You can now install packages.
Step5: Install gitlab enterprise edition package
Once the repository is setup we can install the gitlab-ee package from the repository as shown below and passing the external url that we want the gitlab to configure.
gitadmin@gitserver:~$ sudo EXTERNAL_URL="http://gitserver.stack.com" apt-get install gitlab-ee
...
Notes:
Default admin account has been configured with following details:
Username: root
Password: You didn't opt-in to print initial root password to STDOUT.
Password stored to /etc/gitlab/initial_root_password. This file will be cleaned up in first reconfigure run after 24 hours.

NOTE: Because these credentials might be present in your log files in plain text, it is highly recommended to reset the password following https://docs.gitlab.com/ee/security/reset_user_password.html#reset-your-root-password.

gitlab Reconfigured!

       *.                  *.
      ***                 ***
     *****               *****
    .******             *******
    ********            ********
   ,,,,,,,,,***********,,,,,,,,,
  ,,,,,,,,,,,*********,,,,,,,,,,,
  .,,,,,,,,,,,*******,,,,,,,,,,,,
      ,,,,,,,,,*****,,,,,,,,,.
         ,,,,,,,****,,,,,,
            .,,,***,,,,
                ,*,.


     _______ __  __          __
    / ____(_) /_/ /   ____ _/ /_
   / / __/ / __/ /   / __ `/ __ \
  / /_/ / / /_/ /___/ /_/ / /_/ /
  \____/_/\__/_____/\__,_/_.___/


Thank you for installing GitLab!
GitLab should be available at http://gitserver.stack.com

For a comprehensive list of configuration options please see the Omnibus GitLab readme
https://gitlab.com/gitlab-org/omnibus-gitlab/blob/master/README.md

Help us improve the installation experience, let us know how we did with a 1 minute survey:
https://gitlab.fra1.qualtrics.com/jfe/form/SV_6kVqZANThUQ1bZb?installation=omnibus&release=15-0
Step6: Retrieve the random generated password
Once the gitlab server is installed we can retrieve the random generated password as shown below for the root user.
gitadmin@gitserver:~$ sudo cat /etc/gitlab/initial_root_password
# WARNING: This value is valid only in the following conditions
#          1. If provided manually (either via `GITLAB_ROOT_PASSWORD` environment variable or via `gitlab_rails['initial_root_password']` setting in `gitlab.rb`, it was provided before database was seeded for the first time (usually, the first reconfigure run).
#          2. Password hasn't been changed manually, either via UI or via command line.
#
#          If the password shown here doesn't work, you must reset the admin password following https://docs.gitlab.com/ee/security/reset_user_password.html#reset-your-root-password.

Password: H4+lionetepbDrCdFq3b9szzEdtcyjalumzcgUdDVSw=

# NOTE: This file will be automatically deleted in the first reconfigure run after 24 hours.
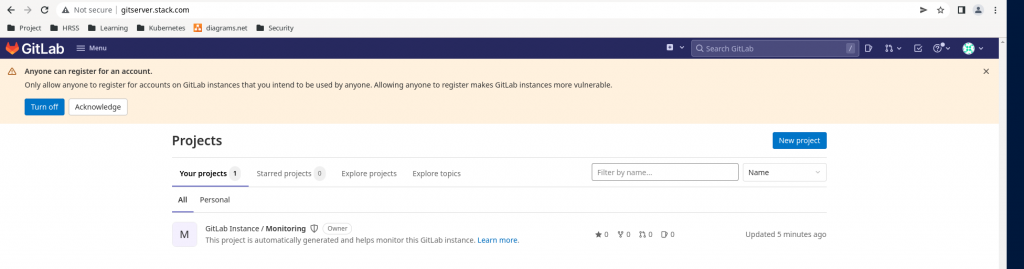
Step7: Validate the gitlab server url
We can validate the gitserver server url by logging in with the default root user and the random generated password as shown below.
url - http://gitserver.stack.com
username - root
password - H4+lionetepbDrCdFq3b9szzEdtcyjalumzcgUdDVSw=
NOTE: Generated Password may be different in your case.
Step8: Change the random generated password for root user
As a part of security we need to make sure the default password is changed. Go to Edit Profile – Password and change the random generated password.
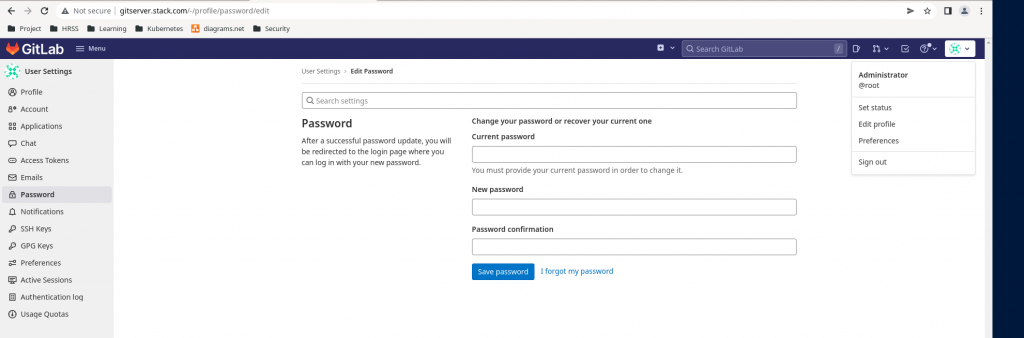
Once you update the password you should be see the login page with successfully password reset message on top.

Now you should be able to login with the new root password into the gitlab gui.
Hope you enjoyed reading this article. Thank you..
Leave a Reply
You must be logged in to post a comment.