How to pipe data from PostgreSQL into Elasticsearch using logstash
Here in this article we will see how we can ingest or pipe the data from postgres sql database table into the elasticsearch for indexing. We will be setting up a database table in postgres sql. We will be using the logstash with JDBC plugin to collect this postgres sql data and output it to elasticsearch index. Then we will be using kibana to visualize the data that has been indexed in elasticsearch.
Test Environment
Fedora 32 installed
Docker and Docker compose installed
Procedure
Step1: Setup elasticsearch and kibana using docker compose
As a first step. let’s setup the elasticsearch and kibana service using the below docker compose file. We are setting up a two nodes elasticsearch cluster with kibana. Please note we have used the volume mount ‘/apps/elasticsearch/data’ which is created on host machine and mapped to ‘/usr/share/elasticsearch/data’ for data persistence.
File: docker-compose.yml
version: '3'
services:
  odfe-node1:
    image: amazon/opendistro-for-elasticsearch:1.12.0
    logging:
      driver: "json-file"
      options:
        max-size: "100m"
        max-file: "3"
    container_name: odfe-node1
    environment:
      - cluster.name=odfe-cluster
      - node.name=odfe-node1
      - discovery.seed_hosts=odfe-node1,odfe-node2
      - cluster.initial_master_nodes=odfe-node1,odfe-node2
      - bootstrap.memory_lock=true # along with the memlock settings below, disables swapping
      - "ES_JAVA_OPTS=-Xms4096m -Xmx4096m" # minimum and maximum Java heap size, recommend setting both to 50% of system RAM
    ulimits:
      memlock:
        soft: -1
        hard: -1
      nofile:
        soft: 65536 # maximum number of open files for the Elasticsearch user, set to at least 65536 on modern systems
        hard: 65536
    volumes:
      - /apps/elasticsearch/data:/usr/share/elasticsearch/data
    ports:
      - 9200:9200
      - 9600:9600 # required for Performance Analyzer
    networks:
      - odfe-net
  odfe-node2:
    image: amazon/opendistro-for-elasticsearch:1.12.0
    logging:
      driver: "json-file"
      options:
        max-size: "100m"
        max-file: "3"
    container_name: odfe-node2
    environment:
      - cluster.name=odfe-cluster
      - node.name=odfe-node2
      - discovery.seed_hosts=odfe-node1,odfe-node2
      - cluster.initial_master_nodes=odfe-node1,odfe-node2
      - bootstrap.memory_lock=true
      - "ES_JAVA_OPTS=-Xms4096m -Xmx4096m"
    ulimits:
      memlock:
        soft: -1
        hard: -1
      nofile:
        soft: 65536
        hard: 65536
    volumes:
      - /apps/elasticsearch/data:/usr/share/elasticsearch/data
    networks:
      - odfe-net
  kibana:
    image: amazon/opendistro-for-elasticsearch-kibana:1.12.0
    logging:
      driver: "json-file"
      options:
        max-size: "100m"
        max-file: "3"
    container_name: odfe-kibana
    ports:
      - 5601:5601
    expose:
      - "5601"
    environment:
      ELASTICSEARCH_URL: https://odfe-node1:9200
      ELASTICSEARCH_HOSTS: https://odfe-node1:9200
    networks:
      - odfe-net

#volumes:
#  odfe-data1:
#  odfe-data2:

networks:
  odfe-net:
Once the docker compose file is prepared and required volume mounts created on host machine, We can start the elasticsearch and kibana service as shown below.
docker-compose up -d
Step2: Setup Postgre SQL database using docker compose
Now. let’s us setup our Postgre SQL database using the below docker compose file. Here we have configured the environment variables database, user, password which we will be using to connect to the database once the service is up and running.
File: docker-compose.yml
version: '2.1'
services:
  db:
    image: postgres
    ports:
      - "5432:5432"
    volumes:
      - ./pg-data:/var/lib/postgresql/data
    environment:
      POSTGRES_DB: inventorydb
      POSTGRES_USER: postgres
      POSTGRES_PASSWORD: postgres
Once the docker compose file is ready, we can start the postgres sql database service as shown below.
docker-compose up -d
Step3: Create a table and insert data
Here, we will connect to our Postgre SQL server which is running within the container on port 5432 as shown below.
psql -U postgres -p 5432 -h localhost -W
Now lets connect to the database named ‘inventorydb’ in which we will be creating our table and insert the data.
postgres=# \c inventorydb
Lets create the table named booksdb with four varchar fields as shown below.
inventorydb=# CREATE TABLE booksdb(title VARCHAR(32), firstname VARCHAR(32), lastname VARCHAR(32), publisher VARCHAR(64));
CREATE TABLE
Now, let’s insert the data into the table which we just created. Here we are inserting some data related to books.
inventorydb=# INSERT INTO booksdb(title, firstname, lastname, publisher) VALUES('Learning Python 5th Edition', 'Mark', 'Lutz', 'Orielly');
INSERT 0 1
inventorydb=# INSERT INTO booksdb(title, firstname, lastname, publisher) VALUES('Mastering Elastic Stack', 'Yuvraj', 'Gupta', 'Packt');
INSERT 0 1
inventorydb=# INSERT INTO booksdb(title, firstname, lastname, publisher) VALUES('Head First Python', 'Paul', 'Barry', 'Orielly');
INSERT 0 1
Let’s verify our table ‘booksdb’ for the data that we inserted.
inventorydb=# select * from booksdb;
            title            | firstname | lastname | publisher
-----------------------------+-----------+----------+-----------
 Learning Python 5th Edition | Mark      | Lutz     | Orielly
 Mastering Elastic Stack     | Yuvraj    | Gupta    | Packt
 Head First Python           | Paul      | Barry    | Orielly
(3 rows)
Step4: Dwonload the Postgre SQL JDBC driver jar
Now, in order to integrate logstash with Postgre SQL database to collect the data we will need Postgre SQL database driver which needs to be configured in the JDBC input plugin. You can download the latest available version of this driver from the below download page.
JDBC Driver Jar File: postgresql-42.2.22.jar
Step5: Create a logstash.conf to pipe data from Postgre SQL database and index in Elasticsearch
Lets now prepare our logstash.conf file in which we need to define our source of input and destination to which we would like to send the data. As shown below, we are using the JDBC input plugin here to configure our database input source by defining the jdbc driver jar file, drive class name, connection string url, jdbc username and password. Also we have defined the schedule at which the logstash need to run SQL statement to collect the data from the Postgre SQL database. The statement that we have defined here is select statement which will collect all the rows available in the table.
File: logstash.conf
input {
  jdbc {
    jdbc_driver_library => "/usr/share/logstash/postgresql-42.2.22.jar"
    jdbc_driver_class => "org.postgresql.Driver"
    jdbc_connection_string => "jdbc:postgresql://localhost:5432/inventorydb"
    jdbc_user => "postgres"
    jdbc_password => "postgres"
    schedule => "* * * * *"
    statement => "SELECT * from booksdb"
  }
}

output {
  stdout {
    codec => rubydebug
  }
}

output {
    elasticsearch {
        hosts => ["https://localhost:9200"]
        index => "booksdata"
        ssl => true
        ssl_certificate_verification => false
        user => "admin"
        password => "admin@1234"
    }
}
Step6: Update the logstash docker-compose with the logstash.conf
Now, let’s configure our logstash service with the jdbc driver jar file and logstash.conf file volume mounted. Here i have also used the self signed certificate and key file to configure the logstash which is optional can be removed for testing purpose. Also please note the volume mount ‘/apps/logstash/data’ created on host machine to persist the logstash data mapped within container at ‘/usr/share/logstash/data’.
File: docker-compose.yml
version: '2.1'
services:
  logstash:
    image: docker.elastic.co/logstash/logstash-oss:7.9.1
    logging:
      driver: "json-file"
      options:
        max-size: "100m"
        max-file: "3"
    ports:
      - "5044:5044"
    depends_on:
      - db
    environment:
      - PIPELINE_WORKERS=1
      - PIPELINE_BATCH_SIZE=125
      - PIPELINE_BATCH_DELAY=50
    volumes:
      - $PWD/logstash.conf:/usr/share/logstash/pipeline/logstash.conf
      - $PWD/server.crt:/etc/server.crt
      - $PWD/server.key:/etc/server.key
      - /apps/logstash/data:/usr/share/logstash/data
      - /apps/logstash/postgresql-42.2.22.jar:/usr/share/logstash/postgresql-42.2.22.jar
Start the logstash oss service using the docker compose file as shown below.
docker-compose up -d
Step8: Validate the logstash service logs
Here you can see that logstash service which is collecting the data from Postgres SQL database which further will be sent to elasticsearch for indexing.
docker-compose logs -f logstash
Output:
logstash_1  | [2021-10-05T05:24:00,309][INFO ][logstash.inputs.jdbc     ][main][6d86c188d1be3b42f2a7b7d4bd8b349abcea27452c16dd9c4787840c8ebcd206] (0.001130s) SELECT * from booksdb
logstash_1  | {
logstash_1  |      "publisher" => "Orielly",
logstash_1  |     "@timestamp" => 2021-10-05T05:24:00.312Z,
logstash_1  |       "lastname" => "Lutz",
logstash_1  |      "firstname" => "Mark",
logstash_1  |          "title" => "Learning Python 5th Edition",
logstash_1  |       "@version" => "1"
logstash_1  | }
logstash_1  | {
logstash_1  |      "publisher" => "Packt",
logstash_1  |     "@timestamp" => 2021-10-05T05:24:00.312Z,
logstash_1  |       "lastname" => "Gupta",
logstash_1  |      "firstname" => "Yuvraj",
logstash_1  |          "title" => "Mastering Elastic Stack",
logstash_1  |       "@version" => "1"
logstash_1  | }
logstash_1  | {
logstash_1  |      "publisher" => "Orielly",
logstash_1  |     "@timestamp" => 2021-10-05T05:24:00.313Z,
logstash_1  |       "lastname" => "Barry",
logstash_1  |      "firstname" => "Paul",
logstash_1  |          "title" => "Head First Python",
logstash_1  |       "@version" => "1"
logstash_1  | }
Step9: Validate the Elasticsearch index for SQL data
Now, we can go to Kibana service and add the booksdata index to discover our indexed data which is Postgre SQL database entries.
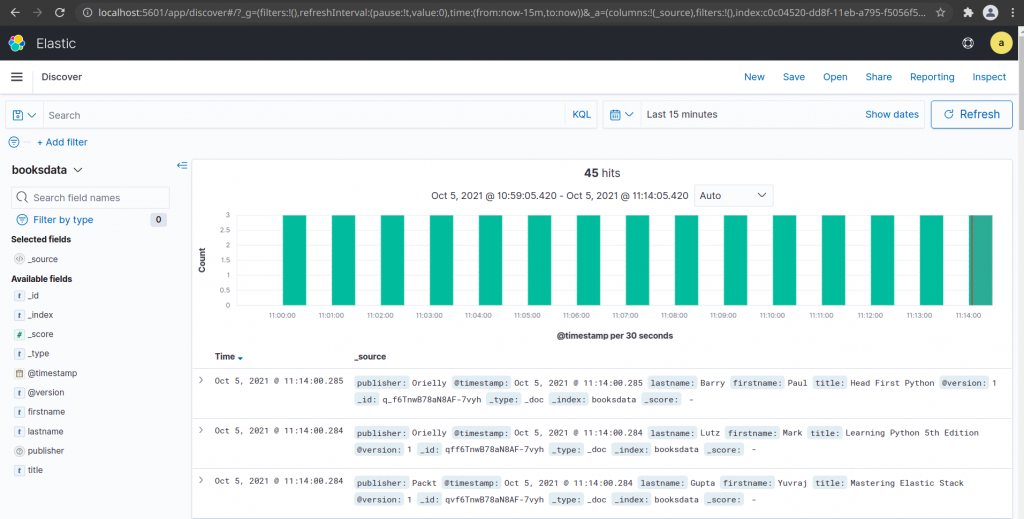
So, here we have seen how we can synchronize the data from Postgre SQL database into the Elasticsearch for indexing using the logstash JDBC input plugin.
Hope you enjoyed reading this article. Thank you..
Leave a Reply
You must be logged in to post a comment.