How to configure Intelligent Routing Feature in Websphere Application Server
Here in this article we will try to explore the Intelligent Routing – Intelligent Management features of WebSphere Application Server.
Test Environment
RHEL or CentOS 7 with WAS ND v9 installed
What is Intelligent Management
Intelligent management provides a set of autonomic components that respond dynamically to the real-time conditions of the environment, adapting the infrastructure to respond to business needs, allowing requests to be prioritized, and intelligent routing to respond to critical applications and users.
Benefits
- Intelligent Routing: Requests to applications are prioritized and routed based on administrator defined rules
- Health Management: Detect specific defined conditions automatically and take corrective action
- Application Edition Management: Roll out new versions of applications without any downtime
- Performance Management: Provides a self-optimized middleware infrastructure
Procedure
Step1: Create a Deployment Manager Profile
[root@desktop1 bin]# ./manageprofiles.sh -create -profileName Dmgr01 -profilePath /opt/IBM/WebSphere9/profiles/Dmgr01 -templatePath /opt/IBM/WebSphere9/profileTemplates/management -serverType DEPLOYMENT_MANAGER
INSTCONFSUCCESS: Success: Profile Dmgr01 now exists. Please consult /opt/IBM/WebSphere9/profiles/Dmgr01/logs/AboutThisProfile.txt for more information about this profile.
Step2: Create a Application Server Profile
[root@desktop1 bin]# ./manageprofiles.sh -create -profileName AppSrv01 -profilePath /opt/IBM/WebSphere9/profiles/AppSrv01 -templatePath /opt/IBM/WebSphere9/profileTemplates/default
INSTCONFSUCCESS: Success: Profile AppSrv01 now exists. Please consult /opt/IBM/WebSphere9/profiles/AppSrv01/logs/AboutThisProfile.txt for more information about this profile.
Step3: Federate the Application Server Profile to Deployment Manager Profile with the installed Applications included
[root@desktop1 bin]# pwd
/opt/IBM/WebSphere9/profiles/Dmgr01/bin
[root@desktop1 bin]# ./startManager.sh
ADMU0116I: Tool information is being logged in file
           /opt/IBM/WebSphere9/profiles/Dmgr01/logs/dmgr/startServer.log
ADMU0128I: Starting tool with the Dmgr01 profile
ADMU3100I: Reading configuration for server: dmgr
ADMU3200I: Server launched. Waiting for initialization status.
ADMU3000I: Server dmgr open for e-business; process id is 8510
[root@desktop1 bin]# pwd
/opt/IBM/WebSphere9/profiles/AppSrv01/bin
[root@desktop1 bin]# ./addNode.sh desktop1.example.com 8879 -includeapps
...
ADMU0003I: Node desktop1Node01 has been successfully federated.
[root@desktop1 bin]# ./startServer.sh server1
...
ADMU3000I: Server server1 open for e-business; process id is 9874
Step4: Create a Simple On demand router Server testodr
[root@desktop1 bin]# pwd
/opt/IBM/WebSphere9/bin
[root@desktop1 bin]# ./wsadmin.sh -f ./createodr.jacl desktop1Node01 odr testodr
WASX7209I: Connected to process "dmgr" on node desktop1CellManager01 using SOAP connector;  The type of process is: DeploymentManager
WASX7303I: The following options are passed to the scripting environment and are available as arguments that are stored in the argv variable: "[desktop1Node01, odr, testodr]"
createodr: checking for existence of node desktop1Node01
createodr: checking to see if server testodr is already configured on node desktop1Node01
createodr: checking to see if the nodeagent server mbean is available
createodr: Node type verified as a valid node
createodr: checking for the existence of a NodeSync MBean on node desktop1Node01
createodr: creating a server testodr .....
createodr: saving the configuration
createodr: Invoking synchronization for node WebSphere:name=nodeSync,process=nodeagent,platform=common,node=desktop1Node01,diagnosticProvider=true,version=9.0.0.4,type=NodeSync,mbeanIdentifier=nodeSync,cell=desktop1Cell01,spec=1.0 because serverStartupSyncEnabled is set to false...
createodr: Done with synchronization.
createodr: done.
[root@desktop1 bin]# pwd
/opt/IBM/WebSphere9/profiles/AppSrv01/bin
[root@desktop1 bin]# ./startServer.sh testodr
...
ADMU3000I: Server testodr open for e-business; process id is 10873
Step5: Validate the ODR basic functionality
By default, if no rules are specified in the testodr – Routing policy HTTP rules section, all the requested contexts are accepted and are routed to the backend application servers within cell as shown below.
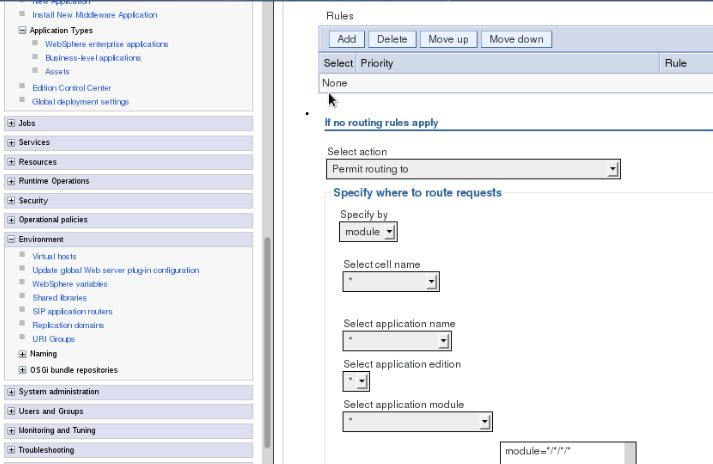
Access the below URL and it should route the request to the server1 hosting the DefaultApplication.ear.
http://desktop1.example.com/hello
http://desktop1.example.com/snoop
http://desktop1.example.com/hitcount
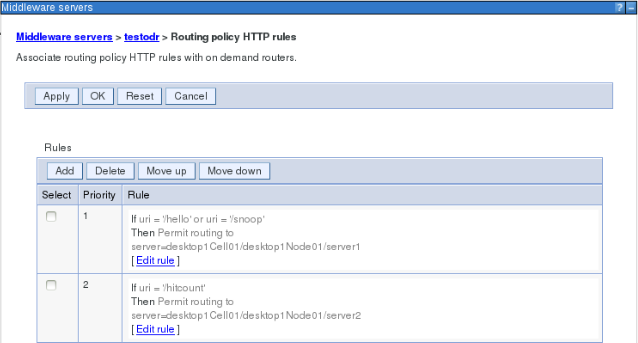
Step6: Edit the HTTP routing policy to route based on the URI name
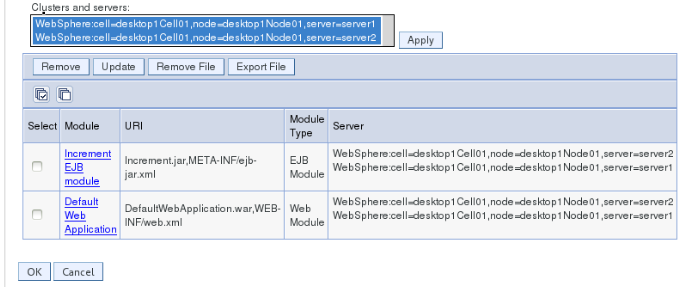
/hello and /snoop – route the requests to server1
/hitcount – route the requests to server2
For the purpose of showing this routing based on URI, I have created an additional server – server2 and mapped the DefaultApplication to server – server2 and started the JVM.
Create HTTP routing rules as show below.
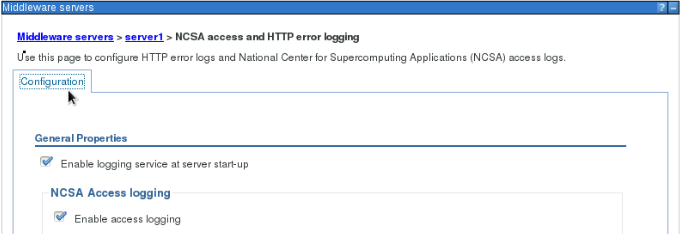
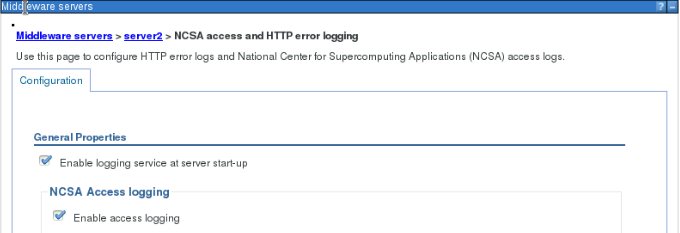
Step7: Enable HTTP access logging for server1 and server2
Step8: Validate the Request routing to server1 and server2 based on URI
You can validate the request routing by hitting the below URLs.
http://desktop1.example.com/hello
http://desktop1.example.com/snoop
http://desktop1.example.com/hitcount
[root@desktop1 server1]# pwd
/opt/IBM/WebSphere9/profiles/AppSrv01/logs/server1
[root@desktop1 server1]# tail -f http_access.log | egrep 'hello|snoop|hitcount'
192.168.0.1 - - [25/Oct/2017:00:01:34 -0400] "GET /hello HTTP/1.1" 200 849
192.168.0.1 - - [25/Oct/2017:00:01:53 -0400] "GET /snoop HTTP/1.1" 200 10665
192.168.0.1 - - [25/Oct/2017:00:02:30 -0400] "GET /hello HTTP/1.1" 200 849
192.168.0.1 - - [25/Oct/2017:00:02:38 -0400] "GET /snoop HTTP/1.1" 200 10665
[root@desktop1 server2]# pwd
/opt/IBM/WebSphere9/profiles/AppSrv01/logs/server2
[root@desktop1 server2]# tail -f http_access.log | egrep 'hello|snoop|hitcount'
192.168.0.1 - - [25/Oct/2017:00:02:13 -0400] "GET /hitcount HTTP/1.1" 200 2227
192.168.0.1 - - [25/Oct/2017:00:02:46 -0400] "GET /hitcount HTTP/1.1" 200 2227
As you can see as per the routing rules defined, the requests are being routed based on the URI context. This is just a very basic example that I have shown. Some scenarios where in you can utilize this feature are as below.
Scenario 1: If you have Enterprise Application with all the Web and Business logic components developed using standard frameworks, you can route the requests specific to web components (i.e servlets and JSP) into one JVM and route requests for Business logic components into another JVM though the same application is hosted on both the JVM’s.
Scenario 2: If you have Enterprise Application with Database intensive activities, you can route the requests for web related requests to one JVM and route the requests with DB activities to other JVM.
Hope this article help you in getting an understanding of one feature of Intelligent management. I will try to post some more articles on Intelligent management based on Service Policies, Work classes and Transaction classes.
Hope you enjoyed reading this article. Thank you..
Leave a Reply
You must be logged in to post a comment.