How to distribute traffic using AWS ELB
Here in this article we will try to understand about AWS Elastic Load Balancer (ie. ELB) and leverage it to distribute traffic across multiple targets such as EC2 instances.
AWS Elastic Load Balancer
Elastic Load Balancing automatically distributes your incoming traffic across multiple targets, such as EC2 instances, containers, and IP addresses, in one or more Availability Zones. It monitors the health of its registered targets and routes traffic only to the healthy targets. You can select the type of load balancer that best suits your needs.
There are three different types of load balancers supported by AWS Elastic Load Balancer.
- Application Load Balancer (ALB): Best for web applications and RESTful APIs. It acts as a smart reverse proxy, allowing you to route traffic to different backend services based on the URL path (e.g., routing /images to one target group and /api to another).
- Network Load Balancer (NLB): Best for scenarios requiring extreme performance, millions of requests per second, static IPs, and ultra-low latency. It acts at the connection level rather than the request level, passing raw network traffic directly to your targets without modifying packets.
- Gateway Load Balancer (GLB): Best for deploying, scaling, and managing security appliances like third-party firewalls and Intrusion Detection Systems (IDS). It operates transparently to the traffic and forwards IP packets to fleets of appliances before allowing the traffic to continue to its destination.
Features of ELB
- Distrubutes traffic across multiple targets
- Monitors and Routes traffic to healthy target resources
- Auto scales in response to changing traffic trends
- Offload SSL/TLS encryption and decryption at ELB layer
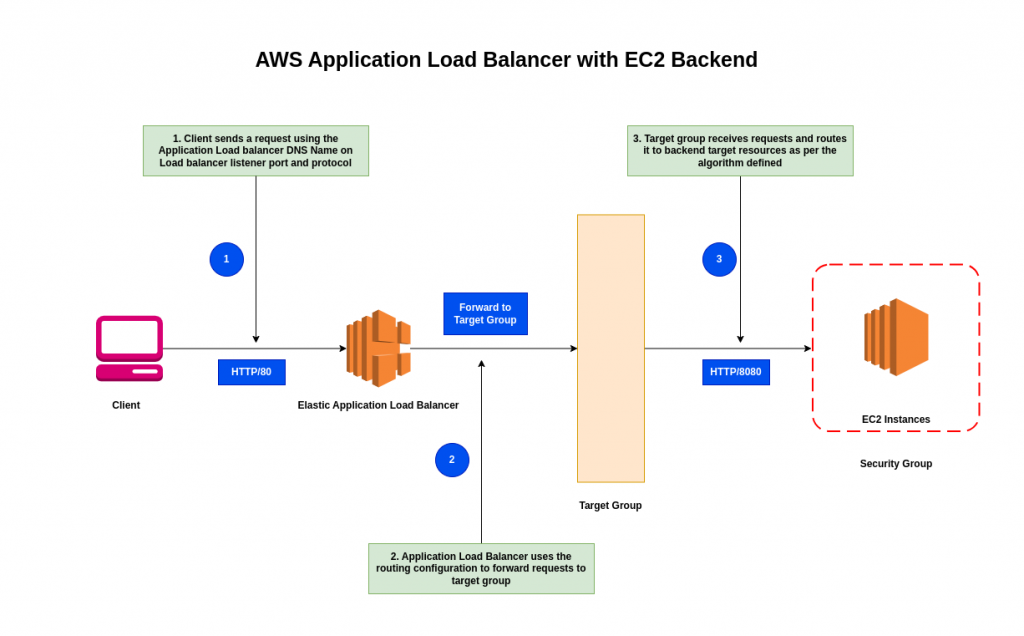
Here we are going to leverage Application Load Balancer to demonstrate how we can distribute traffic between multiple EC2 instances within a target group.
High Level Architecture
If you are interested in watching the video. Here is the YouTube video on the same step by step procedure outlined below.
Procedure
Step1: Create EC2 instances
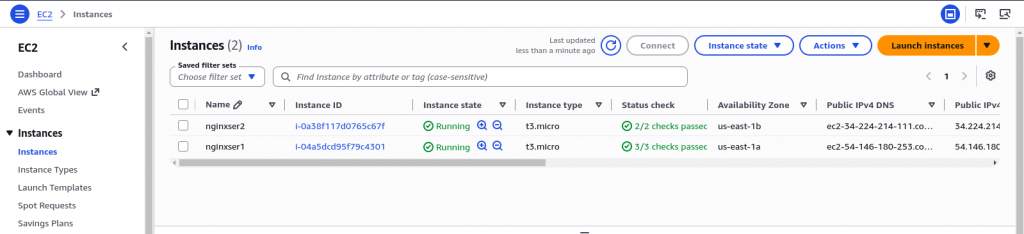
As a first step let’s create EC2 instances on which we will be installing the nginx service. Here are the details of the server.
The security group that we are going to create here can also be used in the later stage when we can create a load balancer.
Name: nginxser1
AMI: Amazon Linux 2023 (ie. Free tier eligible)
Instance type: t3.micro
Keypair: Generate or Use your existing keypair
VPC: your_vpc
Subnet: your_subnet in AZ1
Security Group: Allow the following protocols and ports from any ip address
            1. HTTP - 80
            2. HTTP - 8080
            3. SSH - 22
Name: nginxser2
AMI: Amazon Linux 2023 (ie. Free tier eligible)
Instance type: t3.micro
Keypair: Generate or Use your existing keypair
VPC: your_vpc
Subnet: your_subnet in AZ2
Security Group: Allow the following protocols and ports from any ip address
            1. HTTP - 80
            2. HTTP - 8080
            3. SSH - 22
Step2: Install nginx service
Here we will SSH into each ec2 instance and install the nginx service, update the nginx.conf file to listen on port 8080 and start up the nginx service.
# SSH to ec2 instance
admin@fedser:aws$ ssh -i ./techstackkey.pem ec2-user@34.x.x.x

# Install nginx
[ec2-user@ip-172-x-x-x ~]$ sudo dnf install nginx

# Update nginx list port to 8080
[ec2-user@ip-172-x-x-x ~]$ cat /etc/nginx/nginx.conf | grep "listen"
        listen       8080;
        listen       [::]:8080;

# Start nginx
[ec2-user@ip-172-x-x-x ~]$ sudo systemctl start nginx.service
admin@fedser:aws$ ssh -i ./techstackkey.pem ec2-user@54.x.x.x

# Install nginx
[ec2-user@ip-172-x-x-x ~]$ sudo dnf install nginx

# Update nginx list port to 8080
[ec2-user@ip-172-x-x-x ~]$ cat /etc/nginx/nginx.conf | grep listen
        listen       8080;
        listen       [::]:8080;

# Start nginx
[ec2-user@ip-172-x-x-x ~]$ sudo systemctl start nginx.service
Now you should be able to access your nginx service using the instances public ip address as shown below.
nginxser1: http://32.x.x.x:8080/
nginxser2: http://54.x.x.x:8080/
Step3: Create EC2 instance target group
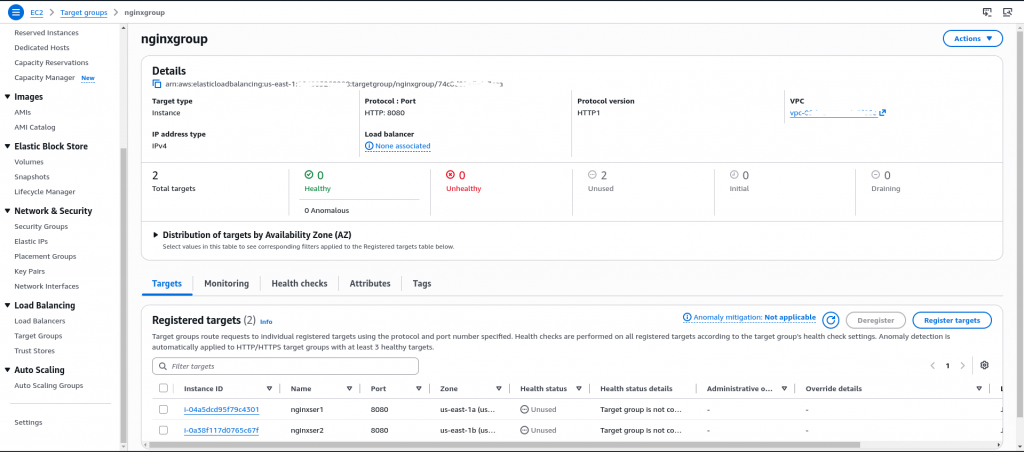
In this step we are going to create a target group which is nothing but a logical grouping of destination resources used by Elastic Load Balancing (ELB).
Let’s navigate to EC2 Service page and select Target Groups.
Create Target Group
- Create a Target Group with Target Type as Instances
- Provide a Target Group name as nginxgroup
- In the protocol and port set it as HTTP and 8080 (ie. protocol and port of the nginx service)
- In IP address type select IPv4
- In VPC select your VPC
- Set Protocol version as HTTP/1
- In the Health check section set Health check protocol as HTTP and Health check path as “/” and override the health check port as 8080.
Register Targets
In this section select the two instances that we created in our initial step as the targets to which the requests need to be routed. Set Ports for the selected instances as 8080. and Click of Include as pending below and click next.
Finally review your configuraiton and create the target group.
Step4: Create an Application Load Balancer
Now its time to create our first AWS Elastic Load balancer of type Application. Let’s navigate to EC2 Service page.
- Navigate to Load balancers and click on Create Application Load Balancer
- Set Load balancer name as nginxalb
- Select scheme as Internet Facing
- Select Load balancer IP address type as IPv4
- In Networking Mapping, select your VPC and select the subnets in which EC2 instance was launched
- Select the Security group that allows HTTP port 80 access from any IP address
- In Listeners and routing section
- Set the protocol and port as HTTP and 80 for the Application Load balancer
- Set the Routing action to Forward to Target group
- Select the target group nginxgroup that was created in previous step
Let’s now review the load balancer resource map as shown below.
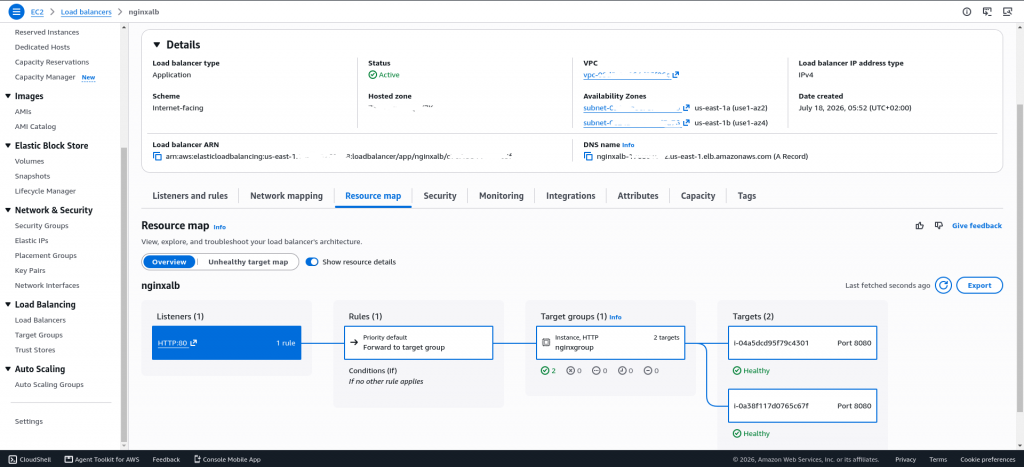
Step5: Validate the Application Load Balancer
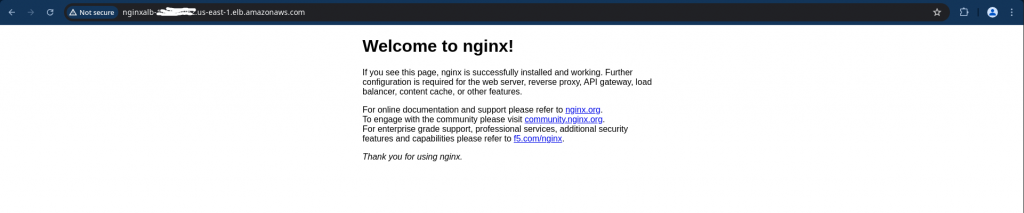
Now we can validate if the Application load balancer is proxying the traffic to the backend target group consisting of two registerred ec2 instnaces by hitting the DNS name of the ALB as shown below.
Hope you enjoyed reading this article. Thank you..


Related Posts