How to manage Python packages using Nexus OSS Group repository
Here in this article we will try to use Nexus OSS group repositories to manage python packages built using the uv python package manager.
Test Environment
- Fedora 41 server
- Python 3.x
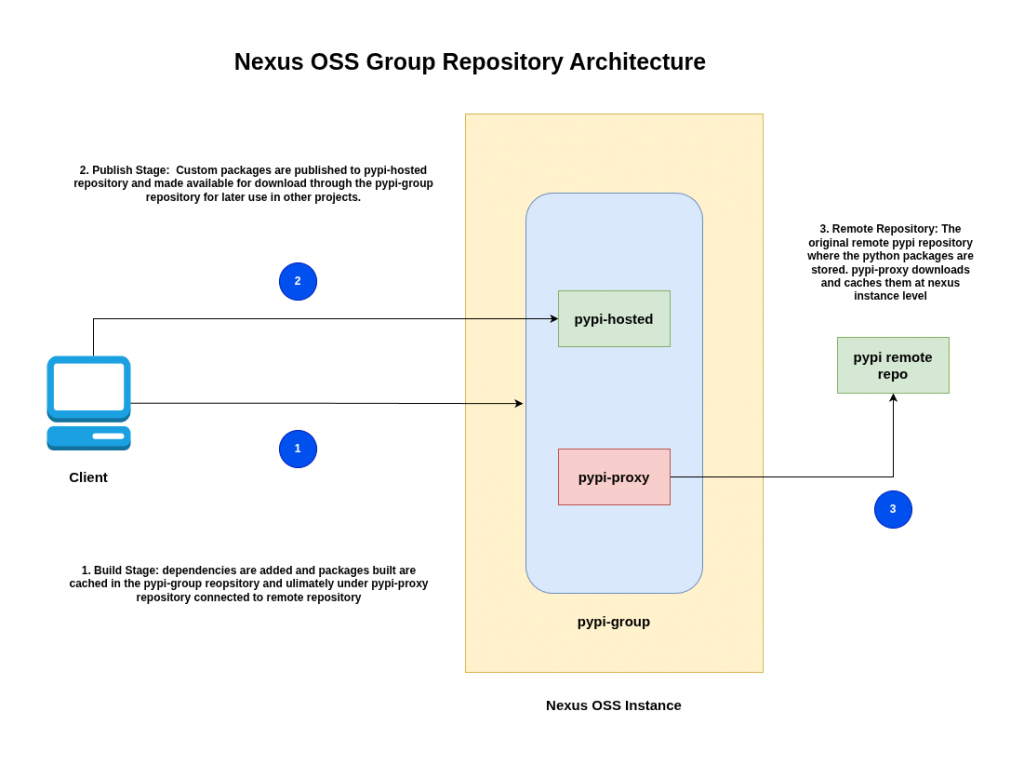
Nexus Repository Types
- Proxy Repository: A proxy repository caches content from a remote repository. When a client requests content, Nexus Repository first checks the local cache. If the content is not cached, Nexus Repository retrieves it from the remote repository, stores it locally, and serves it to the client.
- Hosted Repository: A hosted repository also known as internal or private repository is used to store artifacts or components within the private location.
- Group Repository: A group repository combines multiple repositories, including other repository groups, into a single repository. Users can then rely on a single URL for their configuration needs, and administrators can continue to add more repositories and components to the repository group.
High Level Architecture
If you are interested in watching the video. Here is the YouTube video on the same step by step procedure outlined below.
Procedure
Step1: Ensure Docker and Docker compose installed
As a pre-requisite step ensure that docker and docker-compose is installed and running.
admin@linuxscratch:nexus_oss$ docker -v
Docker version 29.2.1, build a5c7197

admin@linuxscratch:nexus_oss$ docker compose version
Docker Compose version v5.0.2

admin@linuxscratch:nexus_oss$ sudo systemctl start docker.service
admin@linuxscratch:nexus_oss$ sudo systemctl status docker.service
Step2: Ensure Nexus OSS service installed
Here we will be setting up Nexus OSS service with Postgres database as the backend to manage and store all repository metadata and configuration data. We will be using docker compose to instantiate these services.
admin@linuxscratch:nexus_oss$ cat docker-compose.yml
services:
  postgresql:
    image: releases-docker.jfrog.io/postgres:17.6-alpine
    container_name: postgresql
    environment:
      - POSTGRES_DB=nexus
      - POSTGRES_USER=nexus
      - POSTGRES_PASSWORD=nexus@1234
    volumes:
      - ./init.sql:/docker-entrypoint-initdb.d/init.sql
      - postgres_data:/var/lib/postgresql/data

  nexus3:
    image: sonatype/nexus3:3.92.2
    container_name: nexus3
    depends_on:
      - postgresql
    environment:
      - NEXUS_SECURITY_INITIAL_PASSWORD=admin@1234
      - NEXUS_SECURITY_RANDOMPASSWORD=false
      - NEXUS_CONTEXT=nexus
      - NEXUS_DATASTORE_NEXUS_JDBCURL=jdbc:postgresql://postgresql:5432/nexus?currentSchema=nexus
      - NEXUS_DATASTORE_NEXUS_USERNAME=nexus
      - NEXUS_DATASTORE_NEXUS_PASSWORD=nexus@1234
      - NEXUS_DATASTORE_NEXUS_ADVANCED=maximumPoolSize=10
    ports:
      - "8081:8081" # Nexus UI
    volumes:
      - nexus-data:/nexus-data

volumes:
  nexus-data:
  postgres_data:
Within the postgres service we are going to run an init.sql script to create a schema named “nexus” and install an extension within this schema as shown below.
admin@linuxscratch:nexus_oss$ cat init.sql
-- Create the schema if it doesn't already exist
CREATE SCHEMA IF NOT EXISTS nexus;

-- Install the pg_trgm extension into the specific schema
CREATE EXTENSION IF NOT EXISTS pg_trgm SCHEMA nexus;
Now we are ready to launch our Nexus OSS service as shown below.
admin@linuxscratch:nexus_oss$ docker compose up -d
If this is the first time you are starting up the Nexus OSS service you need to complete the setup tasks when you launch the Nexus OSS portal.
URL: http://linuxscratch.stack.com:8081/nexus
Step3: Create PyPi proxy repository
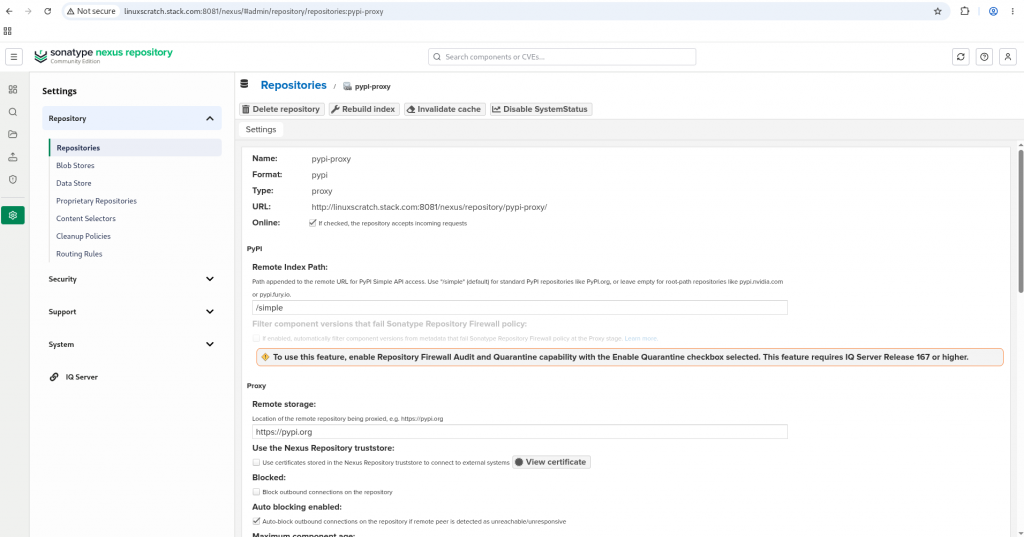
Now that nexus is up and running, let us create our first repository (ie. pypi proxy repository) which connects to a remote pypi repository and caches content locally when pulled to save bandwidth and speed up build time.
Navigate to Settings → Repositories → Create repository.
- Select pypi (proxy) from the list of recipes.
- Enter a descriptive name (e.g., pypi-proxy).
- Set the Remote Storage URL to https://pypi.org.
- Click Create repository
NOTE: Remote Index Path “/simple” gets appended to the remote URL for PyPI Simple API access.
The /simple path targets the standard Python Simple Repository API. Tools append /simple to ensure they can parse the HTML anchor tags of available packages.
For non-standard, legacy, or multi-format repositories (like Nexus or Artifactory native endpoints), the path is left blank to prevent 404 routing errors.
Here is the url for the proxy repository.
http://linuxscratch.stack.com:8081/nexus/repository/pypi-proxy/
Step4: Create Python Hosted repository
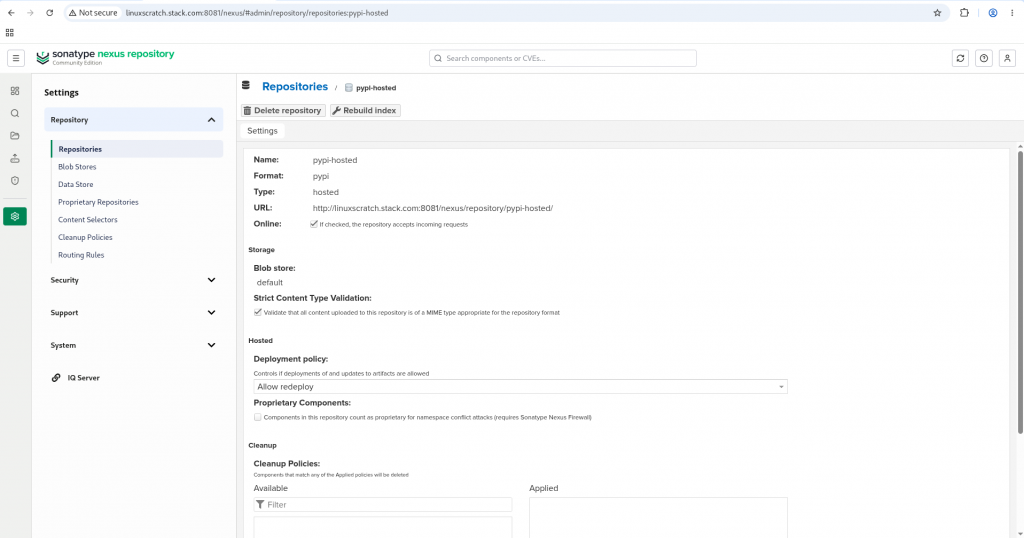
Now let’s go ahead a create a PyPi Hosted or private repository.
Navigate to Settings → Repositories → Create repository.
- Select pypi (hosted) from the list of entries.
- Enter a name (e.g., pypi-hosted).
- Choose your desired deployment policy, Here i am setting it to Allow Redeploy for the demo.
- Click Create repository.
Here is the url for the hosted repository.
http://linuxscratch.stack.com:8081/nexus/repository/pypi-hosted/
Step5: Create PyPi group repository
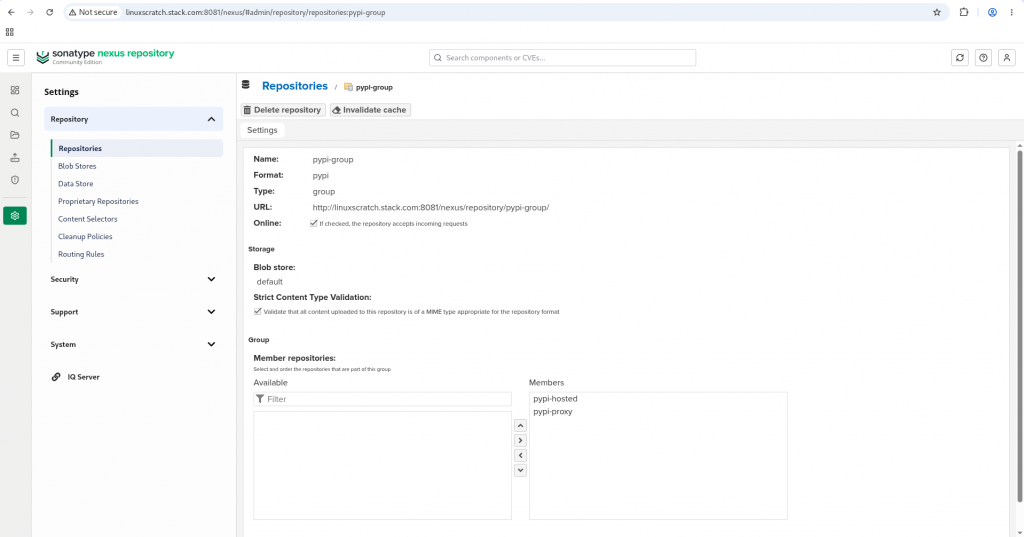
Here we are going to create Nexus PyPI Group Repository which acts as a unified endpoint combining multiple PyPI repositories (such as public proxies and private hosted registries) into one URL. This allows your Python development team to download both public open-source packages and internal proprietary packages using a single configuration in tools like pip, Poetry, or uv.
Go to Settings → Repositories → Create repository.
- Select pypi (group) from the list of entires.
- Provide a name for the group (e.g., pypi-group).
- Scroll down to the Member repositories configuration section.
- Move both pypi-hosted and pypi-proxy from the Available list into the Members list.
- Click Create repository
NOTE: Place your hosted repository higher in the member list if you want Nexus to prioritize your internal packages over public packages of the same name.
Here is the url for the group repository.
http://linuxscratch.stack.com:8081/nexus/repository/pypi-group/
Step6: Create a Python Project using UV
Here in this step we will be install UV: Python package and project management tool to initialize a python project.
# Install uv package
admin@linuxscratch:~$ sudo dnf install uv

# Initialize a python project
admin@linuxscratch:~$ uv init uvdemo
Initialized project `uvdemo` at `/home/admin/uvdemo`

# Switch to uvdemo
admin@linuxscratch:~$ cd uvdemo/
Step7: Configure uv project
Here we are going to update the uv initialized projects pyproject.toml with url pointing group repository url from where it need to fetch the packages and publish-url with the hosted repository url where the packages will need to be uploaded.
admin@linuxscratch:~/uvdemo$ cat pyproject.toml
[project]
name = "uvdemo"
version = "0.1.0"
description = "Add your description here"
readme = "README.md"
requires-python = ">=3.14"
dependencies = []

[[tool.uv.index]]
name = "private-registry"
url = "http://linuxscratch.stack.com:8081/nexus/repository/pypi-group/simple"
publish-url = "http://linuxscratch.stack.com:8081/nexus/repository/pypi-hosted/"
Now that we have configured the urls, we need to export the following environment variables with the nexus oss credentials to connect to the repository.
admin@linuxscratch:~/uvdemo$ export UV_INDEX_PRIVATE_REGISTRY_USERNAME="admin"
admin@linuxscratch:~/uvdemo$ export UV_INDEX_PRIVATE_REGISTRY_PASSWORD="admin@1234"
admin@linuxscratch:~/uvdemo$ export UV_PUBLISH_USERNAME="admin"
admin@linuxscratch:~/uvdemo$ export UV_PUBLISH_PASSWORD="admin@1234"
Step8: Build and Publish Python packages
Now its time to build and publish our python package into our hosted repository. Before that lets try to add some dependencies such as requests and ruff for this demo.
admin@linuxscratch:~/uvdemo$ uv add requests ruff
Using CPython 3.14.2 interpreter at: /usr/bin/python3.14
Creating virtual environment at: .venv
Resolved 7 packages in 8.43s
Prepared 6 packages in 3.18s
Installed 6 packages in 91ms
 + certifi==2026.6.17
 + charset-normalizer==3.4.9
 + idna==3.18
 + requests==2.34.2
 + ruff==0.15.21
 + urllib3==2.7.0
Now if you look at the pypi-proxy repository in nexus portal, it will cache all these dependencies by downloading from the remote pypi repository.
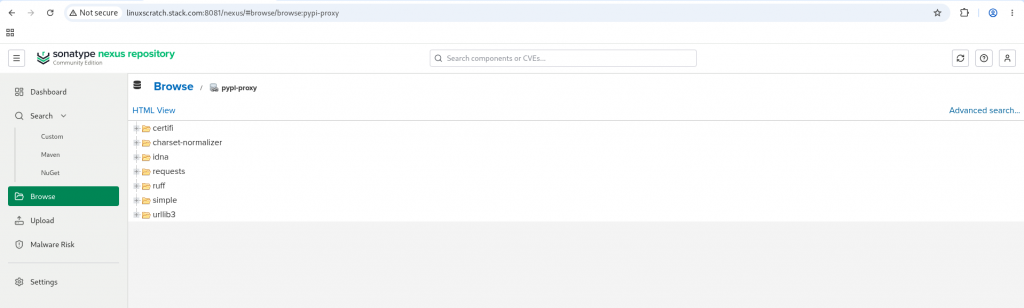
Let’s now try to build our python project to create the packages. The package will be created under the dist folder as shown below.
admin@linuxscratch:~/uvdemo$ uv build
...
adding 'main.py'
adding 'uvdemo-0.1.0.dist-info/METADATA'
adding 'uvdemo-0.1.0.dist-info/WHEEL'
adding 'uvdemo-0.1.0.dist-info/top_level.txt'
adding 'uvdemo-0.1.0.dist-info/RECORD'
removing build/bdist.linux-x86_64/wheel
Successfully built dist/uvdemo-0.1.0.tar.gz
Successfully built dist/uvdemo-0.1.0-py3-none-any.whl
As pypy-proxy is member of pypi-group repository, you will be able to see the same package in that repository as well. Now additionally you would see setuptools also getting cached as a part of build stage.
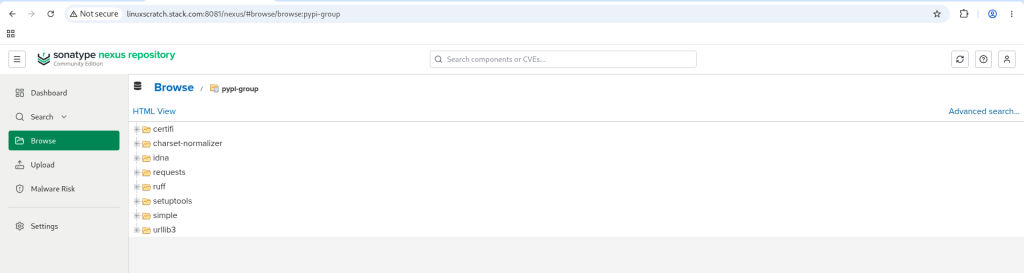
It’s time to publish our packages to the hosted repository as shown below.
admin@linuxscratch:~/uvdemo$ uv publish --index private-registry
Publishing 2 files to http://linuxscratch.stack.com:8081/nexus/repository/pypi-hosted/
Hashing uvdemo-0.1.0-py3-none-any.whl (1.2KiB)
Uploading uvdemo-0.1.0-py3-none-any.whl (1.2KiB)
Hashing uvdemo-0.1.0.tar.gz (1.0KiB)
Uploading uvdemo-0.1.0.tar.gz (1.0KiB)
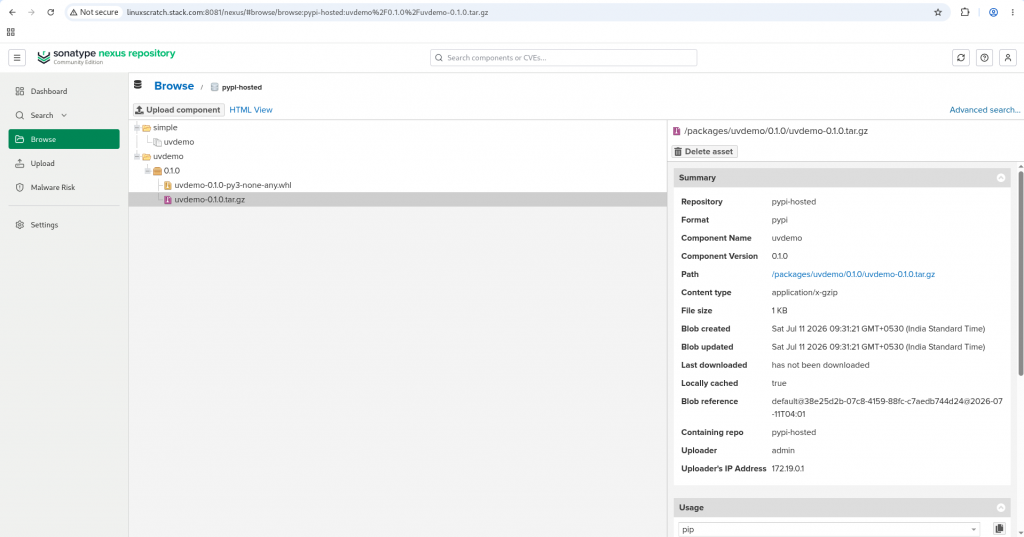
NOTE: Once the internal package is published they are available for later download using the pypi group repository under the context “/simple” referring to the actual package locations.
Here is the url for the uploaded package.
http://linuxscratch.stack.com:8081/nexus/repository/pypi-group/simple/uvdemo/
Hope you enjoyed reading this article. Thank you..


Related Posts